
How to make your own camera strap, using the same hardware and webbing you’d find on one at the photography store, and practically anything you want for the strap!
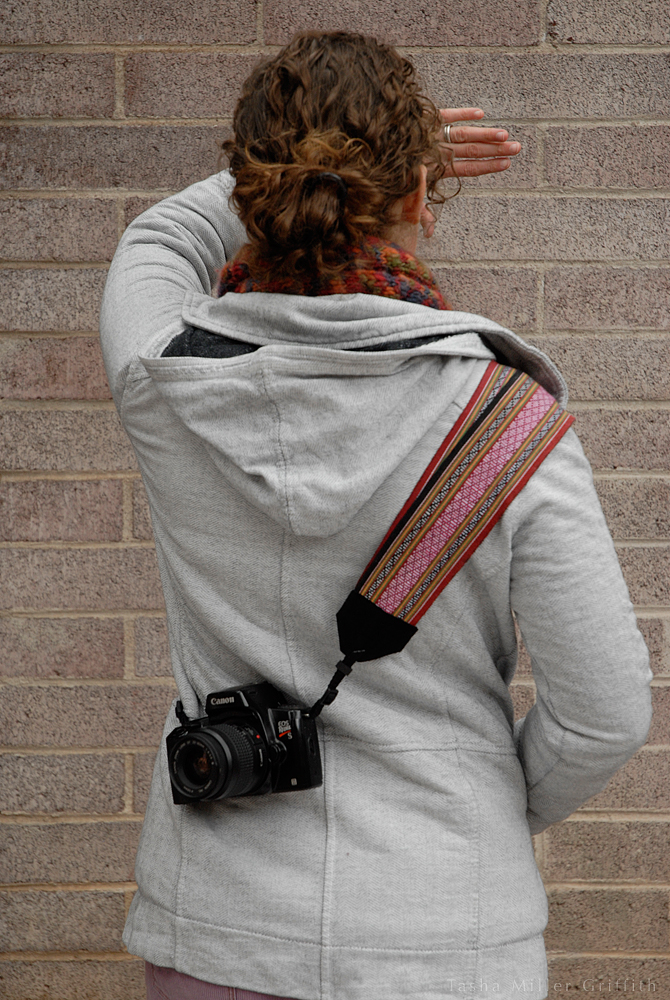
When I got my new (used) camera, I just carried it around in the crook of my arm for quite a while, because I knew exactly what I wanted for a strap, and I couldn’t find it in any camera shop we visited. The new camera is heavy (by my standards anyway) and I did not want a thin strap that would dig that weight into my neck all the time, I wanted a wide soft strap that would cup around my shoulder and hold the weight there. I got this idea from Cat Bordhi (have I mentioned that she’s a mad genius?) specifically from knitting one of her mobius sling bags (in A Second Treasury of Magical Knitting), and it stuck with me.
You will need
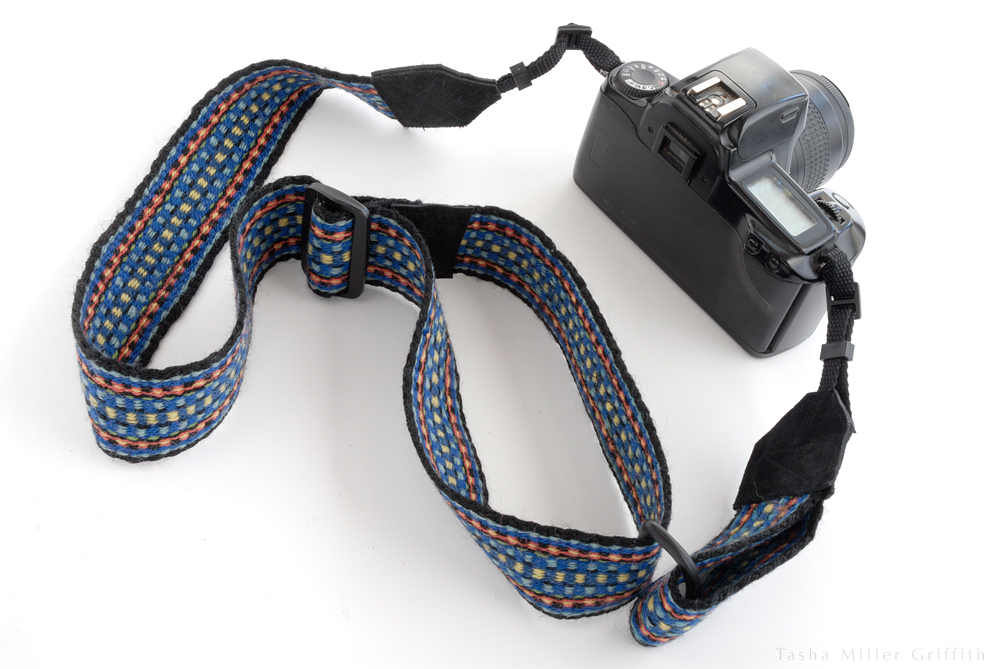
I got the 3/8″ webbing and hardware to go with it from SewingSupplies on Etsy. She made me a package deal like this one, which includes enough supplies to make two straps (each end of a strap takes one piece of webbing, one slider and one keeper). I’m assuming that your camera has a ring or loop which 3/8″ webbing will fit through (most do, but some small point-and-shoots don’t. You might be able to substitute something lighter, I would take your camera to the fabric store and see what you can find).
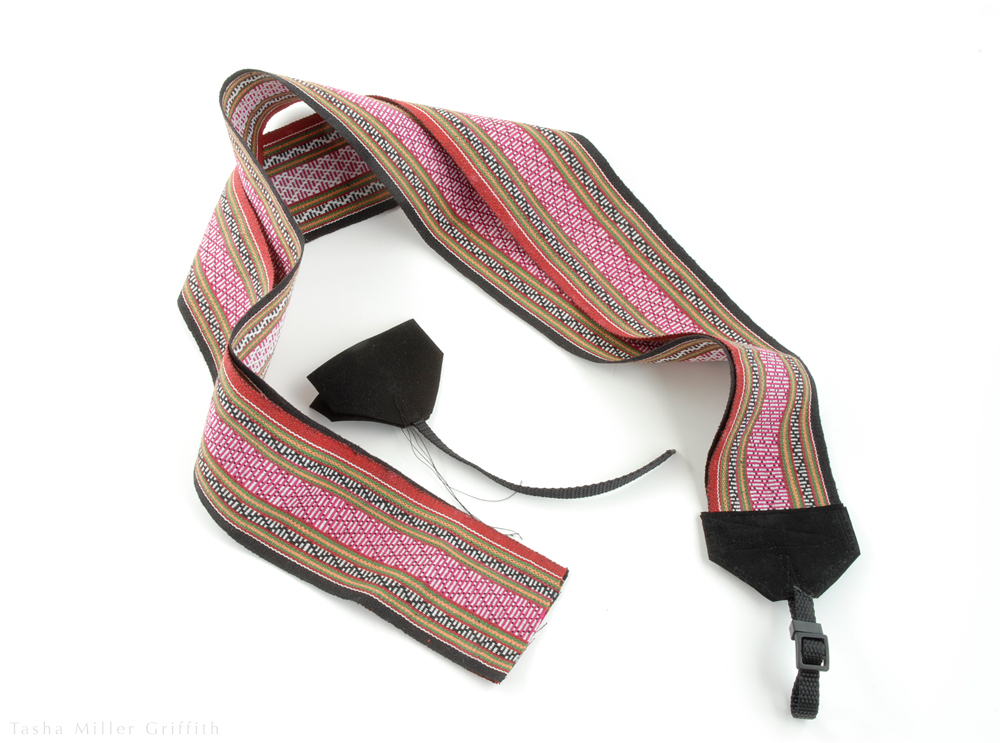
You will also need sturdy material for ends of the strap, where the strap meets the webbing. I used Ultrasuede (faux suede leather) for my strap (above), and some scraps of real leather on a strap for my dad (the one at the top of the post).
If you want your strap to be adjustable, you’ll also need one slider and one loop of hardware, in a size that works with your strap material.
My strap is cut from a length of soft cotton textile woven about 2 3/4″ wide, which was in my mom’s stash. I suspect that my parents brought it back from somewhere in their travels in the 1970’s, but neither of them remembered where, and they both said I could use it, so I did. Dad’s strap is one his mom (my grandmother the weaver) made, which I put new ends and a slider on. I found some similar straps by searching for “handwoven band” or “handwoven strap” on Etsy. You could also start with a belt, or a guitar strap or anything else you like, as long as it’s sturdy enough to hold your camera and thin enough to sew through (which leather belts aren’t. You might be able to use rivets though …).
Prepping the pieces
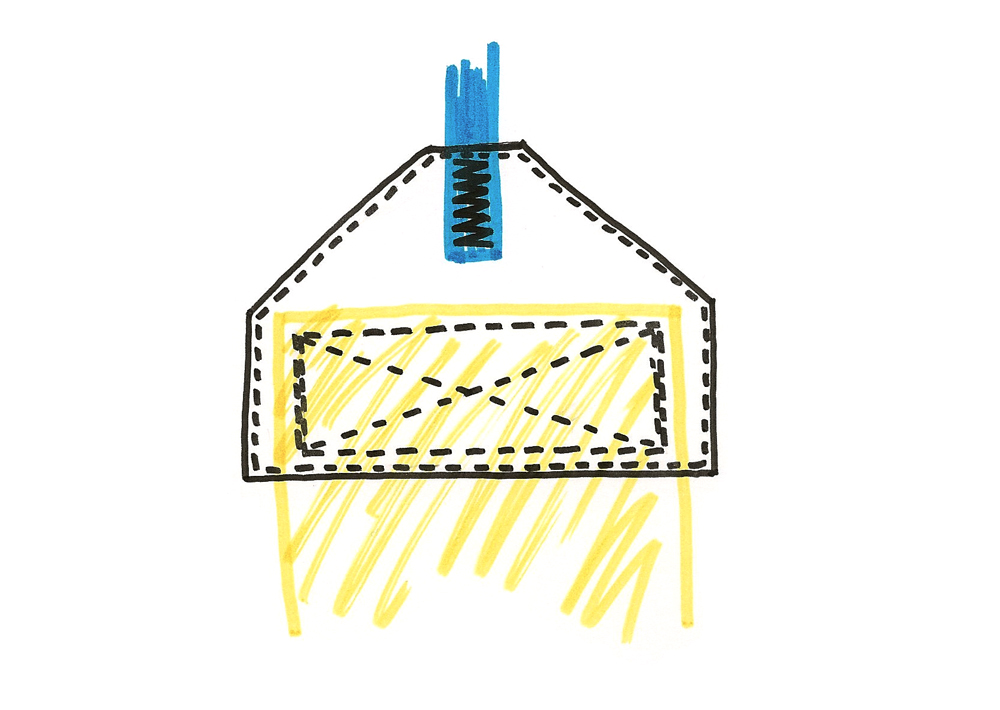
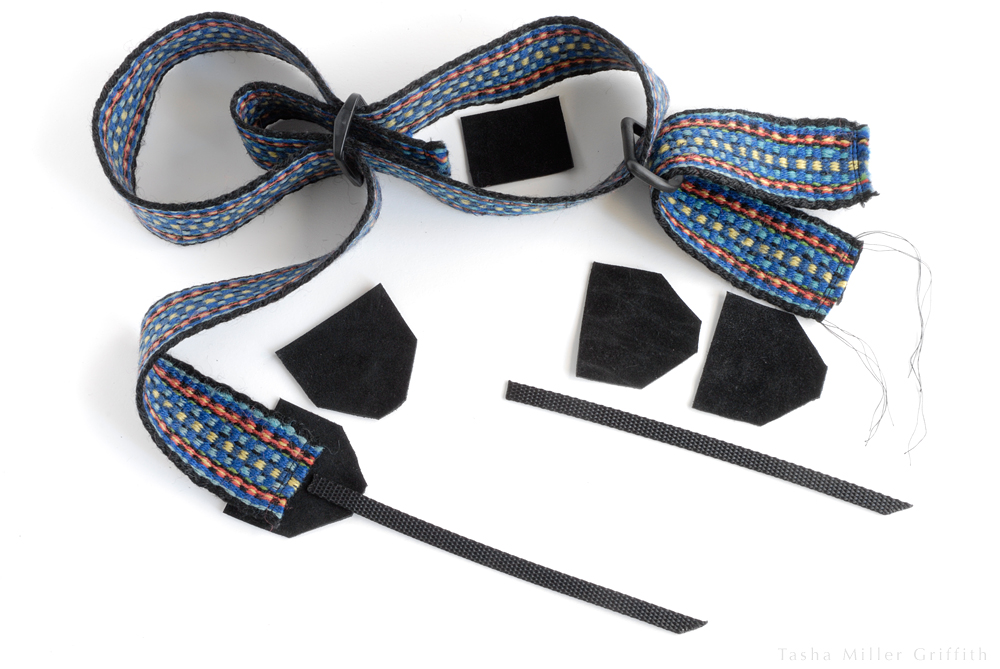
Cut pieces for the ends from faux leather or leather, a bit wider than your strap (allow extra width if your material is thick, so that it can come together and cover the edges of the strap), continuing that width for about an inch, and then tapering to an end to cover the webbing. See below to visualize how the ends cover the strap and the webbing. You will need two leather end pieces for each end of the strap (four total).
Cut a piece of the 3/8″ webbing about 7 1/2″ long for each end of the strap. If you cut the ends of the webbing on a slant, it will make it easier to thread them through the slots on your camera. I like to sear the cut edges of the webbing (to keep them from fraying) by passing them quickly through the blue part of a candle flame.
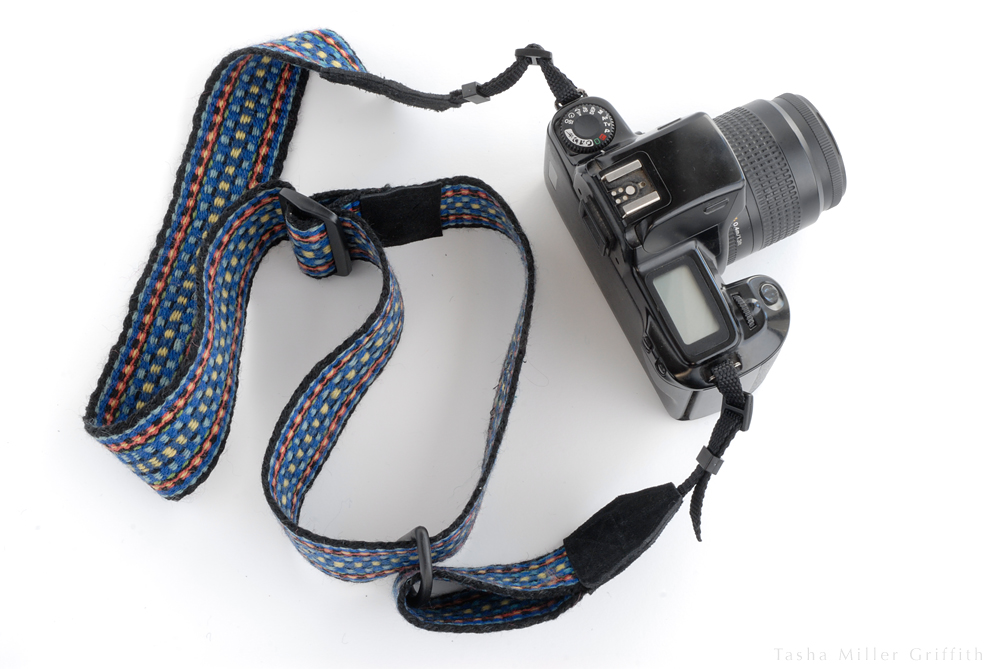
Either figure out where you would like your camera to rest on your body and cut the strap to that length (accounting for the ends and webbing) or plan to make your strap adjustable. I knew exactly how long I wanted my strap to be (so that the camera would rest on the top of my hip), but I made Dad’s so he could adjust it (keep reading for how to do that).
If your strap fabric is prone to fraying/spreading out all over the place, you may want to stitch over the ends before putting everything together. You can even use that stitching to gather in the end of the strap a bit, which I did for Dad’s strap.
Heavy duty stitching
Sewing the strap is actually pretty simple, it’s all about how to join two things which you really don’t want to come apart. My camera is the second-most expensive and precious piece of equipment I own (sewing machine being #1 ) and as I said it’s kind of heavy, so I definitely want some heavy duty stitching here! Basically you’ll do this by adding extra stitches to reinforce the critical areas.
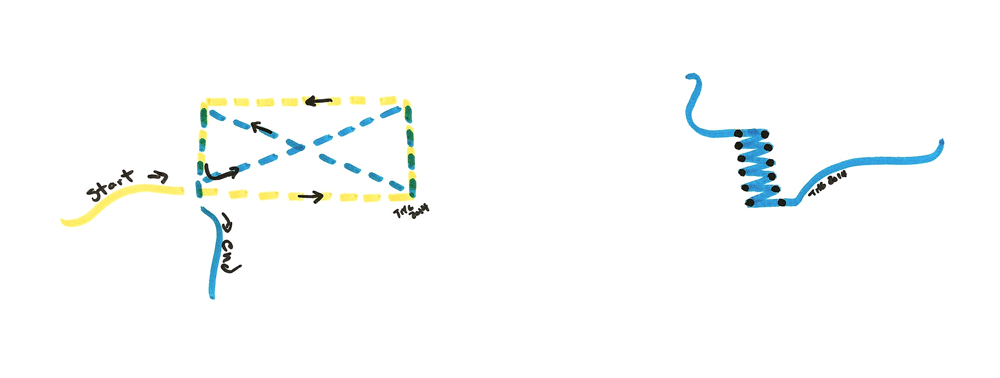
A good way to attach straps for extra strength is to sew a rectangle-and-X pattern (I just realized I have no idea if there’s an official name for this … but here’s how to do it anyway). Sew a rectangle just inside the edges of the strap, basically as big as you can inside the area where the strap and end overlap while catching all the layers (illustrated above). When you get to the point where you started (this is the point with the curved arrow, where the illustrated stitches change from yellow to blue below), sew to the opposite corner. Keep going, overlapping the stitches on one side, then diagonally back to the other side. Overlap one side’s stitches again, to come back to where you started.
Another way you can add stitches to an area that will get stress is to make a bar tack (that is the real name for this one) by using a wide stitch and a short stitch length. Just keep in mind that every time you make a stitch it also makes a hole in the material, so don’t make the stitches so close together that the holes touch and make a weak place where the material could tear.
I used a mini version of the rectangle-and-X to attach the webbing to the ends. A bar tack would work well too. As usual, it’s a good idea to try out your planned techniques on some scraps to see what works.
Once you’ve attached the strap and webbing to the ends, I like to sew around the edge of the ends to keep everything neat. Bury the thread ends wherever you can, and you’re done.
Leather
I’m not a leather sewing expert, but I can give you a couple of tips if you decide to use real leather for the ends. Although it’s more difficult to sew than the faux stuff, it’s wonderfully strong and malleable. First, you will definitely need a leather needle. The main difficulty is getting the machine to punch through the leather, and everything that would normally make your machine want to skip stitches (sewing over different thicknesses of materials, etc.) does so even more. Go slowly, go over skipped stitches again or pick up the foot and go back. Use the hand wheel if necessary, get the weight of the machine on your side. Try switching between a regular foot and a zipper foot to sew around the edges of the ends. I still ended up with some skipped stitches and broken/restarted threads to hide, but I was overall pleased with how my machine handled the leather and all the layers.
Adjustable straps
It’s not much harder to make an adjustable strap, you just have to wrap your head around how it works.
I’m such a visual learner, I need to draw it or better yet, lay out all the pieces to see how they’ll go together, as below. One side is a simple length of strap that goes through the loop and back to the end. The other side goes from the end, through the slider, through the loop, and back through the slider (inside the first pass).
Sew the strap end down so that there’s a short loop of strap inside the slider, covering the raw edge with the extra suede piece. You can use the rectangle-and-X method again.
Special thanks to Bryan’s first 35mm camera for modeling.
A note if you’d like the strap to hug your shoulder like mine: I used two lengths of the strap fabric so that I could separate them to either side of my shoulder. It turns out that it works even if I don’t separate them—I think as long as your strap is fairly wide and soft it will work to wear it on your shoulder.
Make any strap you want! Nice, right?
