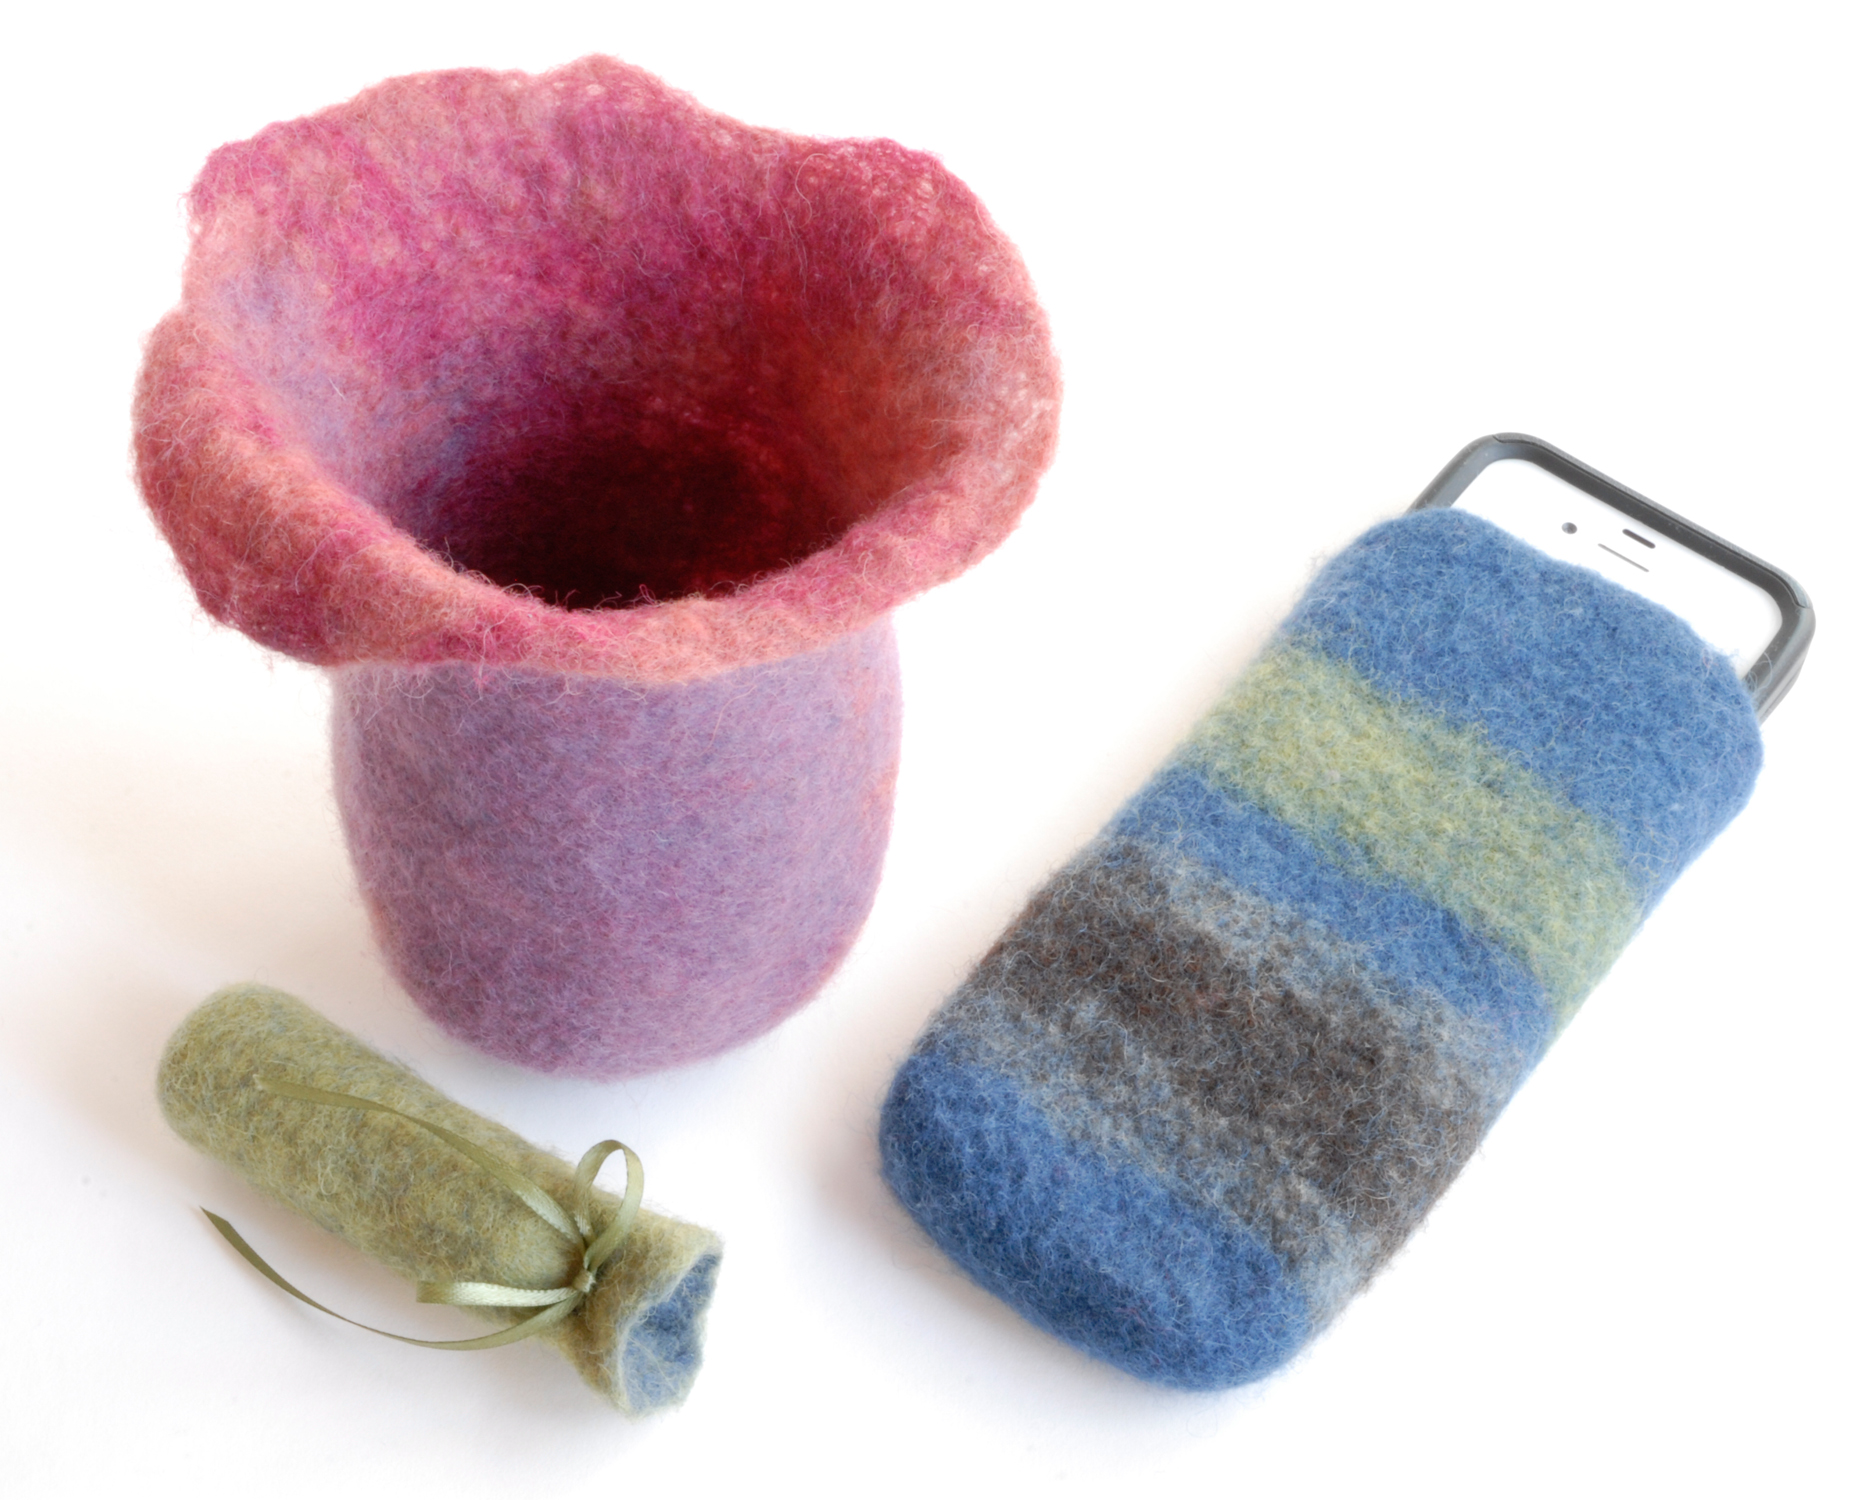
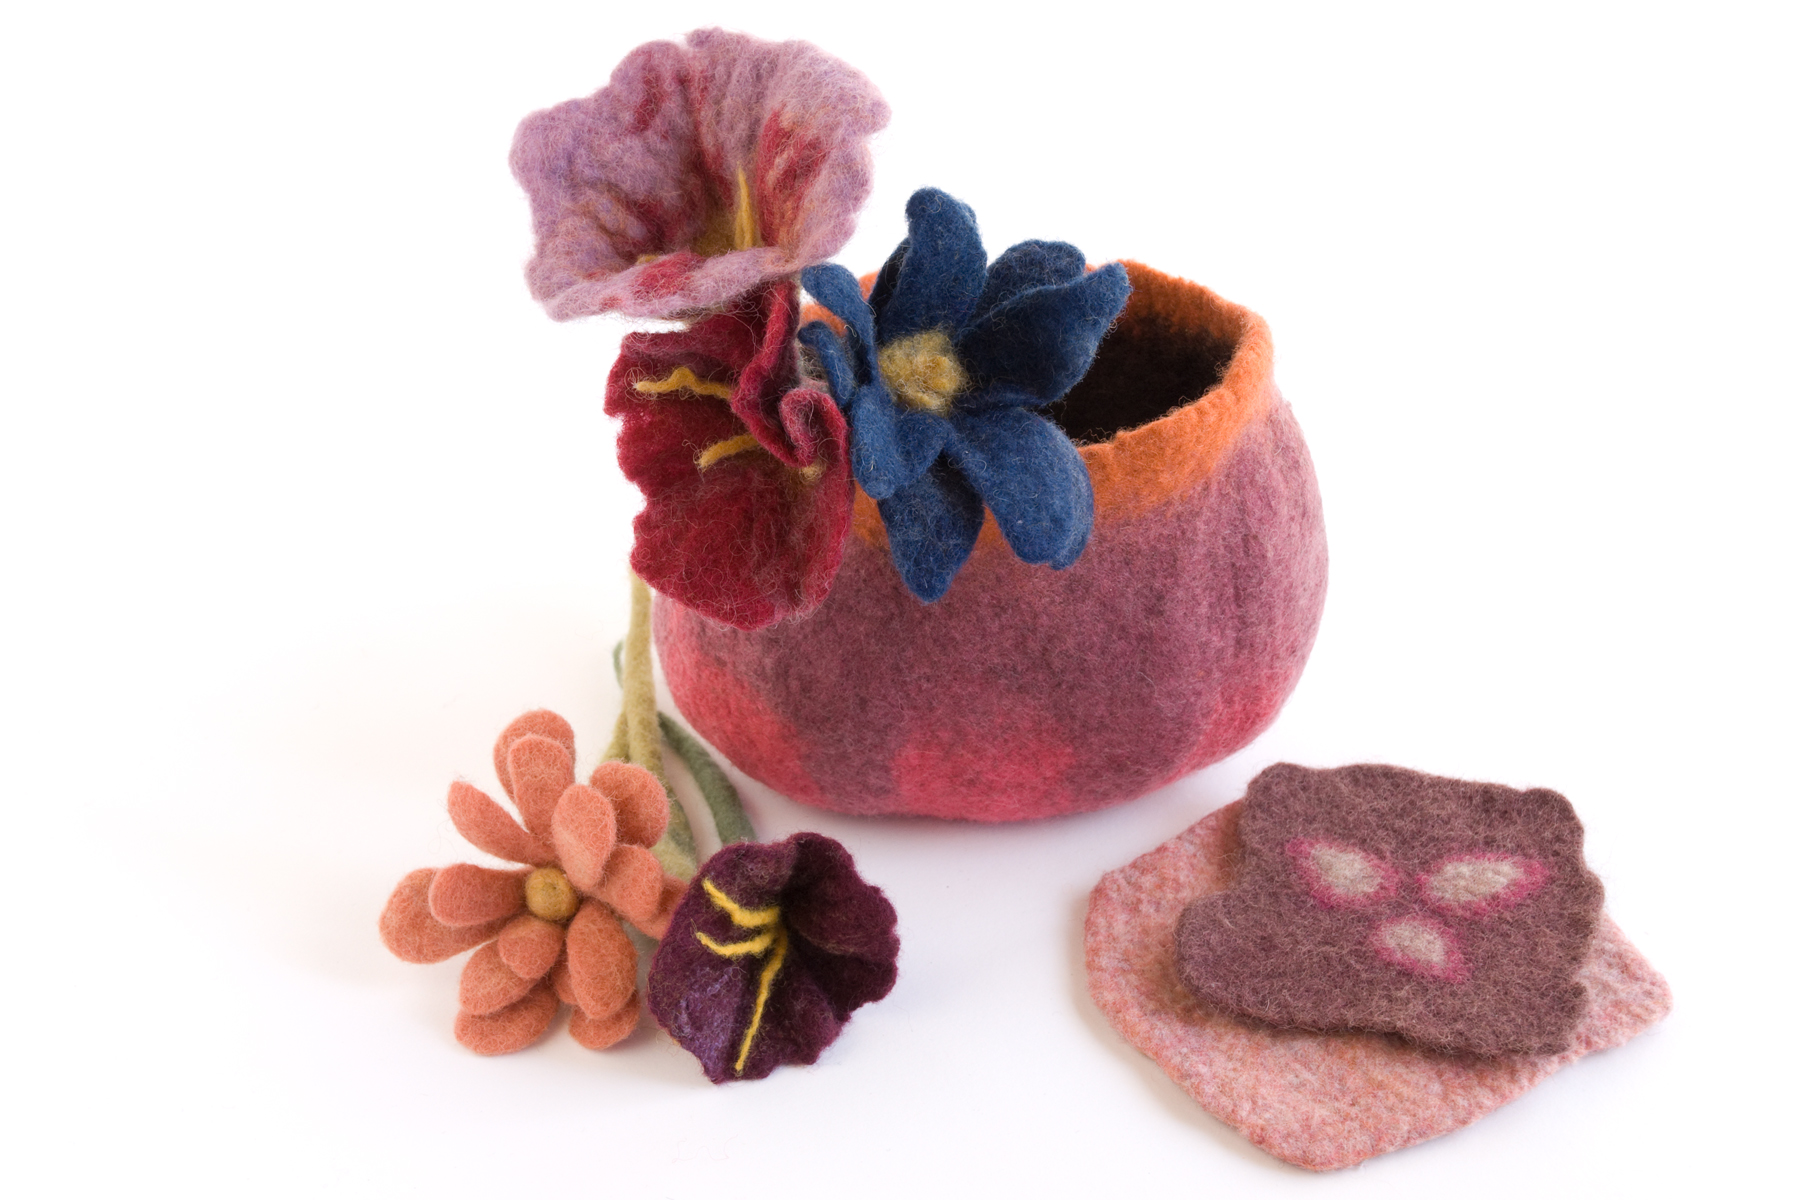
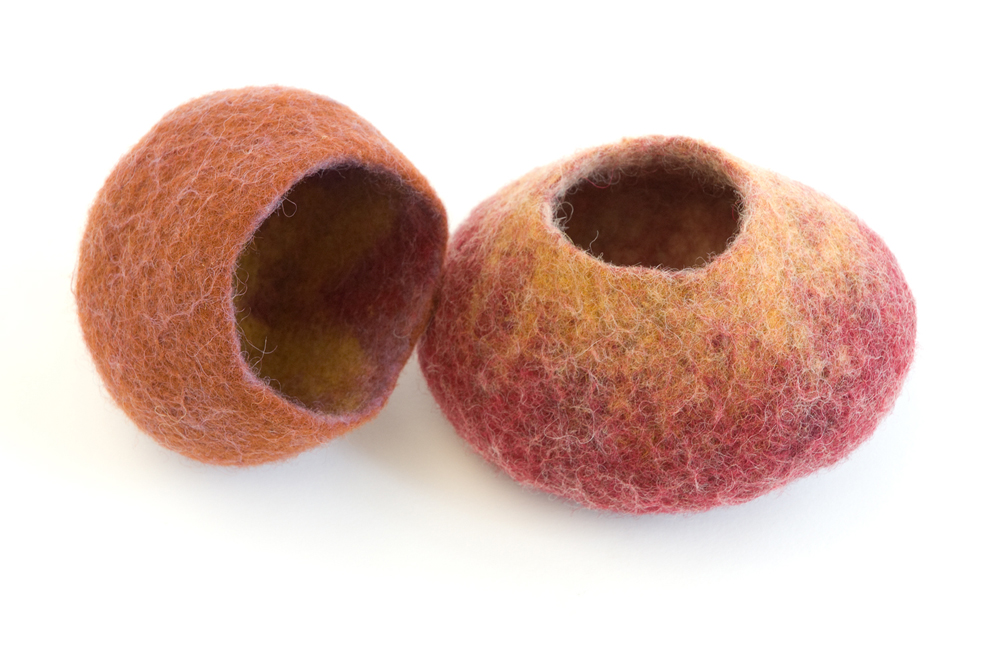
I’m excited to announce something I’ve been dreaming about for a long time; an immersive workshop close to my home in Arizona! This October, you can make felt with me in a lovely studio space, sleep in a peaceful desert retreat, and experience community and craft as we come together to create, share meals, and take a break from the hectic pace of modern life. I’m teaching this workshop and my friend Naomi is facilitating, she’ll be taking care of the space and the food so that we can nourish our creative selves.
October 18 – 20, join us for a weekend felting workshop at Tangent Studios in Paulden, Arizona! Jump in and learn multiple ways to turn soft fluffy wool into sturdy felt, using just water, soap, and elbow grease (plus a few tools). You’ll try flat felting, making a seamless 3D vessel, and shaping a felt flower, as you learn techniques for adding texture and designs to your creations. On the second workshop day, take what you’ve learned in any direction that calls to you, making a trivet, a wall hanging, a small bag, or another project of your choice. Leave inspired and ready to take the next steps on your felting journey! Stay at Triveni Ashram, camp at Tangent Studios or, if you’re local, drive in!
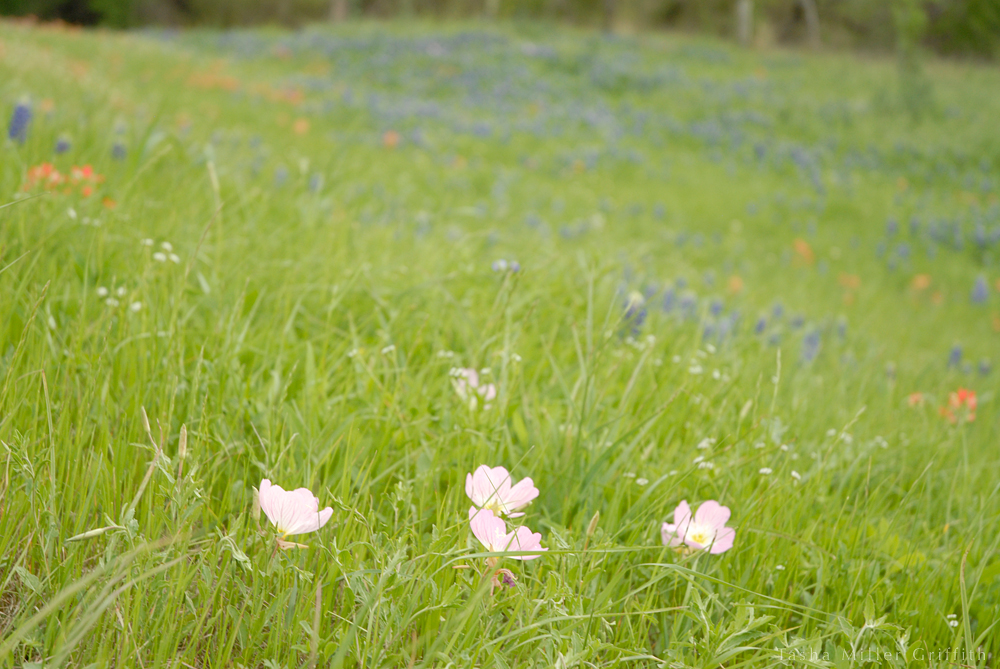
Driving through Texas a decade ago, the roadside wildflowers were so lovely that we found a place to stop and take them in, with a lot of photos.I just made this my laptop background for spring.
Fellow meditators among you may recognize this instruction: If you find that your thoughts have strayed, that you are no longer on your intended path, just begin again. You can begin as many times as you need to, over and over again. Each new beginning can even be celebrated as a moment of mindfulness. There’s no need to despair over the time that was lost.
In life, I think the time is rarely lost. Things other than what I had planned to do often demand my attention. Many of them are actually important, whether they pull me in another direction for a moment, or alter my whole course. Usually it’s both, an ongoing intermingling of my dreams and plans with the workings of the world, in which everything influences everything else.
And so I find myself sitting at my desk today, beginning again with this idea of reaching out, of sharing some of what I am doing out to a bit wider circle.
Teaching at New Venues and with Old Friends
My teaching schedule is alive and well, and my traveling workshops for this year so far are up here! I’m excited to be going with my partner Bryan on a road trip in June to Sitka Center for Art and Ecology on the Oregon coast, where we are both teaching. Robin Wall Kimmerer wrote part of Braiding Sweetgrass there (hearts come out of my eyes thinking about that) and it will be my first visit. I’ll be offering a workshop on Mending and Mindfulness, and one on Botanical Forms in Felt. Details and links are on the class page!
I’ll also be returning to both my beloved folks schools (in fact I have already been to North House once this year). And I am dreaming and scheming with a friend about a new possibility in AZ … more details about that to come later.
Flag Wool Workshops Closing Soon
I’m not teaching this year at Flag Wool Festival, because I’ve been deep behind the scenes organizing the workshops and vendors. The whole Threaded Together team has been working hard to bring FWF 2024 to life! We have some great workshops on offer, including rare opportunities to learn from talented Indigenous artisans, and knitting designers from out of state. Learn more and sign up here. Registration closes this Wednesday, May 15!
That’s all for this particular new beginning. For the last few days, the wind has pushed smoke from a controlled burn away from my place in the late afternoon and I’ve been walking in the nearby woods around sunset, watching the grass get just a little taller and more tiny plants sprout up. The oaks are not really leafing out yet, but I think we’re close.
Be well everyone, and of course feel free to reach out!
I’ve been thinking a lot about my mending journey lately as I put together slides and videos for online classes. New formats, new adventures, but as always, it’s clarifying for me to explain something to someone else, and to dig through photos of past projects, thinking about what I’ve learned in the meantime.
For example, I’d like to share that it turns out, cramming a sock under my sewing machine to put a patch on it works for a while, but if the sock still has life in it and the patched area wears out again, things can get pretty messy, since it’s hard to take off the patch, and covering it again makes a really thick spot.
Multiple patches later …
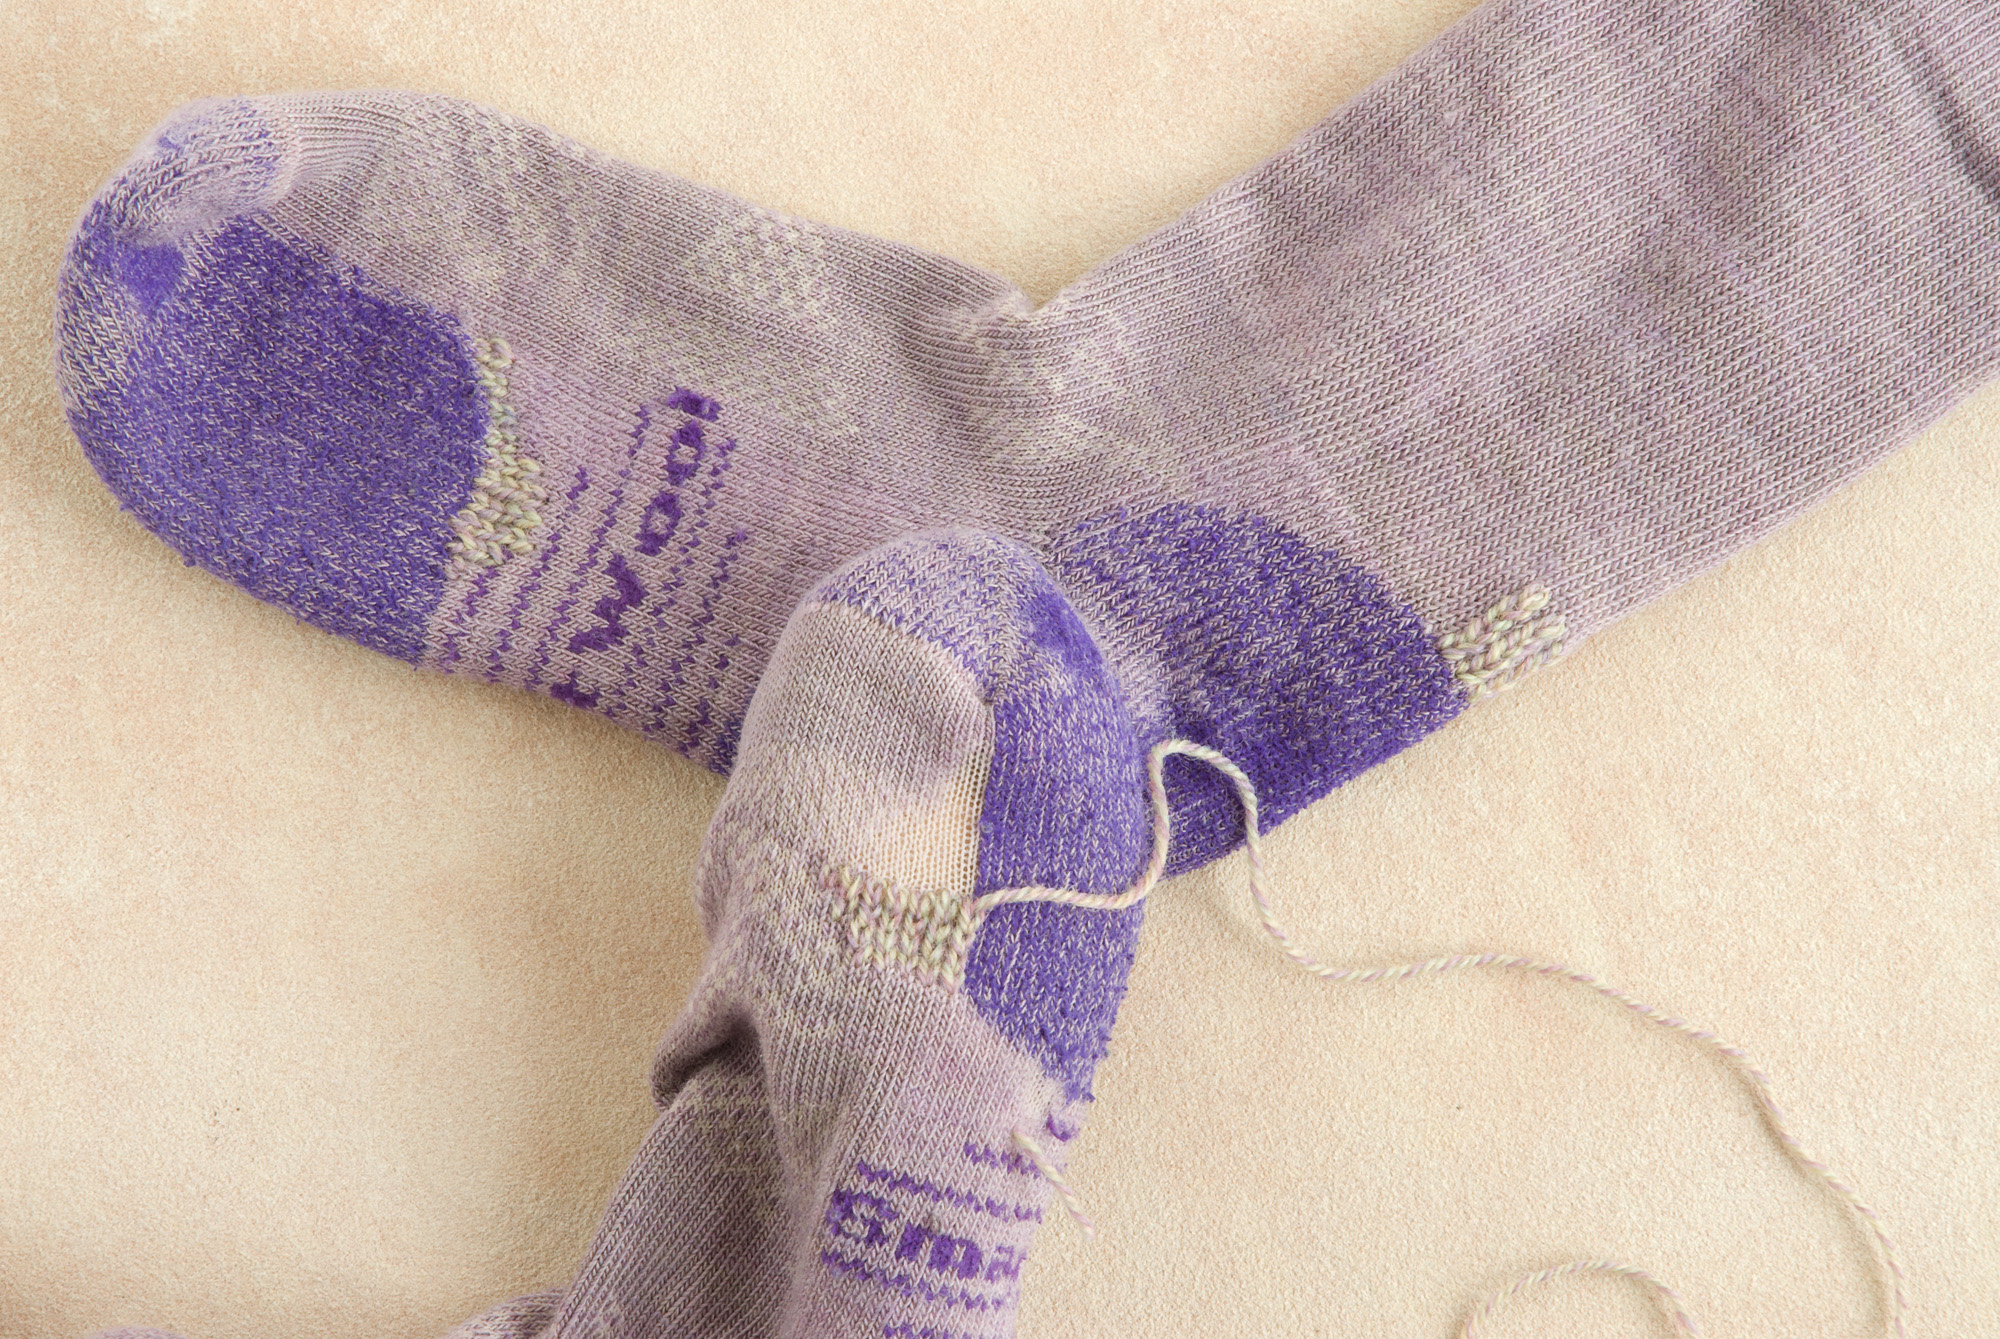
Fortunately, there are lots of other good options! For one, you can use the sewn-knit-duplicate-stitch technique that’s become one of my favorites. Here’s a video I made for North House Folk School with my filmmaker friend Amanda where I walk you through this technique on a sweater knit. It’s definitely easier to practice on a fabric with bigger stitches first. This works on all kinds of knits!
You can even use this for factory-made socks. For those and other fine-gauge knits, try working each new stitch over more than one of the tiny original stitches—for example, treating a block two or four stitches wide and the same number high as one new stitch. (Approximately. It’s fine if you get off by a tiny stitch or two.) I really like this idea for when the wool is gone from a sock but the nylon remains, since it adds new yarn to both sides of the old threads. And, the whole point of mending with the knit stitch (instead of flat woven darning) is that it maintains the stretch and cushy thickness of the original knitted fabric. It’s also easy to add more stitches around the first ones as you need them.
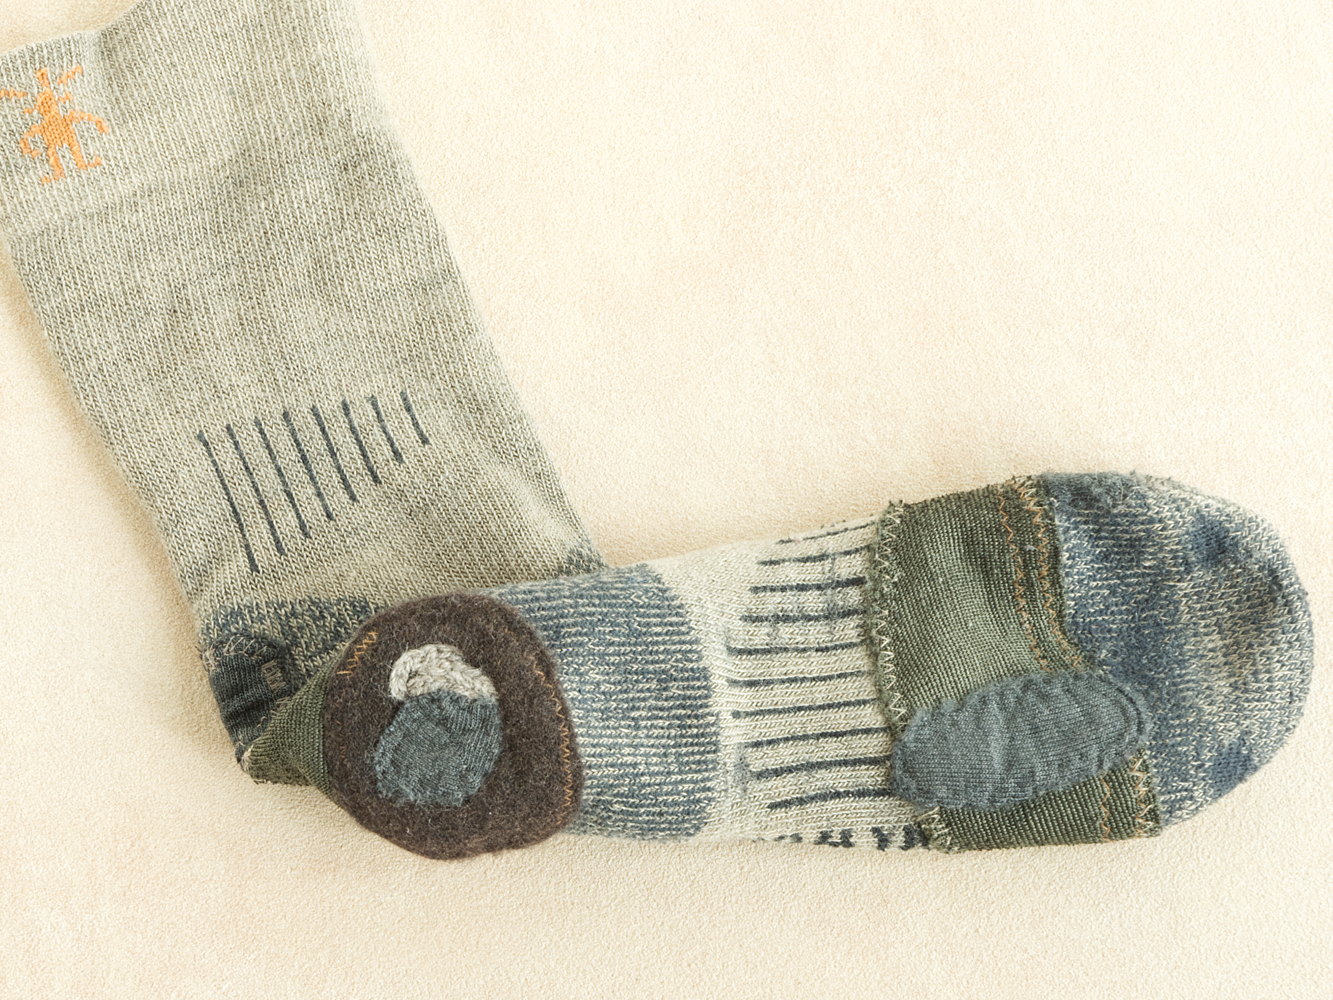
If that seems like not quite your cup of tea, you might try another idea from my North House friend Elise Kyllo—using needle felting to fill in the missing wool. She shows the whole process in this video. (It’s on Facebook, but I’ve had no problems accessing it even though I don’t have an account there.) This technique works best for areas where there are still some threads remaining (either nylon or wool) for the new felted wool to work through and around. Needle felting on its own isn’t usually sturdy enough to fill in an a large hole, unless you wet felt it thoroughly afterwards. And if you’re thinking of patching a large area, also keep in mind that felted fabric is stiff and doesn’t stretch much at all—although that should be fine for the bottom of a sock. And little needle-felted motifs are also a great way to patch small holes in a fine knit sweater.
Sewing on a patch is still a good option too, and I’ve gone back to preferring to sew them by hand. It’s easier to do, easier to take off if you need a new patch later, and I just love how the stitches look. In my quest to add more visible hand stitching to my wardrobe, I’ve been experimenting with stitches that work well with the stretch of knit fabrics. I really like zigzagging running stitches for this, and alternating back stitches that essentially make a catch stitch on the inside. I demonstrate the latter style in the video below, along with how much more these stitches can stretch than a plain running stitch across the grain of the knit. (This is a short video I made for my online classes. There’s no sound. Anyone who has the link can see it, but it’s not searchable, not meant to stand on its own without any explanation.)
I now recommend using one of these stitches rather than the catch stitches I used in my original sock mending post, since it’s easy for long stitches on the surface of the mend to snag on things. You may still want to check out that post for more visuals of sock patches though.
One thing I can’t fix is the tendency of mass-produced socks to lose their stretch and get saggy over time. The nylon content is also problematic from the standpoint of microplastics and biodegradability … but I know there are a ton of these socks in circulation, and I fully support mending them. For myself, I’m slowly letting them go from my life as I embrace knitting socks, and lately, spinning my own yarn to knit the socks … it sounds like a process, and it is—an amazing one—taking me towards a deeper understanding of different kinds of wool, and of how to make a durable yarn. It turns out that Merino is actually a terrible choice for socks—it’s super fine, super prone to pilling and felting, and not very durable! Other springy, non-felting, durable wools exist! In fact, this kind of wool is often undervalued or wasted, when it could be going into naturally wonderful socks and other sturdy knits.
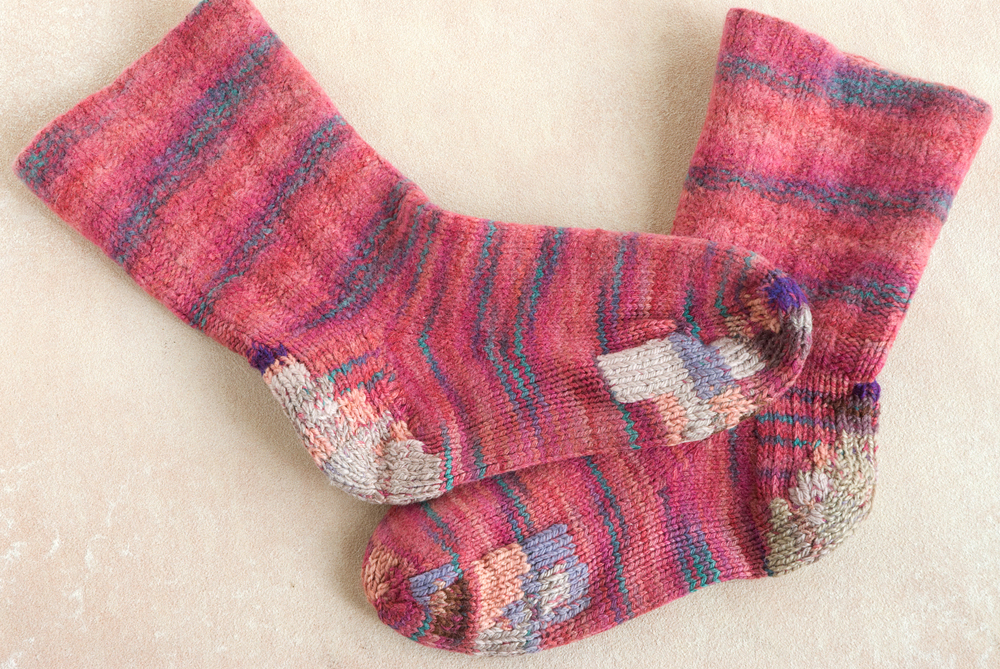
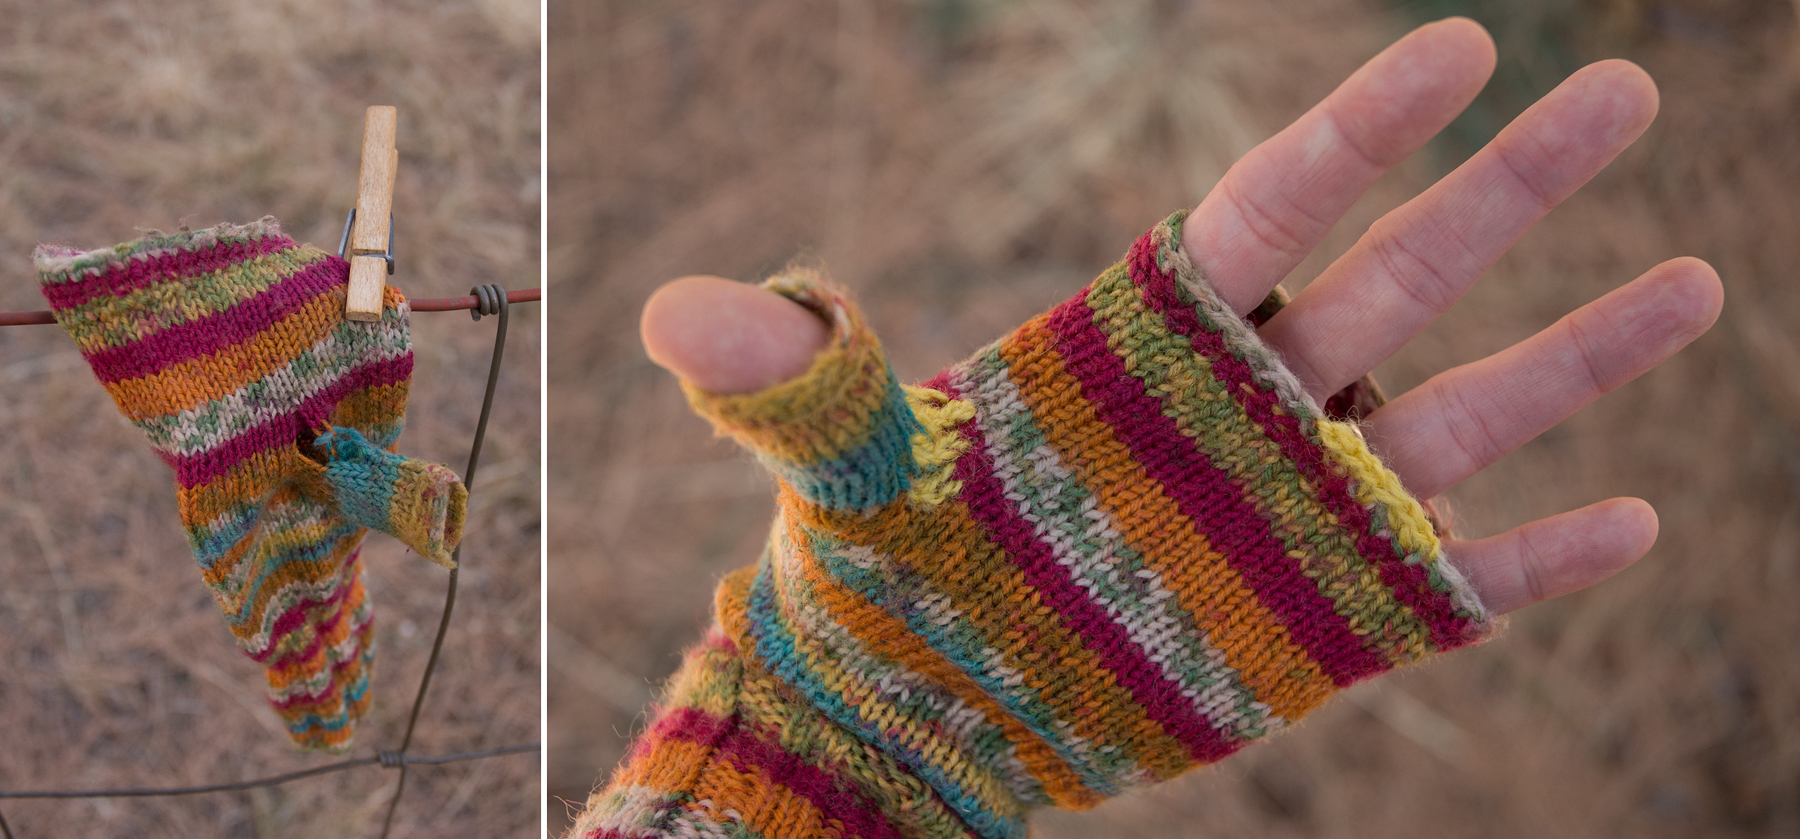
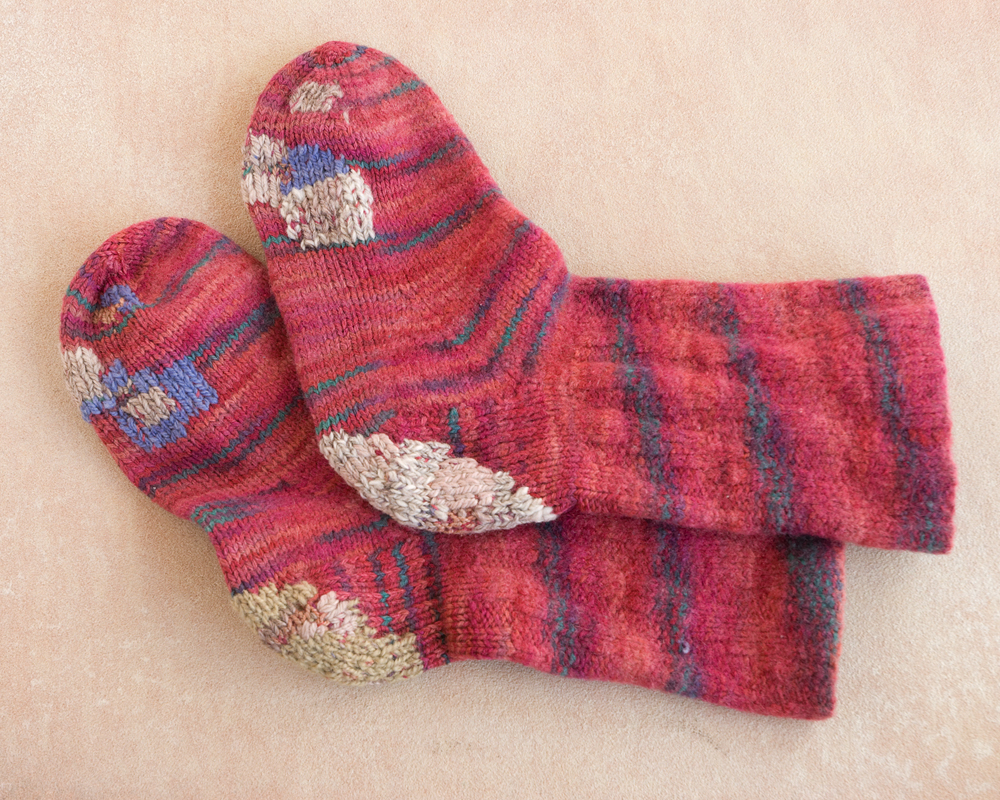
Happily, the tops of good hand knit socks seem to last forever, so as long as I keep repairing the bottoms I’m good to go. I’ve been wearing and mending the socks above since 2012. Still going …
If you want to find out more of what I’ve learned in my mending journey so far, come and join me for a class! You can find upcoming online and in person opportunities on the workshop page.
Just a few weeks ago (it feels like months or years, probably you can relate), I saw one person helping another fix a car in the grocery store parking lot. “Now that’s a useful skill,” I thought, “How often does a textile-related emergency come up that I could help with?” Well, here we are—in a way I certainly never thought possible.
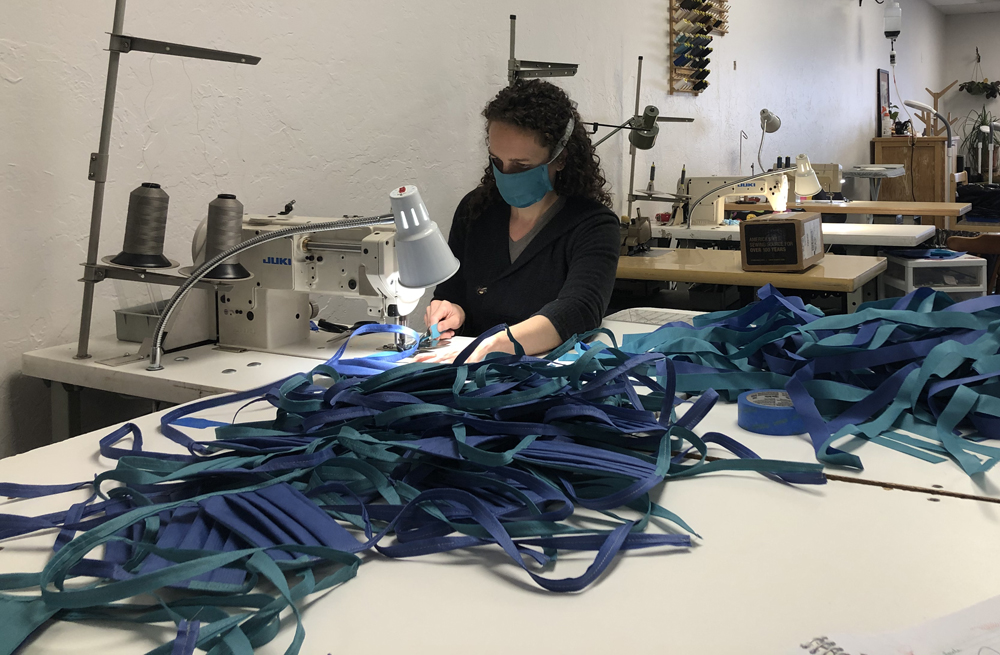
If you have been wondering about sewing masks to help with the shortage caused by the COVID-19 pandemic, here is what I know, and some resources. I’ve been working with a wonderful new nonprofit in my hometown, Threaded Together, to make these.
There’s a bounty of confusing information and patterns out there, and also confusion about how well fabric masks actually work. The bottom line for me on this is that healthcare and emergency workers are actively asking us for them, therefore they are needed. As I understand it, many homemade masks are being used as an outer layer of protection over another mask, and in non-critical-virus situations, to help preserve the supply of N95 masks. And as a last resort.
The material we’re making them from is a wrapping that hospitals use to cover surgical instruments. Most medical centers should have some. There is at least some evidence that it is really good at blocking particles, which is great news. (It’s also important to keep in mind that part of what makes the actual N95 masks so effective is that they are carefully fitted to provide an airtight seal around the face, which ours are not.)
We at Threaded Together (mostly Tina) have come up with a way to make these that is quick and hopefully easy to understand. Ours are based on a pattern put out by Providence, and a surgical mask from our local hospital. We are using two rectangles of fabric 9 x7” each, two strips for ties 36” long by 1” wide, and two pieces of pipe cleaner 4” long, twisted together, for the wire above the nose. There is a short video of Tina showing how to make one on Facebook, Instagram, and YouTube.
We’ve also been making a single-layer style with elastic around the ears. You may have noticed that elastic is nearly impossible to find at the moment, but some folks are getting creative using hair ties, and our friend Darcy thought of using knit fabric (like a T-shirt) for ties, which still has some stretch.
If you are looking for people to who can sew masks, or to coordinate with other sewists, Days for Girls has been stepping up for this project in a big way, and they have chapters around the country.
Frankly, sharing these efforts with family and friends who are medical professionals scares the living daylights out of me. How have we come to this point that I have help to offer them?! And also, being able to do something helpful feels amazingly better. I’m so thankful to all in our community who have offered their time, materials, and equipment, who have bought us lunch, made us playlists, or just waved at us through the window.
I seem to be hovering somewhere between brokenhearted and uplifted, as I guess are many of us these days. May you and yours be well and healthy, and kind to each other.
I’ve been planning and dreaming about posting some natural dyeing instructions here for a while, and I’m happy that the time has come! Dyeing fabric and yarn with colors from nature has been an obsession of mine since 2015, when I started researching printing with natural dyes on fabric, and doing my own testing. I have learned an amazing amount since then, and yet still feel like I have only dipped my toes in the vast ocean of possibilities. When I started this adventure, devouring whatever I could find to read, it was before the newest wave of books on natural dyes came out, and so I read a lot of unillustrated books from the last time natural dyes were having a big moment in the 70’s, and whatever came up in internet searches. Most of those sources seemed a little questionable, they presented information without a lot of reasons behind the methods, and they often contradicted each other. I wanted to know what really worked and what were the best methods, so I started testing various dyes and techniques, and haven’t stopped since. I hope that by sharing some of what I know now, I can help build the kind of knowledge base I wished for—both solidly rooted in good, provable methods, and also empowering to those who still have a lot of questions. (Full disclosure: I still have a lot of questions too. It is impossible to know the answers to all of the questions about natural dyes, and that is one thing that keeps me going.) Buckle your safety belts, there’s a hefty dose of science coming (and a bit of philosophy too).
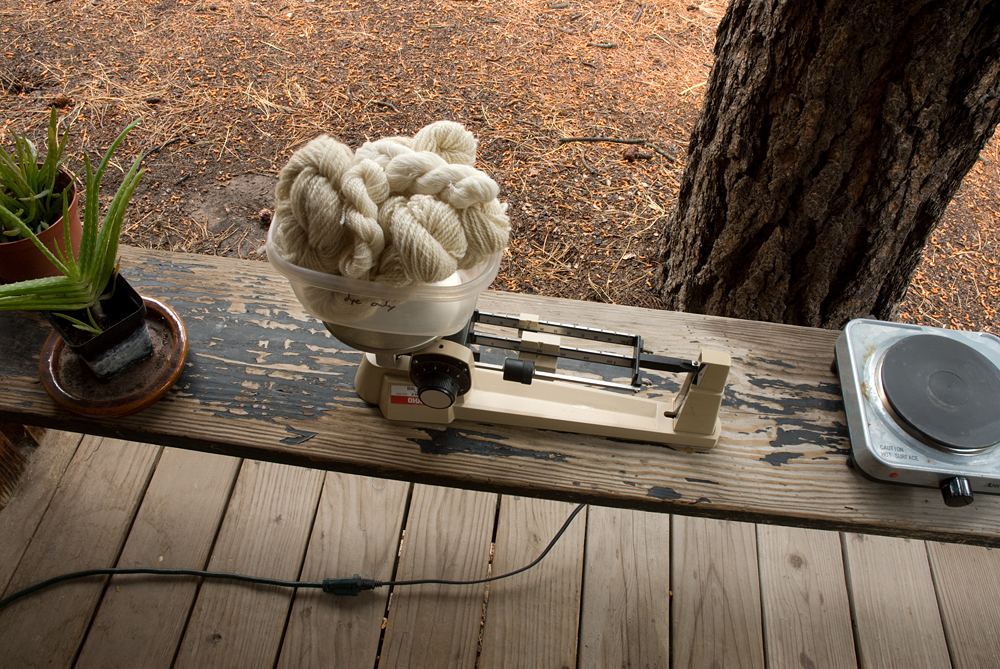
This is my back porch “dye studio.” It’s just a bench where I can put an electric burner and whatever else I need … and it’s my absolute favorite place to be any time the weather is warm enough.
First
things first: there are some basic facts and ideas that we are going
to need for all the discussion about dyeing that follows, so I’ll put
them up here.
Fibers
Animal-grown fibers like wool, silk, alpaca, etc. are made of proteins. These fibers are the easiest to dye, because they readily react with the compounds in mordants and dyes. In fact, as Elizabeth Wayland Barber points out in her (amazing and highly recommended) book Women’s Work: The First 20,000 Years, it was the domestication of sheep and silk worms and the development of wool and silk fabrics that led to color in fashion!
Plant-grown fibers like cotton, linen, and hemp are made of cellulose, and are chemically and structurally different from protein fibers. To bust our first myth right here: it is totally possible to get vibrant colors using natural dyes on plant fibers—it just took a humans a little bit longer to figure out how. The famously intense “Turkey red” color, and the original printed cottons from India that took Europe by storm in the 17th century, were all made with natural dyes on cellulose fibers! They do require a different process for scouring and mordanting than protein fibers to produce deep colors.
Rayon
is a man-made fiber created by chemically breaking down wood pulp and
extruding it. Since it is made of cellulose, it behaves similarly to
plant fibers in dyeing. Bamboo is also a regenerated cellulose fiber
(unless, and more rarely, it is processed more like linen). According
to my natural dye and fiber mentor Catharine Ellis (see resources at
the end of this post) “Tencel” and “Lyocell” are regenerated
cellulose fibers produced with a method that recycles almost all of
the chemicals and water used, while other methods of producing rayon
and bamboo fibers create a lot of chemical waste.
Almost all other synthetic fibers don’t work with natural dyes, so I won’t cover them here. (In addition, synthetic fibers like polyester, nylon, etc. are basically plastic, and create similar environmental issues as other plastics do when they are made, used, and discarded. Especially troubling: they introduce micro-plastics into waterways when they are washed.)
Weight
of Fiber
The best way to figure out how much dye, mordant, detergent for scouring, or whatever else you need for your project is to base it on the weight of the fiber you are dyeing. Also sometimes called “weight of goods,” this is the dry weight of the thing you want to dye, whether it is wool yarn or a T-shirt. Weigh it, and write down the weight, preferably in your dye notebook, or somewhere you will be able to find it later. If you are scouring a few things that you plan to dye separately, do your future self a favor and write down the weights of the individual items, rather than just the total. I encourage you to weigh in grams if possible—not to convert ounces to grams (that’s difficult)—just leave all your weights in grams and find percentages that way (that’s easy: 10% of 487 grams is 48.7 grams, etc.).
Dye
Pots and Utensils
It’s
important to use separate pots, spoons, tongs, containers for
weighing things, etc. for dyeing. Do not use the ones you cook with.
My philosophy on this is that “non-toxic” is not the same as
“good for you to eat.” A large stainless steel pot is a dyer’s
best friend, and small ones are also useful. A pot or two and a spoon
or tongs to stir with are enough to get you started.
The
pot you use for scouring, mordanting, and dyeing should be big enough
to give your fiber room to move. If it’s too bunched up, the solution
won’t be able to get to all of it and it will dye unevenly. I will
often split fabric yardage into a few pieces to make it easier to
stir without becoming hopelessly wrapped around itself, and allow it
to be divided into batches if needed.
Assuming you aren’t yet overwhelmed, let’s move on. Now we have some natural fiber yarn or fabric that we want to dye. Mordants (to be covered in a later post) and dyes form chemical bonds with the fiber at a molecular level, and they can’t do that if there are a lot of waxes, oils, or dirt in the way—in other words if the fiber is dirty. This is where scouring comes in, meaning intense washing, to make sure the fibers can absorb as much dye as possible.
Does
Scouring Really Make a Difference?
Short
answer: Yes.
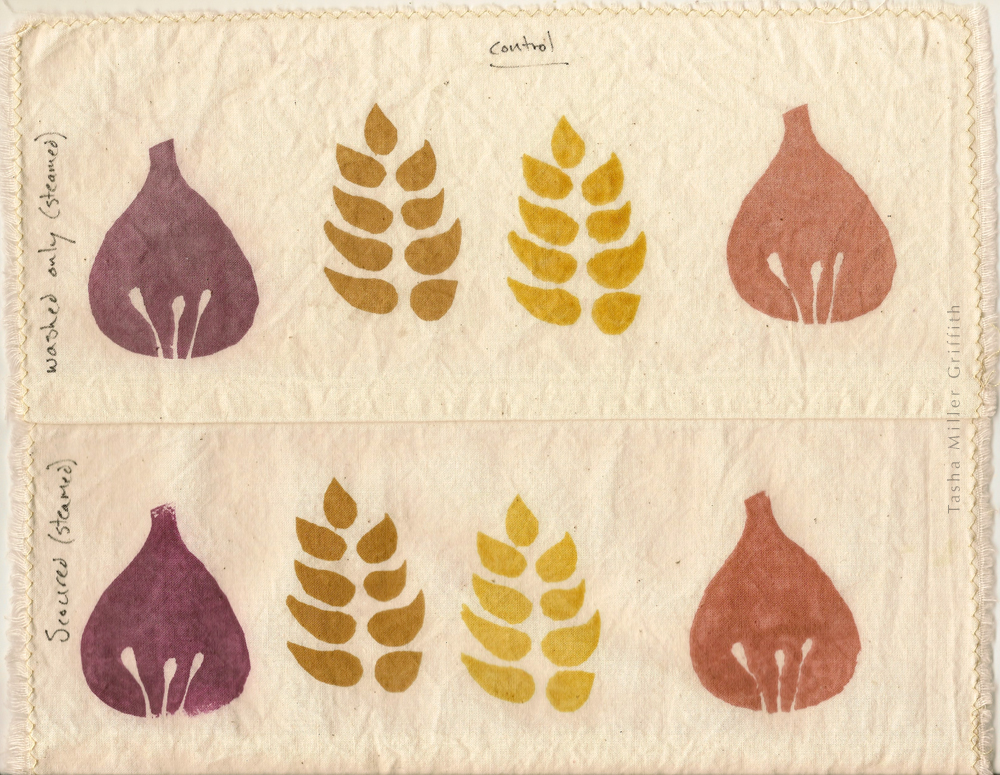
Here below are some of the very first samples I made to test things out. The background is unbleached cotton muslin fabric, washed in the washing machine only (top), or scoured (bottom), before printing with (left to right) cochineal, black tea, Osage orange, and madder dye pastes.1 There is no mordant on these, which is why the colors are dull, particularly the cochineal (more about that later). Notice the differences between the two treatments, how three of the four colors are more saturated on the scoured fabric. (I’m honestly not sure what’s going on with the other color, Osage orange, maybe I will know the answer in another five years or so …)
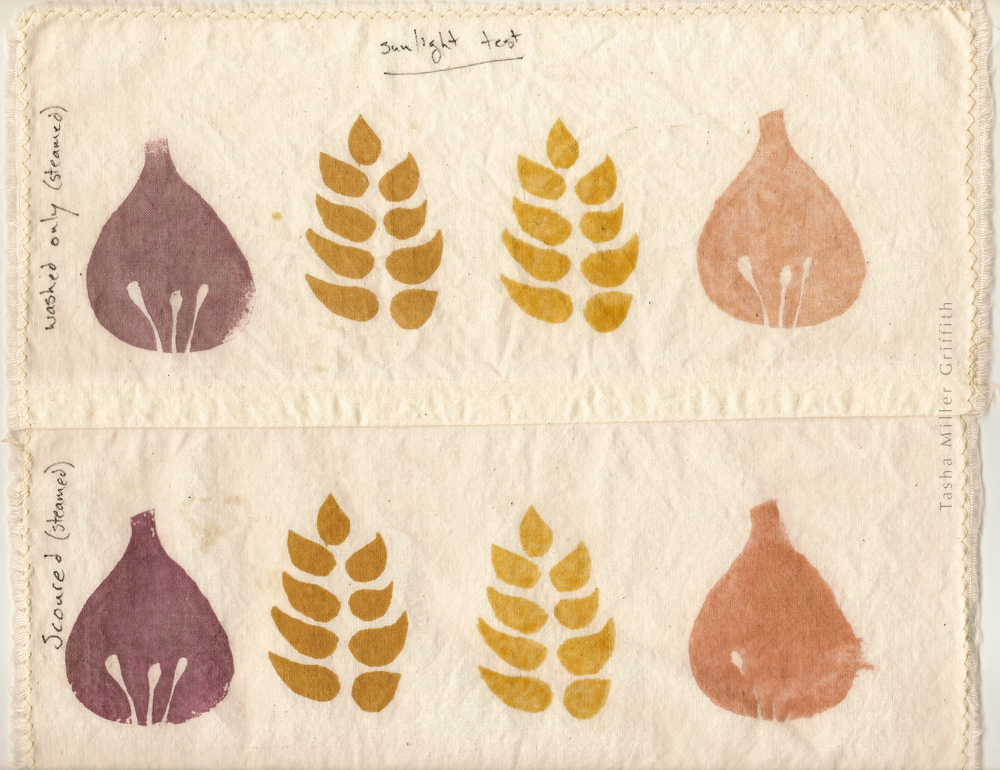
Below
are samples from the same batch (as close to identical as possible),
after a couple of weeks in the sun. More dye can bond with the fibers
in the scoured samples, which means not only are the colors deeper to
begin with, but they last longer. I got similar results with samples
that were washed multiple times. I can also see the same effect on
wool and silk fabrics that were either hand washed, or scoured using
the method below.
Do I
Have to Scour Everything?
Short
answer: It’s up to you.
If you
can’t or don’t want to scour your fiber before dyeing, wash it as
thoroughly as you can, and know that while you probably won’t get the
best possible result, you will still get color to attach.
Fabrics
and yarns that are already bleached (stark snow white instead of a
softer “natural” color) have been intensely scoured at the
factory where they were made, and usually don’t need scouring again.
You should still wash them thoroughly (in a hot water, long cycle if
cotton or linen, or by hand if wool or silk), to get rid of any
starches, sizing, oils etc. that may have been added.
I can’t talk about all of this without encouraging us all to think more broadly about where the materials we are using come from, especially if we are buying them new rather than secondhand. Bleached fabric or yarn might be easier for us to work with at home, but where was it processed, what chemicals were used to scour and bleach it, and what precautions were taken to protect the workers and the local environment from overexposure to those chemicals? One of the big reasons I started working with natural dyes was to give myself creative options that I really felt good about. Being more involved in the process from fiber to garment means that I am responsible for a lot of decisions that it’s easy to not even think about in a consumer society—and that I am taking back the power and the freedom to decide for myself how the textiles that touch my body every day will be made.
To
Scour Protein Fibers
I adapted this method (my current favorite) from Kristine Vejar’s book The Modern Natural Dyer.
1. Pour an inch or so of hot water in the bottom of your pot. Add pH neutral detergent* at a percentage of 0.5% of your weight of fiber—equivalent to about ½ teaspoon for 500 grams of fiber or just a few drops for 100 grams. Stir to dissolve the detergent. Add enough additional warm water so that the fiber will have some room to move.
2. Add your fiber, and more warm water to cover, if needed.
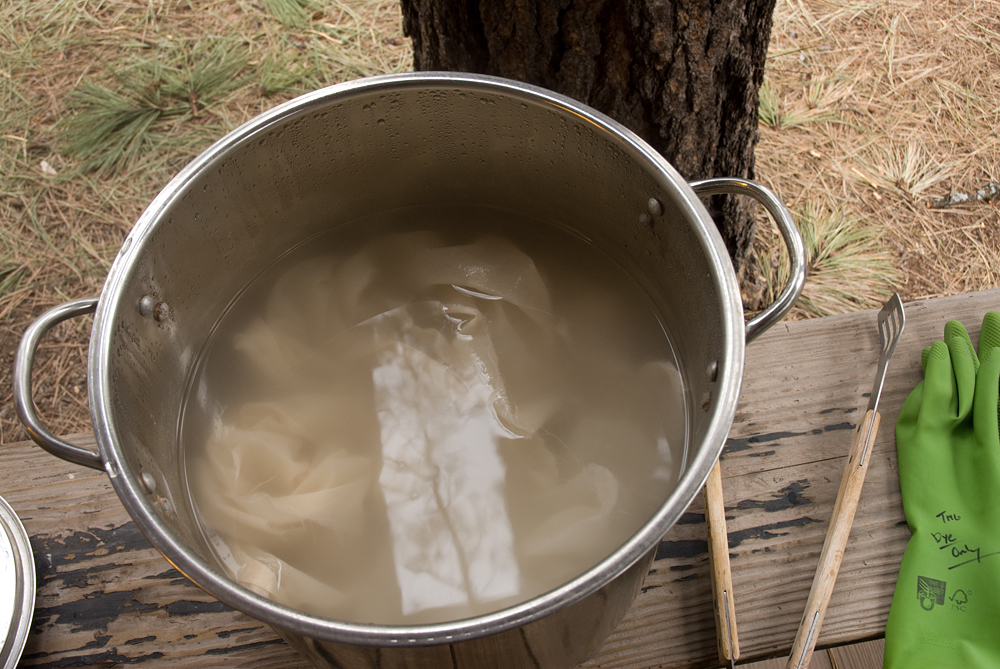
3. Slowly bring the water up to around 180° F (just below a simmer). Many sources say that boiling can damage silk, and it will felt wool. Hold at around 180° for about 30 minutes. Stir the fabric every 5 to 10 minutes throughout the process, bringing sections from the bottom to the top, and redistributing any clumps or tight areas that form, so the scouring water has a chance to get to every part of it.
4. Take the pot off the heat, and let it cool down until you can put your gloved hands in the water comfortably.
5. Gently rinse the fabric in a couple of changes of water at the same temperature as the cooled-off scouring bath.
Why
This Way?
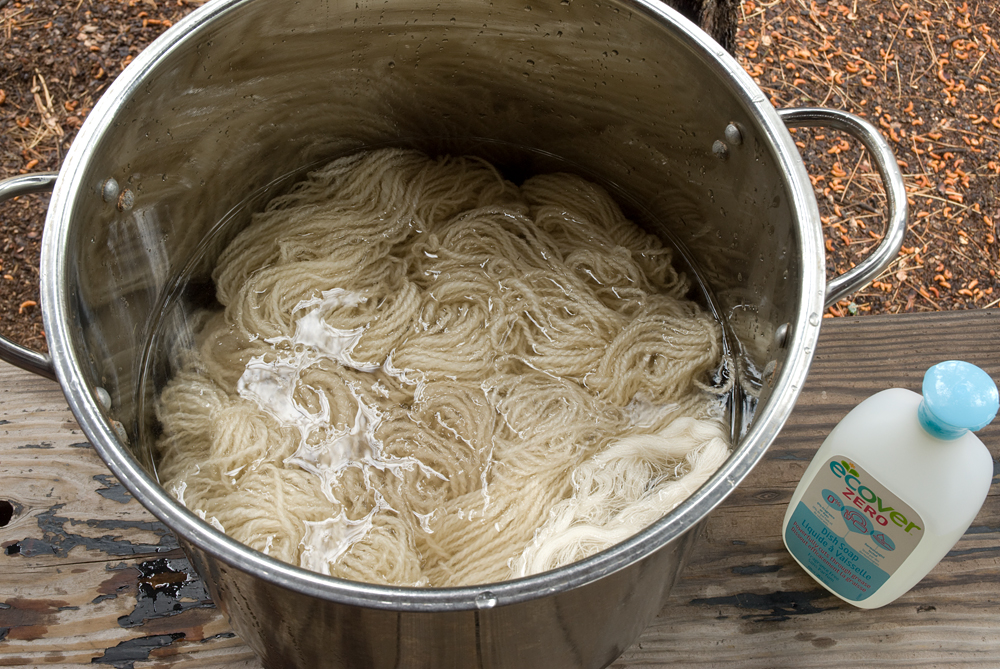
*Detergents: Protein fibers are slightly acidic (human hair is too), and can be damaged by alkaline solutions, which is why it’s important to use a pH neutral or slightly acidic detergent. (A lot of laundry detergents work in part by being alkaline, so they aren’t recommended.) Dish detergent works, and I have successfully scoured a fair amount of wool and silk fabric using Ecover brand Zero (unscented). But if your fiber is greasy and you need more than the small amount suggested here, it can take a ridiculous amount of rinsing to get rid of the dish soap suds. Lately I have been using a detergent designed for cleaning wool, like Unicorn Beyond Clean or Kookaburra Scour.2
Wool
and other animal fibers are almost always thoroughly washed (also
called scouring) before they are processed into roving, yarn, and
fabric. A lot of that processing relies on the addition of small
amounts of oil to make it go smoothly, and the carding/spinning oil
is the primary thing we want to remove by scouring wool yarn or
fabric again before dyeing, along with any leftover lanolin, etc.
Note:
Most types of wool are naturally prone to felting, which occurs with
moisture and agitation, and is accelerated by heat and temperature
shocks. In other words, the conditions needed for scouring and dyeing
are also conducive to felting, so treat your wool gently. Raise and
lower the temperature of whatever bath the wool is in slowly, and
stir it only as much as needed for the solution to get to all the
fibers, turning the yarn or fabric around gently. You can also dye
wool as it comes off the sheep, before it is spun or woven, but be
aware that the fibers are especially prone to felting before they
have the twist of yarn to organize and protect them, so be extra
careful!
Silk,
which is extruded by silkworms as they make their cocoons, includes a
gummy substance called seracin as well as fiber. Both of these
components are proteins, and both absorb dye. Most silk fabrics and
yarns are sold either “de-gummed” with the seracin removed, or
with it left in on purpose to make the fabric crisp. I am not a silk
expert, but I have had good results using the same gentle scouring
above with silk fabrics.
To Scour Cellulose Fibers
This method is also adapted from The Modern Natural Dyer. I usually use a little less soda ash than the recipe in the book, and it seems to be enough for unbleached cotton fabric. I haven’t been able to see a difference adding detergent to this scour, the soda ash alone works really well, and rinses out easily.
1. Pour an inch or so of hot water in the bottom of your pot. Add soda ash at 4% of your weight of fiber—equivalent to about 1 teaspoon for 100 grams of fiber. Wearing gloves, stir the water to dissolve everything. Add enough hot water so that the fabric will have some room to move.
2. Add your fabric, and more hot water to cover, if needed.
3. Bring the water up to a simmer (this may take a while if the pot is large), and let it simmer gently for about 30 minutes (with the lid ajar so it doesn’t boil over). In my experience, having the pot at a rolling boil just pushes sections of your fiber out of the water, especially if you are scouring fabric. Stir the fiber every 5 to 10 minutes throughout the heating and simmering, bringing sections from the bottom to the top, and redistributing any clumps or tight areas that form, so the scouring water has a chance to get to every part of it.
4. Take the pot off the heat, and let it cool down until you can put your gloved hands in the water comfortably. Squeeze out the fiber and set it aside (the pot lid is a good place to put it). The water will probably look cloudy and slightly brownish. If it looks very dark and dirty, you may need to scour this fiber again with a fresh bath.
Be a good citizen, and add a little vinegar to the water in the pot to help neutralize the alkalinity before you pour the water down the drain, especially if your drain goes to a septic system.
5. Rinse the fabric in a few changes of warm to hot water.
Why
This Way?
Cotton
isn’t washed before spinning and weaving, because the natural waxes
it contains don’t interfere with those processes. But they definitely
interfere with dye reaching the fiber, which is why cotton needs a
little more intense scouring than wool does before dyeing. Cellulose
fibers respond well to alkaline conditions, but can be damaged by
acids. They aren’t damaged by boiling or by quick changes between hot
and cold conditions, which makes them easy to handle during scouring.
Soda
ash is sodium carbonate, an alkaline salt. It occurs naturally where
lakes evaporate, and is used for everything from water softening and
adjusting the pH in swimming pools to making glass. The fact that
it’s quite alkaline is what makes it work so well for scouring
(recall that soap is traditionally made by combining a strong
alkaline substance with fat). That also makes irritating to your skin
and eyes, so wear gloves when handling the fiber in this bath, and
don’t hold you head directly above the steaming pot.
Linen and hemp are bast fibers—this means they grow in the stalk of the plant. Pectins hold the whole stalk together, as well as the fiber bundles that make up linen threads. Some of the pectin needs to be dissolved in order for the fiber to be workable (this happens during processing), but if too much breaks down (as can happen in a harsh scouring) the fibers get weak and break easily. I asked Cassie Dickson3, a linen expert who grows and processes a lot of her own fiber, if she scours her linen before dyeing and she said that she does. Currently I’m recommending taking it a little gentler with linen than cotton, start with a little less soda ash and see how you like the results.
By the way, if you are wondering whether this kind of scouring is good for difficult household laundry, the answer is: if the difficulty is oily (like pillowcases that spent a few too many nights with someone’s greasy hair) it works amazingly well! If I have scoured some fabric and it still seems like the bath has cleaning power, I will sometimes add a pillowcase or a kitchen towel while the pot is still hot, or add and reheat it later once I remove the fabric I’m going to dye.
Notes
1 A lot of my experiments (and frankly obsession) with natural dyes has centered around using them to screen print designs on fabric. I’ll be using these samples as illustrations, but not explaining this process in detail here. It’s just too much for this format, and I’m still actively trying out various ideas and changing my mind frequently about what is the best practice and what is possible. (I am teaching everything I know about it though.)
2 For more about detergents and scouring wool, see “Scouring: Which Product is Which?” by Beth Smith, PLY Magazine issue 22, Autumn 2018 (The Power Issue).
3
See “Ready for Retting”by Cassie Dickson, PLY Magazine
issue 20, Spring 2018 (The Flax Issue).
Resources
If you
don’t want to wait for me to finish my explanations to go further, I
certainly don’t blame you!
I was fortunate enough to take a workshop with Catharine Ellis last summer, and I have the greatest respect for her work. She has a new book with Joy Boutrup called The Art and Science of Natural Dyes: Principles, Experiments, and Results which is by far the most useful, practical, and comprehensive natural dye how-to book I’ve ever seen. If it’s out of your budget, may I suggest asking your local library to get a copy?
Catharine’s blog is full of fascinating and useful information too.
If you are at all connected to the fiber/textile world online, you are most likely already aware of the explosion in conversation around diversity, discrimination, and inclusion that has been going on, and expanding outward. (If not, here is a summary of how it started on Ravelry.) At first, I admit I was disappointed to read about prejudice happening in a community I’m a part of, and to realize how little I was aware of it. Now, I’ve come around to thinking that being exposed to this reality is a needed opportunity to engage more fully and to do better, both for me personally and hopefully for the broader community. I’ve read and listened and learned (some, no doubt I have much more to learn), and I would like to offer both some resources that have been helpful to me for any other white folks who may be able to use them (below), and more importantly, any help I can to BIPoC (Black and Indigenous People of Color) who may be able to use it.
For BIPoC reading this, if I can help you, either with textile skills like knitting, spinning, natural dye, etc., or advice and/or networking for teaching, writing, or other things I do, just let me know. I don’t have all the keys by any means, but I’ll be happy to share what I know. Please contact me here.
For my fellow white people, I want to heartily recommend the podcast series Seeing White from Scene on Radio. It was recommended to me by my aunt, who has done a lot more thinking around race than I have, and I later found out that it’s also used by a meditation/mindfulness teacher I respect for anti-racist work. Listening to this series was amazingly eye-opening for me. I knew about slavery in US history, about segregation, and discrimination against BIPoC for housing and jobs … but I was also brought up to believe that all people are equal, and at least in unspoken messages, that if we are just nice to each other, everything will be alright. I did not learn about how all these forms of prejudice are tied together, or that the white men who founded our country were explicitly setting up a system to benefit people who looked like them, at the expense of everyone else.
As Robin DiAngelo puts it in Part 14 of Seeing White, “I cannot tell you how transformative and liberating it is to start from the premise, ‘Of course I’ve been thoroughly conditioned into a racist worldview. Of course I have a racist frame of reference, and investments in this system, and I have patterns. Of course, that is unavoidable, and while it wasn’t my fault, I do have to take responsibility, because to not do that is to actually collude.’ ”
In my teaching and writing, I’m constantly asking people to think more deeply about where the textiles we use every day come from. I now understand more than ever why that is uncomfortable—at the bottom of it, it means I’m asking people to consider and acknowledge which other people and ecosystems have been exploited in order for us to have these things. I think it’s totally fair that I’m now being asked to consider those questions from this different angle.
It’s not fun to think about my environmental impact, but doing so is ultimately empowering, because I can use the knowledge to make better choices. And not surprisingly, in a similar way, I’m finding that by looking more closely at the institutional racism around me, I feel more like I can make a difference to help change it. When an organization I care about, which has clear issues with a lack of diversity, sends me a survey about their future (this happened recently), I can share my concerns. I can bring a better internal framework to conversations, emails, my own work … and adding this piece, thinking about racism more deeply, has somehow unlocked an ability in myself to bring up some of the issues I really care about when someone asks me for advice or an opinion—which is great.
I took some time in between episodes of Seeing White to process things, and I’ve been alternating also listening to:
On Being, which is my all-time favorite program/podcast. Talk about deep conversations. For me, some of them have been actually life-changing. There are some directly related to challenging racism, and also a whole lot of conversations with brilliant BIPoC, everyone from civil rights leaders to poets. And it’s full of gems in unexpected places, like recently this poem, Ode to My Whiteness by Sharon Olds.
What’s Good with Stretch and Bobbito, which I stumbled across on NPR. It’s full of honest conversations with BIPoC musicians and celebrities, a lot of laughter, and they aren’t afraid to ask the occasional very deep question. I hope there is another season coming!
You can tell that I currently have a lot more life space for listening than reading. But I also want to mention the book Americanah by Chimamanda Ngozi Adichie, which I read a while back, is great, and changed how I think about what it might be like to be Black in America.
I’m pretty sure that people who read this blog like their fiber arts mixed with some searching questions about life and society, but just for anyone who’s gotten this far and is still thinking, “I just come here for the sewing,” I think Jacey did a good job in this post on the PLY blog of talking about why that isn’t really helpful.
And, although this is a place where I tell my stories, this issue isn’t really about me, so comments are closed. Please engage the broader conversation elsewhere. With love to everyone!
Hi all! Here are a few fun things in my world happening now and coming up soon:
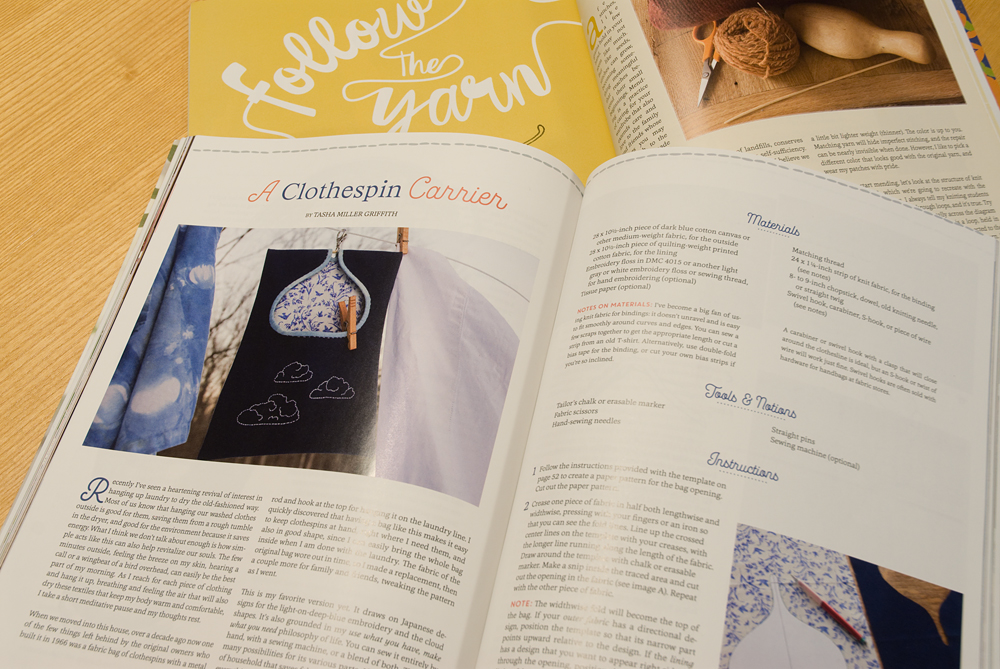
The info for my spring and summer workshops is up! I have new classes at Textiles West (in Colorado Springs) in May, and at the Intermountain Weavers Conference (in Durango, CO) in July. Plus, screen printing with natural dyes at Flag Wool Festival, embroidery and an introduction to natural dyes at Coconino Center for the Arts, and a return to both John C. Campbell Folk School and North House Folk School later in the summer! Check out all the details over here.
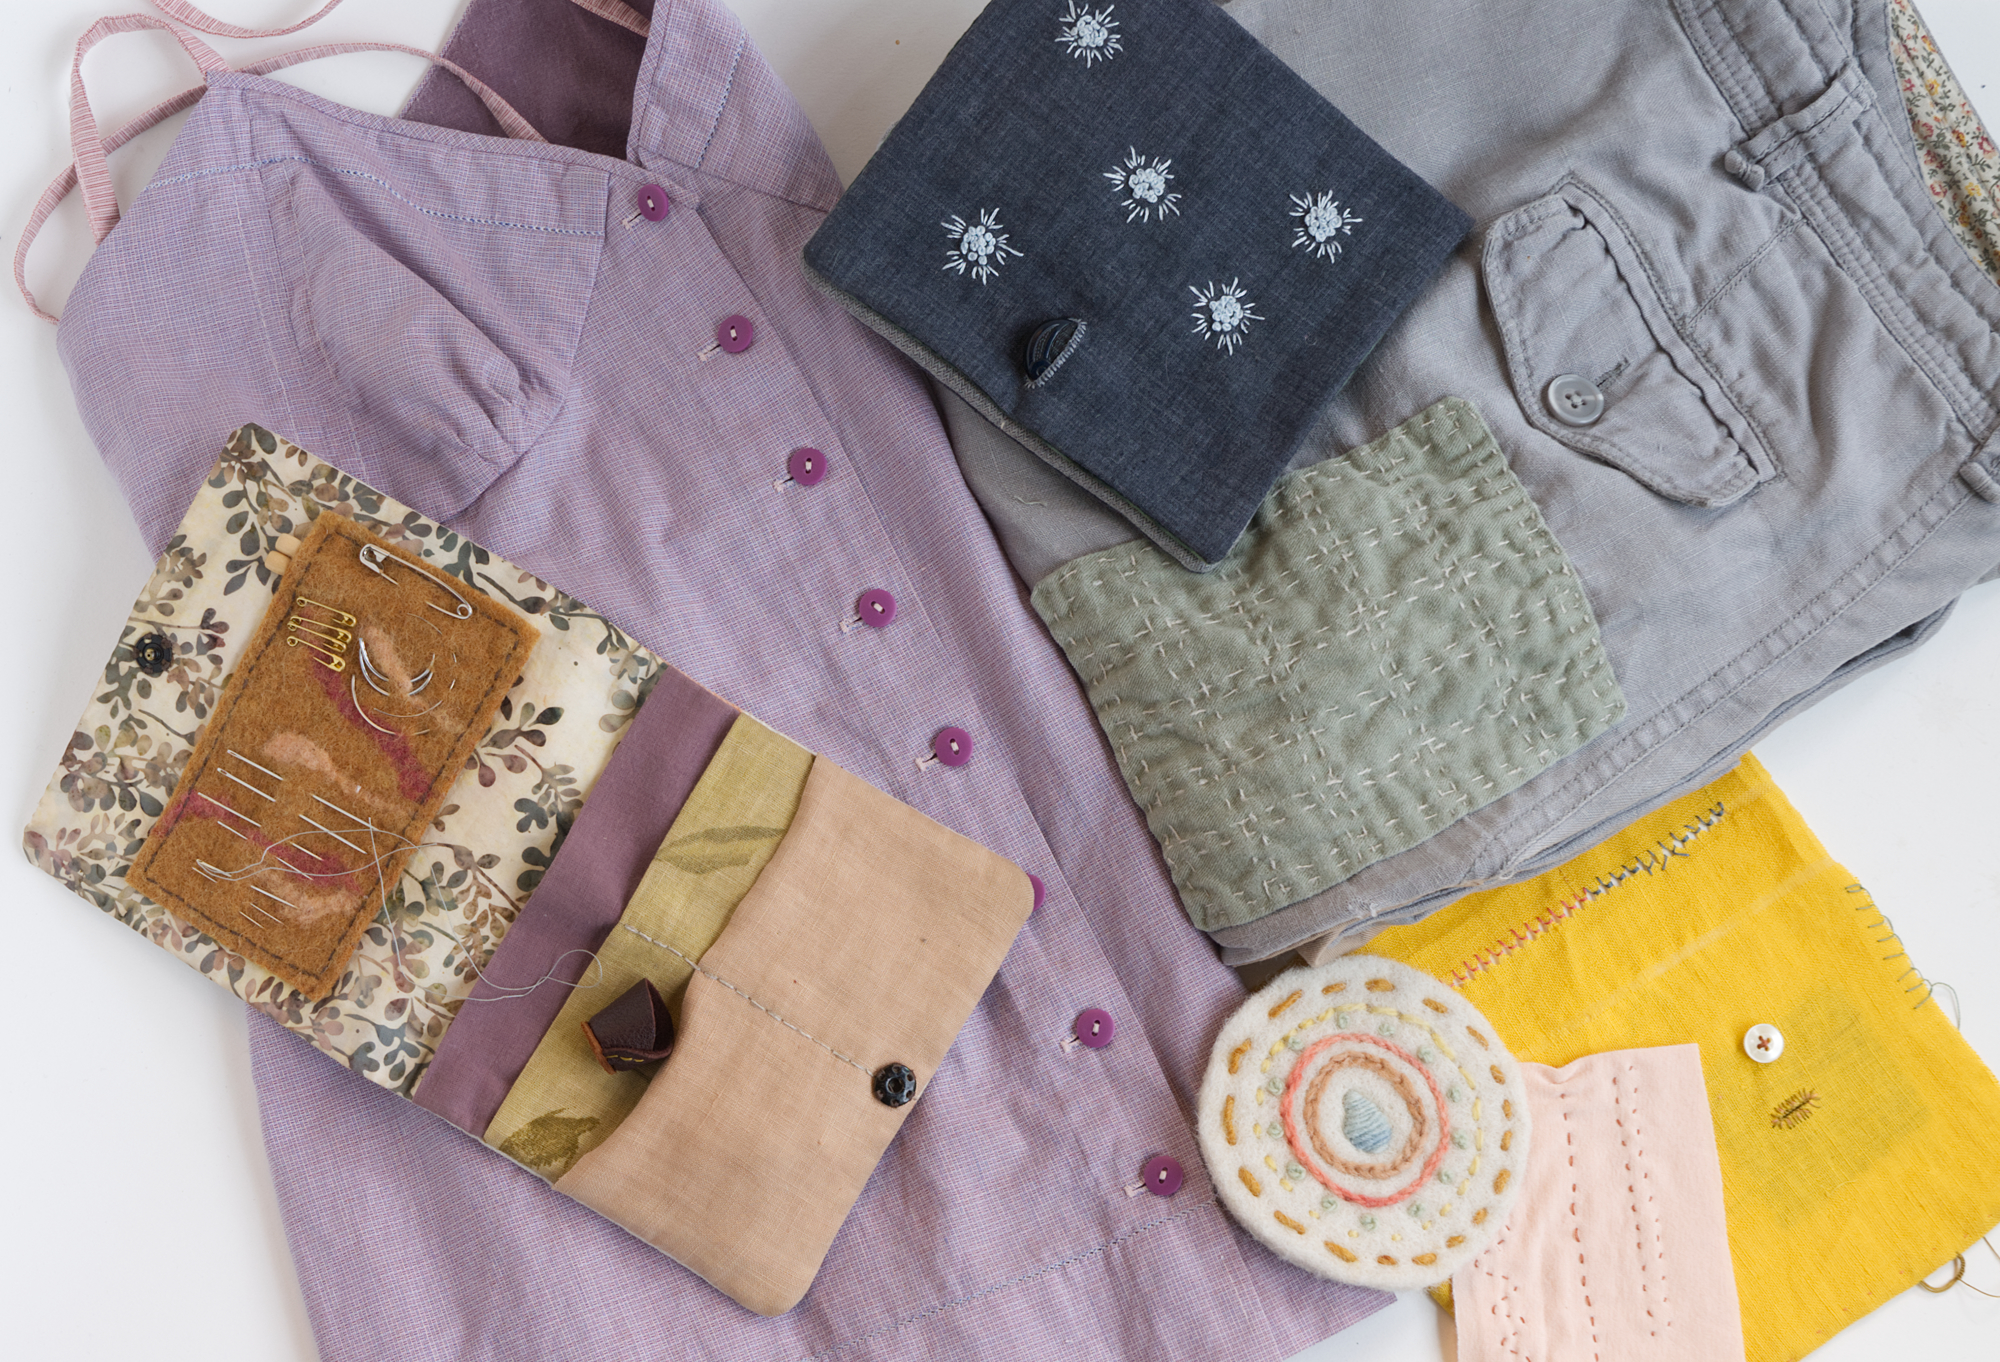
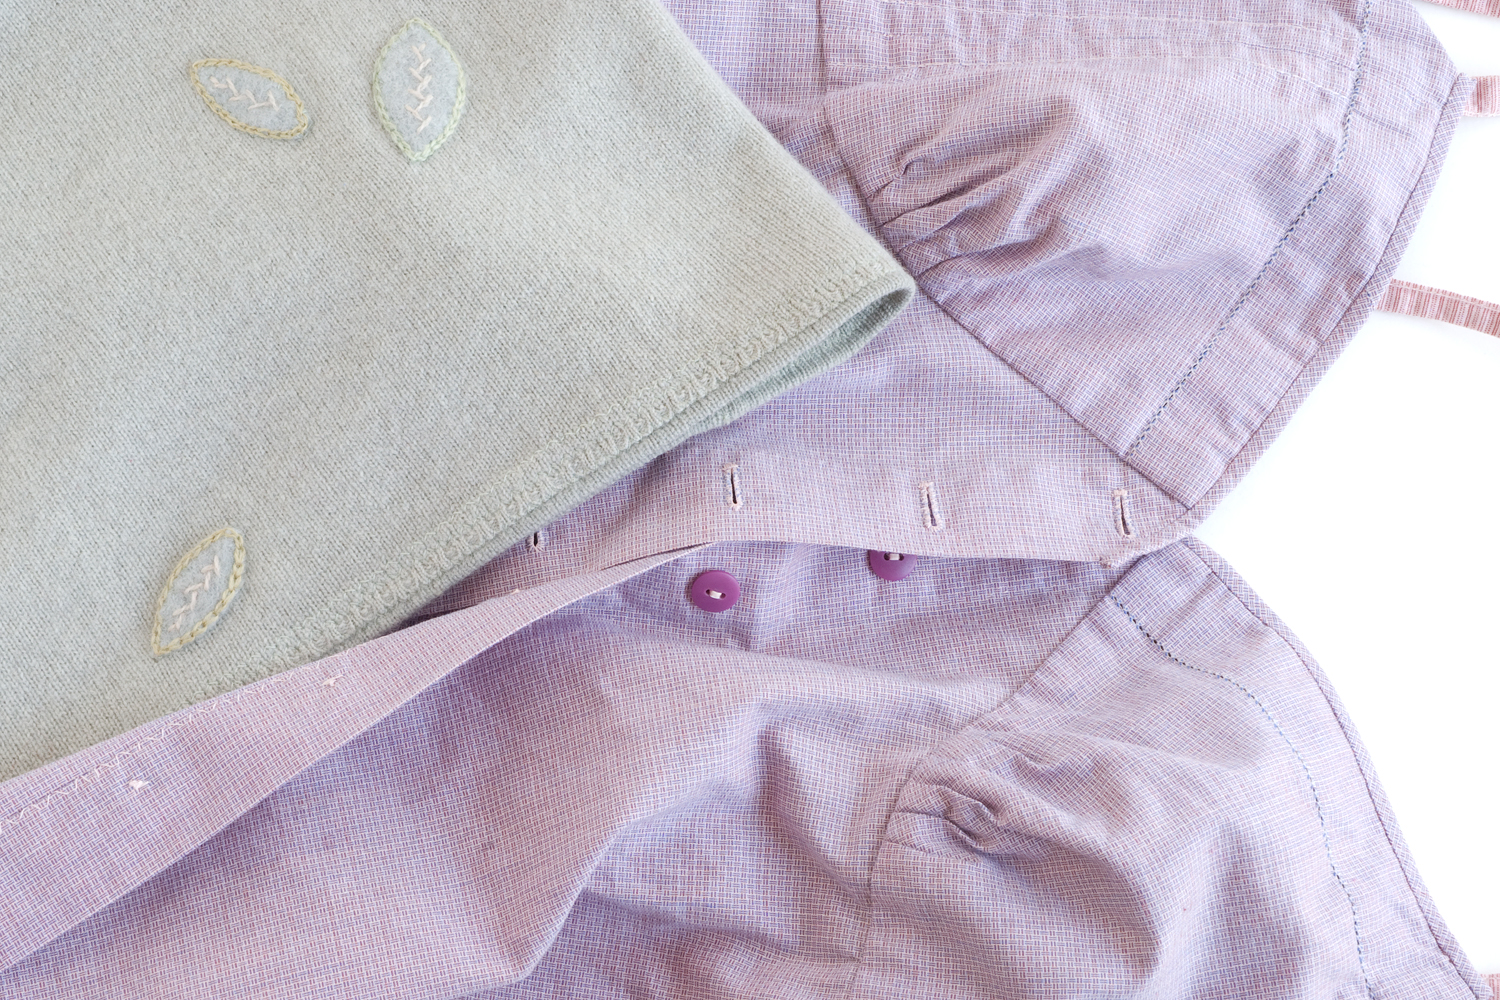
Also, pictured above, I have an article in the current issue (31 :: REVIVE) of Taproot magazine! It’s a tutorial for sewing and embroidering a cloth bag to hold your clothespins. And because (although it seems inconceivable) I don’t think I ever mentioned it here, if you happen to see a copy of issue 28 :: GRAIN anywhere, my favorite method for mending knits is in there.
I have a clear intention of being more present in this space in 2019, and offering more content here. At least in the short term, it’s looking good …
I’m spending this weekend in Durango, CO with family. We went out walking the other night as a snowstorm was blowing in at dusk. Wide, wet flakes falling gently but with velocity towards my upturned face. We climbed steps up the side of a long hill, and I worried that it would be too dark to comfortably see our way back. But in fact, by the time we turned around, the snow caught and reflected all the light there was all around us, and the steps were clearly outlined white patches with dark rims.
I’m hoping that might be a metaphor for life, that if I can just be patient and trust, I’ll be able to see a path, even in the dark. I’m in the mood for turning over stones, clearing decks, and keeping one eye open for new ideas. Here are some recent and upcoming projects:
New Knitting Pattern
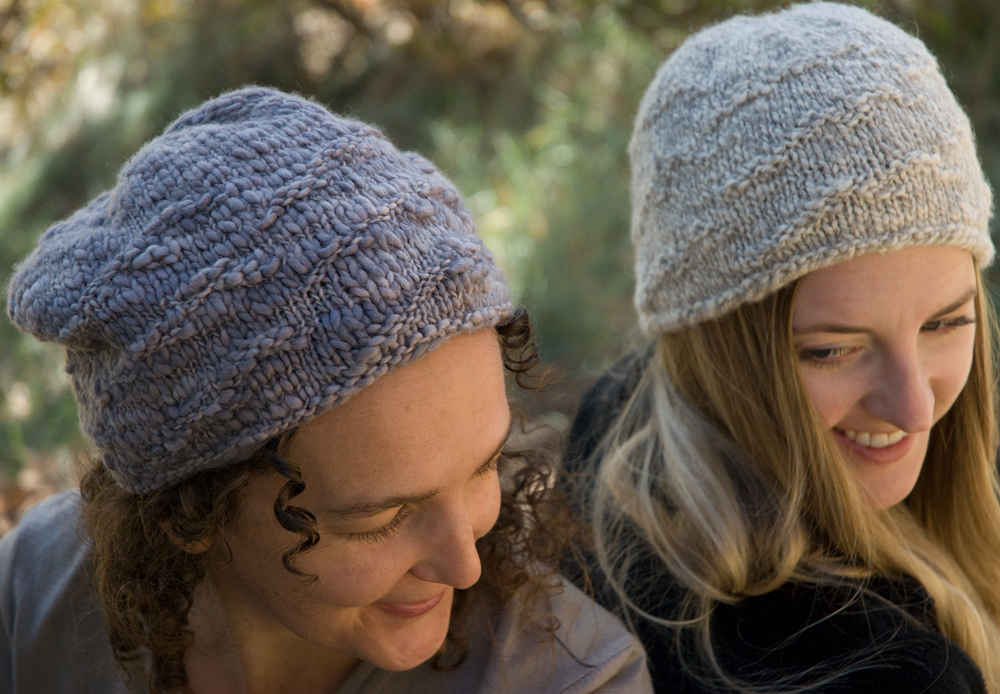
Here’s something I’ve been working on for a while, finally out in the world—I made a “real” knitting pattern! The Cloudscape Hat is now available on Ravelry and on Etsy. It uses bulky thick-and-thin yarn from local dyer Andrea of Spinup Yarns, and it’s also great for handspun yarns. If you like it, please “like” it on either platform to help spread the word.
This was a project which both exercised my creative muscle, and reminded me that it takes a village to do almost anything worthwhile. One new person who very kindly contributed was our friend Gretta who helped with modeling. Musical bonus: Gretta and her husband Kyle are the core of the amazing band Towr’s—not just my favorite local band, but one of my favorite bands anywhere, and really lovely humans.
Arizona Fiber Arts Retreat
In January, after the holiday bustle, this is a relaxing gathering of fiber folk with workshops, a speaker, vendors, and lots of open spin/knit time. Relocated from Arcosanti and in its second year at the Prescott Resort. I’m teaching four different half-day workshops: Fiber + Twist = Yarn (beginning spinning), Finishing for Fiber Artists, and two sessions of Creative Mending—for Woven and Knit fabrics. Workshops do fill up, so register soon to secure your spot!
Handmade Holiday Market
I’m happy to be spending this Tuesday night with a bunch of fun & creative local women, showing all kinds of handmade items in this intimate little market (details on the flyer above). I’m bringing goods and gifts for makers, including felting and knitting kits, gift cards for lessons, and some really special fabric. There will be wine, beer, and snacks provided. Come and say hello!
Mending Service
New this fall, I’ve launched a mending service, where (you guessed it) I will fix your treasured textiles! Read all about it here. Questions and thoughts are welcome!
Have you ever wondered where twisted stitches come from, why there are two common ways to decrease a stitch instead of just one, or what the heck is “combination” knitting? Do you get confused when you pick up or transfer stitches and find that they seem somehow different from what you’re used to? Has anyone ever told you that you knit “the wrong way”? If so, keep reading—but let’s get one thing straight right up front—there is no wrong way to knit! (And I am not the only one to say so.) If your way is comfortable for you and produces fabric you like, it’s a good way.
No matter what combination of stitch orientation, wrapping direction, and yarn handling you use, there are certain basic elements of how knitting stitches form that are the same. These influence how you work your stitches as you knit, and how your finished stitches look. Once you understand these basics, you can gain the confidence to handle your stitches however the situation calls for, and maybe even the freedom to try out different ways to knit! If you have your own knitting handy, please get it and follow along looking at the live stitches, I think it will make more sense that way.
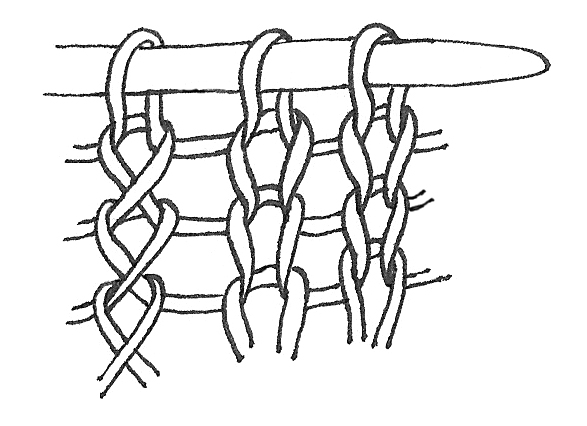
Let’s start with the shape of a stitch: when you look at a piece of finished knitting (or the part of in-progress knitting below the needles) each knit stitch looks like a mostly-flat “V” shape, and each purl stitch looks like a horizontal bar. Both stitches are actually just loops of yarn, oriented differently to the ones below. (We’ve talked about that before, and it’s worth mentioning many times—in fact I recommend that you keep thinking about it until you can see it with your eyes closed).
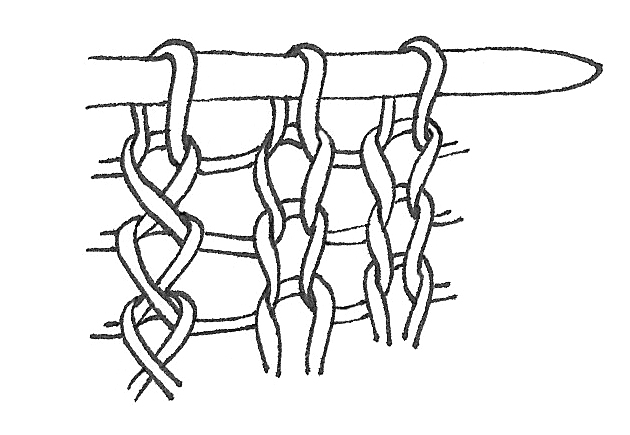
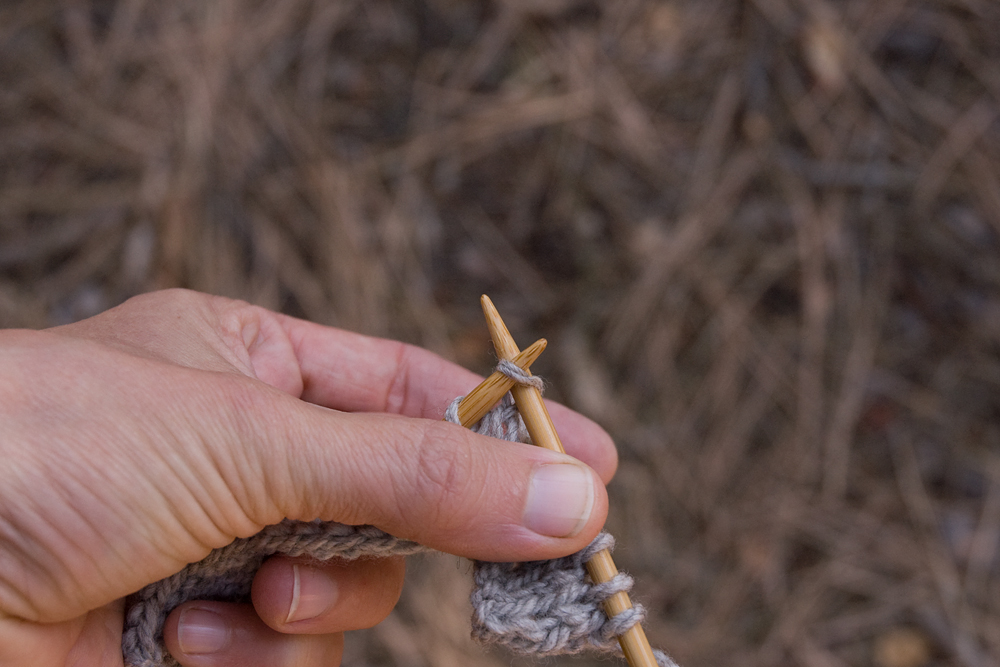
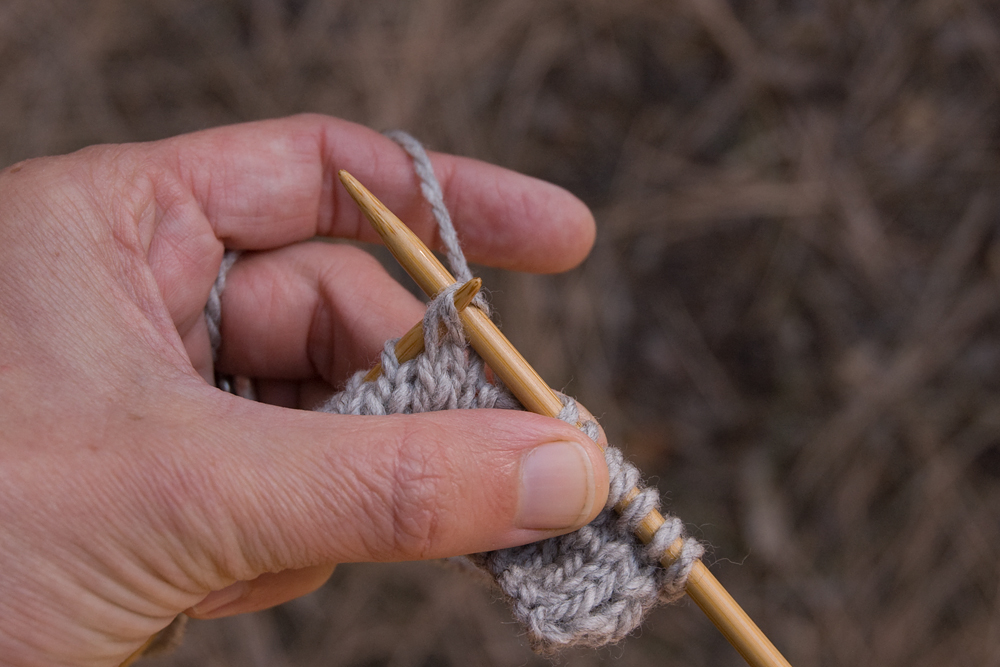
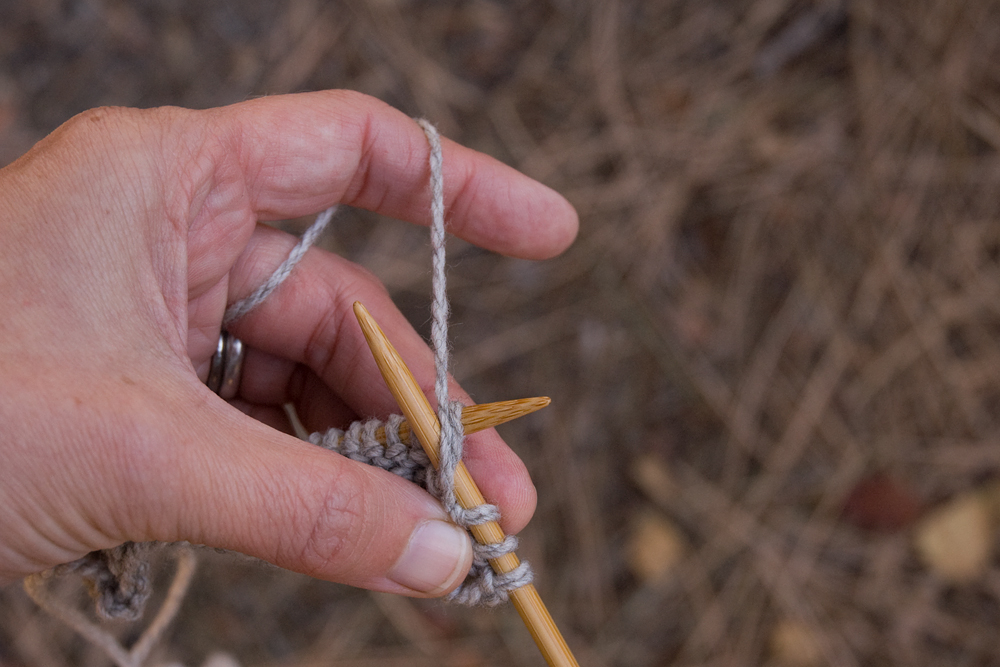
We have knitting needles to hold all the loops we’re still working with until the next row/round, so that they don’t come un-looped. As soon as you put two stitch loops on a needle, they have an orientation, which can be one of only two ways: with the leading side of the stitch (the side which is closest to the tip of the needle holding it) either in front of the needle (closer to you) or in back of the needle (further from you). This is sometimes called stitch “mount,” and the sides of the stitches called “legs,” as if they were riding horses—visualize that if it’s helpful to you.
Leading side in front on the left, leading side in back on the right. We’ll get to the twisted stitches in a minute …
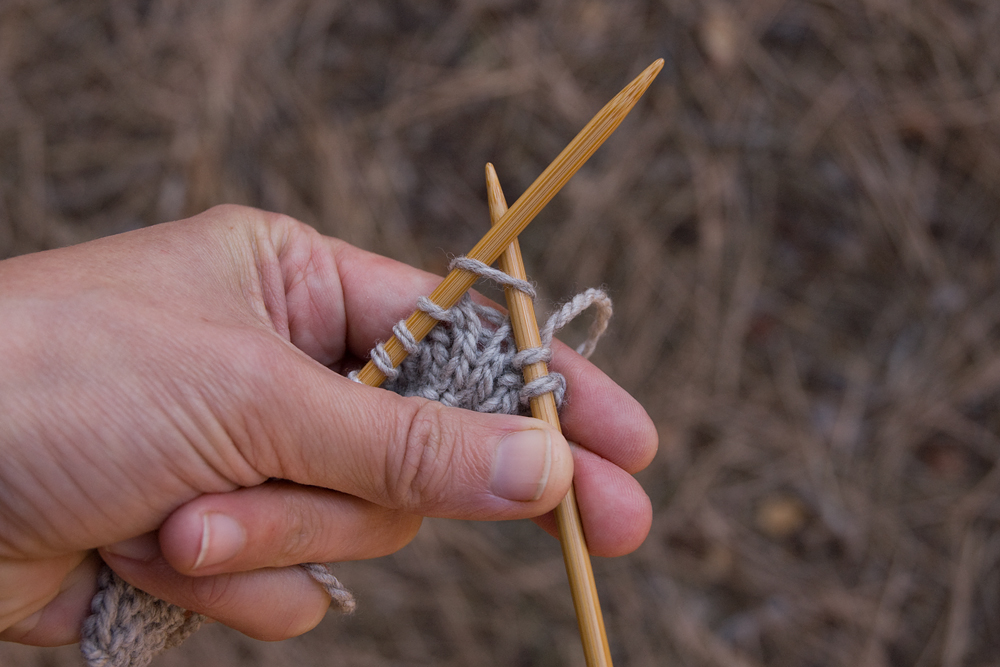
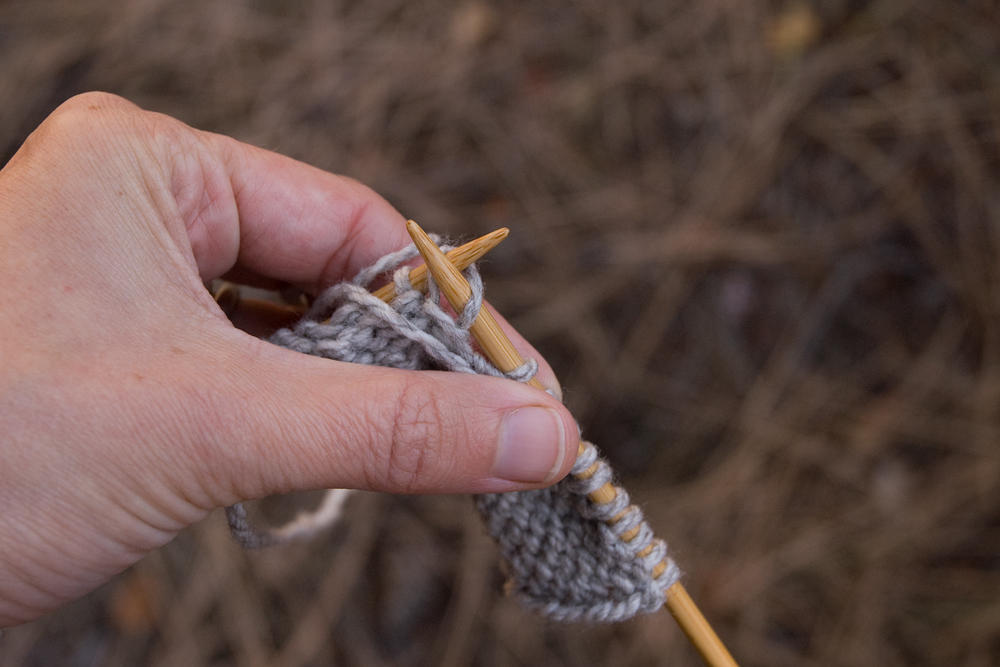
Most American knitters I know expect that the leading side of each stitch will be in front, and most pattern instructions I read assume that it is. With the leading side in front, if you reach the working needle (the needle which is making the stitches, usually the right hand one) into the front of the stitch to knit it, you can see that the stitch is pulled open, and it will make an open, “V” shaped stitch once it is knit. If you reach into the back of the stitch, it feels tighter (this difference is helpful, and noticeable to most knitters even if they’re beginners). If you look closely you can see that the two sides of the stitch are now twisted around each other, and they will remain twisted in the knitted fabric. (Sometimes you want a twisted stitch to tighten up part of your work, but most of the time it’s not the goal.)
Reaching into the front of a stitch with the leading side in front
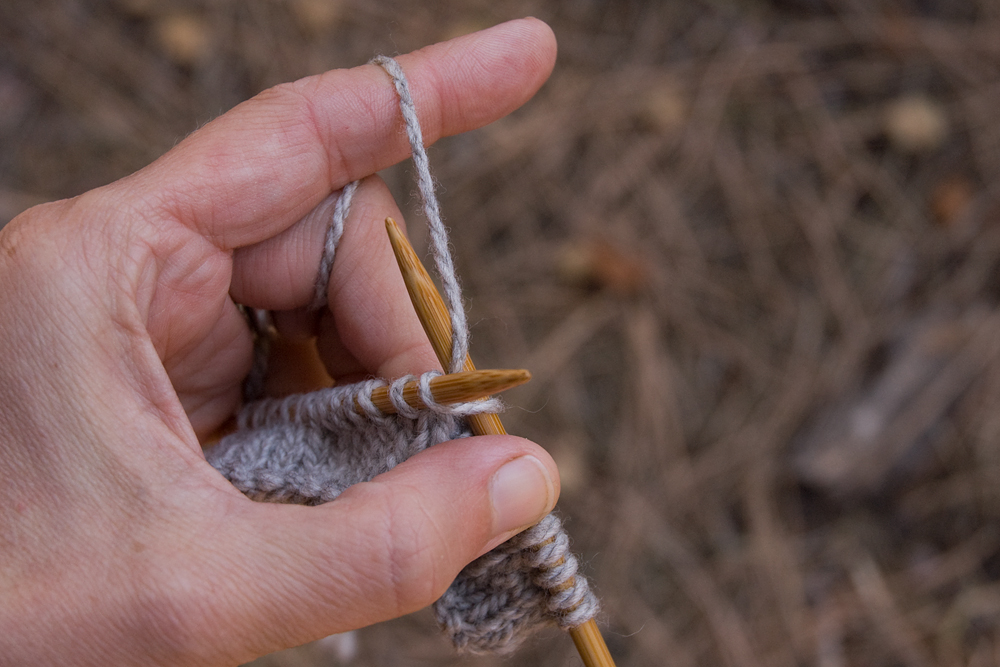
Reaching into the back of a stitch with the leading side in front
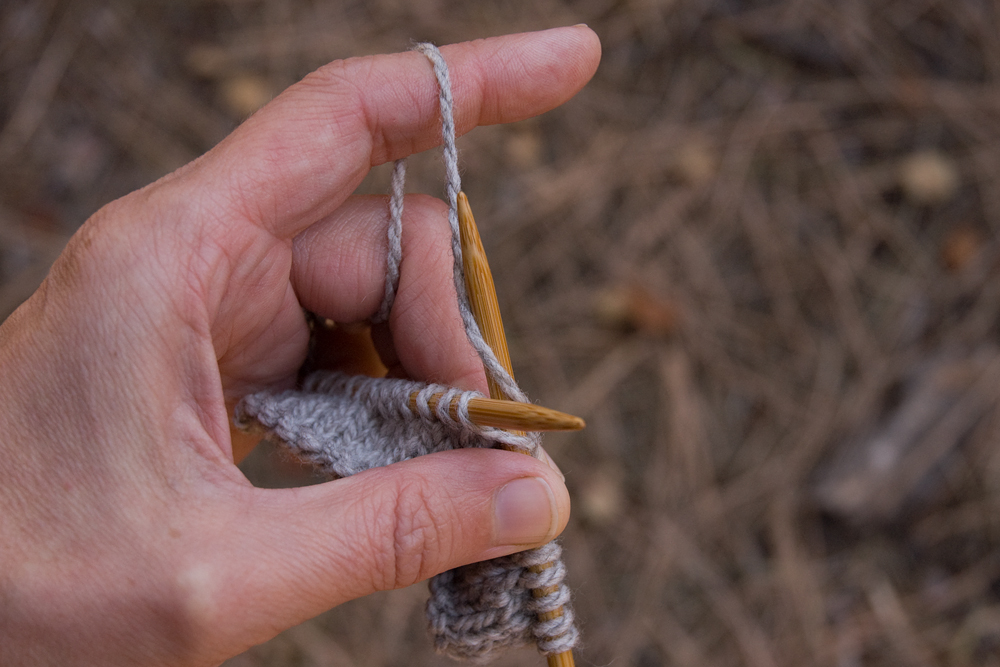
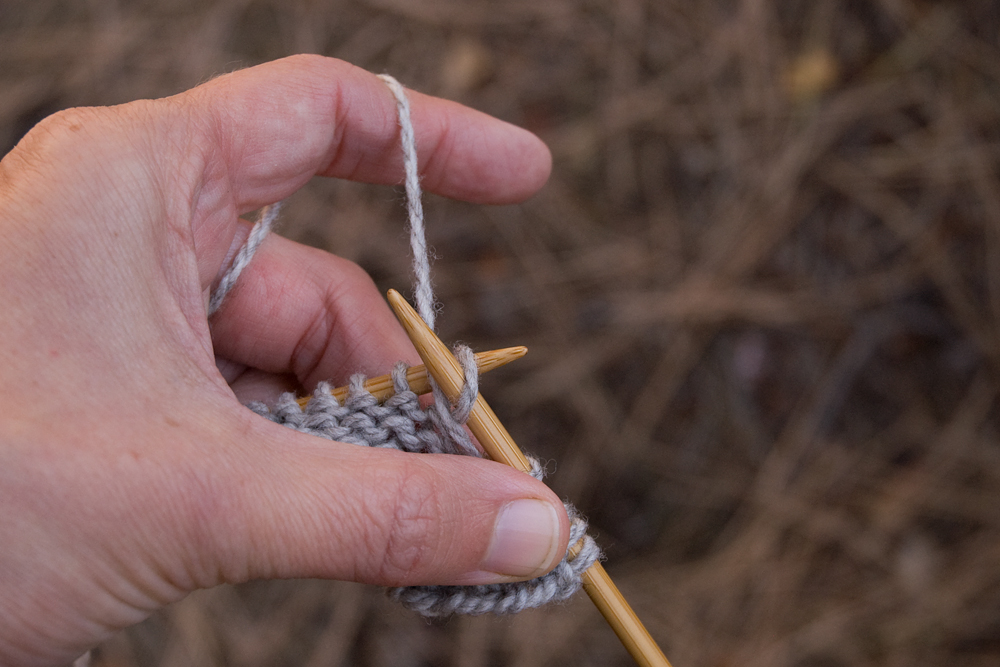
Now look at what happens when the leading side of the stitch is in back. If you reach into the front of the stitch, it feels tight, and the sides of the stitch twist. If you reach into the back, the stitch is open, and will form an open (not twisted) stitch in the fabric. So, it behaves in the opposite way as a stitch with the leading side in front, but the open stitches will be absolutely identical in the fabric. (Side note: twisted stitches formed from these two setups twist in opposite directions.)
Reaching into the back of a stitch with the leading side in back
Reaching into the front of a stitch with the leading side in back
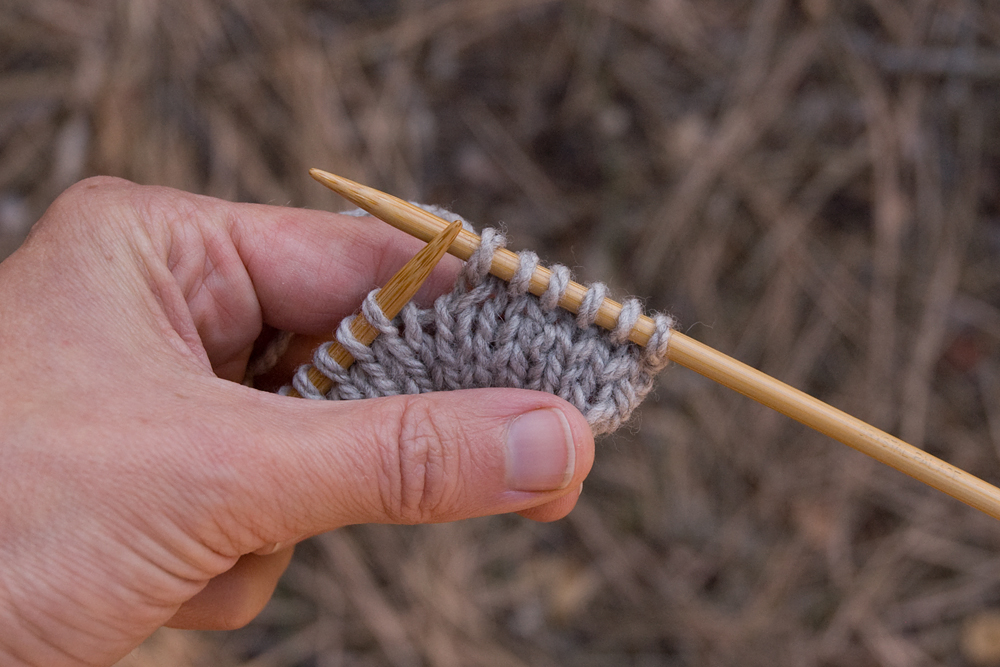
Twisted stitch in the fabric below the needle
We have now discovered a deep truth of knitting: there are only two ways that a stitch can “sit” on the needle, and no matter which way it is, if you knit (or purl) through the leading side, the stitch will be open, and if you knit through the trailing side it will be twisted.
Many knitters first think about these differences when they get to decreases. To Knit Two Together (k2tog),you reach your working needle into two stitches at once, from left to right, through the front of the stitches, and assuming that those stitches have the leading side in front, both stitches will be open,the left one will be on top of the right one, and the decrease will lean to the right.
Knitting two together through the front
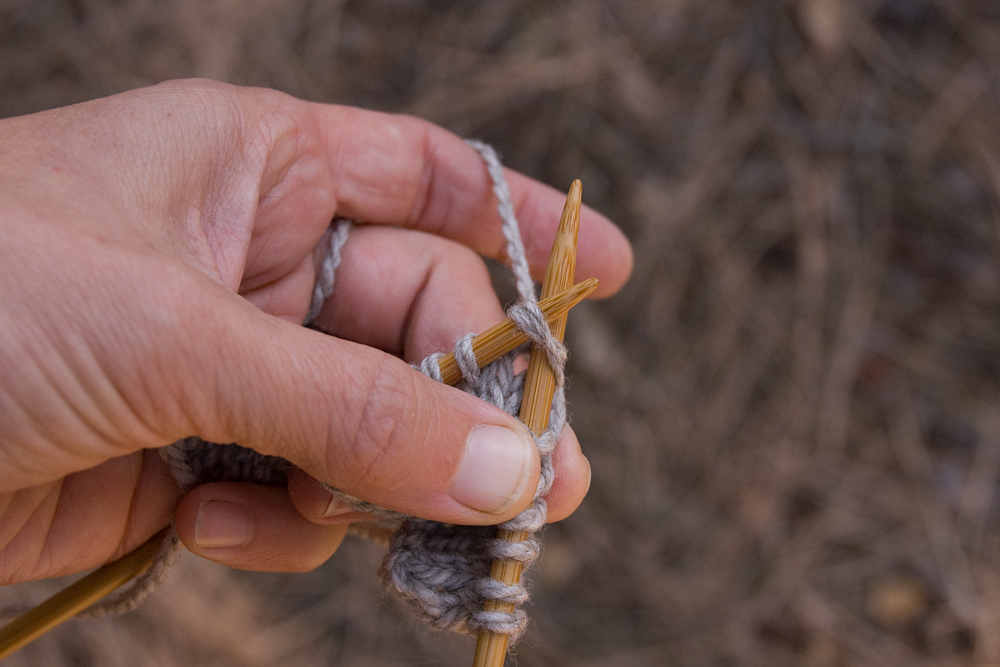
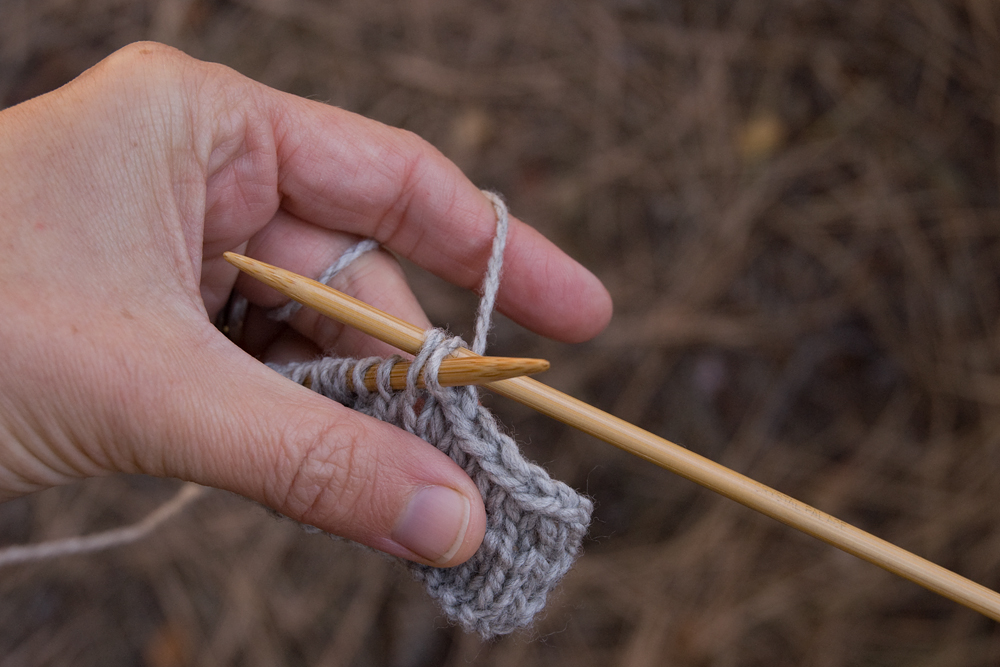
If you want a decrease that leans the other way (so that, for example, the shoulders of your sweater will look symmetrical), you could knit two stitches together through the back, so that the right stitch will be on top of the left one. But if your stitches have the leading side in front, that would twist them both and pull the decreasing stitch really tight. This is the reason for the Slip, Slip, Knit (ssk) decrease—if you slip the two stitches (one at a time) to the working needle by reaching into the front (“as if to knit”), it flips them around so that the leading side is in back. Then you can pass them back onto the holding needle with the needles tip to tip (“as if to purl”), and then you are ready to knit them both through the back, so that both stitches will be open, the right one will be on top of the left one, and the decrease will lean to the left. (If you have knitting in front of you right now, you can see this happen before your eyes.)
Slipping a stitch to change its orientation
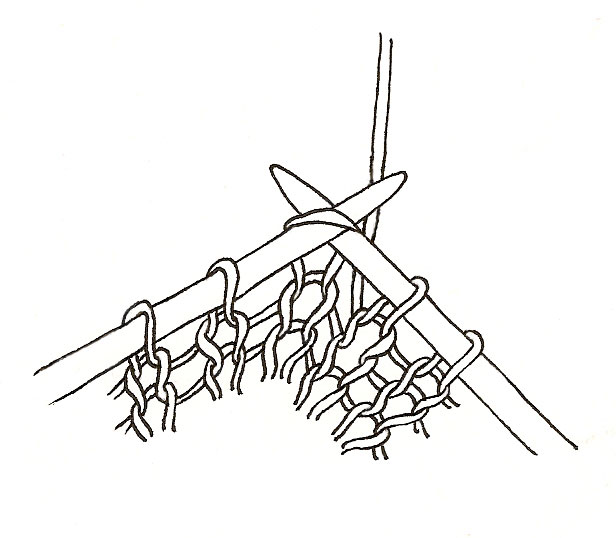
Knitting two together through the back
All of this works if you are making purl stitches rather than knit, it just may look and feel a little funky if you’re not used to it. You can absolutely purl a stitch through the back side. And you can flip purl stitches around bypassing them between needles. My golden rule for this is: if the needles tips are essentially (or could be) pointing them same way as you are picking up the stitch to transfer it, it will flip the stitch around. If the needle tips are pointing towards each other (tip to tip), you will transfer the stitch without changing its orientation.Note that if you reach into the trailing side of the stitch instead of the leading side to transfer it, you’ll twist it, just like when working it. Play around with it a little bit, you’ll see what I mean.
Setup to work a purl stitch through the back side
Ok, are you with me so far? To review: whether a stitch in knitted fabric is open or twisted depends on these two things: which way the stitch is oriented on the needle, and which way it is knit (through the front or the back). To get an open stitch, always knit or purl through the leading side of the stitch. It’s easy to re-orient the stitches to get the effect you want, by flipping them around with the needles.
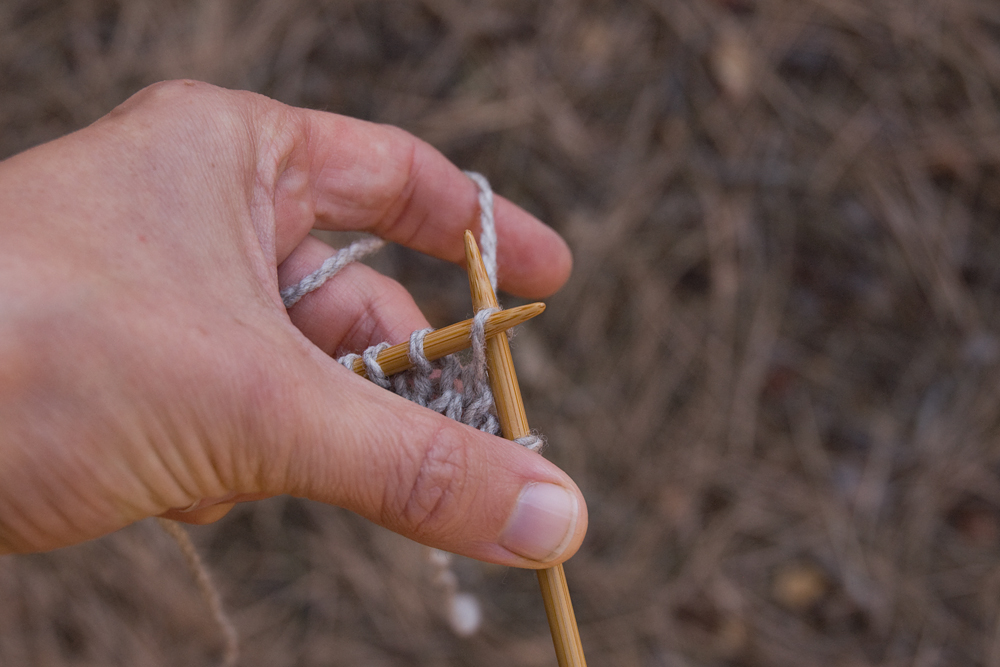
Fair enough, you may think, but how do the stitches get to be oriented one way or another in the first place? Don’t they all just appear with the leading side in front? Excellent question. You may have noticed that there are also two (only two) directions in which you can wrap the yarn around the needle as you make a new stitch. If you’re reading this in the US, you were probably taught that the “right” way to knit is to wrap the yarn from under the needle to the front and over the top (counterclockwise if you are looking at the tip of the needle), and the right way to purl is to bring the yarn from the front up over the top of the needle and down (again counterclockwise).
The wrapping direction applies whether you knit by holding the yarn in your right hand and throwing (English style) or by holding it in your left and picking (Continental style). In the photos below, I’m holding the yarn on the left, but it works with either technique. Even in Portuguese knitting, it may look different, but there are still two ways to wrap the yarn!
Setup to knit a stitch, wrapping the yarn counterclockwise
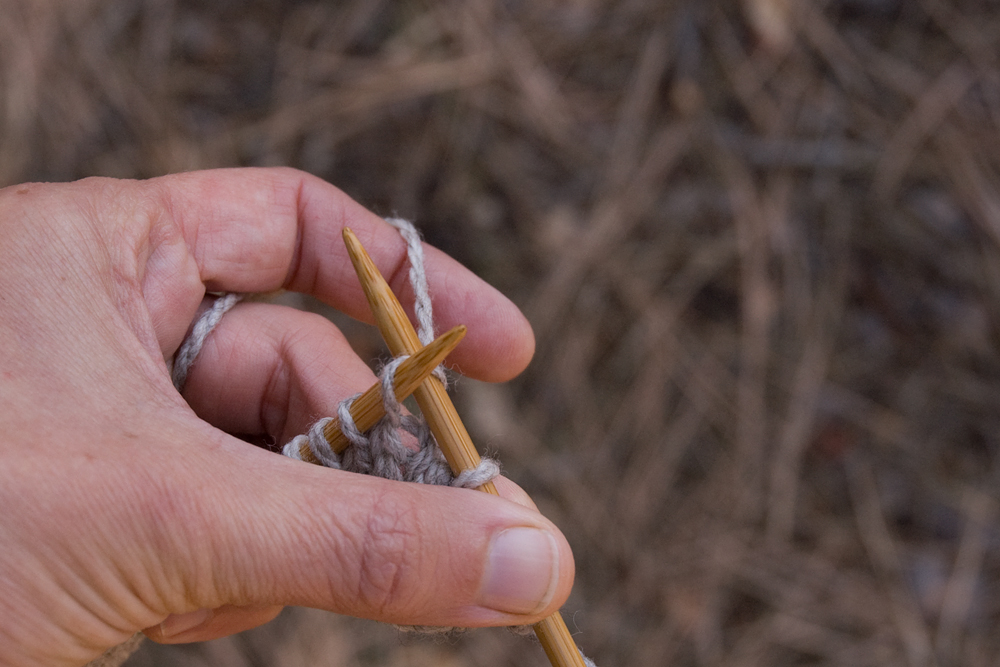
Setup to knit a stitch, wrapping the yarn clockwise
Here is our second deep truth of knitting: if you wrap the yarn counterclockwise, your new stitches will come out with the leading side in front. If you wrap the yarn the other way (clockwise as you look at the needle tip) when knitting or purling, your stitches will come out with the leading side in back.
(If you had rows, or parts of rows, of mysterious twisted stitches as a beginner, inconsistent wrapping direction followed by not noticing that the stitches were different is probably why.)
Here is where combination knitting comes in. If you knit Continental style, by holding the yarn on the left and picking the stitches from the tensioned yarn, you may have noticed that it’s actually a lot easier to form purl stitches by bringing the working needle in front of the yarn and just pushing it away from you through the existing stitch. This wraps the yarn clockwise around the needle tip, meaning that your stitches for the next row will have the leading side in back. Which is no problem now, right? Just knit them through the back, and they will come out open just like you want them to.
Setup for Continental purl stitch, wrapping the yarn counterclockwise
Setup for Continental purl stitch, wrapping the yarn clockwise
I learned about all this not long after I started knitting, from reading the excellent book Knitting in the Old Way by Priscilla Gibson-Roberts and Deborah Robson. There’s an explanation and handy illustration in the Knitting Methods chapter which shows “Western” style (leading side of the stitch in front), “Eastern” style (leading side in back), and a combined style. The combined style made sense to me, so I used it. Later I learned about Annie Modesitt, probably this era’s biggest champion of combination knitting—and a vocal supporter of the fact that there’s no wrong way to knit. (According to Annie’s blog, it sounds like she’s having an awful time lately. I certainly wish her a quick-as-possible recovery and all the best.)
Knitting in the Old Way also gives a fairly elastic bind-off method which I used for just about everything when I started knitting. It’s easy, and I still like it! All you do is knit two stitches together, then pass the resulting one stitch back to the holding needle, knit it together with the next stitch, and repeat. What it took me a while to realize is that I particularly like the look of this bind-off when the stitches are oriented with the leading side in back and knit through the back—that way they lean gracefully in the direction the bind-off is progressing (towards the left, like an ssk decrease) and make a nice series of open “Vs” along the bound-off edge.
Knit-two-together bind-off, worked through the back
Pop quiz: say you are knitting along with the leading side of your stitches in front, and you want to make this bind-off with the leading side in back, what should you do? As usual, there’s more than one correct answer. You could flip the stitches around one by one with the needles as you come to them. Or, you could wrap the yarn clockwise as you work the stitches of the row/round before the bind-off, so that the stitches come out with the leading side in back already!
I’m guessing that all this still seems confusing if you’re new to it, but I promise it gets much more intuitive after you knit with these ideas in mind for a little while. At this point, I can honestly say that I don’t even consciously notice which way a stitch is oriented when I come to it, my hands just put the needle through the front or the back as needed.
Considering all the variations in knitting style that folks use, before we end here I want to put a vote in for patterns to say “twist the stitch” instead of “knit through back of loop” and “work a left-leaning decrease” instead of “ssk.” Really, it would be so much clearer, and more understandable for those who knit in different ways from the American “standard” way. I will try to follow this principle in my own pattern writing.
Speaking of which, have you seen my Cloudscape Hat pattern? It was in part the inspiration for writing this post. I’ve shared my approach to these fundamentals of knitting in various classes, tried unsuccessfully to get a couple of knitting magazines which you’ve heard of to publish it (Really! Can you believe it?), and finally decided just to put it out here.
As Michel Garcia says about natural dye knowledge, are we going to build a wall around what we know and keep it jealously for ourselves, or are we going to share it freely in the belief and hope that it will grow and flourish as more people are exposed to it? Certainly I think this knowledge is incredibly useful to anyone who knits. If you find this post worthwhile, please share it! Wouldn’t it be great if it got more notice here than it would have in a magazine …
Are you ready for a radical anti-consumerist statement? Here goes: I have enough clothes. Now, this isn’t a terribly original radical idea, even among other makers & sewists (for one, Felicia wrote eloquently about it last summer). But it’s an idea that I’ve been rolling around my head for a year or so now, mulling over where I’m going with it, and I think I’ve made some progress.
Roughly six years ago, without really telling anyone about it, I decided that I would get the clothes I needed in my wardrobe by making them instead of buying them. At the time, I needed quite a bit. For winter wear I remember having a total of two long sleeved knit shirts, both plain cotton not-great-fitting ones from the thrift store. Situations like that were part of the reason I went handmade; I was frustrated looking for ready-made clothes I liked that I could afford, and tired of feeling like most of what I wore didn’t suit my personality or my life. Me-Made-May was also essential in getting me going in this direction. Before we move on, I want to acknowledge that it is a great privilege to be able to choose warmer and better-looking clothes. While I’m not always sure what to do with that knowledge, it seems important to say it, and I do think that just acknowledging it helps me be more grateful and mindful of what I have, and encourages me to take care of things and not take them for granted.
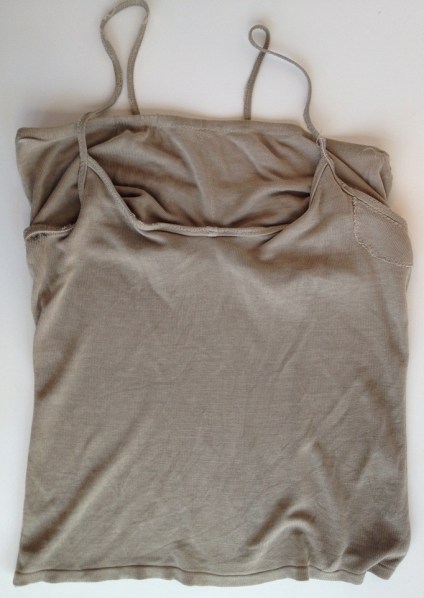
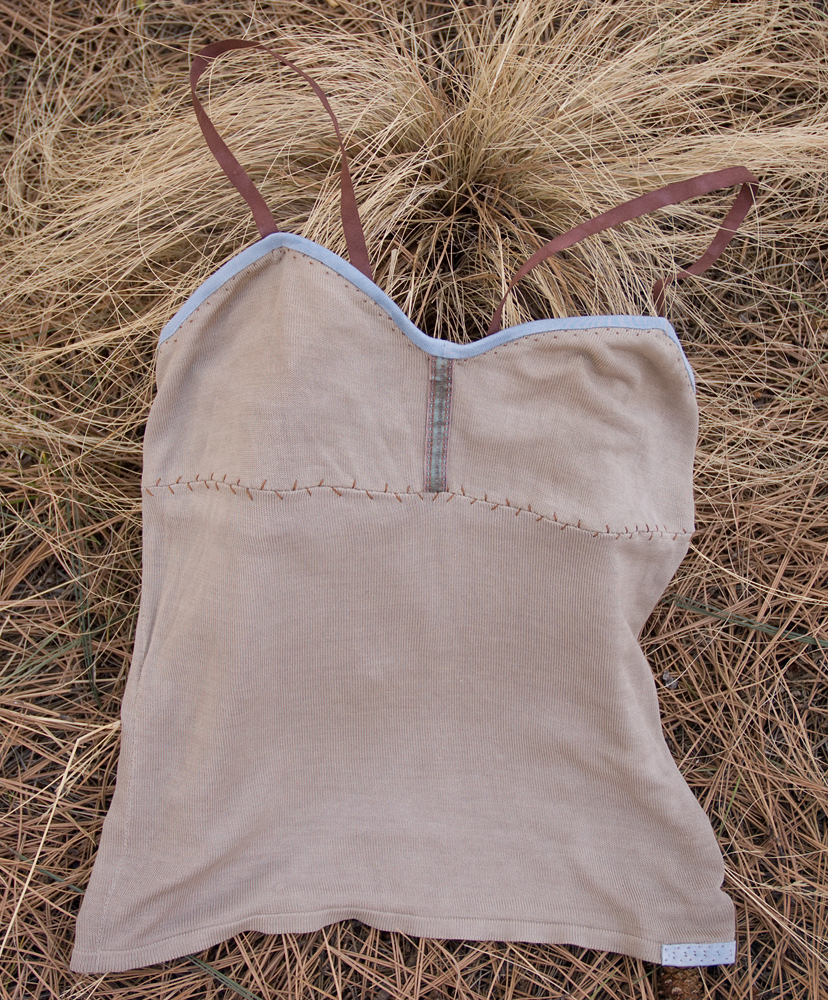
This was an old silk cami with a shelf bra inside, made from a thrifted top. As you can see, it had a lot of wear and had already been patched once. But there was still enough sound fabric between the body and the shelf to reconstruct a different cami (below). It’s certainly arguable that this was too much work, too much hand stitching, for a garment which realistically is made from worn fabric and has a limited life expectancy. And yet, it gave me a lot of freedom to experiment, and a functional garment …
So back then, I just started sewing garments, beginning with what I needed most, and then moving to the next-most-needed thing. It worked—I slowly but surely built a wardrobe of clothes I love, which covers just about any situation in my life. The new things have been mostly me-made, with a few lucky thrifted/gifted pieces mixed in. It certainly helped my progress that I already knew how to to sew (and knit), that I was already thinking about how my style reflects the way I want to be seen, and that I had a fair amount of fabric stashed away (although I certainly acquired more for specific projects).
Because I came into my personal wardrobe sewing revival from a place of making what I really needed, it was unavoidably obvious when I got to the point of not needing much. It’s been a gradual but ultimately fairly profound shift for me; from having a new garment in progress most of the time, to focusing more on slower projects, mending, and keeping my wardrobe in good shape.
These handknit socks I got from a friend quite a while back are my longest-running mending project. I just can’t give them up. All but one pair are still going.
At first, I was a little conflicted about all this. I thought I might miss sewing things from fresh fabric, or maybe more truthfully that I would miss dreaming things up to sew out of fresh fabric. But, as Jess pointed out, there’s no reason not to keep dreaming. After all, just a small percentage of the garments I imagine ever get sewn, no matter how much I’m actually making. Also, it turns out that for me anyway, it’s just as satisfying to dream up ways to re-make things that have been languishing in the back of my closet or in the “try again” basket. And it’s not that I am making nothing new. Right now I am knitting socks (the world’s slowest pair since I’m only working on them when traveling, plus I keep changing my mind and ripping out the heel …), spinning yarn which will become a sweater in its own sweet time, and plotting a new shirt from my natural-dye-printed fabric. And, I’ve just realized that neither my newer purple corduroys nor my blue cotton pants are really presentable for outside wear anymore—there will always be things to make!
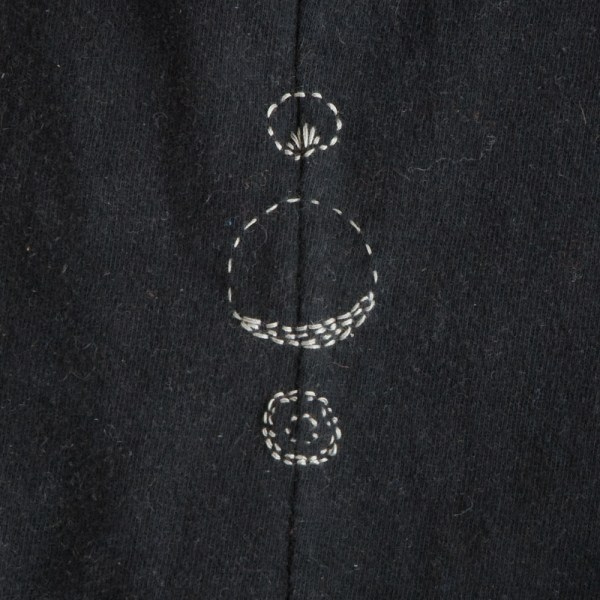
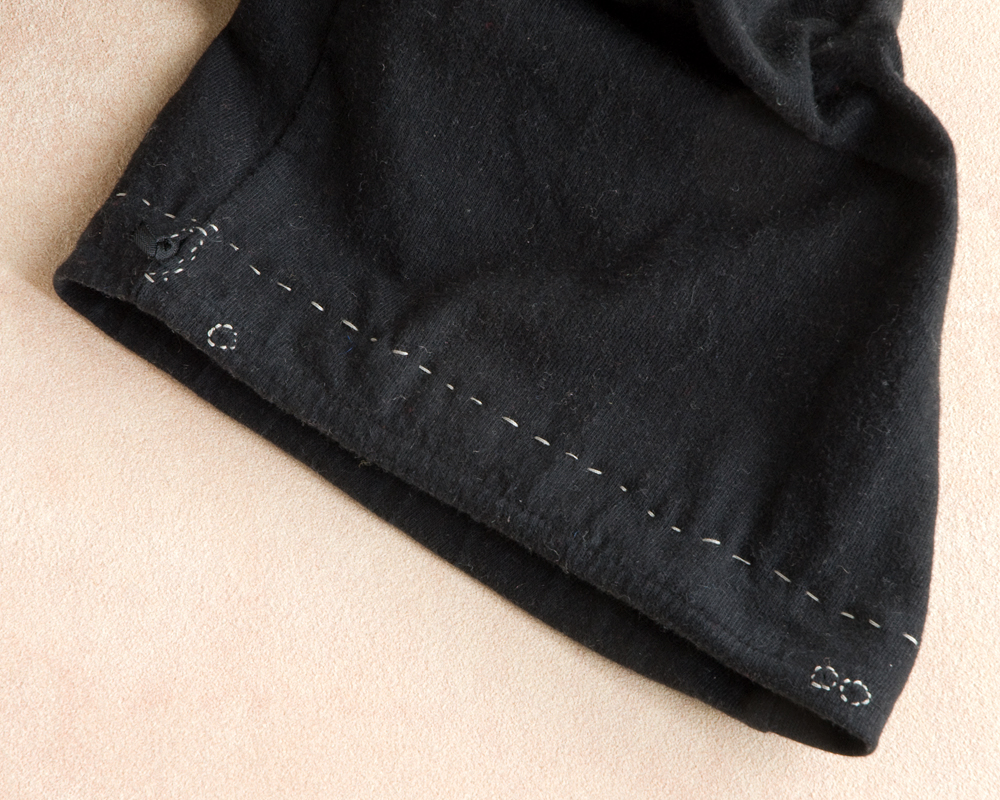
But for the most part, my sewing lately has been directed towards keeping my existing wardrobe going, making it better, and adding in the next level of that message I want to send when people see what I’m wearing. At some point it occurred to me that while I know I’m wearing handmade, anyone who sees my clothes (especially if they don’t sew) will just assume that I bought them somewhere, like “everyone” does. In fact, many a sewist’s goal has been to make clothes that look “just as good” as store-bought ones. Well, I’ve decided that I’d actually like people who see me on the street to think to themselves, “Hey, I wonder if she MADE that … or someone did …”—in a good way, of course! I’m interested in adding more hand stitching, more hand-dyed fabrics (and eventually handmade fabrics?!), and definitely interested in wearing visible mending proudly on the outside of my clothes.
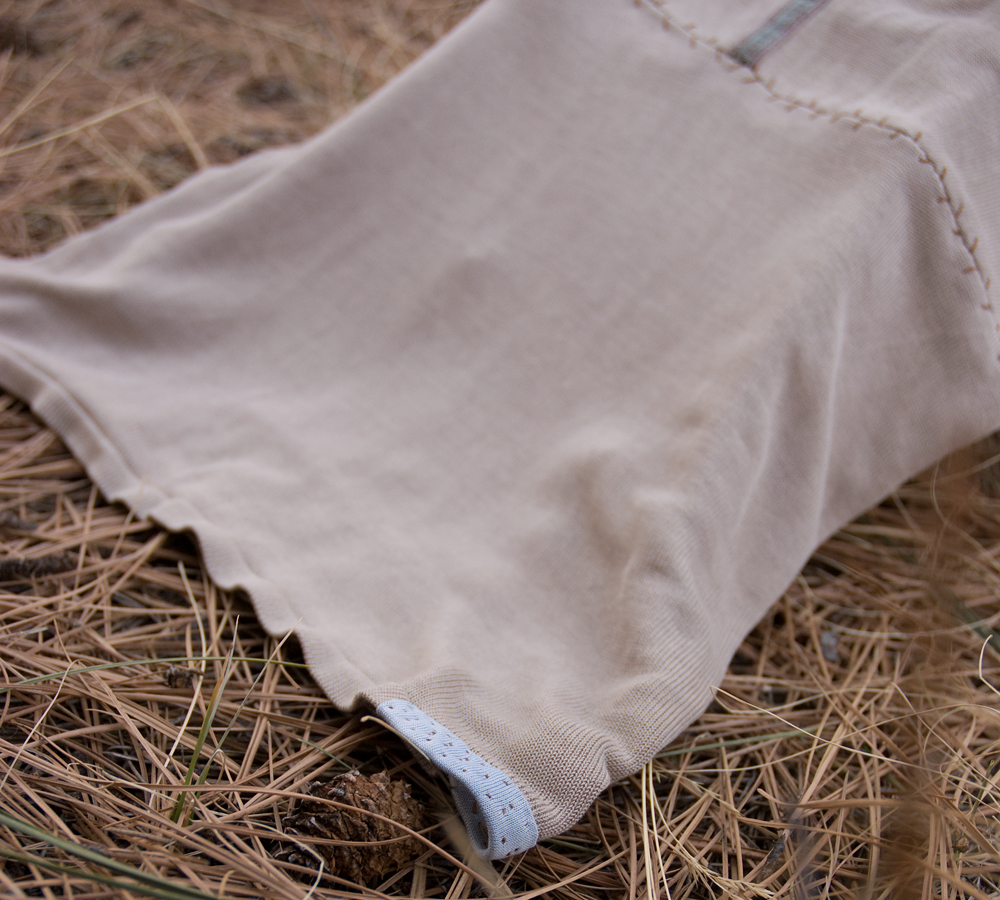
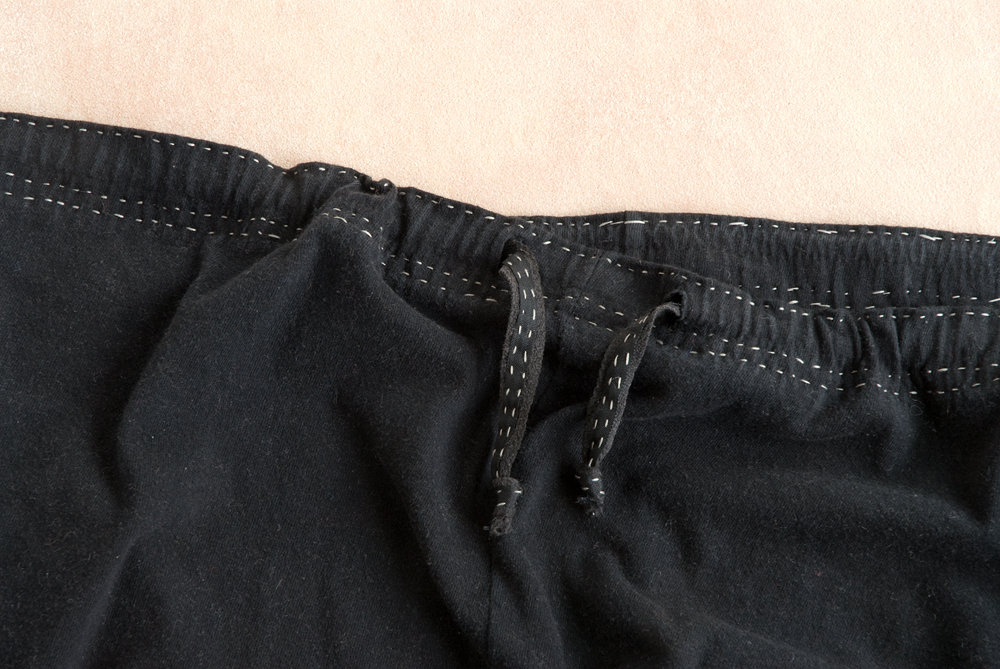
Rather than making a new pair of PJ pants when I needed some recently, I decided it made more sense to revamp a pair that Bryan wasn’t wearing. That meant getting rid of crumbling elastic, and adding enough hand stitching that they felt like “my new comfy beautiful PJs” rather than “this hand-me-down thing I’m stuck with.”
This downshift in sewing fits in really well with other shifts in my life over the past couple of years. A lot of my creative energy has been and is now going into thinking about natural dyes, fibers, and fabric printing. As I’ve taught those skills more widely, I’ve been working hard to learn all I can and improve my process. (It’s the biggest, deepest, best rabbit hole of research and experiments I’ve ever been in.) I’m teaching mending more too, so it’s been perfect timing for me to take on mending my own wardrobe as more of a deliberate project, seeing how far I can push things and what I will learn by continuing to choose “fix it” over “rag bag.” As much as I am devoted to other textile arts, it pops into my head over and over again that mending is probably the most valuable, most potentially world-changing thing I could do, show, or teach. (Come join me! New classes recently added.)
I think it’s also worth noting that I’m more comfortable in this stage of my evolution as a maker because of the type of maker I am. While I certainly try to master the skills I take on, every textile technique I learn about fascinates me, and I’m always ready to expand my horizons. So spending less time sewing ultimately means I’ll have more time for dyeing, spinning, maybe some weaving, or to try something else entirely new—a bonus in my book.
This blog has evolved with me, and I want it continue to do so. I have plans to start sharing some of what I’ve learned about natural dyeing here, as well as whatever else comes up. So for now, a happy season to you, whatever yours may be. (The monsoon rains just started here, and I am so very grateful!)