News April 2016: Flag Wool and Me-Made-May

Hi everyone!  Just a couple of quick things today.

First off, I’m teaching at my hometown wool festival Flag Wool and Fiber again this year, and it’s coming up: June 4 & 5.  I’ll have a brand new class on modern free-form embroidery, and I’ve really been enjoying researching and brushing up my stitching skills for that. I’m also doing a “Knitter’s Toolbox” class that’s intended to take your knitting to the next level. Click through to the festival’s site to read more about both classes.


knitter's toolbox


Second, it’s almost Me-Made-May!  After some debate I’ve decided to pledge to wear only me-made (not just -altered or -repaired) garments this year, with a few exceptions: raincoat (not about to try making one when I have an almost-new one), socks (not enough me-knit ones yet), and then there’s a jacket which I would love to finish by May … but it might very well not happen, so I left myself a little wiggle room (if it’s cold enough for a jacket I’m wearing one, me-made or not).

We’ll see how this goes.  I’m not sure that I’ll feel more self-sufficient wearing only things I cut from scratch rather than things I altered or fixed so I could wear them, and I’m pretty sure there are a couple of garments I’ll miss wearing.  But this pledge seemed like the next logical step in the wardrobe direction I’ve been headed, and I’m curious to see how I end up feeling about it and what I’ll discover.  I’d also like to share (most likely on Instagram) a little more of my MMM than I have in the past couple of years.  Even though that can be hard on the road, I’m going to try.

And launching soon, a project which is actually a fusion of the two items above—I hope you’ll stay tuned!

Fire and Succotash


succotash 1


So here I am again!  And with a recipe as promised earlier.  I was holding onto this post until Bryan’s post on the Fires of Change blog went up, so that all of you not in Flagstaff could get an idea of what heck was absorbing all the energy around here in August/September … the post explains his thoughts and motivations for the new work, and even includes a making-of video with some footage shot by yours truly—ha!

And, how about some succotash?  I admit that we’re about done with fresh beans and corn here, but who knows what’s fresh where you all are … we actually snagged what’s probably the last fresh corn and black eyed peas of the season at the farmers’ market yesterday, so we may have one more variation on this in the coming week.  I snuck in these photos here and there over the past month or so.  It also includes my favorite tips for prepping fava beans—how I love them (I love the black eyes too, what is it about peas?).  Here’s to a last taste of summer for those of us in the northern half!
 

Shelling Fava beans:

Favas do take a little extra work, since you need to shell them twice, but I think the flavor is well worth it. Especially in the second shelling, this is one of those times when being efficient with your hand motions makes a big difference—the difference between a task that feels tedious and one that’s very doable.

Start some water to boil in a medium-size pot on the stove. Split the thick outer pods and pop out the beans. When the water is boiling, drop in the beans. Boil just until they all float, about a minute or two. Pour them into a colander, and either pour a little cold water over them, or just wait until they’re cool enough to handle.

Boiling softens the inner shells covering the beans—they’ll be opaque whitish-green and leathery. They’re not very tasty as you can imagine, which is why we’re taking them off. My favorite way to do this is to use one hand to grab a bean, and hold it over a bowl to collect the shelled ones. Pinch a tear in the shell with the other hand, and use the first hand to squeeze the bean so it pops out of the shell and into the bowl. Reach for a new bean with the first hand at the same time the other hand drops the shell into a compost/discard pile. Repeat.


succotash 2


A quick note on cutting corn off the cob (as long as we’re talking about prepping veggies): any time I try standing the corn up and cutting off the kernels on a flat surface, it makes a humongous mess, which only makes me like this task less. Lately I’ve been holding the corn cob over a big bowl (with fingers as far towards the bottom of the cob as possible) and slicing off the kernels with a knife across the top. I know it looks like I’m about to cut my finger off, but I haven’t come close to that so far …


succotash 3


Fava Bean or Fresh Pea Succotash

Fittingly, this is mainly Bryan’s recipe. He made various iterations of it last summer, after we ate something similar at Riffs (highly recommended when in Boulder, CO). This makes a generous portion for two, or a side for more.

Prep 2 lbs unshelled fava beans (see note above). You can also use fresh shelling peas, starting with about 1 lb unshelled. Shell them and then steam briefly, until just bright green, before adding.  I would treat fresh black eyed peas the same way as green shelling peas, except they won’t turn green when you steam them, so taste to see when they’re just barely tender.  Lima beans, or any other favorite kind, would also be delicious here. You want to end up with between 1 and 1 ½ cups of beans/peas, depending on the balance you like. I like more beans.

Cut kernels off 3-4 ears of corn, to yield about 2 cups.

Melt 2 Tablespoons butter in a skillet over medium heat. It seems like a lot, but the buttery, slightly salty flavor here is key to offset the sweetness of the corn and make a really lovely contrast.

Sauté ½ of a yellow onion, diced, in the butter until it’s translucent and starting to brown.

Add 2 cloves of minced garlic.

Then add 2 chopped roasted red peppers, either sweet or slightly spicy.

Sauté for a couple of minutes, then push all this to the sides of the skillet, and add the beans or peas to the middle. Cook until they’re barely tender. Stir everything together, and then push to sides again.

Turn up the heat to high, and add the corn to the middle of the skillet. Leave it alone there for a couple of minutes while you sprinkle 2 teaspooons of fresh herbs on top—we like mainly thyme, but you can use a little sage or oregano as well.

Ideally the corn will get slightly browned, but in any case taste it and when it’s barely done, turn off the heat, stir everything together. Sprinkle with salt (we use unsalted butter and about ¼ teaspoon salt) pepper, and smoked paprika if you have it for a little smoky/spicy flavor. Taste for seasoning.

Top with shredded fresh basil, and enjoy while still warm!


succotash 4
Succotash in the wild with another summer favorite, any variation on the (water)melon and feta salad from Plenty.


I’m in a Fashion Show at Flagstaff Photography Center


FPC Fashion show poster

Look, my name is on this poster!


I know what you’re thinking, I’m too short to be a model – but it’s not like that!  Actually, there’s an eclectic show at FPC this month, celebrating fashion, photography, and the intersection between art and what we wear, and featuring some of my work!


4 bags photo fashion


If you are in town, come by, I will be there this Thursday night for the fashion forum, and Friday during First Friday art walk.  I have a lovely selection of one of a kind purses, scarves, and wallets in the show, all made from recycled and handmade materials and totally unique!  Plus the work of four different photographers, and some totally wild and amazing macramé masks made by Sheree.


4 scraves photo fashion


If you’re not near Flagstaff, I’ve also been working feverishly on my latest project, which will be available worldwide, very soon if all goes well!


All’s Well That Ends Well, but Please, Don’t Put Your Wool in the Washine Machine


viola outfit 2


At one point, I considered not writing this post at all, because I’m pretty embarrassed about how this skirt got to the point where it needed remodeling in the first place.  But in the end, there was no way to not write about it, especially since I ended up wearing this once-shameful skirt to dressy Flagstaff event (maybe the only dressy Flagstaff event? We always joke that people here wear jeans to everything) . . .

I made this skirt, as near as I can figure, about 10 years ago!  This was a time before I knew much at all about wool, other than the basics; it comes from sheep, it’s been used since ancient times, people say it’s lovely, etc.  It may be worth pointing out that this was also years before I had felted anything, on purpose or otherwise.  You probably see where this is going.  I put a sample of the fabric though a normal cycle in the washing machine.  Nothing happened, the fabric looked just about the same as when it went in.  “Great!”  I thought.  I made up the skirt using the Folkwear Walking Skirt pattern, one I love and have used a lot.  And, I continued to wash it in the machine.  It never went in the dryer, thankfully, or what happened next probably would have been a much shorter process.  As it was, the fabric continued to look like nothing happened, for many years, for dozens and dozens of washes.  But eventually, all that agitation inevitably started the fibers felting together.  By last winter it was impossible to ignore.


pinstripe skirt remodel 1


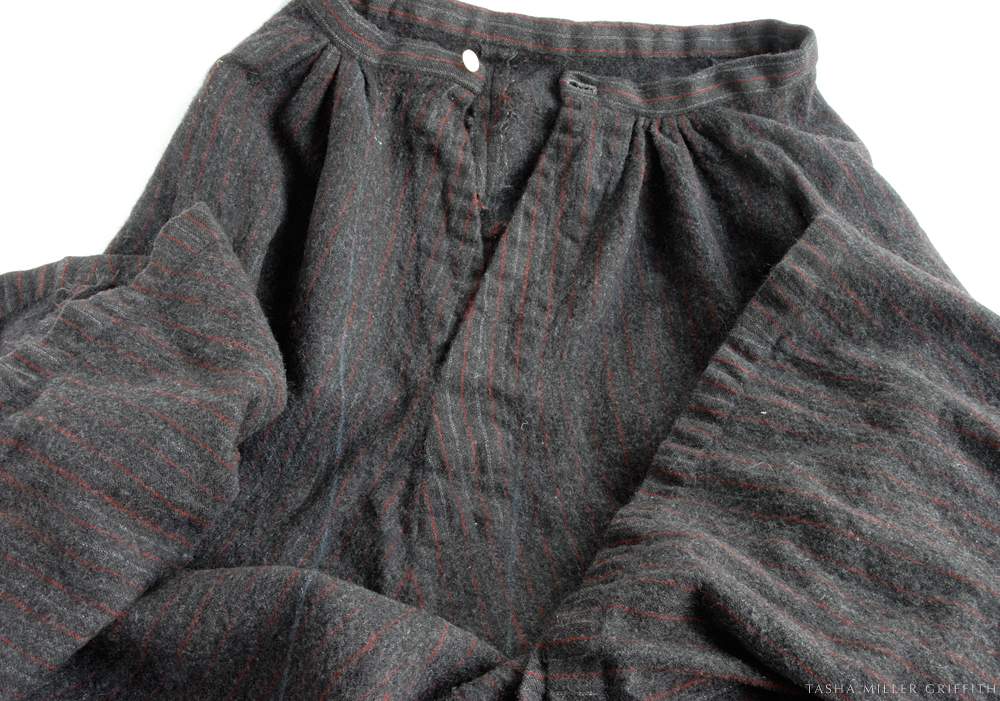
Since I now know quite a bit about felting, once I could look past my obvious horror since I had ruined some lovely fabric, I found it fascinating that the places on the skirt where small parts of the fabric were stitched to each other (the waistband, hem, and back placket) were still unfelted, while the big skirt pieces were noticeably felted, thicker and fuzzier.  Actually, it was the contrast between the two parts that made the skirt look weird, especially the unfelted hem, which looked almost gathered against the felted skirt.  My current theory is that since the hem and placket fibers couldn’t move as much, they couldn’t interlock to felt like the others did.

The skirt sat in my to-fix pile until I figured out a plan, actually a pretty simple one, which I think is essential to not spending inordinate amounts of time remodeling something.  I would cut off the not-as-felted hem, waistband, and placket, fit the remaining felted skirt to a wider and lower waistband facing, make a new placket, and re-hem it.  Above you can see my chalk lines for what to cut in the back, I continued the line of the wider side of the placket down to the hem, and cut a symmetrical amount from the other side of center back, to keep the back pieces the same size.  I got little pieces of felted fabric to use for my new placket from the extra cut off below the old placket.


viola outfit 3


While I working on this project, I was also trying to figure out what I would wear to the Viola awards.  They’re Flagstaff’s yearly art and science awards for teaching, exhibits, and community outreach, and they throw a big Oscar-like party to give them out.  Bryan was nominated for one this year, for the exhibit of his In a Big World Wandering work, for which we also made the giant silk cyanotype.  I’d never been before, and I wondered what would everyone wear, what should I wear, should I borrow something, is it more like a costume party, should I wear something shiny?

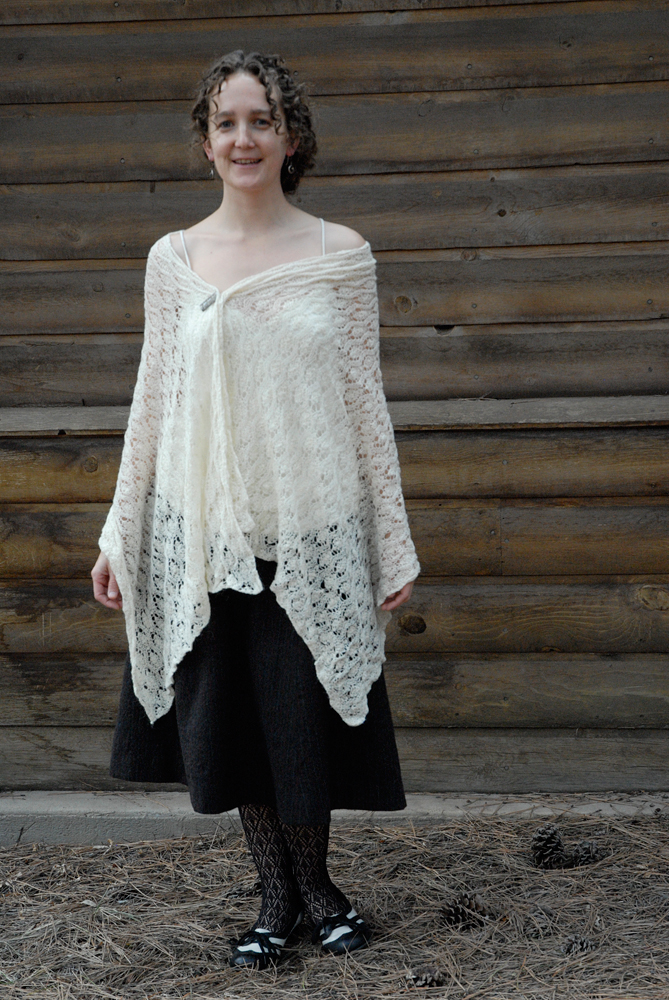
I am not a shiny person.  In the end, I decided not even to go to my friend’s and try on formals to borrow, but instead to wear something that reflects who I really am.  Not only that, but I realized I could actually wear the lovely tailored skirt I was working on – if I went ahead and finished it!  I took the photos of my outfit right before we left, and I think you can tell I was pretty thrilled with my decision.  If what we wear tells everyone we meet a lot about who we are and where we stand, shouldn’t it be even more important, at an event where people are actually paying attention to my clothes, for me to wear something that shows my values and my heart?


pinstripe skirt and top


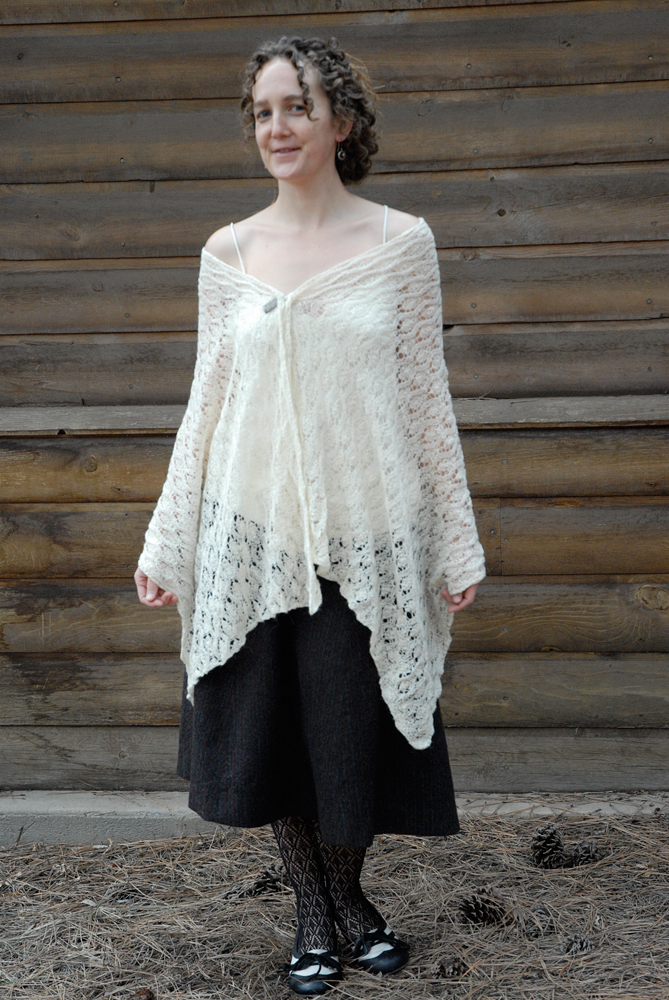
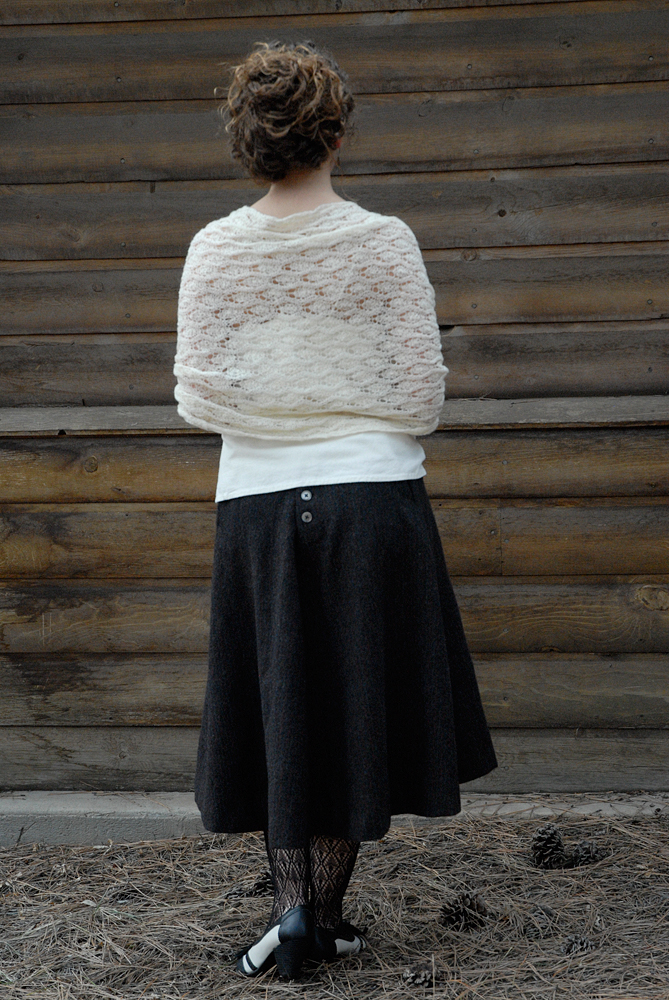
So I wore the rescued skirt, in it’s newly tailored glory!  Note the buttery folds.  And a nubbly cream silk tank top I made to wear to a wedding last year (same copied pattern as this linen one) which has proved more useful than I thought it might.  The shawl is something I started knitting for our wedding, realized would never be done in time, and eventually finished later.  (It’s a longer and wider version of the Fiber Trends Cocoon Lace Wrap, in a wool/alpaca blend lace weight yarn.)  It’s drapey and surprisingly warm, enough to keep me comfortable outside while I took the photos.  The pin holding it closed was my grandmother’s.  I didn’t make the tights or shoes, but I still love them . . . topped off with my winter coat, and I felt like I had stepped back to the ’40’s.


bryan and tasha viola photo booth


Proof that we went and I wore this outfit!  If you are curious what others wore, or what the event looked like, there are lots and lots more photos on the Facebook page for the organization.   We didn’t win (Bryan’s photo exhibit was up against the opening of the Discovery Channel Telescope!  And the winner, a recycled art exhibition that’s been going strong for 10 years here) but it was a really fun party, and I got lots of compliments, especially on the shawl.


pinstripe skirt remodel 2


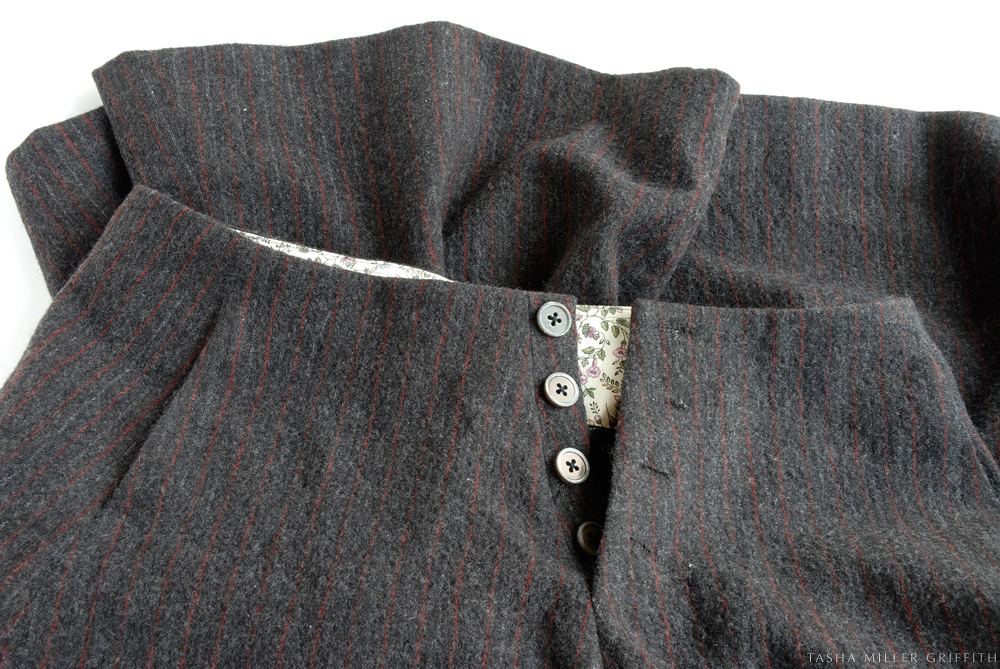
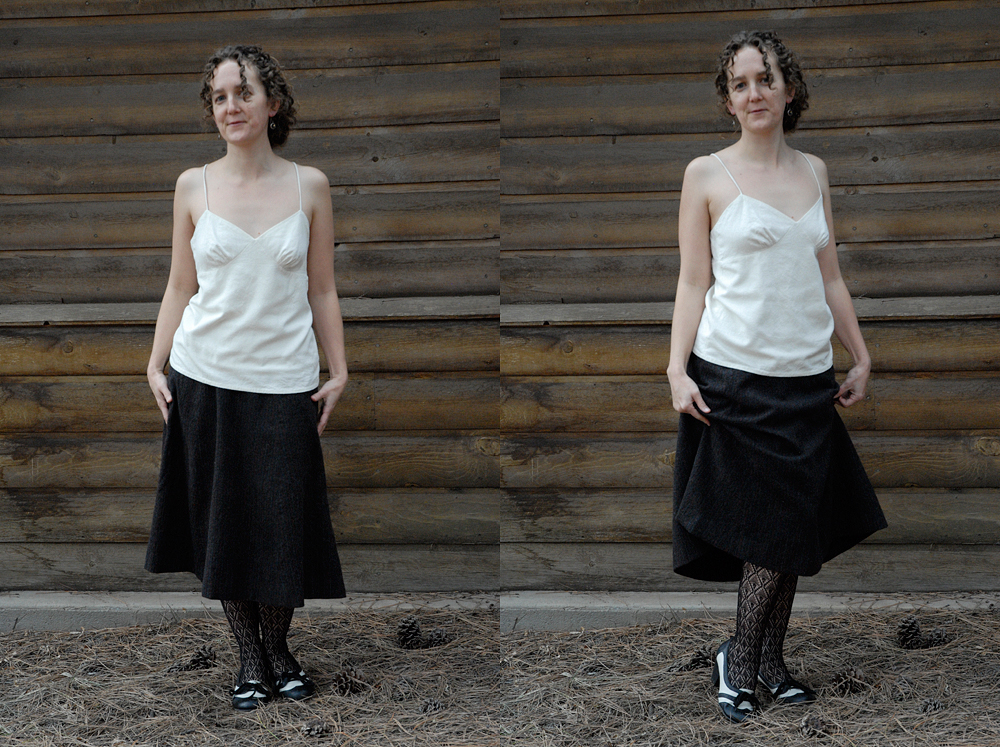
But back to the skirt, and I might as well confess one more thing, I feel slightly guilty but I can’t help it; I like this fabric more now than I did in it’s new/intended state.  It’s so soft but with so much body, and it tailors like a dream.  In fact, making the new placket and waistband gave me the itch to sew with wool again, it’s just a pleasure to work with.  This has got to be the flattest-laying, easiest-pressed-in-place placket I’ve ever made.  And the buttonholes – I made them by hand with a single strand of waxed black cotton sewing thread, and it was as if I sealed the cut edges with a magic wand.  Not only can you not see the stitches here, I couldn’t see them in my studio while sewing in broad daylight.  Note the pockets!  Another benefit of me-made formal wear.


pinstripe skirt remodel 3


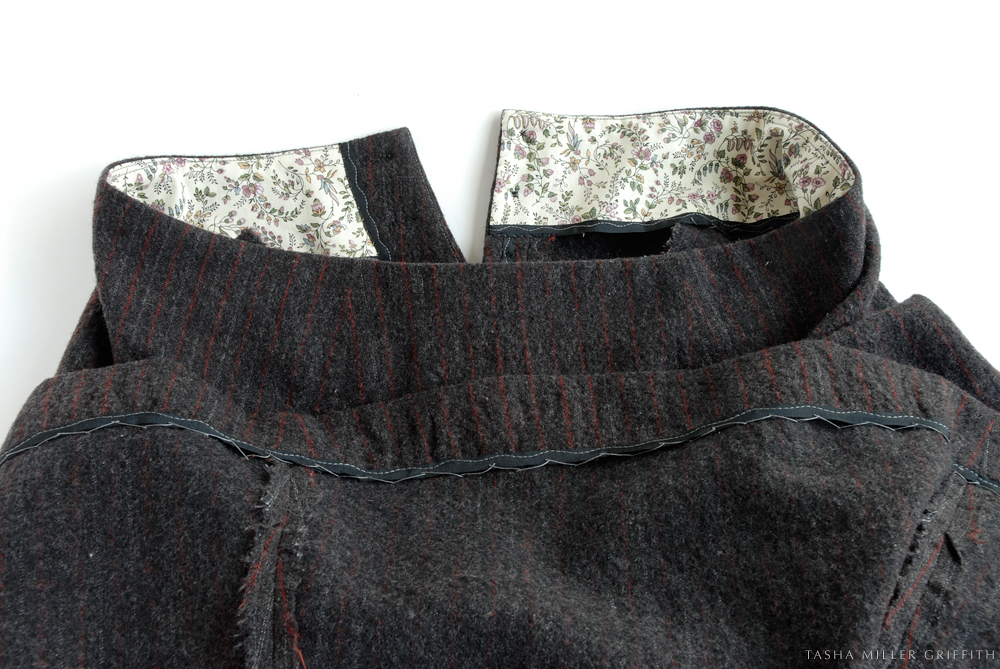
I also thought about how much I’ve learned in the last ten years.  I was able to add several refinements to this second round of the skirt, including using rayon ribbon on a lot of the edges to reduce bulk, adding a contoured waistband that fits my figure, and using catch stitches to secure the hem and placket so they wouldn’t show from the outside.  Now that it’s on a strictly hand-wash-only plan, the new and improved version should last me another ten years at least!


viola outfit 1


Morals of the story: please wear your heart on your sleeve, especially to formal events.  Sometimes a silk purse is lurking inside the sow’s ear of your mistakes.  And people please, no wool in the washing machine!


Giant Cyanotype on Silk!


Some of you may be wondering what I have been up to lately, besides cooking and (occasionally) posting about it here.  Well, in part – this!  Bryan has a solo show on at the Flagstaff Photography Center for the next month, and for part of it he had this crazy brilliant idea to make a huge public participation project.  On silk, panels 12′ by 6′.  Which would hang on curved wooden supports (making that part was his responsibility).  The idea is that you walk through it, not just look at it, and the fabric touches you and moves with the wind, thus making a different, more interactive experience of what a photograph can be.


The first part for me was making the silk panels.  Suffice it to say I have never been this nervous about sewing a rectangle.  Ever.  I attached a measuring tape to my work table so that I would tear all the pieces exactly the same length, and got out my walking foot so as not to distort the long seams.


In the process, I kind of fell in love with this huge expanse of crepe de chine.  Having never sewn anything nearly this big out of silk before (a ballgown is the only thing I could think of that would compare) I had never studied how it falls like liquid, but somehow also holds a body, almost a stiffness in certain circumstances.  Amazing.  I’m not-so-secretly hoping that the leftover fabric ends up in my stash.


But back to the photo project – the next step was to soak the silk panels in the chemistry for cyanotype – like those blue prints you may have made in the sun with leaves and flowers, and hang them up to dry.  This we did at night, inside the garage.  It took longer to dry than Bryan expected, so we ended up setting the alarm for 4 am to take them down.  They got rolled up and the rolls went into a long skinny bag of blackout fabric (also made by me, and luckily went together easily like the plan in my head).  By now you are starting to see how this project had a certain secret-agent-mission appeal.  At one point I had a grocery list which included 8 gallons of distilled water, blackout fabric, muslin, carpet rolls/large dowels, thread, and shellac.


On the morning of the exposure, we set up (mostly) clean trash cans to hold water for rinsing, a hose, the muslin sheet so everyone could practice where to put their hands and bodies, and a hugely tall clothesline to hold the finished pieces while they dried.  Thankfully, a bunch of our friends and members of the photo community showed up and agreed to lie still in the sun for 15 minutes while they and the silk sheets took in enough light to make a photo.  And thankfully the monsoon clouds held off just long enough to get it done (it rained later)!  Bryan repositioned people partway through to get a lighter blue in some places.


Meanwhile I ran around taking snapshots, and then with the help of a few volunteers, dunked the first panel in successive changes of water to rinse out the unexposed chemistry, while Bryan and the rest of the volunteers exposed the second one.


Even though I was very involved with this project, I didn’t anticipate quite how much I would like the finished result.  I think Bryan did a great job bringing his vision for it into reality.  And, after obsessively checking my math at the beginning, I could finally breathe a sigh of relief as the panels slid onto the wood and I could see that everything came out the right size!  It’s hard to see just how cool it is here, but imagine walking through it.  I am impressed with the little details that come through, aspects of people’s hair and clothing that make it more personal.


If you are passing though Flagstaff, you can check it out yourself at the Photo Center (right on Heritage Square) through the end of August!


Join a Colorwork Class

There’s still room in my colorwork knitting class tomorrow!  We’ll learn fair isle and intarsia techniques, or two ways to use two or more colors as you knit.  If you’re near Flagstaff, come out and knit with us!

To sign up, call Purl in the Pines (our lovely local yarn shop) at 928 – 774 – 9334.