If You Want to Help Sew Masks

Me binding straps onto a big pile of face masks.

Just a few weeks ago (it feels like months or years, probably you can relate), I saw one person helping another fix a car in the grocery store parking lot. “Now that’s a useful skill,” I thought, “How often does a textile-related emergency come up that I could help with?” Well, here we are—in a way I certainly never thought possible.

If you have been wondering about sewing masks to help with the shortage caused by the COVID-19 pandemic, here is what I know, and some resources. I’ve been working with a wonderful new nonprofit in my hometown, Threaded Together, to make these.

There’s a bounty of confusing information and patterns out there, and also confusion about how well fabric masks actually work. The bottom line for me on this is that healthcare and emergency workers are actively asking us for them, therefore they are needed. As I understand it, many homemade masks are being used as an outer layer of protection over another mask, and in non-critical-virus situations, to help preserve the supply of N95 masks. And as a last resort.

The material we’re making them from is a wrapping that hospitals use to cover surgical instruments. Most medical centers should have some. There is at least some evidence that it is really good at blocking particles, which is great news. (It’s also important to keep in mind that part of what makes the actual N95 masks so effective is that they are carefully fitted to provide an airtight seal around the face, which ours are not.)

We at Threaded Together (mostly Tina) have come up with a way to make these that is quick and hopefully easy to understand. Ours are based on a pattern put out by Providence, and a surgical mask from our local hospital. We are using two rectangles of fabric 9 x7” each, two strips for ties 36” long by 1” wide, and two pieces of pipe cleaner 4” long, twisted together, for the wire above the nose. There is a short video of Tina showing how to make one on Facebook, Instagram, and YouTube.

We’ve also been making a single-layer style with elastic around the ears. You may have noticed that elastic is nearly impossible to find at the moment, but some folks are getting creative using hair ties, and our friend Darcy thought of using knit fabric (like a T-shirt) for ties, which still has some stretch.

If you are looking for people to who can sew masks, or to coordinate with other sewists, Days for Girls has been stepping up for this project in a big way, and they have chapters around the country.

Frankly, sharing these efforts with family and friends who are medical professionals scares the living daylights out of me. How have we come to this point that I have help to offer them?! And also, being able to do something helpful feels amazingly better. I’m so thankful to all in our community who have offered their time, materials, and equipment, who have bought us lunch, made us playlists, or just waved at us through the window.

I seem to be hovering somewhere between brokenhearted and uplifted, as I guess are many of us these days. May you and yours be well and healthy, and kind to each other.

All About Backstitch

Tasha Miller Griffith

Backstitch Drawing 1

Revised and updated with new photos and text (and drawings I found in my sewing class materials), this tutorial is now better than ever! Feel free to grab a fabric scrap and some thread and follow along.

If I had to name the single most useful hand sewing stitch I know, it would probably be the backstitch. I love it for repairs, for sewing in zippers, and for anywhere I need the control and flexibility of hand stitching with a hard-wearing stitch.

When you think of hand sewing, you probably think of running stitches, like the ones below. The needle dips into the fabric and comes up going in the same direction. You can make several running stitches on the needle before pulling the thread through, and the thread slides easily through several running stitches at once.

new backstitch 1

In a backstitch, the thread loops around itself, which makes the stitch much…

View original post 287 more words

Things I’ve Sewn: Merino Knit Tops

In which I find some truly lovely fabric.


blue stripe trous and wool knits 2


I’ve made a real effort to make the things that I really want to do (mainly creating for myself and for fun) a priority.  No matter what, (unless I’m so busy I can’t think straight) if I’m home, I’m working on sewing something.  And if I’m on the road, it’s knitting and drawing, etc.  So sometimes it surprises me when I look back at posts here and realize that nothing I’ve made for myself for a while is visible!  It’s time to catch up a little bit on sewn projects, especially with Me-Made-May’14 right around the corner.

I think I’ll talk a little bit about the tops here first (and save the pants for another post) mainly because there’s not a whole lot to say, except about the fabric.  Last fall, I stumbled into the fact that a fabric store called The Fabric Store, based in Australia, had just opened a store in LA.  This meant that a whole bunch of New Zealand merino knit fabric was suddenly within reasonable shipping distance of my house!  And, AND they had organic merino knits, something I have been searching for, as a way to hopefully buy wool which is raised responsibly.  (If any of the lovely USA-grown-made-processed yarn folks are reading this, some of you should mill some fabric!) Anyway, The Fabric Store doesn’t have direct online ordering, but if you call or email them, they will find out what you’re looking for, and send you several lovely cards of generous swatches.


blue stripe trous and wool knits 9What lens flare?  Clearly I am floating in a sea of magical bubbles …


I chose organic merino knit in the “mushroom” color, and I love, love, love, this fabric.  It’s soft, it has drape but it also has body, and great stretch and recovery.  There’s something substantial about it that just says “wool” (I love wool) and it has a subtle sheen to the right side which makes it look just a little special.

When it arrived, I was in desperate need of a few more long sleeve tops for winter, so I made a simple T-shirt style first.  In this fabric, my pattern (the same one I used for these tops) is just the tiniest bit tight/clingy (you can see my cami straps, which is not my favorite thing) but boy, it is a terrific layer for winter.  And spring—I’m wearing it as I type this!


blue stripe trous and wool knits 8


The second shirt I made just a little more complex, using another pattern that I copied from one of those lucky thrift store finds with fit and style I love.  In an ongoing experiment to see if I can get knit shirts to more closely follow, and still flatter, my shape, I tried dividing the pattern into princess lines in back, so that I would have two extra seams to add width over the hips.  If I do this again, I’ll curve the lines more so that they come in at the waist, and then out again, yes?


blue stripe trous and wool knits 6


And I have fabric leftover!  Somehow, despite an earlier failure to squeeze one uninterrupted long-sleeve knit top out of one yard, by careful placement and a somewhat generous cut, it looks like I will get 3 tops out of 3 yards of this.  I was debating maybe dyeing the last top’s worth, until Bryan mentioned that he liked the way this color looks with my skin.  That settles that—I’m looking forward to making another style, same color, this coming fall.

I wore this exact outfit, new top and pants, on both our way out to Texas AND my flight back.  It’s just really versatile, comfortable, and perfect for the varying temperatures of spring.  More about the pants coming soon!


blue stripe trous and wool knits 4


How to Make French Toast—and Happy New Year

With variations, tips and tricks to customize your own perfect French toast recipe.


french toast in skillet


It took me long enough, right?  (Can you believe it’s been almost two years?  Yeah, me neither.)  For a blog with this name, which features recipes, the lack of actual directions for making French toast was getting a little ridiculous.  Here’s the thing, I didn’t want to post just a recipe for French toast, that seemed silly, everyone already knows how to make French toast, right?  Instead I would put together some marvelous, unheard-of combination of toppings and put that in a post, with the actual French toast just included almost as a by-the-way, here’s how I make it.

I started off yesterday morning with just such a plan, to make a seasonal orange-based sauce.  I wasn’t going to tell you this next part, but it now seems important: it did not go well.  In fact, it reminded me specifically of the part of the year just passed that I would very much NOT like to repeat in the year to come: me trying very hard for a goal which I (perhaps) have somehow misjudged in one or more ways, expending a lot of time and energy but not quite getting where I’d like to go.

I like to think I’m not superstitious, but at first, this seemed like the most inauspicious possible sign for January 1.  Then, as it rolled around in my brain a little more, I started to think that maybe the failed orange sauce (it came out ok after all) was a cautionary tale, and if I took it the right way, I could use it to steer away from the process I don’t want, and towards the one I do.


french toast on plate


I started thinking; maybe just French toast is enough.  Of course not everyone already knows how to make it.  Especially since I have some tips and ideas to get you started with your own never-before-seen, awesome variations.  After all, this space is supposed to be about empowering you to make things, and not about me showing off, even though I love sharing the things I make here.

In 2014, I’d like to be more grounded, less hectic.  I still have a million dreams of every kind, so many things that I’d love to do.  But my journey towards them might not be about reaching as far as I possibly can in one grasp, or frantically trying to fit as much as I possibly can into every single day.  Maybe it will be more about doing one little bit at a time, and even about recognizing and sharing the good bits I already have right in front of me.

Happy New Year, friends!  May it be a good one for all.


How to Make French Toast


First, and most importantly, you need bread.  You can use any kind, and it’s not just a metaphor, or part of the 6 words I chose to describe my life, it really is the best possible use for bread that’s staler than you’d like to eat it.  Brioche, or banana bread, or any other thing that’s called a “bread” and maybe borders on dessert, will make amazing, Ann-Sather-worthy French toast.  I’ve used my homemade bread for our most recent versions.  As always, a quality bread (or any ingredient) will lend even more layers of subtle delicious flavor to the toast (or any finished dish), but it also may be a tastier use for a less-than-stellar bread than eating it alone.  How much batter the bread will soak up varies wildly depending on the type of bread and how dry it is, etc.

Next, you need some egg and stuff to soak the toast in.  I like it to be mainly egg, because I do not like the inside of the bread to be soggy when it’s done.  I like to whisk up the egg etc. in a glass dish with a flat bottom rather than in a bowl, so I can put a few pieces of bread in to soak at a time, and not be left with a little well of liquid at the bottom that the bread can’t reach.  For about 6 pieces of bread (again, this varies a LOT depending on your bread, but you can always add a little more to the pan) I use:

3 eggs, whisked up well with:

1/4 cup milk (it’s Ok to substitute non-dairy milk here)

A pinch of salt

A larger pinch of sugar

Next, add some flavorings to the egg mixture—whatever your heart desires.  A generous sprinkle of cinnamon, a pinch of ginger and a pinch of cloves is a good way to start, especially in winter.  A splash of liqueur is good—for an especially luxurious version, substitute a generous splash of cream for the milk, and add the lost liquid back in by way of brandy or rum etc.  Vanilla extract is good (but probably choose it or liqueur), or try another extract, maybe paired with a spice or two, for a unique flavor.  I especially like to compliment whatever I’m planning to put on top with a bit of something in the batter, but keep it fairly subtle.

french toast soaking
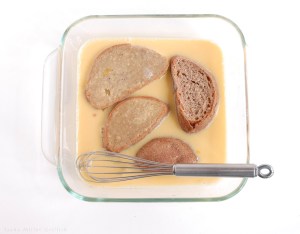
Soak the toast in the batter for a few minutes, then flip the slices over, and let them soak for another couple minutes.

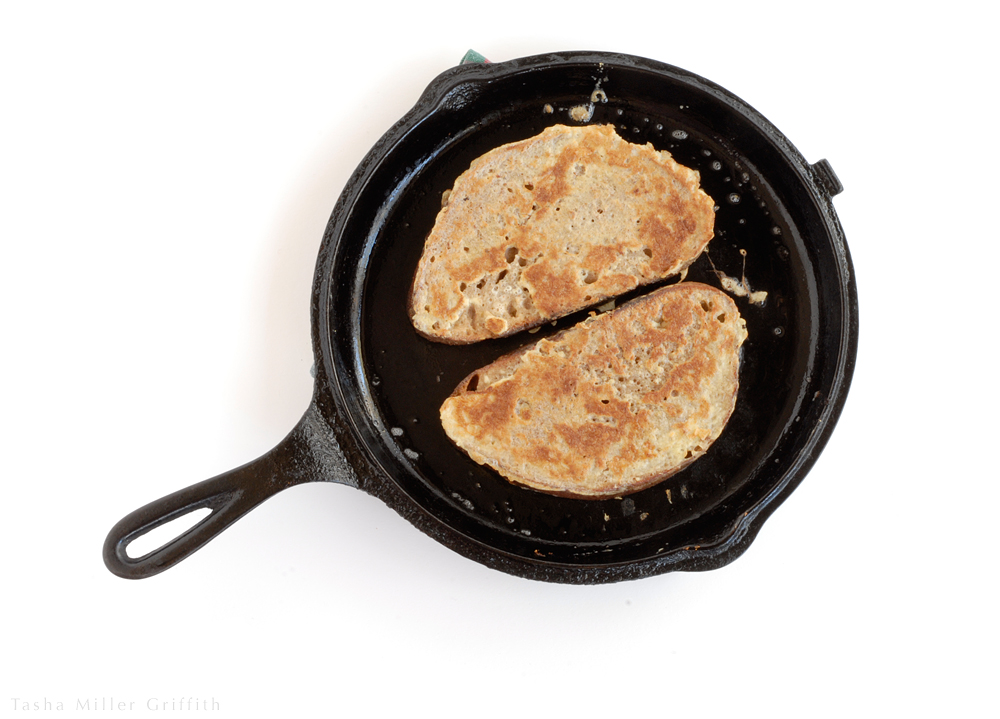
To cook the toast, heat up a heavy skillet over medium heat and melt some butter in it, maybe 1/2 Tablespoon butter for four slices (in my little skillet I used less).  The toast should sizzle when it hits the pan, and the egg batter should start to set up right away.  It only takes a few minutes to get lovely brown spots on the bottom side, at which point flip the toast over.  You may need to add a little more butter between batches.

If not all of the toast is done at once, you can keep it warm on plates in the oven at 200° F, until you’re ready to serve it.

For toppings, really, the sky is the limit.  It’s—ahem—delicious with just real maple syrup and homemade crème fraîche.  A little orange zest (or even iffy orange sauce) is really good with this basic setup.  Practically any fresh seasonal fruit is amazing on French toast, strawberries in spring are particularly wonderful.  Any jam you have is good.  Coarsely chopped toasted nuts are great (bread with nuts in it would also be great as base).  Melted butter, fruit syrup, whipped cream . . .

Some of my favorite flavor combinations may yet appear as time goes on.  Please share yours as well!


Northern Arizona Corn Bread


NAZ cornbread


One of the few recent food happenings I have actually gotten a photo of is this cornbread.  It’s my adaptation of a recipe that my Mom has made since I was little.  It came from one of my elementary school teachers, Ms. Bené.  We made it during our creative retreat this year, actually twice, it was a hit!  It’s a sweeter-style cornbread, what in the US we call “Northern” style.  I’ve given it a Southwestern twist as well.  It’s great with blue cornmeal, if you can find it, and pretty awesome with some chiles inside as well.


Northern Arizona Cornbread

In a large bowl, mix well:

1/2 cup (1 stick) melted butter

2/3 cup sugar

2 eggs


Stir in:

1 cup buttermilk, and 1/2 teaspoon baking soda

-or- plain milk and no soda

The buttermilk gives a nice flavor, but it’s not necessary.  Either way, you can add a dash more milk for a very moist cornbread.


Pile on top of the liquids in the bowl:

1 cup blue cornmeal (or yellow if you can’t find blue.)

1 cup whole wheat flour (you can use white or a mix if you prefer)

1/2 teaspoon salt

2 teaspoons baking powder (at sea level, at 7000′ I use 1  1/4 tsp)

Stir just until blended.


Optional: remove the stems, centers, and seeds from 3 roasted green chiles.  Cut into thin strips, and stir in just before baking.  This adds a delicious bit of spiciness, but leave out if you are serving the cornbread along with other hot foods, which it goes really well with! Chile time is coming again soon!


Scrape into a heavy baking pan.  Any size 9 x 9″ or bigger will work, the cornbread will just be a little thicker or thinner.  Bake at 350˚ F for about 20 minutes, until a toothpick inserted in the center comes out clean.  It should be a little bit brown around the edges and golden on top, although with the blue corn it can be harder to see.   Enjoy!

A Simple and Delicious Way to Cook Artichokes


artichokes on plate


Phew—who’s ready for a break and some easy cooking?  I know I am.  As I mentioned in this post about broiled asparagus, spring came along just in time for me this year.  I’ve been busting my booty over my recently launched beginning sewing e-book for the last couple of months, so anything that tasted delicious and and fresh without a whole lot of time and effort in the kitchen was a major bonus.  We’ve eaten a lot of artichokes this spring.

I love artichokes.  That time of spring when they appear at our CSA farm store, tiny and fresh and beautiful in their variations, would get me excited whether or not I needed some easy food options.  So we’ve eaten a lot of them, practically one every day for a while there.  I also wasn’t running to the store unless absolutely necessary, so I did some experimenting with what I added and how I cooked them.  Considering how cool this spring has been in many parts of the country, I’m hoping their are still some artichokes available near you!


artichokes with lid


Simply Delicious Artichokes

  • Rinse the your artichokes and trim the stems flush with the bottoms.  I don’t trim any of the leaves.  Especially when they are small and fresh, I like to leave on each possible delicious morsel.  My mom cooks the stems along with the rest, but I find they are often somewhat bitter.
  • Put the artichokes in a pot in a single layer.  Use a pressure cooker if you have one (more about that below).  Either put the artichokes stem side down in the pan and add about 1/2″ of water around them, or put them in a steamer basket with either the top or the stem up and add water below.  I haven’t found any difference in how they come out with any of those methods.
  • Optional: add a drizzle of olive oil on top.  It doesn’t change the flavor very much, but it does the usual jobs of added oil: making sure that the artichokes don’t dry out and adding a little smoothness to the taste.
  • Optional: add a drizzle of lemon juice.  This doesn’t change the flavor much either, but without it the water left in the pot turns an amazing dark green color which could stain your cookware.  However, I cooked a bunch without any lemon and they came out fine.
  • Put the lid on the pot and cook until the leaves are tender.  Pull one out from somewhere in the middle, and pull the base of the leaf off with your teeth to see if it’s tender.  It’s hard to overcook them.  I knew they were taking a while to cook on my stove, but I didn’t realize how long until I started keeping track for this post.  It was anywhere from 45 minutes to an hour and a half!  So then I did what should have been obvious, at least at high altitude, got out the pressure cooker.  15 minutes later (12 minutes at high pressure plus warm-up and cool-down) I had cooked artichokes!


Ok, you knew I was going to say this, right?  But it’s no joke, artichokes are totally delicious with crème frâiche!  And possibly even more delicious with just a bit of good quality balsamic vinegar on top, so that each leaf you dip gets some of each.  If you’ve never eaten one before, there are illustrated directions here, among other places.  I may have to try a clove garlic in the water next time I make them.  But I bet the flavor of the artichokes themselves will still be my favorite part.  (By the way, they contain a chemical that can change your perception of other flavors, so beware of eating them with your best wine.)  Enjoy!