Me-Knit Blue Sweater with Lace

Plus some tips for finishing hand knits.


blue talamh sweater 2


First things first: stop press!  I finished the sweater which I started knitting in Me-Made-May this year!  Between times when I made a real effort to work on it at least an hour a day while on the road, and times when I was back at home and pretty much ignoring it completely, it averaged out to just about 6 months start to finish.  And I’m fine with that, I mean, it’s hand-knitting an entire sweater.


blue talamh sweater 5


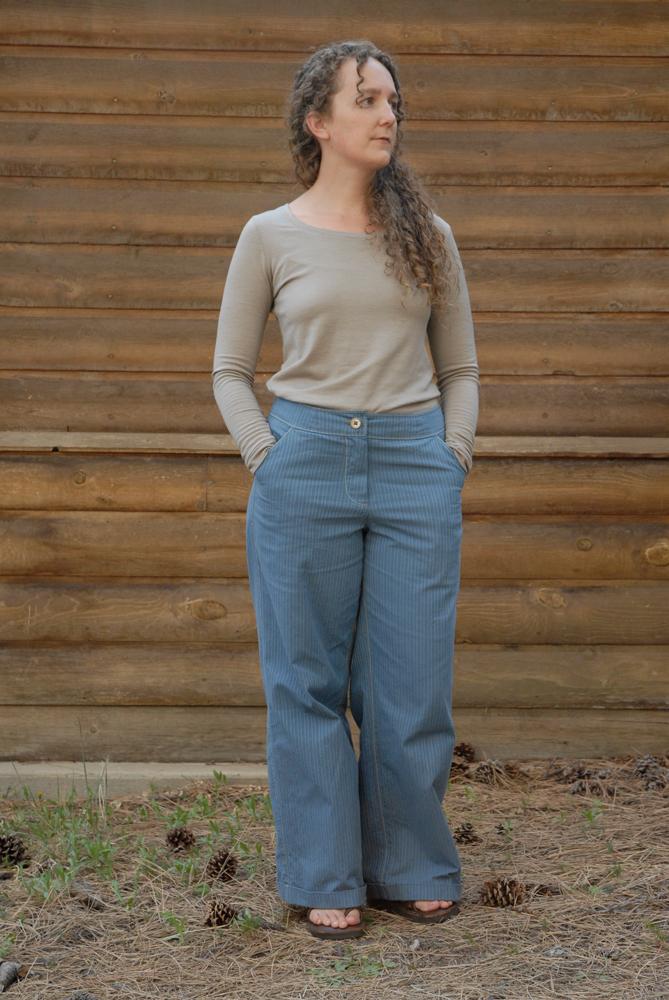
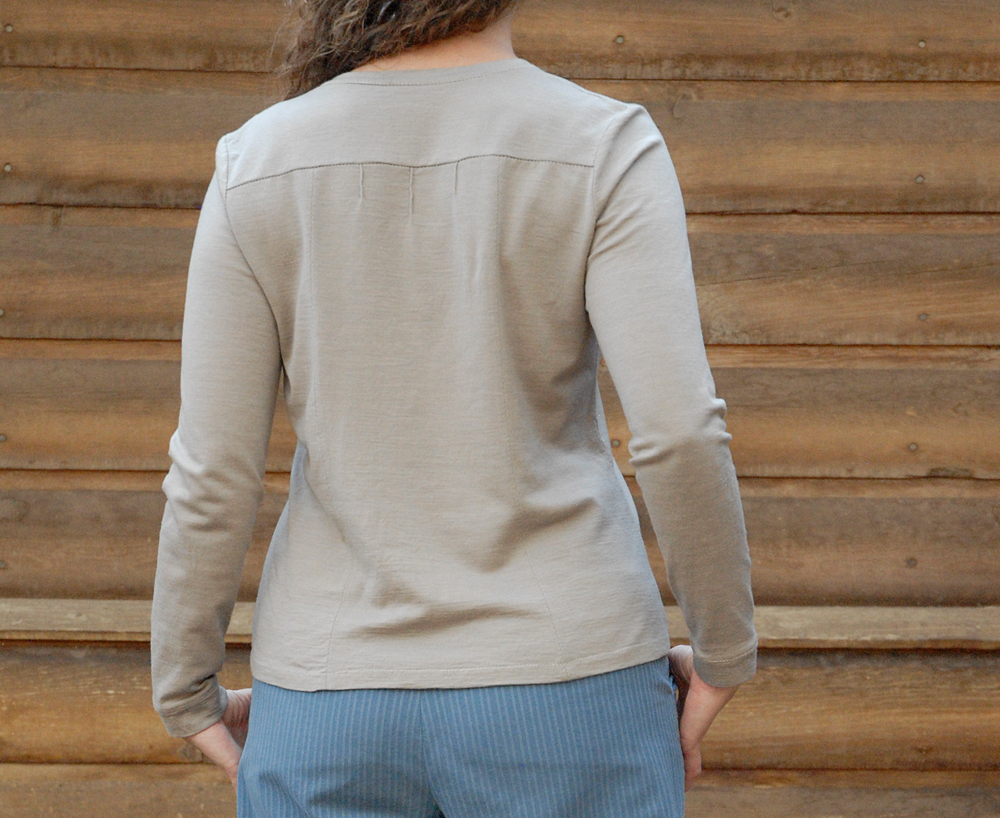
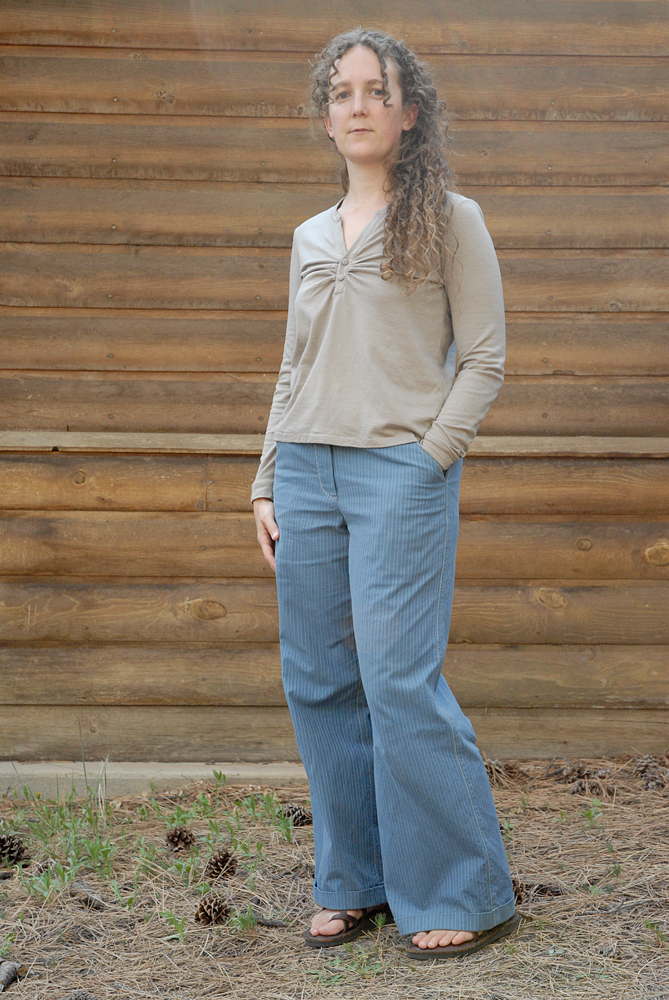
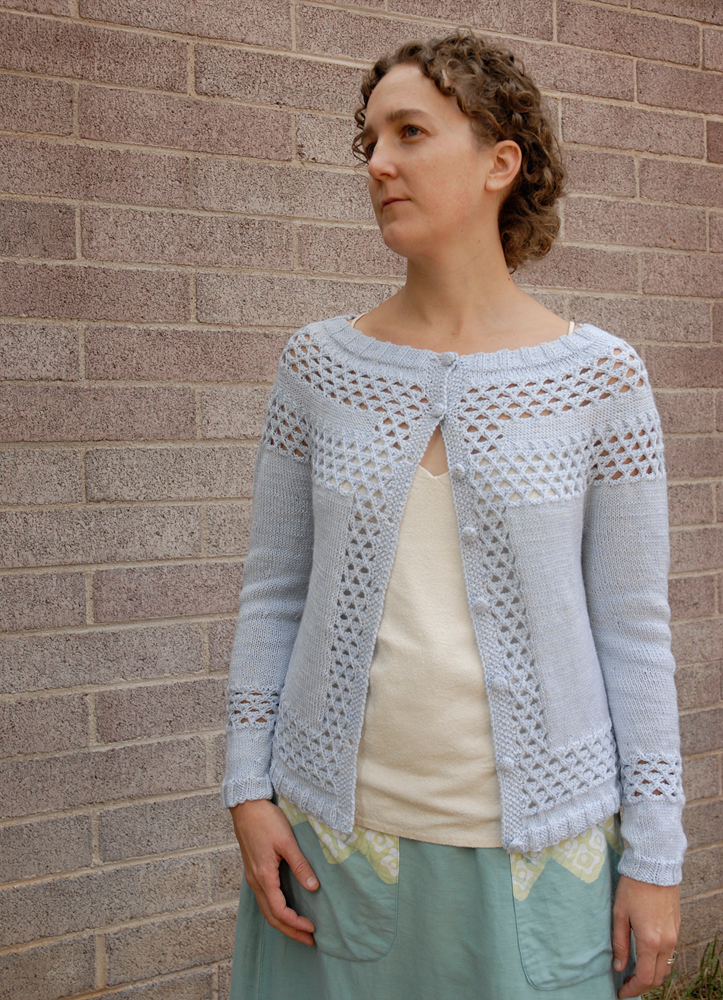
An entire sweater which I’m pretty much totally in love with.  This is the Talamh pattern by Carol Feller.  I wanted a pattern with some lace, but also some edgyness, some modernity, and I thought the lace pattern she used really fit the bill.  I added the wide lace section to the center back (it looks awesome, right?) but otherwise actually made fewer changes than I normally do when I’m knitting someone else’s pattern.  If you’re interested, I decided to keep those notes on Ravelry this time, feel free to check them out!


blue talamh sweater 3


In this space, aside from how pleased I am with this project, I thought I’d share a bit about finishing, specifically sewing in a ribbon for stabilization around the neck (which totally saved this sweater!) and how I “weave in” yarn ends.


Adding grosgrain ribbon

As I was blocking this sweater (basically just getting it wet, stretching the lace out a bit, and smoothing out bumps before letting it dry) I decided to try putting it over my dress form (if it’s good enough for Kate Davies, it’s good enough for me!).  But the sweater kept slipping down, and, rather than pin it up every inch or so, I decided to let it dry flat.  Well, after it was dry and I tried it on in front of the mirror, the same thing happened.  The join between the body and the sleeves is a bit low anyway (my fault, and one of only two things I’d probably change if I make a sweater like this again).  As the neckline stretched wider, the underarms and the whole rest of the sweater sagged downward until it looked fairly ridiculous, at which point I’d tug the neck up again.  Clearly, the loose-ish ribbing at the top was not enough to hold the rest of the sweater in place.


blue talamh sweater ribbon 3


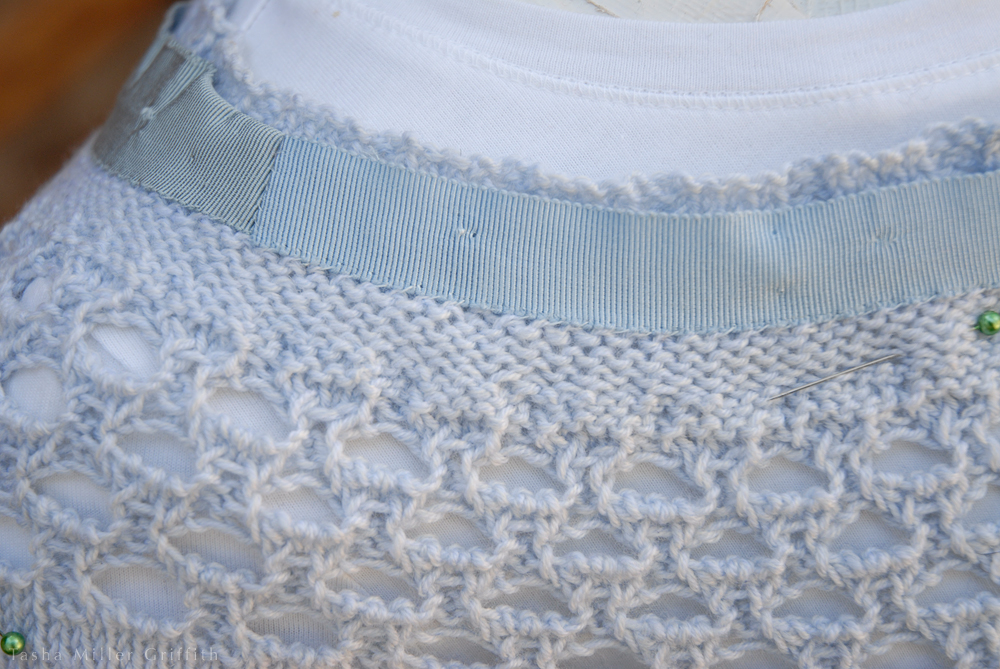
I had stabilized various parts of other sweaters with ribbon before, and it occurred to me that I could try it here.  I opened the drawer where I keep bits of ribbon, and there were two lovely grosgrain sections, probably salvaged from recycled sweaters, that both almost matched perfectly!  And each was a width to fit under part of the ribbing on the sweater.  Call it good karma for using up this yarn I’ve had for ages, or proof that if you save the good stuff, it does actually come in handy later.

Pinning the sweater inside out on my dress form to hold it in place, I shaped the ribbon around the curves and steamed it lightly to match them.


blue talamh sweater ribbon 1


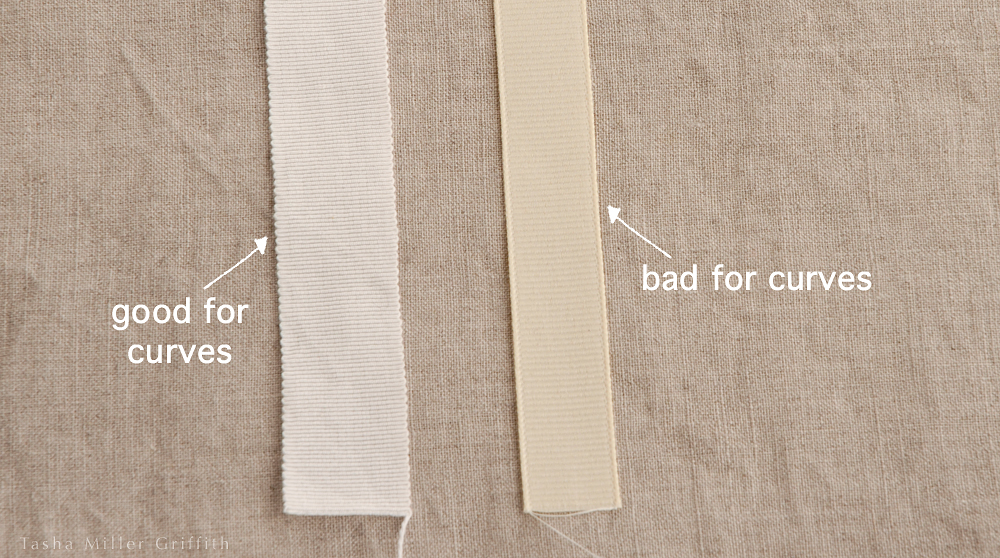
Note that in order to curve nicely like this, you need authentic grosgrain ribbon, the kind with the bumpy edges, where the thick yarns in it are free to move a bit.  “Grosgrain” ribbon from your local big box store often has tight edges, which are fine for straight sections, but won’t curve worth a darn.

grosgrain ribbon


I bought sewing thread to match my yarn as closely as possible, and sewed the ribbon on with tiny whip stitches, at the edge where the ribbing meets the first plain knitting section.  After trying on the sweater to check that it was working, I put it back on the dress form inside out, and sewed around the top edge of the ribbon as well.  If you do this, don’t pull the sewing stitches too tight, just try to keep the ribbon softly snug to the sweater, and not to distort the knitting.


blue talamh sweater ribbon 2


This worked so well!  Like magic, my sweater now stays in place, just where I want it, and the ribbon is basically invisible from the outside.


Finishing yarn ends

There were quite a lot of ends in this sweater, mostly because I’ve had this yarn for over a decade (!).  Part of that time was before I knew how to deal with moths, and the outside of a few of the skeins got rather munched early on, leading to extra breaks in the yarn, and weak places that I decided to treat the same as breaks (ie, not use them, and leave the tails to work in later).  I usually tie the ends or the break/place I don’t want to use into a slipknot, just to keep a little tension on the yarn as I’m knitting around it.


finishing knitting 1


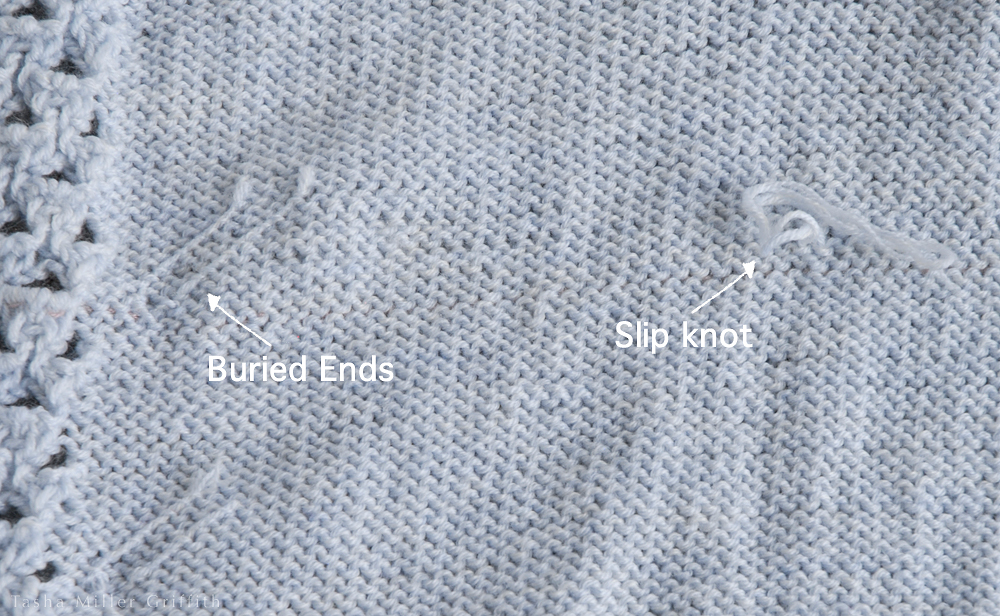
I’m sure there are other good methods for burying yarn ends, this is mine.  Keeping the tail going in the direction it was headed, I take a short stitch, then a tiny back stitch to anchor the thread, followed by a tunneling of the yarn along the back of the existing stitches.

Don’t pull tightly, or you’ll pucker the knitted fabric.  Leave enough yarn tail so that as the sweater stretches, the tail can move without catching or distorting anything.

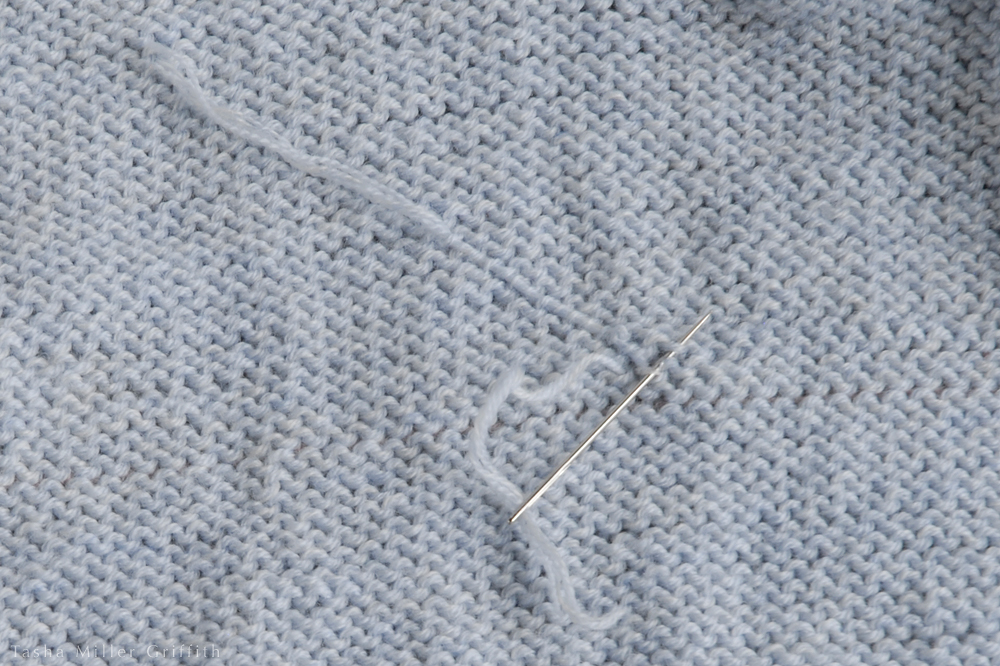
Maybe my best tip is to use a needle with a big enough eye to hold the yarn, but a very sharp tip, making it easy to pierce just the backs of stitches, and keep the yarn tails out of sight.  My absolute favorite are “Chenille” needles from John James, available at fine sewing and embroidery stores.

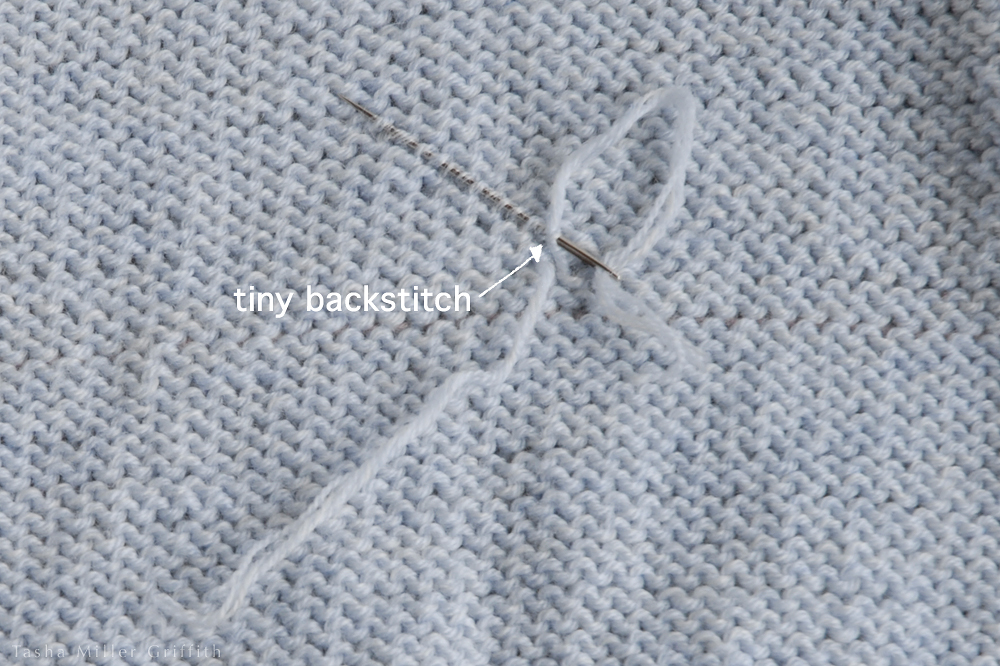
With each end, take one short stitch, catching just the back of the knitting stitches:


finishing knitting 2


Followed by a tiny backstitch, which functions like a knot to keep the yarn in place.  I start just behind where the last stitch ended, and then continue skimming along the backs of the knitting stitches for the length of the needle. In a stockinette fabric like this, the purl “bumps” make handy diagonals, good directions to hide yarn without it showing on the outside.

If you’re particularly worried about this part of the knitting getting stress or pulling out, (or your yarn is slippery) you could take another short stitch and back stitch, then the long burying stitch. That should hold it!


finishing knitting 3


If at any point you’re unsure if a stitch might be showing on the public side, just check.  One good thing about stitches is that they’re reversible.

Note that the ends should go in opposite directions, at least with the first short stitch.  Take them in the direction they’d pull from if you kept knitting, so that the two ends cross, rather than pull away from each other.


finishing knitting 4


On garment edges, a good place to bury ends is often along columns of ribbing.


finishing knitting 6


When you’re finished, trim the ends so that enough remains on the back for the end to stay there, and not poke through to the front.

That’s about it for now.  Just in case you’re wondering, I did make those matching buttons, and I’ll post about them soon too.  I hope this is helpful, and just let me know if you have more knitting/finishing questions!


Things I’ve Sewn: Merino Knit Tops

In which I find some truly lovely fabric.


blue stripe trous and wool knits 2


I’ve made a real effort to make the things that I really want to do (mainly creating for myself and for fun) a priority.  No matter what, (unless I’m so busy I can’t think straight) if I’m home, I’m working on sewing something.  And if I’m on the road, it’s knitting and drawing, etc.  So sometimes it surprises me when I look back at posts here and realize that nothing I’ve made for myself for a while is visible!  It’s time to catch up a little bit on sewn projects, especially with Me-Made-May’14 right around the corner.

I think I’ll talk a little bit about the tops here first (and save the pants for another post) mainly because there’s not a whole lot to say, except about the fabric.  Last fall, I stumbled into the fact that a fabric store called The Fabric Store, based in Australia, had just opened a store in LA.  This meant that a whole bunch of New Zealand merino knit fabric was suddenly within reasonable shipping distance of my house!  And, AND they had organic merino knits, something I have been searching for, as a way to hopefully buy wool which is raised responsibly.  (If any of the lovely USA-grown-made-processed yarn folks are reading this, some of you should mill some fabric!) Anyway, The Fabric Store doesn’t have direct online ordering, but if you call or email them, they will find out what you’re looking for, and send you several lovely cards of generous swatches.


blue stripe trous and wool knits 9What lens flare?  Clearly I am floating in a sea of magical bubbles …


I chose organic merino knit in the “mushroom” color, and I love, love, love, this fabric.  It’s soft, it has drape but it also has body, and great stretch and recovery.  There’s something substantial about it that just says “wool” (I love wool) and it has a subtle sheen to the right side which makes it look just a little special.

When it arrived, I was in desperate need of a few more long sleeve tops for winter, so I made a simple T-shirt style first.  In this fabric, my pattern (the same one I used for these tops) is just the tiniest bit tight/clingy (you can see my cami straps, which is not my favorite thing) but boy, it is a terrific layer for winter.  And spring—I’m wearing it as I type this!


blue stripe trous and wool knits 8


The second shirt I made just a little more complex, using another pattern that I copied from one of those lucky thrift store finds with fit and style I love.  In an ongoing experiment to see if I can get knit shirts to more closely follow, and still flatter, my shape, I tried dividing the pattern into princess lines in back, so that I would have two extra seams to add width over the hips.  If I do this again, I’ll curve the lines more so that they come in at the waist, and then out again, yes?


blue stripe trous and wool knits 6


And I have fabric leftover!  Somehow, despite an earlier failure to squeeze one uninterrupted long-sleeve knit top out of one yard, by careful placement and a somewhat generous cut, it looks like I will get 3 tops out of 3 yards of this.  I was debating maybe dyeing the last top’s worth, until Bryan mentioned that he liked the way this color looks with my skin.  That settles that—I’m looking forward to making another style, same color, this coming fall.

I wore this exact outfit, new top and pants, on both our way out to Texas AND my flight back.  It’s just really versatile, comfortable, and perfect for the varying temperatures of spring.  More about the pants coming soon!


blue stripe trous and wool knits 4


Half My Wardrobe in Detroit, and What I Did About It

Not as much as I would have liked.  But, contrary to the impression you may have gotten from this space, I did squeeze in a little sewing for myself the last time we were home.  When we leave the truck somewhere in art show land (otherwise known as the Midwest) and fly back home to get some r&r (or maybe embark on some crazy giant new project) I leave a bunch of my summer wardrobe out there.  This last time, I kind of did it to myself on purpose, packing even fewer of my summer tops than I reasonably could have fit in my luggage, hoping that it would motivate me to sew some new ones.

First, I finished a top I had been working on during the visit home before this one.  I wear a lot of tank tops in the summer, and I have been thinking about how to make some woven ones as well as the usual knits.  This one is a copy of a silk top, the cups of which I found flattering and comfortable.  During Me Made May, I fell in love with linen all over again, specifically this one mm green linen skirt, which is getting to the super soft and drapey stage of life.  I had this natural linen leftover from a long-ago project and thought I would try it out.


I lined only the cups, with thin soft cotton, catching them in the midriff seam and folding under and hand sewing the other sides, I like how it came out.  The original top has a scalloped satin stitch on the edges, and I decided to try something similar.  I also had some thick linen thread which I loved with the fabric, but no amount of coaxing and bigger needles would convince my machine this was a reasonable thing to work with, so I ended up using a narrow zigzag to hold in on the surface.  Both of the edge treatments are softer and more subtle after a few washings.  I made the straps using a thin piece of fabric from the selvage edge, wrapping it around a thin ribbon.


I wanted to make sure it came out long enough, and I may have overdone it, but the tunic length is working alright so far.  Funny how I don’t notice things in the original (like the back riding up) until I copy it.  Sigh.  I’ll also check out the front wrinkles before I make another one.

Next, I pulled out some pink knit leftover from another top to make a tank for yoga, of which I desperately needed more.  I had some narrow fold over elastic in my stash which should have been perfect, but for some reason every step of this project fought me tooth and nail and used up WAY more of my precious sewing time than was reasonable for something so simple and small!  I ripped a lot of seams.  I tried adding a self-fabric section for the hem which absolutely refused to look decent with any type of stitching.  Plus, when I tried the top on it seemed too tight and clingy, and I already have one round of tops made from this pattern (a heavily modified Kwik Sew 3524) which are NOT too tight and clingy!  Finally I realized that if I ripped the stitching from the little bit of elastic I had used as a test, I would have just enough to put around the bottom as well.  Which I did, and without even trying it on again, put it in my closet and wore it to yoga the next day (keep reading for a picture).  The top stitching on the elastic is beyond wonky.  But I needed it, I made it, and I was wearing it, and some days that just has to be enough.

After that, I made a pair of dainties, partly because I didn’t have much time left and they were cut out already, and partly to prove that my beloved Bernina and I do actually have a good relationship with knits.  Which in fact we do.


On our “real” return home for the fall a couple of weeks ago, I decided to make one more tank top before moving on to fall/winter sewing. I had a tee shirt with a hole in it that I had been meaning to convert into a wearable top for ages.  Unfortunately, it was cut so far off the grain of the knit that I couldn’t just use the the original hem, as Zoe suggests, and I had to cut the back and front shelf liner in two pieces each to get them to fit.  But I did use white top stitching, which I liked on the original shirt.


I liked this picot edge elastic, but it was not exactly soft, so I sandwiched it between the layers, sewing it to the liner first with a zigzag, and then the top layer with a twin needle.  For the straps I used a similar idea to the ribbon wrapping, but using plain elastic, zigzag, and the twin needle again.  This time everything went smoother, and start to finish, including experiments, took less than three hours.  That’s more like it!


See me being all zen about the pink top.  See how much clingier AND drapier it is than the blue one?  Crazy fabric difference.  I checked and the previous versions have stretched out with wear as well.  I might make the next one just slightly wider to start with.

Next up for my sewing, pants!  What are you making for the coming season? How do you figure out what fabric will do before you sew it?  I’m, um, still figuring that part out apparently. . .