Just a few weeks ago (it feels like months or years, probably you can relate), I saw one person helping another fix a car in the grocery store parking lot. “Now that’s a useful skill,” I thought, “How often does a textile-related emergency come up that I could help with?” Well, here we are—in a way I certainly never thought possible.
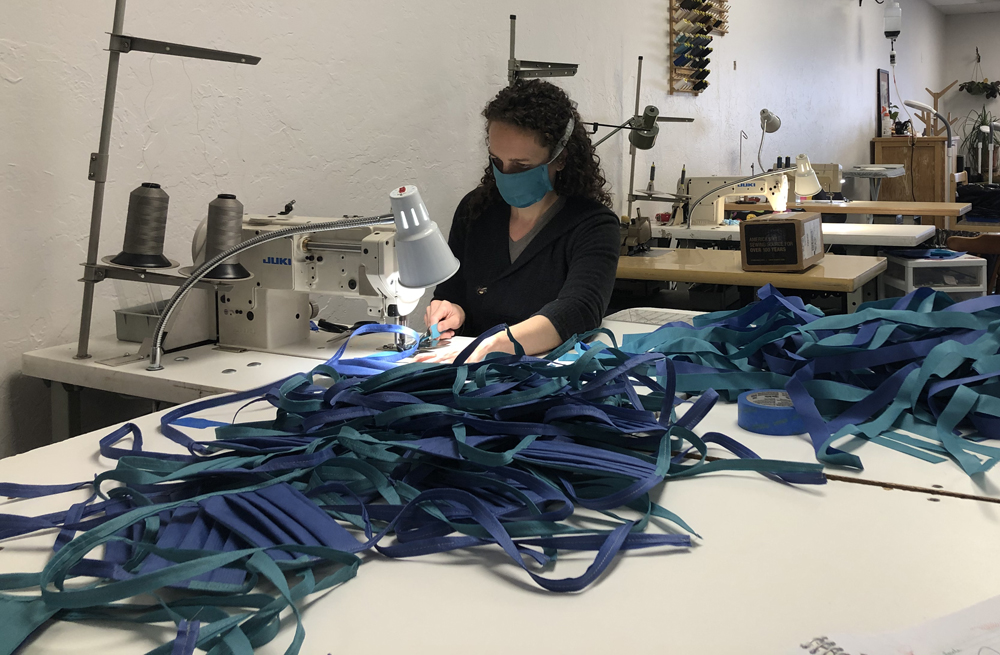
If you have been wondering about sewing masks to help with the shortage caused by the COVID-19 pandemic, here is what I know, and some resources. I’ve been working with a wonderful new nonprofit in my hometown, Threaded Together, to make these.
There’s a bounty of confusing information and patterns out there, and also confusion about how well fabric masks actually work. The bottom line for me on this is that healthcare and emergency workers are actively asking us for them, therefore they are needed. As I understand it, many homemade masks are being used as an outer layer of protection over another mask, and in non-critical-virus situations, to help preserve the supply of N95 masks. And as a last resort.
The material we’re making them from is a wrapping that hospitals use to cover surgical instruments. Most medical centers should have some. There is at least some evidence that it is really good at blocking particles, which is great news. (It’s also important to keep in mind that part of what makes the actual N95 masks so effective is that they are carefully fitted to provide an airtight seal around the face, which ours are not.)
We at Threaded Together (mostly Tina) have come up with a way to make these that is quick and hopefully easy to understand. Ours are based on a pattern put out by Providence, and a surgical mask from our local hospital. We are using two rectangles of fabric 9 x7” each, two strips for ties 36” long by 1” wide, and two pieces of pipe cleaner 4” long, twisted together, for the wire above the nose. There is a short video of Tina showing how to make one on Facebook, Instagram, and YouTube.
We’ve also been making a single-layer style with elastic around the ears. You may have noticed that elastic is nearly impossible to find at the moment, but some folks are getting creative using hair ties, and our friend Darcy thought of using knit fabric (like a T-shirt) for ties, which still has some stretch.
If you are looking for people to who can sew masks, or to coordinate with other sewists, Days for Girls has been stepping up for this project in a big way, and they have chapters around the country.
Frankly, sharing these efforts with family and friends who are medical professionals scares the living daylights out of me. How have we come to this point that I have help to offer them?! And also, being able to do something helpful feels amazingly better. I’m so thankful to all in our community who have offered their time, materials, and equipment, who have bought us lunch, made us playlists, or just waved at us through the window.
I seem to be hovering somewhere between brokenhearted and uplifted, as I guess are many of us these days. May you and yours be well and healthy, and kind to each other.
I’ve been planning and dreaming about posting some natural dyeing instructions here for a while, and I’m happy that the time has come! Dyeing fabric and yarn with colors from nature has been an obsession of mine since 2015, when I started researching printing with natural dyes on fabric, and doing my own testing. I have learned an amazing amount since then, and yet still feel like I have only dipped my toes in the vast ocean of possibilities. When I started this adventure, devouring whatever I could find to read, it was before the newest wave of books on natural dyes came out, and so I read a lot of unillustrated books from the last time natural dyes were having a big moment in the 70’s, and whatever came up in internet searches. Most of those sources seemed a little questionable, they presented information without a lot of reasons behind the methods, and they often contradicted each other. I wanted to know what really worked and what were the best methods, so I started testing various dyes and techniques, and haven’t stopped since. I hope that by sharing some of what I know now, I can help build the kind of knowledge base I wished for—both solidly rooted in good, provable methods, and also empowering to those who still have a lot of questions. (Full disclosure: I still have a lot of questions too. It is impossible to know the answers to all of the questions about natural dyes, and that is one thing that keeps me going.) Buckle your safety belts, there’s a hefty dose of science coming (and a bit of philosophy too).
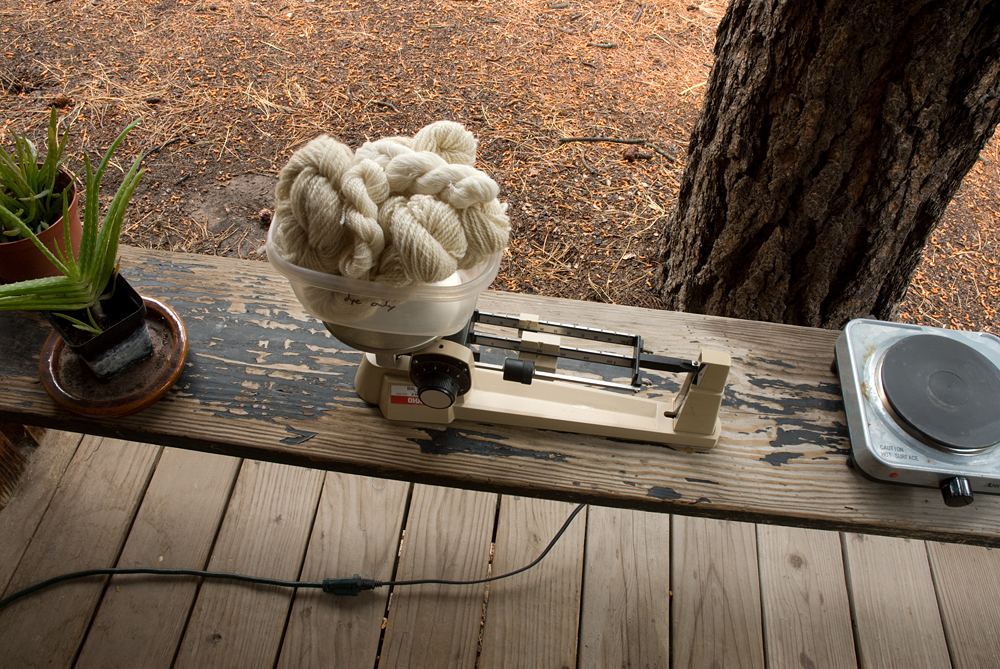
This is my back porch “dye studio.” It’s just a bench where I can put an electric burner and whatever else I need … and it’s my absolute favorite place to be any time the weather is warm enough.
First
things first: there are some basic facts and ideas that we are going
to need for all the discussion about dyeing that follows, so I’ll put
them up here.
Fibers
Animal-grown fibers like wool, silk, alpaca, etc. are made of proteins. These fibers are the easiest to dye, because they readily react with the compounds in mordants and dyes. In fact, as Elizabeth Wayland Barber points out in her (amazing and highly recommended) book Women’s Work: The First 20,000 Years, it was the domestication of sheep and silk worms and the development of wool and silk fabrics that led to color in fashion!
Plant-grown fibers like cotton, linen, and hemp are made of cellulose, and are chemically and structurally different from protein fibers. To bust our first myth right here: it is totally possible to get vibrant colors using natural dyes on plant fibers—it just took a humans a little bit longer to figure out how. The famously intense “Turkey red” color, and the original printed cottons from India that took Europe by storm in the 17th century, were all made with natural dyes on cellulose fibers! They do require a different process for scouring and mordanting than protein fibers to produce deep colors.
Rayon
is a man-made fiber created by chemically breaking down wood pulp and
extruding it. Since it is made of cellulose, it behaves similarly to
plant fibers in dyeing. Bamboo is also a regenerated cellulose fiber
(unless, and more rarely, it is processed more like linen). According
to my natural dye and fiber mentor Catharine Ellis (see resources at
the end of this post) “Tencel” and “Lyocell” are regenerated
cellulose fibers produced with a method that recycles almost all of
the chemicals and water used, while other methods of producing rayon
and bamboo fibers create a lot of chemical waste.
Almost all other synthetic fibers don’t work with natural dyes, so I won’t cover them here. (In addition, synthetic fibers like polyester, nylon, etc. are basically plastic, and create similar environmental issues as other plastics do when they are made, used, and discarded. Especially troubling: they introduce micro-plastics into waterways when they are washed.)
Weight
of Fiber
The best way to figure out how much dye, mordant, detergent for scouring, or whatever else you need for your project is to base it on the weight of the fiber you are dyeing. Also sometimes called “weight of goods,” this is the dry weight of the thing you want to dye, whether it is wool yarn or a T-shirt. Weigh it, and write down the weight, preferably in your dye notebook, or somewhere you will be able to find it later. If you are scouring a few things that you plan to dye separately, do your future self a favor and write down the weights of the individual items, rather than just the total. I encourage you to weigh in grams if possible—not to convert ounces to grams (that’s difficult)—just leave all your weights in grams and find percentages that way (that’s easy: 10% of 487 grams is 48.7 grams, etc.).
Dye
Pots and Utensils
It’s
important to use separate pots, spoons, tongs, containers for
weighing things, etc. for dyeing. Do not use the ones you cook with.
My philosophy on this is that “non-toxic” is not the same as
“good for you to eat.” A large stainless steel pot is a dyer’s
best friend, and small ones are also useful. A pot or two and a spoon
or tongs to stir with are enough to get you started.
The
pot you use for scouring, mordanting, and dyeing should be big enough
to give your fiber room to move. If it’s too bunched up, the solution
won’t be able to get to all of it and it will dye unevenly. I will
often split fabric yardage into a few pieces to make it easier to
stir without becoming hopelessly wrapped around itself, and allow it
to be divided into batches if needed.
Assuming you aren’t yet overwhelmed, let’s move on. Now we have some natural fiber yarn or fabric that we want to dye. Mordants (to be covered in a later post) and dyes form chemical bonds with the fiber at a molecular level, and they can’t do that if there are a lot of waxes, oils, or dirt in the way—in other words if the fiber is dirty. This is where scouring comes in, meaning intense washing, to make sure the fibers can absorb as much dye as possible.
Does
Scouring Really Make a Difference?
Short
answer: Yes.
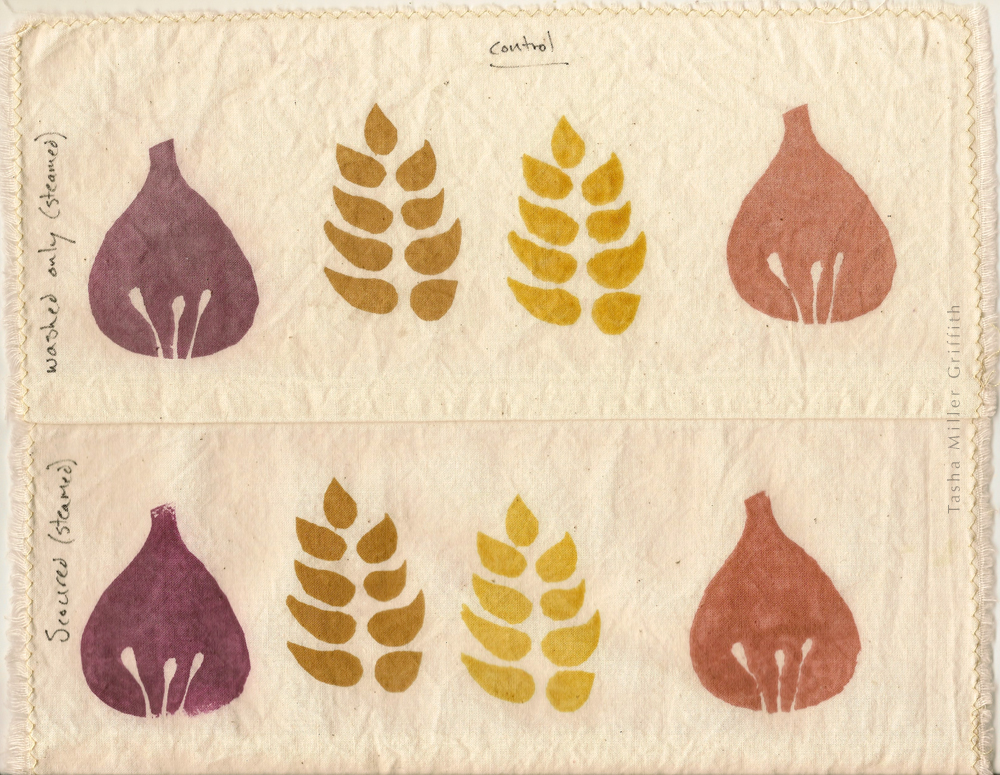
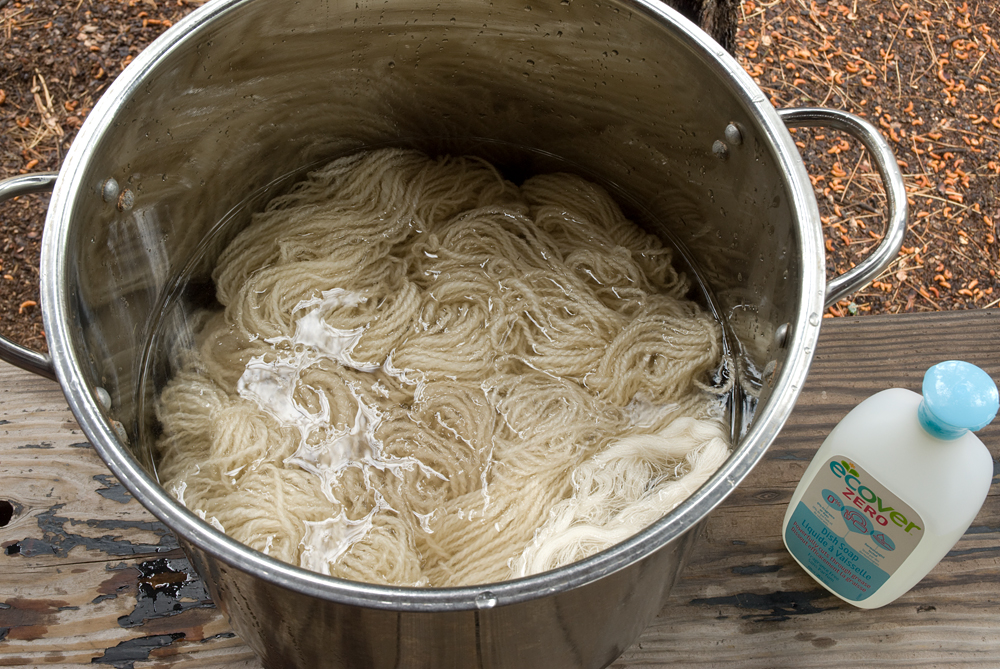
Here below are some of the very first samples I made to test things out. The background is unbleached cotton muslin fabric, washed in the washing machine only (top), or scoured (bottom), before printing with (left to right) cochineal, black tea, Osage orange, and madder dye pastes.1 There is no mordant on these, which is why the colors are dull, particularly the cochineal (more about that later). Notice the differences between the two treatments, how three of the four colors are more saturated on the scoured fabric. (I’m honestly not sure what’s going on with the other color, Osage orange, maybe I will know the answer in another five years or so …)
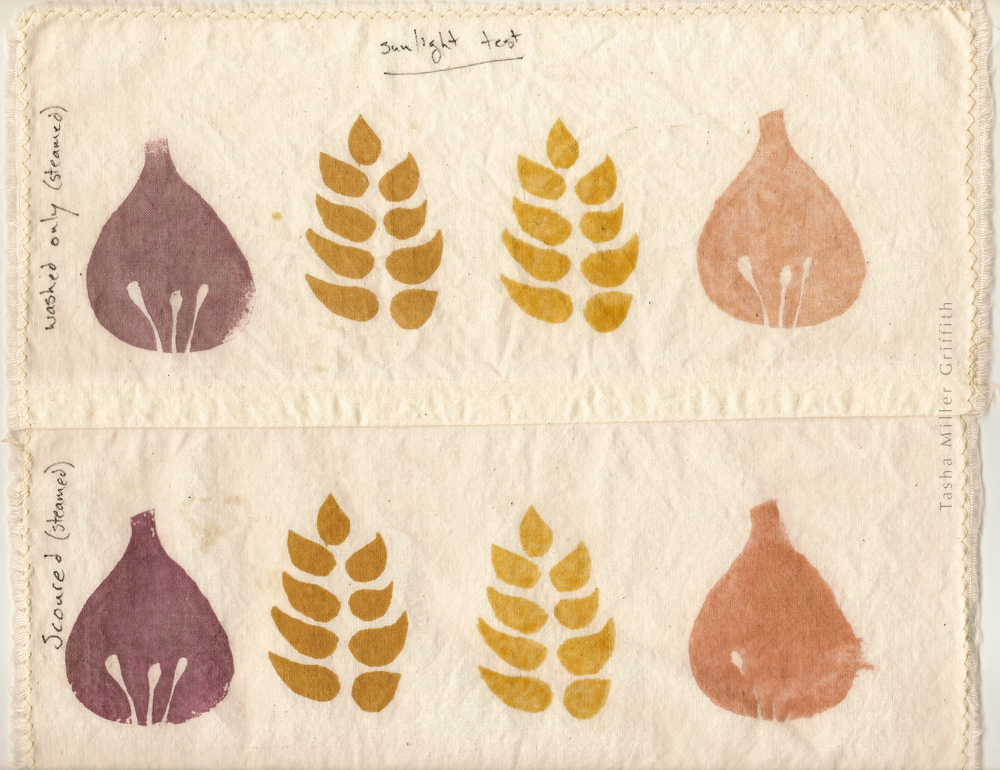
Below
are samples from the same batch (as close to identical as possible),
after a couple of weeks in the sun. More dye can bond with the fibers
in the scoured samples, which means not only are the colors deeper to
begin with, but they last longer. I got similar results with samples
that were washed multiple times. I can also see the same effect on
wool and silk fabrics that were either hand washed, or scoured using
the method below.
Do I
Have to Scour Everything?
Short
answer: It’s up to you.
If you
can’t or don’t want to scour your fiber before dyeing, wash it as
thoroughly as you can, and know that while you probably won’t get the
best possible result, you will still get color to attach.
Fabrics
and yarns that are already bleached (stark snow white instead of a
softer “natural” color) have been intensely scoured at the
factory where they were made, and usually don’t need scouring again.
You should still wash them thoroughly (in a hot water, long cycle if
cotton or linen, or by hand if wool or silk), to get rid of any
starches, sizing, oils etc. that may have been added.
I can’t talk about all of this without encouraging us all to think more broadly about where the materials we are using come from, especially if we are buying them new rather than secondhand. Bleached fabric or yarn might be easier for us to work with at home, but where was it processed, what chemicals were used to scour and bleach it, and what precautions were taken to protect the workers and the local environment from overexposure to those chemicals? One of the big reasons I started working with natural dyes was to give myself creative options that I really felt good about. Being more involved in the process from fiber to garment means that I am responsible for a lot of decisions that it’s easy to not even think about in a consumer society—and that I am taking back the power and the freedom to decide for myself how the textiles that touch my body every day will be made.
To
Scour Protein Fibers
I adapted this method (my current favorite) from Kristine Vejar’s book The Modern Natural Dyer.
1. Pour an inch or so of hot water in the bottom of your pot. Add pH neutral detergent* at a percentage of 0.5% of your weight of fiber—equivalent to about ½ teaspoon for 500 grams of fiber or just a few drops for 100 grams. Stir to dissolve the detergent. Add enough additional warm water so that the fiber will have some room to move.
2. Add your fiber, and more warm water to cover, if needed.
3. Slowly bring the water up to around 180° F (just below a simmer). Many sources say that boiling can damage silk, and it will felt wool. Hold at around 180° for about 30 minutes. Stir the fabric every 5 to 10 minutes throughout the process, bringing sections from the bottom to the top, and redistributing any clumps or tight areas that form, so the scouring water has a chance to get to every part of it.
4. Take the pot off the heat, and let it cool down until you can put your gloved hands in the water comfortably.
5. Gently rinse the fabric in a couple of changes of water at the same temperature as the cooled-off scouring bath.
Why
This Way?
*Detergents: Protein fibers are slightly acidic (human hair is too), and can be damaged by alkaline solutions, which is why it’s important to use a pH neutral or slightly acidic detergent. (A lot of laundry detergents work in part by being alkaline, so they aren’t recommended.) Dish detergent works, and I have successfully scoured a fair amount of wool and silk fabric using Ecover brand Zero (unscented). But if your fiber is greasy and you need more than the small amount suggested here, it can take a ridiculous amount of rinsing to get rid of the dish soap suds. Lately I have been using a detergent designed for cleaning wool, like Unicorn Beyond Clean or Kookaburra Scour.2
Wool
and other animal fibers are almost always thoroughly washed (also
called scouring) before they are processed into roving, yarn, and
fabric. A lot of that processing relies on the addition of small
amounts of oil to make it go smoothly, and the carding/spinning oil
is the primary thing we want to remove by scouring wool yarn or
fabric again before dyeing, along with any leftover lanolin, etc.
Note:
Most types of wool are naturally prone to felting, which occurs with
moisture and agitation, and is accelerated by heat and temperature
shocks. In other words, the conditions needed for scouring and dyeing
are also conducive to felting, so treat your wool gently. Raise and
lower the temperature of whatever bath the wool is in slowly, and
stir it only as much as needed for the solution to get to all the
fibers, turning the yarn or fabric around gently. You can also dye
wool as it comes off the sheep, before it is spun or woven, but be
aware that the fibers are especially prone to felting before they
have the twist of yarn to organize and protect them, so be extra
careful!
Silk,
which is extruded by silkworms as they make their cocoons, includes a
gummy substance called seracin as well as fiber. Both of these
components are proteins, and both absorb dye. Most silk fabrics and
yarns are sold either “de-gummed” with the seracin removed, or
with it left in on purpose to make the fabric crisp. I am not a silk
expert, but I have had good results using the same gentle scouring
above with silk fabrics.
To Scour Cellulose Fibers
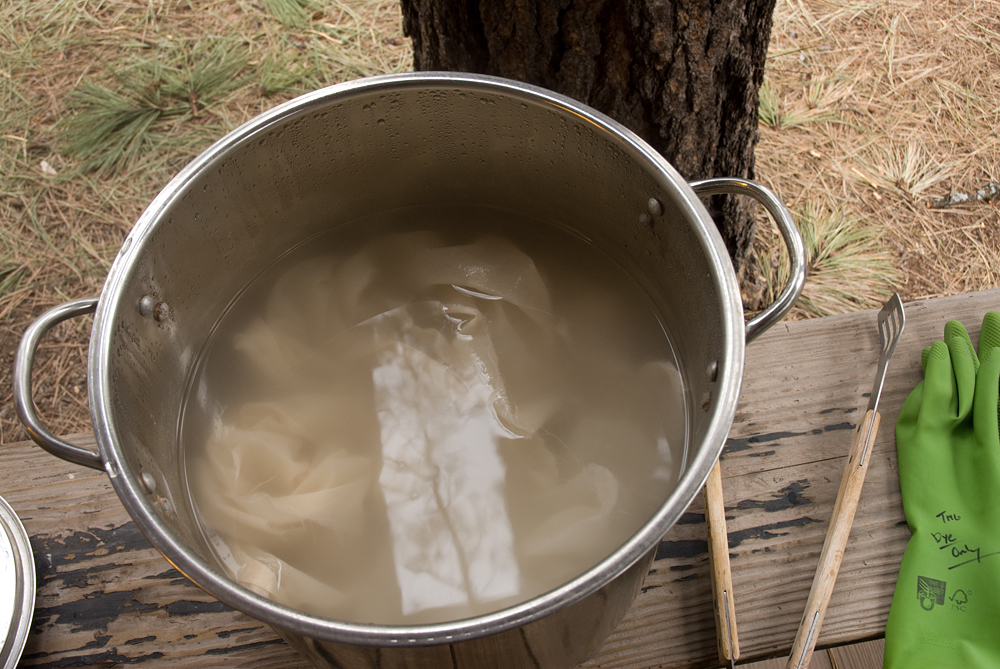
This method is also adapted from The Modern Natural Dyer. I usually use a little less soda ash than the recipe in the book, and it seems to be enough for unbleached cotton fabric. I haven’t been able to see a difference adding detergent to this scour, the soda ash alone works really well, and rinses out easily.
1. Pour an inch or so of hot water in the bottom of your pot. Add soda ash at 4% of your weight of fiber—equivalent to about 1 teaspoon for 100 grams of fiber. Wearing gloves, stir the water to dissolve everything. Add enough hot water so that the fabric will have some room to move.
2. Add your fabric, and more hot water to cover, if needed.
3. Bring the water up to a simmer (this may take a while if the pot is large), and let it simmer gently for about 30 minutes (with the lid ajar so it doesn’t boil over). In my experience, having the pot at a rolling boil just pushes sections of your fiber out of the water, especially if you are scouring fabric. Stir the fiber every 5 to 10 minutes throughout the heating and simmering, bringing sections from the bottom to the top, and redistributing any clumps or tight areas that form, so the scouring water has a chance to get to every part of it.
4. Take the pot off the heat, and let it cool down until you can put your gloved hands in the water comfortably. Squeeze out the fiber and set it aside (the pot lid is a good place to put it). The water will probably look cloudy and slightly brownish. If it looks very dark and dirty, you may need to scour this fiber again with a fresh bath.
Be a good citizen, and add a little vinegar to the water in the pot to help neutralize the alkalinity before you pour the water down the drain, especially if your drain goes to a septic system.
5. Rinse the fabric in a few changes of warm to hot water.
Why
This Way?
Cotton
isn’t washed before spinning and weaving, because the natural waxes
it contains don’t interfere with those processes. But they definitely
interfere with dye reaching the fiber, which is why cotton needs a
little more intense scouring than wool does before dyeing. Cellulose
fibers respond well to alkaline conditions, but can be damaged by
acids. They aren’t damaged by boiling or by quick changes between hot
and cold conditions, which makes them easy to handle during scouring.
Soda
ash is sodium carbonate, an alkaline salt. It occurs naturally where
lakes evaporate, and is used for everything from water softening and
adjusting the pH in swimming pools to making glass. The fact that
it’s quite alkaline is what makes it work so well for scouring
(recall that soap is traditionally made by combining a strong
alkaline substance with fat). That also makes irritating to your skin
and eyes, so wear gloves when handling the fiber in this bath, and
don’t hold you head directly above the steaming pot.
Linen and hemp are bast fibers—this means they grow in the stalk of the plant. Pectins hold the whole stalk together, as well as the fiber bundles that make up linen threads. Some of the pectin needs to be dissolved in order for the fiber to be workable (this happens during processing), but if too much breaks down (as can happen in a harsh scouring) the fibers get weak and break easily. I asked Cassie Dickson3, a linen expert who grows and processes a lot of her own fiber, if she scours her linen before dyeing and she said that she does. Currently I’m recommending taking it a little gentler with linen than cotton, start with a little less soda ash and see how you like the results.
By the way, if you are wondering whether this kind of scouring is good for difficult household laundry, the answer is: if the difficulty is oily (like pillowcases that spent a few too many nights with someone’s greasy hair) it works amazingly well! If I have scoured some fabric and it still seems like the bath has cleaning power, I will sometimes add a pillowcase or a kitchen towel while the pot is still hot, or add and reheat it later once I remove the fabric I’m going to dye.
Notes
1 A lot of my experiments (and frankly obsession) with natural dyes has centered around using them to screen print designs on fabric. I’ll be using these samples as illustrations, but not explaining this process in detail here. It’s just too much for this format, and I’m still actively trying out various ideas and changing my mind frequently about what is the best practice and what is possible. (I am teaching everything I know about it though.)
2 For more about detergents and scouring wool, see “Scouring: Which Product is Which?” by Beth Smith, PLY Magazine issue 22, Autumn 2018 (The Power Issue).
3
See “Ready for Retting”by Cassie Dickson, PLY Magazine
issue 20, Spring 2018 (The Flax Issue).
Resources
If you
don’t want to wait for me to finish my explanations to go further, I
certainly don’t blame you!
I was fortunate enough to take a workshop with Catharine Ellis last summer, and I have the greatest respect for her work. She has a new book with Joy Boutrup called The Art and Science of Natural Dyes: Principles, Experiments, and Results which is by far the most useful, practical, and comprehensive natural dye how-to book I’ve ever seen. If it’s out of your budget, may I suggest asking your local library to get a copy?
Catharine’s blog is full of fascinating and useful information too.
Hi all! Here are a few fun things in my world happening now and coming up soon:
The info for my spring and summer workshops is up! I have new classes at Textiles West (in Colorado Springs) in May, and at the Intermountain Weavers Conference (in Durango, CO) in July. Plus, screen printing with natural dyes at Flag Wool Festival, embroidery and an introduction to natural dyes at Coconino Center for the Arts, and a return to both John C. Campbell Folk School and North House Folk School later in the summer! Check out all the details over here.
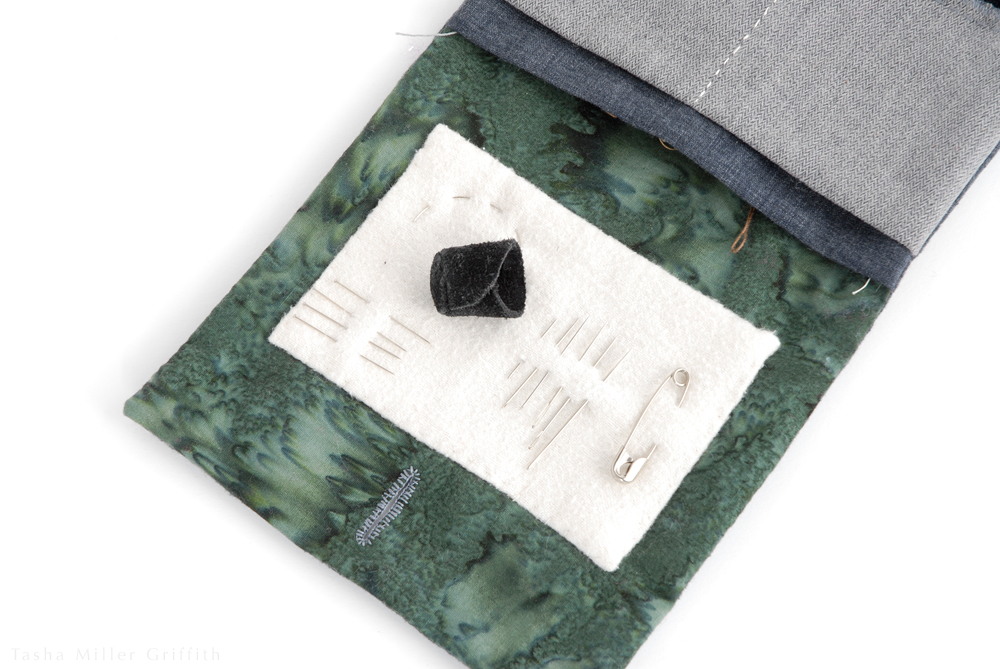
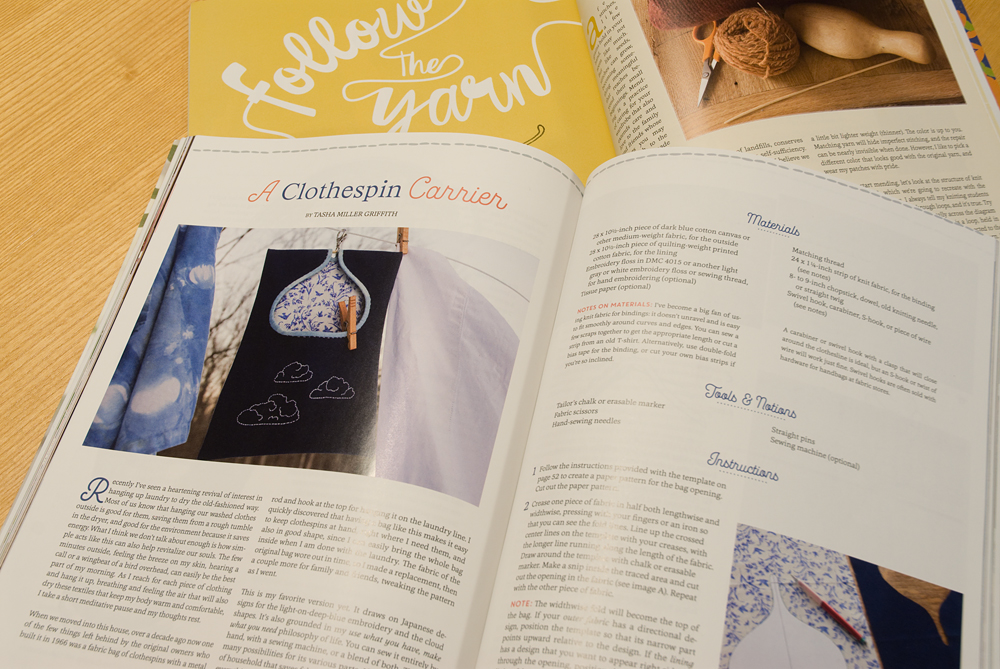
Also, pictured above, I have an article in the current issue (31 :: REVIVE) of Taproot magazine! It’s a tutorial for sewing and embroidering a cloth bag to hold your clothespins. And because (although it seems inconceivable) I don’t think I ever mentioned it here, if you happen to see a copy of issue 28 :: GRAIN anywhere, my favorite method for mending knits is in there.
I have a clear intention of being more present in this space in 2019, and offering more content here. At least in the short term, it’s looking good …
Hello everybody, it’s been a little while! I’m a firm believer in blogging whenever you can and feel inspired, not on a pre-ordered schedule, and I also think that most blogging apologies are a waste of time and just make you feel bad. Still, it’s been much longer than I meant it to be, and I’d like to echo Molly’s sentiments on Orangette: if I ever decide to leave this space for good, I’ll tell you so. It seems only fair. The way she puts it at the end of that post is so good.
The first reason for my losing track of online things was one of the better ones: for the second time ever, we hosted our annual family and friends craft retreat at my house last month. The first time we hosted it, two years ago, was when I had an inspiration—the infinite to-do list—that started a big difference in my thinking.
I have to say, I was pretty proud of myself this time. I felt calm and relaxed in the lead-up, and I even slept well before and during at least the first part of the week—proof that I’ve made progress as a human lately, and let go of some anxiety, even the good kind that’s more like excitement. (If you need this too, may I highly recommend the book The Three Marriages by David Whyte, which is full of deep insights about things in general, and came into my life at exactly the right time. You can also listen to a good interview with him from On Being.)
It was one of those times when being calmer and going slower actually ended up meaning that I got more done. We cleaned off the back porch, for instance, which probably hadn’t been done in the two intervening years …
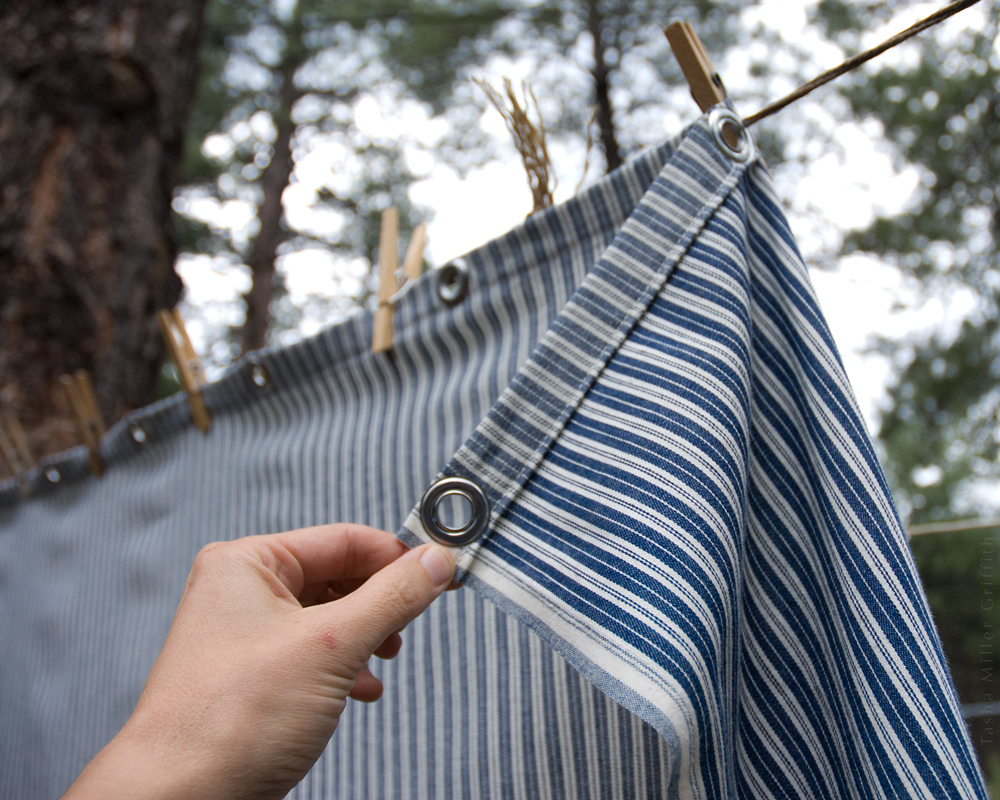
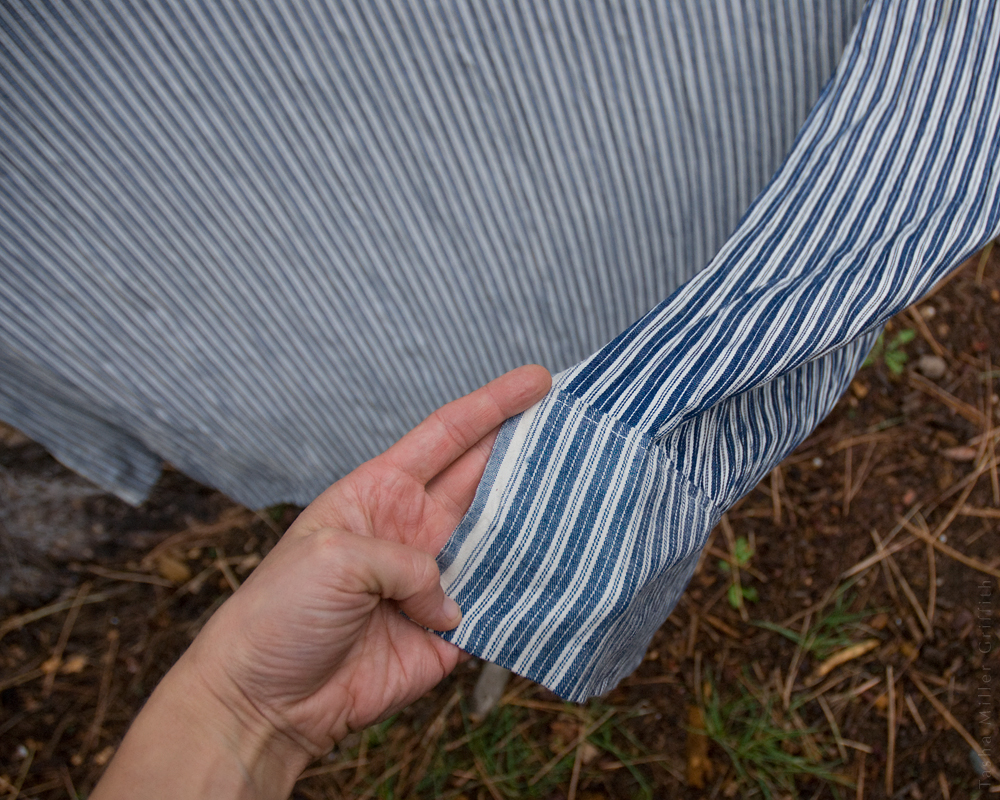
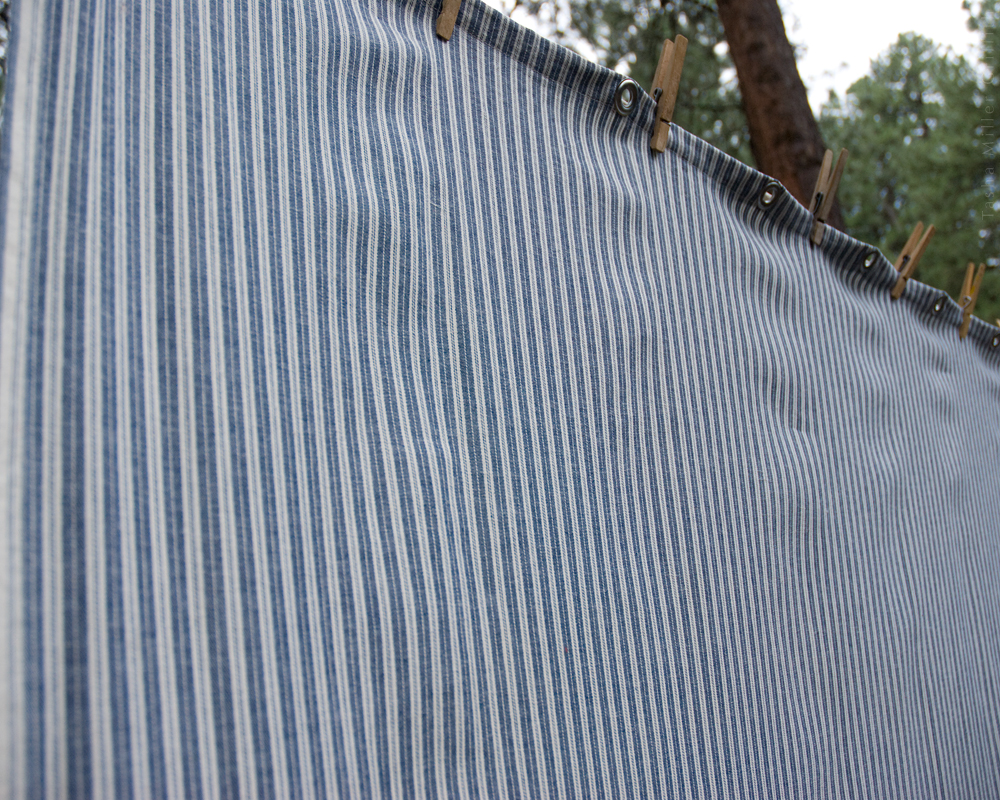
And I made a new shower curtain! Well, “made” might be exaggerating somewhat. I took a length of wide fabric, hemmed it, installed some grommets, and there we go.
I’d like to apologize to all of our previous guests for the old shower curtain, a cheap vinyl thing with one ripped eyelet, which someone bought right as we were moving into our house a decade or so ago, and had been there in various states of nastiness ever since. Incidentally, I also figured out that if I actually took the vinyl thing down, soaked it in the tub with vinegar and dish soap, and took a scrub brush to it, it came out clean—enough better that I decided to save it in case I need a waterproof something.
Back to the new curtain though: I’ve been slowly moving more and more away from synthetic materials and towards natural ones for all kinds of reasons. I got another push that way when I found out that polyester and nylon clothes shed tiny synthetic fibers in the wash which eventually find their way into the oceans, enter the food chain when they’re eaten by small critters, and never break down. I first heard about this on Science Friday a while back (but cannot now find the specific program). It came up again recently on Root Simple. This was one of those last-straw moments. I’m convinced, I’m done with that, and I’ve been trying harder not to buy any synthetic fabrics.
So I wanted a natural fiber shower curtain, and as I was looking for one and researching options, it occurred to me that I had in my stash some wide cotton fabric which was basically what I was looking for—lightweight but tightly woven. And with stripes!
I measured the old curtain to figure out what length would work best (a little shorter than standard turns out to be good for my tub) and if one width of the fabric would be enough (it was, but you could always add a seam if not).
I made a deep hem on the bottom, and a narrower one at the top. The hardest part was hammering in the grommets. Typically for me, I liked the “wrong” side of the fabric better since it’s a little more textured and subtle, so I put that on the outside.
I had a few questions, but figured it was worth trying to see what would happen. Would plain cotton keep the water inside my shower? Yes it did! Would a deep hem be enough to weigh down the bottom? It was! To be on the safe side as far as mildew, I’ve been wringing the curtain out after I shower, and then spreading it out as much as possible to dry. So far, it’s working really well, and it’s so much nicer to look at than the old one, it’s fairly ridiculous. I also like the idea that I can take this one down, put it in through the washer, and hang it to dry in the sun once a month or so, which should actually be easier than cleaning the vinyl one.
If you wanted a sheer curtain, or a liner for a more decorative fabric on the outside, I suspect that silk organza would be amazing (although I haven’t tried it, not having that much on hand). Something so thin but crisp and tightly woven should dry almost instantly, and look beautiful. Oh printed silk …
Anyway, I hope this give you all some ideas!
It feels good to be writing here, and I intend to do it again soon.
A beginning embroidery primer, with free patterns.
For the last few years, May has found us around Washington DC. We usually do two art shows there, and in between stay with some dear friends and ride the Metro to visit the sites of our nation’s capitol. The whole time we’re surrounded by so many people (especially from my middle-size-town perspective). Since it’sMe-Made-May, I spend even more time thinking about what those people are wearing than I normally would. It’s easy to get a little bummed out when I look around and consider that, of the hundreds of strangers I can see at any given moment on the subway platform or at a monument, perhaps none of them are wearing anything handmade. But it also got me thinking that maybe they just haven’t considered it, that if they knew there was a whole movement going on, that folks around the country and the world were encouraging each other and posting about their handmade wardrobes at that very moment, maybe it would encourage a few of them to at least think about it.
So I wanted to bring something that said I was participating in Me-Made-May, and/or that I had made part of my outfit, off the internet and onto my physical person where all those strangers could see it. I started to talking to Zoe about it, and she liked the idea too. I owe her big thanks for her support, bouncing ideas around, and of course for putting on this challenge for us again this year! Since MMM is all about stitching, and I’ve been doing a lot of hand-sewing and embroidery lately, here’s what I ended up with:
You can make them too! I designed these little badges with embroidery beginners in mind, and I’ll walk you through some parts that might be confusing, so even if hand-sewing isn’t usually your thing, you can handle it. If you’re already further along in your embroidery journey, feel free to skip down and glance through the photos, then print the pattern and get started. Click the link below to get the pattern:
You’ll need some felt, and some embroidery floss, thread, or fine yarn.
Wool felt is an ideal material to start stitching on, since it’s forgiving, doesn’t ravel, is thick enough to not need backing, and you can hide ends and extra stitches in the thickness.
The Me-Made-May badge is stitched here in variagated cotton floss, and the “I MADE this!” one in wool thread. There’s more about the specific threads I used at the end of this post.
You’ll also need a few basic sewing tools: a sharp needle with a long eye, and a small sharp scissors. I always wear a thimble like this onewhen I’m hand stitching.
Finally, you’ll need a scrap of tissue paper and a fine-point pen to transfer your design to the felt.
thread types
Let’s talk for a minute about the differences between cotton and wool, and floss and thread, for stitching. Wool threads designed for embroidery are often labeled “crewel” (a type of embroidery) and are usually made up of two single strands (called plies) twisted together. This plying is integral to the structure of the thread, and it’s not meant to be separated.
Cotton floss often comes in a loosely twisted bundle of threads, which can be separated to make various thicknesses. This is called “strandable” floss. If you look closely (maybe with a magnifier), each strand of this kind of floss actually has its own two-ply structure. Some cotton threads have a non-strandable structure as well.
Just like in sewing or knitting, the different properties of wool and cotton fibers make a difference to how they work in embroidery. Wool’s crimpy, elastic nature means that it plumps up, filling gaps and making it easier to embroider a smooth satin stitch or a plush knot. Cotton is denser, smoother, and less elastic, meaning you may need more thread to cover the same area, and the stitching will have a tighter, flatter look.
getting started
Put a little piece of tissue paper over the printed pattern you want to make. You can use scraps of tissue, and iron them flat if necessary. Using a fine-point pen that won’t bleed, trace the pattern carefully, including the circle around the edge. Make a single line for thinner shapes and letters, and draw around the outline of thicker shapes. Pin the tissue to your felt, with the pins outside the circle. You’ll stitch right through the tissue and the felt to make the design.
I tried several methods of transferring the patterns to my felt, and this one worked the best. An iron-on transfer pen (not a pencil) also works, but it makes thick permanent marks that are a little fiddly to apply, and must be covered with stitching.
To thread the needle, I use the techniques I shared in this Seamwork articleabout hand-stitching. I found that it helps to fold over the end of the wool thread, and to wet the end of the cotton floss.
To begin, take a long stitch on the back through the thickness of the felt, coming up near where you want to start. Let a little bit of thread remain on the back surface. You can trim it off later to neaten things up. If possible, take your first stitch as a backstitch to anchor the thread.
General embroidery tips:
Stitch in good light! It’s unbelievable what a difference this makes.
Test out your stitches and thread on a scrap before you start, especially if you are experimenting with new stitches and/or aren’t sure what thickness of thread to use to get the look you want.
How even your stitches look depends mainly on how even the tension is between one stitch and the next. Start off slow and even.
When moving from one letter or shape to the next one, take a stitch through the thickness of the felt to keep it hidden. To keep long stitches from pulling the next part of the embroidery out of shape, push the needle straight through to the back of the work, then take a long stitch into the felt, coming out on the back near where you want to start again. Then bring the needle up to the front in your next spot.
the stitches
Most of the text in these patterns is made with backstitch. I explain this stitch in that Seamwork article, and in even more detail in this post.
Backstitch tips:
Put your needle in right at the end of the last stitch for a solid line.
Look ahead at the section you are stitching, and decide whether to divide it into two stitches or three, etc.
Think about the path of the thread when you come to corners and curves. Remember that where the needle goes in is the beginning of the current stitch, and where it comes out is the end of the next stitch.
For the scallops around the edge of the Me-Made-May badge, I used a simple straight stitch. Follow the individual lines on the pattern for a looser look that shows off the separate threads, or fill in the whole scallop shape, depending on the thread you’re using and the look you’re going for.
I filled in the thicker lines of text with satin stitch, which is basically a row of straight stitches very close together, so that they look like a solid surface. It’s easier to keep these stitches even and plush-looking if you work them over a base of another stitch. For these patterns I outlined the satin stitch sections in backstitch first.
Straight & satin stitch tips:
Backstitch around the outline of all the text, and finish all other parts of the design that use the pattern as a guide, then remove the tissue pattern before you fill in the satin stitch. You’ll be able to see exactly where the stitches are more clearly, and pulling off the tissue will be easier.
Cut carefully around the outer circle of the design. Leave the outside of the tissue pinned to the felt for reference and later cutting (you may actually want a few more pins at this point to hold it smoothly). Tear out the part under the badge itself. Pointed tweezers are an ideal tool for pulling out tiny/stubborn pieces of tissue.
I find it easier to keep an even tension if I put the needle all the way through to the back at the end of each stitch, and bring it up again close to the stitch I just made on the same side of the shape I’m stitching. This method is slower to work than the more common technique of taking the needle under on one side of the shape and up on the other side in one stitch. But, it uses less thread and is easier to control, especially when you’re starting out.
Stitch as close to the foundation backstitches as possible for a full look. You can even push the foundation stitches to the side with the needle to make more space and keep the line of stitches even.
If your satin stitch comes out a little lumpy, it can help to put the eye of your needle into a row of stitching and move it gently back and forth.
When making satin stitch around curves (like on the D in “MADE”) it helps to make the stitches inside the curve as close together as possible, and fan them out a bit on the outside of the curve, a technique that’s illustrated in detail on Needle ‘n Thread here.
The round knots around the outside of the “I MADE this!” badge are colonial knots. They’re a variation on a French knot where you loop the thread in a figure eight around the needle before pushing it back into the fabric. I like these because they hold a larger, more textural shape, and can’t come undone as you’re making them. They look especially plump in wool threads. There are more pictures and explanation about colonial knots on Sarah’s Hand Embroidery Tutorials.
finishing
When you come to the end of a section of thread, bury it through the felt for a short distance and come out on the back. You can trim the ends close, since some thread remains in the thickness to keep your stitches from pulling out.
Once all your stitching is complete, cut out the felt circle, once more going carefully around the shape you traced.
Sew a pin, a clip, or a magnet to the back, and it’s ready to go meet the world.
supplies
I used handmade felt, because I have lots of scraps of it laying around. Use what you can find near you, but if you possibly can, use real wool felt rather than the synthetic stuff. Wool is just so much lovelier to work with, and it will hold up to wear much better. Mine was 2-3mm, or around 1/8” thick. Weir craftssells a variety of felt online, including some that’s handmade and some that’s made in USA.
I discovered two things while looking for threads for this project: there are probably as many small companies and indie dyers making embroidery threads as there are making knitting yarn, and I personally am just not interested in using floss in flat colors. My mom has been into embroidery for as long as I can remember, and a quick dig through just part of her stash resulted in many more beautiful options than I could use.
For the Me-Made-May badge, I chose two colors of variegated cotton “painter’s threads” from Tentakulum; 121 “Cezanne” and 125 “Matisse.” They’re made in Germany, and available through embroidery suppliers in the US, including Artistic Artifacts. DMC also makes a couple of ranges of variegated floss, which are a lot more common, at least where I live.
For the “I MADE this!” design, I used some amazing fine crewel wool thread, dyed with natural pigments by Renaissance Dyeing, out of France; color numbers 0309, 1622, 1708, and 2000. Single colors are available in the US through Hedgehog Handworks. Photos do not do these colors justice; they are good enough to eat! Any crewel wool or very fine yarn that you like would be a good substitute.
In case you’re wondering, while I had plenty of materials to choose from right in front of me, I did do a little searching to see what I could come up with for organic/traceable threads. Renaissance Dyeing looks good on the sustainability front; they use all natural dyes and local wool, it’s just that they’re far away from me. Organic Cotton Plus also sells a line of organic cotton embroidery floss which is grown & spun in Peru and dyed in the USA.
Personally, I think I’ll be using a lot of the yarn scraps I have lying around, especially for larger designs. And I think it would be well worth it to buy (or spin!) some natural colored thread, and drop a tiny skein into every dye pot I try. It takes so little, why not?
resources
All you have to do is start searching on Instagram, Etsy, or wherever you get your internet eye candy to find amazing examples of beautiful modern embroidery. I particularly like Katherine Shaughessy’s crewel work, she has two bookswith a fun modern aesthetic, and sells supplies and patterns (with some free ones) on her site Wool & Hoop. Yumiko Higuchi also does some of my favorite embroidery. She likes to to mix wool & cotton threads, and her book just published in English (Simply Stitched) does a great job of taking advantage of the properties of both, as well as being full of inspiring designs.
If you make one of these, I’d absolutely love to see it! Share it using #mmmay16, #handstitched, or email me a photo. And of course, I’m here to answer questions if I can.
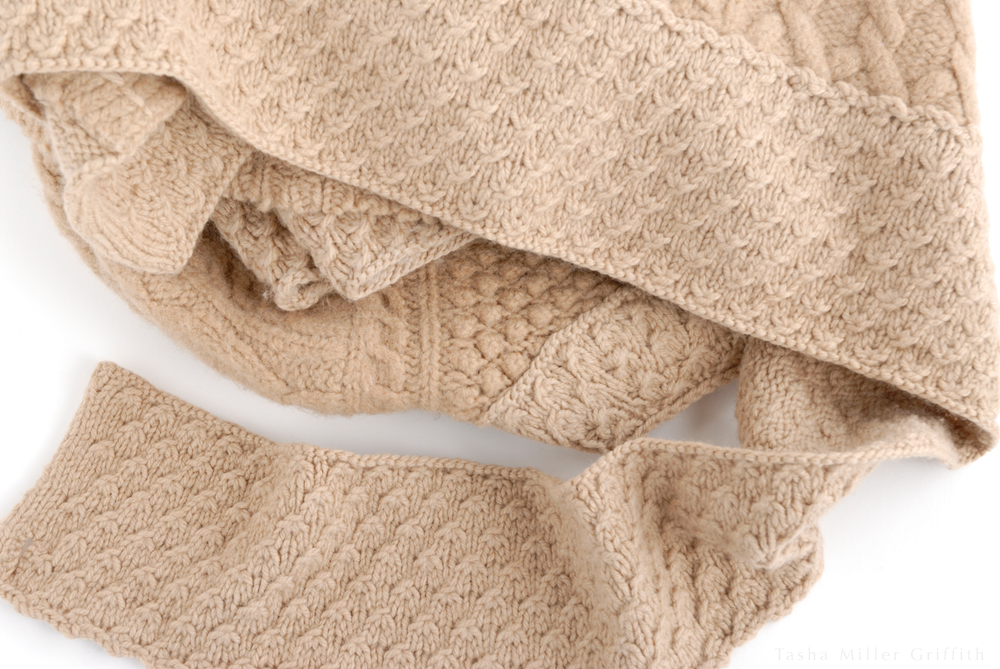
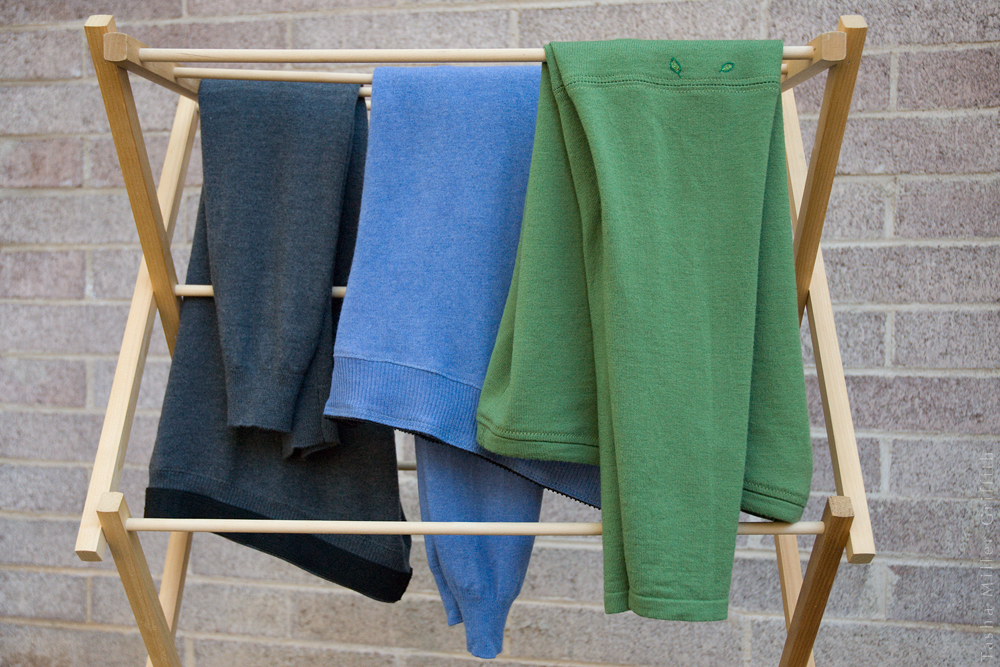
The best thing about making a pledge or taking a challenge may be that it pushes us to find out what’s possible if we stay within certain boundaries. For example: this winter, I found myself in need of some new warm leggings, and a couple of challenges I had in one form or another meant I needed to be creative about how I got them. The results were so good—almost certainly better than whatever I would have come up with without the challenge.
One of my wardrobe goals is to have enough of the right clothes for winter so that I’m cozy (in other words not always cold and therefore slightly grouchy). For the coldest months, it turns out that means wearing an extra warm layer under pants or a long skirt pretty much every day. I’ve already figured out that wool and silk are much warmer than cotton knits (plus I love everything else about wool). I’m still following my fabric-buying pledge from #1year1outfit (until a full year has gone by this summer), which meant I couldn’t hop online and order lovely wool fabrics from New Zealand, even if they are organic. There are a few totally beautiful made-in-USA wool knitsout there, but let’s be honest, I also have a budget. I can’t afford to splurge on every project, and I don’t want to for something like this where I frankly don’t care too much what it looks like, as long as it feels good and works well.
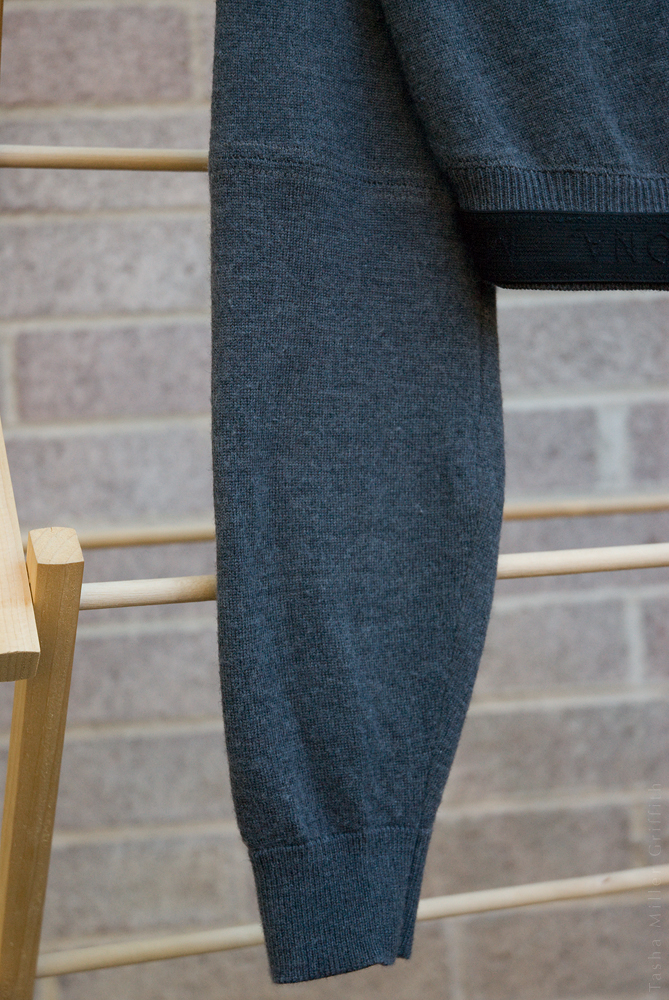
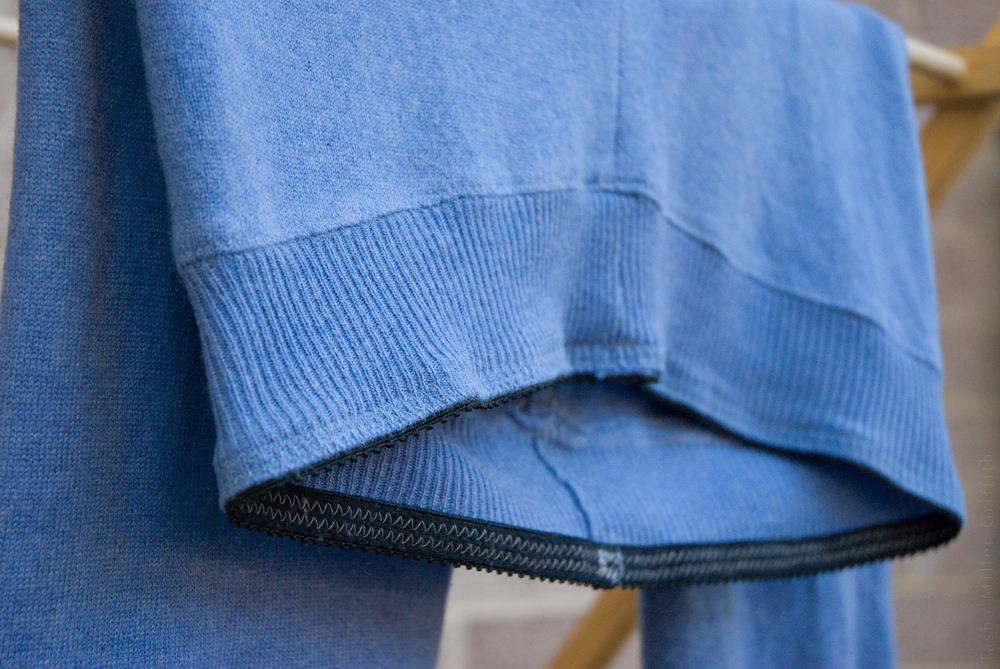
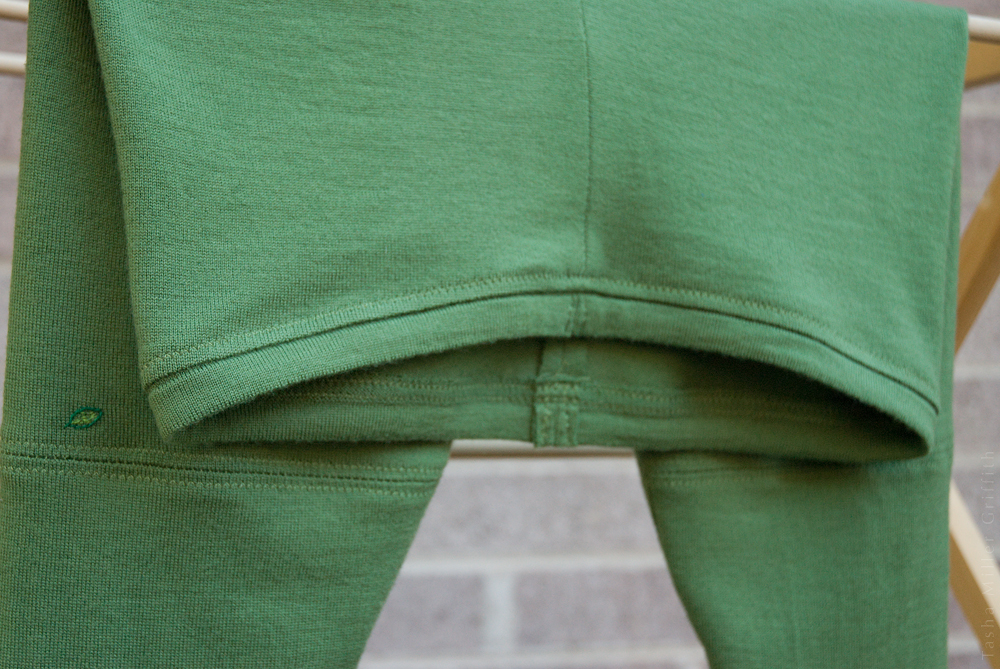
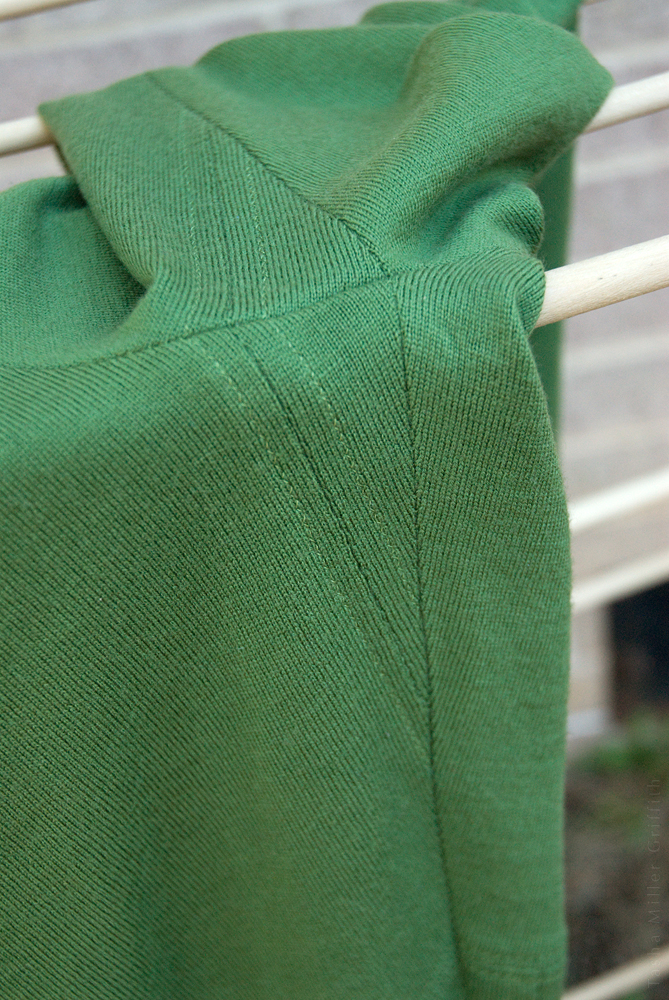
I was thinking about going to the thrift store for something else, and somehow I got the idea that maybe if I found a big enough fine-gauge men’s sweater, I could make leggings out of that. Such, such a good idea!
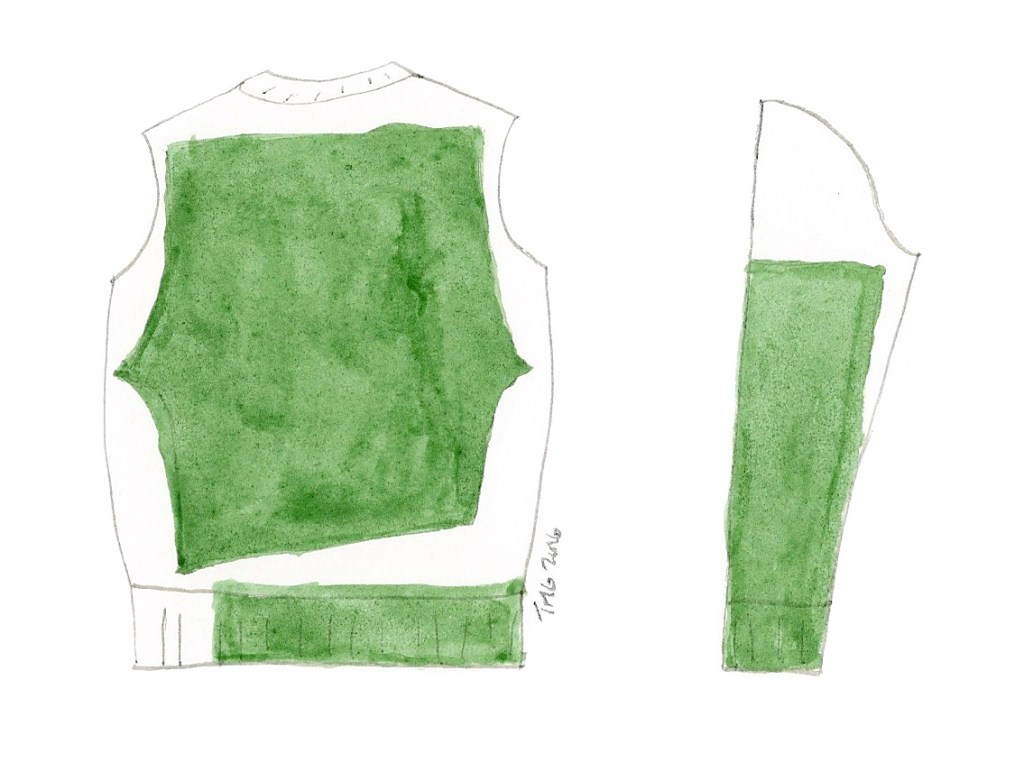
My layout works like this: I cut off the waistband of the sweater, including a little bit above it for seam allowance, and save it for the waistband of the leggings. I flip the sweater inside out and trim off the seams as closely as I can to separate the front from the back. (After makingso many hatsfrom reclaimed cashmere, I am an expert at deconstructing sweaters.) Then I remove the sleeves, in this case leaving the sleeve seams intact as much as possible. The front and back often have fairly different shapes (and a lot of times different grainlines) so I separate them completely at the shoulders after the sleeves are off, and cut from them separately. I cut the top potion of the leggings pattern from the front and back of the sweater, however they best fit. The lower leg comes from the sleeves, utilizing the sleeve cuff as the ankle.
I used the same Espresso Leggings pattern as my first custom fit pair—there’s no going back from custom fit! The lower arm of the sweater was actually a little smaller than the original cuff on my pattern, but it stretched to fit over my ankle just fine. I laid the folded leg pattern over the sleeve, and started to cut where the leg became smaller than the sleeve.
For sewing, I joined the lower leg to the upper leg flat, pressed the seam open, and sewed down the seam allowances for a non-bulky join. Just don’t forget to add a seam allowance to the upper and lower leg when you’re cutting.
As I sewed the inside leg seams, I just merged my seamline into the original seam of the sleeve when I got to that point.
Working on these, I thought a lot about stretch and recovery in knits. All the sweaters I used had about the same horizontal stretch as the fabric I bought for the very first pair; with 4” stretching to about 7”, or 1.75%, so I could use the same size pattern. The sweaters had almost no vertical stretch though, which made the first pair of sweater-cut leggings feel a bit shorter on top than I wanted, so I slashed the pattern and added ¼” vertically above and below the crotch point.
I ended up cutting the ribbing for waistband much shorter than the top of the leggings, since it could stretch much further. The ribbing alone wasn’t quite enough to hold the leggings up, although I loved how it looked. For the charcoal pair, I added wide elastic on top (it may possibly have come off a pair of Bryan’s boxers with worn fabric). This holds up the leggings no problem. The elastic has the recovery needed, but it actually won’t stretch as far as the ribbing, so I had to cut it a little longer. This can make the waist look a little wrinkly by itself, but it all stretches out smooth on the body.
For the second blue/periwinkle pair, I wanted to see if I could use slightly less wide/firm elastic, so I tried some of the bra-band kind from my stash, which is soft on one side, inside the ribbing. That works too, leggings stay up with no problem.
The third green sweater had a narrow hem instead of ribbing at the waist. I decided to use that as a casing for narrow elastic, cutting two sections from the waistband and catching the elastic in the seams. After wearing this pair a couple of times, the jury is still out on whether it could use slightly wider elastic/more pull inside the casing … but if so it would be easy enough to unpick the little vertical seams at the top and sew it in.
Overall, I’m super happy with how these turned out! I answered a few leftover questions from the first-ever pair; like would elastic be enough to hold them at the low-waist level I like (a resounding yes!) and would they work in 100% wool (a big yes again!). Despite the fact that the pattern recommends fabrics with Lycra or Spandex, I like the all-wool version much better (the green and grey pairs are Merino, and the periwinkle is cashmere). These float like a warm soft cloud just touching my skin. They feel amazing and don’t bind in any way. If I were dancing on stage in them, I might care that the knees look a little baggy by the end of the day, but since these are under-layers only, I don’t at all.
So I’m officially set on leggings for a few winters at least! We’ll see how these hold up. They should be fairly easy to patch if needed, since I have the pattern and scraps. I consider the used sweaters a sustainable material source, especially since I can utilize ones that have small stains or holes in them (the little stitched leaves on the green pair are covering former holes in the original sweater). Making leggings this way keeps me within my pledge and my budget. Plus they’re awesome.
If you want to try this, go for it! For my fairly-small-but-very-pair-shaped figure, I need to start with a men’s extra-large sweater to cut the pieces as illustrated. Of course, you can patchwork them a little more if needed. The green sweater was in really good shape (except for the holes), so I got it even though it was a little smaller. I ended up piecing in wedges at the inner thigh to make up for not having quite enough width across the sweater body. It worked fine, but it was a little mind-bending to make sure all the pieces had the right shape and seam allowance, so I don’t recommend it for your first try.
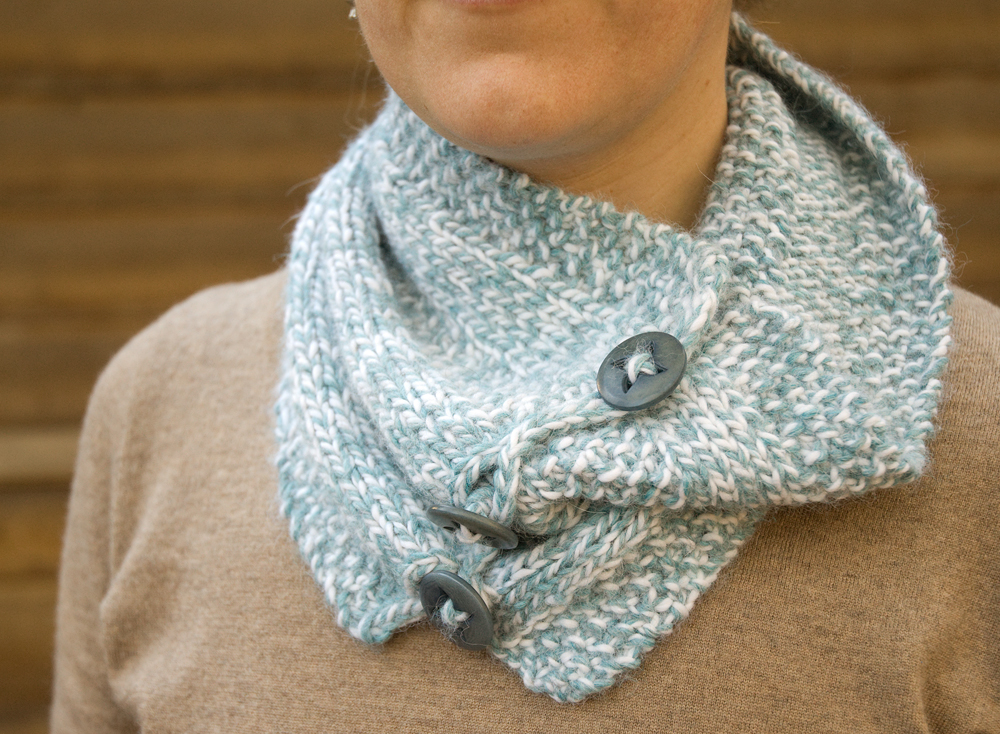
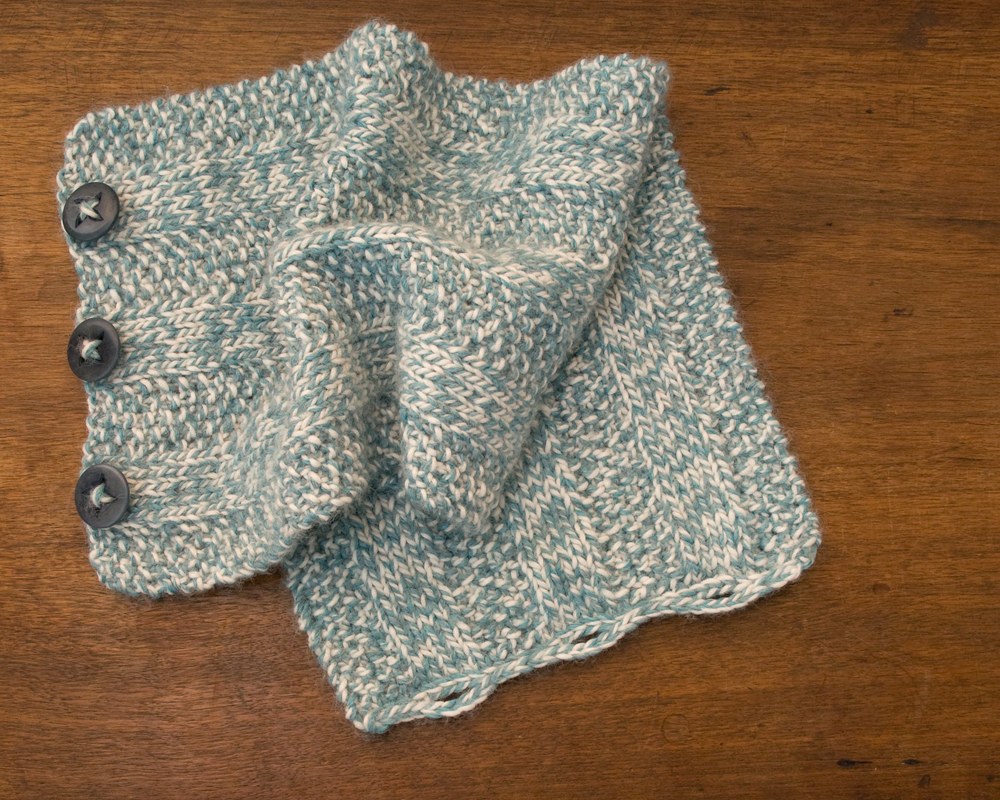
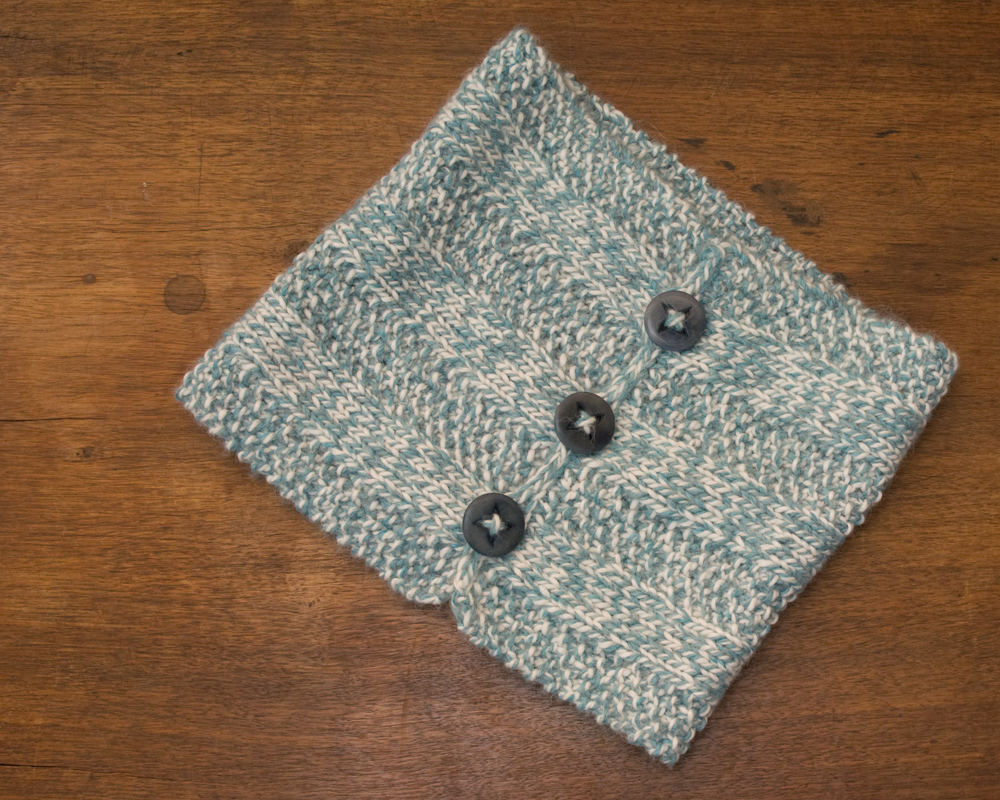
When my cousin was about 12 years old, she knit me a scarf. I’m touched by this gesture every time I think about it. That’s a lot of time and effort to put into an object for someone else when you’re that young. The scarf (at left) is great, made from a colorful thick-and-thin yarn, but it’s kind of short. Then one day a couple of years ago I realized that if I added buttons and buttonholes to the ends, it could be a stylish cowl, and I’d probably wear it a lot more. Which I do.
Then I realized that a cowl like this, just a knitted rectangle with buttons added, would be a perfect second or third knitting project for my students. For when you can knit and purl, but maybe you’d like to make something besides a washcloth using your current skills, before moving on to knitting in the round and all that.
I made a sample one with some seed stitch columns added, and left it at the yarn store where I teach. One day not long ago I was over there, and the owner and one of the employees were telling me about how people ask for the pattern a lot. I was quite surprised. I agreed to write it out. Then I got to thinking, if I’m going to give this pattern to whoever comes into the shop, I’d like to give it to you guys too. So here you go:
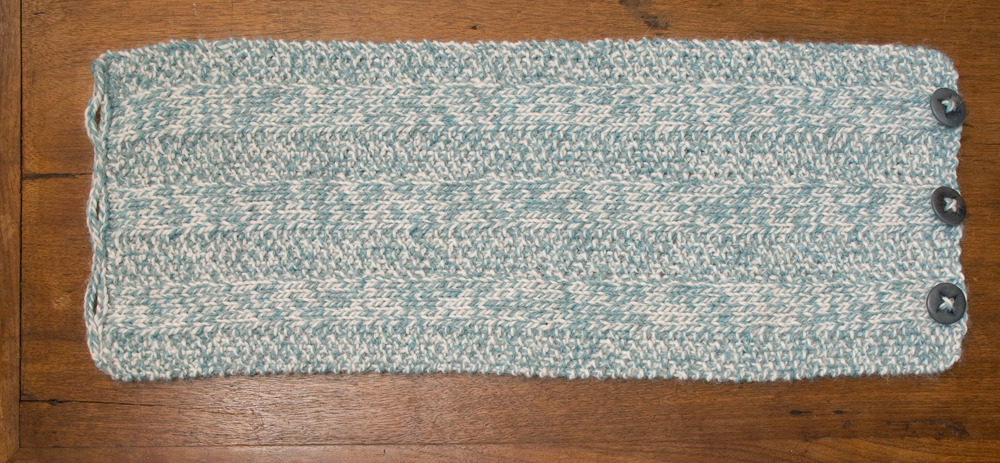
Knitting 102 Cowl Pattern
To make this cowl, you’ll knit a long rectangle, and then use a simple crochet stitch to make buttonholes on one end. Sew buttons on to the other end, and it’s ready to wear!
This concept is very adaptable. It’s easy to vary the yarn, stitch choices, and size to suit your own taste and knitting level.
Materials
Yarn:the sample is made in Cascade Baby Alpaca Chunky, a very soft yarn with a lot of drape and not much bounce. One skein is enough for a small cowl like this. The finished fabric hangs in liquid folds. If you’d like a cowl that will stand up more, choose a yarn with more body and spring.
Gauge: the finished sample has 4 stitches per inch in both stockinette and seed stitch. It’s OK if your gauge comes out a little bit differently, since exact size isn’t super important for this project. It’s still a good idea to make a swatch with your yarn and see if you like how the fabric is coming out, and measure your gauge to get an idea of how big your finished cowl will be.
Needles and Hook: try US size 8 (5mm) knitting needles, but keep in mind that you may need a larger or smaller needle to get the gauge you want (especially if you use a different yarn). You’ll also need a crochet hook in a similar size for the buttonhole loops. In my experience the hook size doesn’t need to be exactly the same for such a small section.
Finished size: the sample cowl is 8 ½“ wide and 22 ½” long. It fits fairly close around my neck, but is big enough to get over my head without undoing the buttons. You can compare the dimensions to any cowl you like to see if this seems like a good size for you.
Directions
Cast on 35 sts (or your stitches per inch x desired size in inches).
Other options: If you’re not quite ready for keeping track of the seed stitch columns, you can also make a perfectly good cowl using garter stitch (knit every stitch, every row) or using seed stitch across the whole piece. (A cowl made with all stockinette stitch—knit one whole row, purl one whole row—will curl up at the edges.)
For the seed stitch pattern, you’ll need an odd number of columns of stitches. In the sample cowl, there are 7 columns of 5 stitches each. You can also vary the number of stitches in each column if that works better with your stitch count.
First row (right side): work in seed stitch for 5 stitches (knit 1, purl 1, knit 1, purl 1, knit 1), and then knit 5 stitches. Repeat this sequence of 10 stitches (2 columns) two more times, and end with 5 stitches of seed stitch.
Note: You may want to put a stitch marker around the needle between the sections to help remember when to switch patterns.
Second row (wrong side):work seed stitch for 5 stitches (knit 1, purl 1, knit 1, purl 1, knit 1), and then purl 5 stitches. Repeat this sequence of 10 stitches (2 columns) two more times, and end with 5 stitches of seed stitch.
Note: this seed stitch in this pattern alternates every stitch between knit and purl, both horizontally and vertically. After set up in the first row, work a knit stitch on top of each purl stitch you see in the seed stitch sections, and vice versa.
Repeat these two rows until you reach your desired length for the cowl.
Bind off—not too tightly or the edge will pucker. Leave a long tail (a couple of feet long) and you can use it to make the buttonhole edge as well.
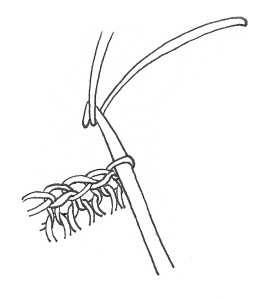
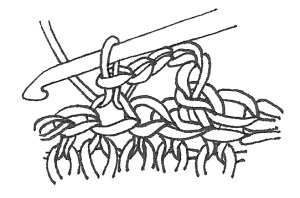
Crochet buttonhole edge
Go into the first stitch of your bind-off with a crochet hook. Pull a small loop of yarn through with the hook. Go into the next bind-off stitch the same way, pull another loop through, and then pull the second loop through the first loop so that you have only one left on the hook.
(I drew these illustrations for my students, who would also have me standing next to them to show them how to do it. If this whole concept of crochet edges is new to you, check out this explanation from Knitty, which covers crocheting on to a knitted edge, as well as the difference between a crochet slip stitch and single crochet stitch.)
Continue in the same way, going into each stitch as you come to it, pulling a loop though it and then through the loop you already have on the needle. This is called a “slip stitch” in American crochet terms.
You’re making a line of crochet stitches, which should look like another bind off row on top of the first one.
When you get to the place where you want to make a buttonhole, chain (pull loops through your working loop one at a time, without connecting to anything else) until you have enough stitches to just fit around your button.
You can make the buttonholes flat to the edge or more of a loop—your choice, depending on where you attach them—but either way they should be just big enough to push the buttons through, otherwise they may come loose while you wear it.
Reattach the chain to the edge by going into the bind-off stitch you choose, and making a slip stitch as you did before.
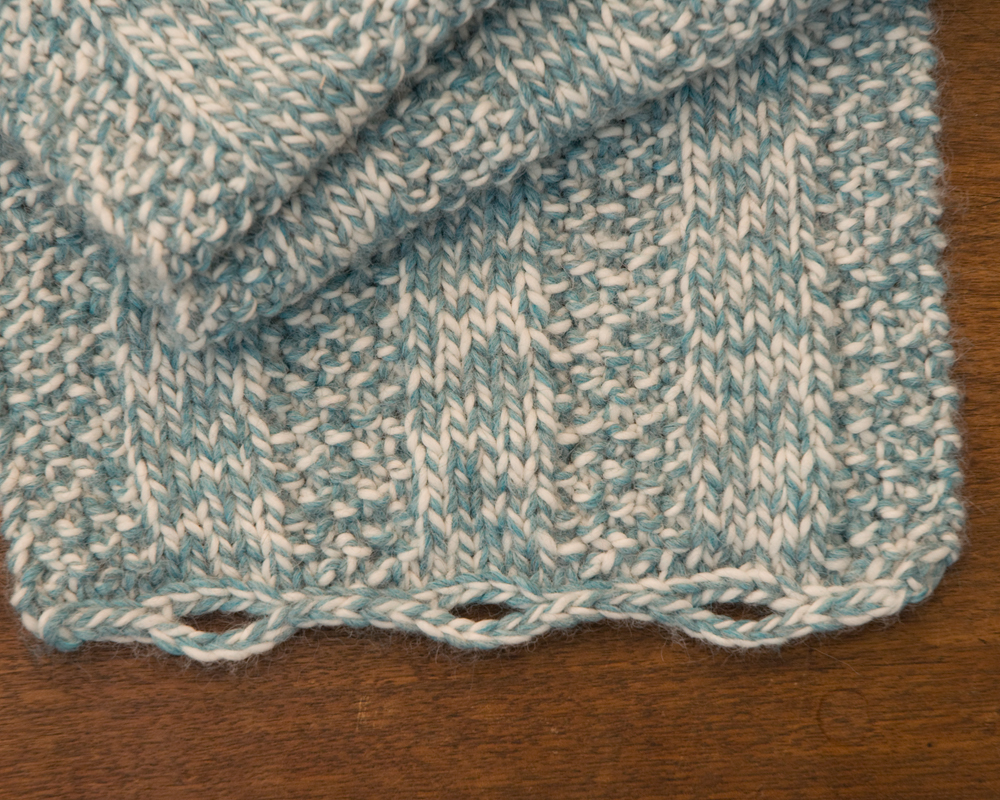
The sample cowl has three large buttons and buttonholes, which line up with the three stockinette stitch columns.
Sew on your buttons to line up with the buttonholes. I use the same method as I do with sewing thread, except the yarn only goes once each way through the buttons since it’s so thick.
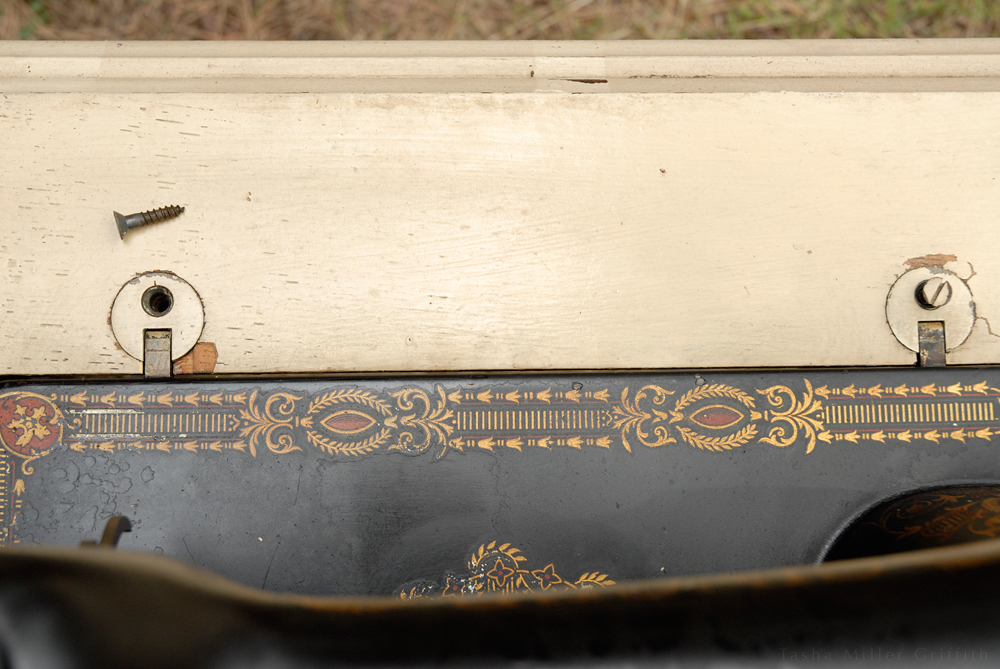
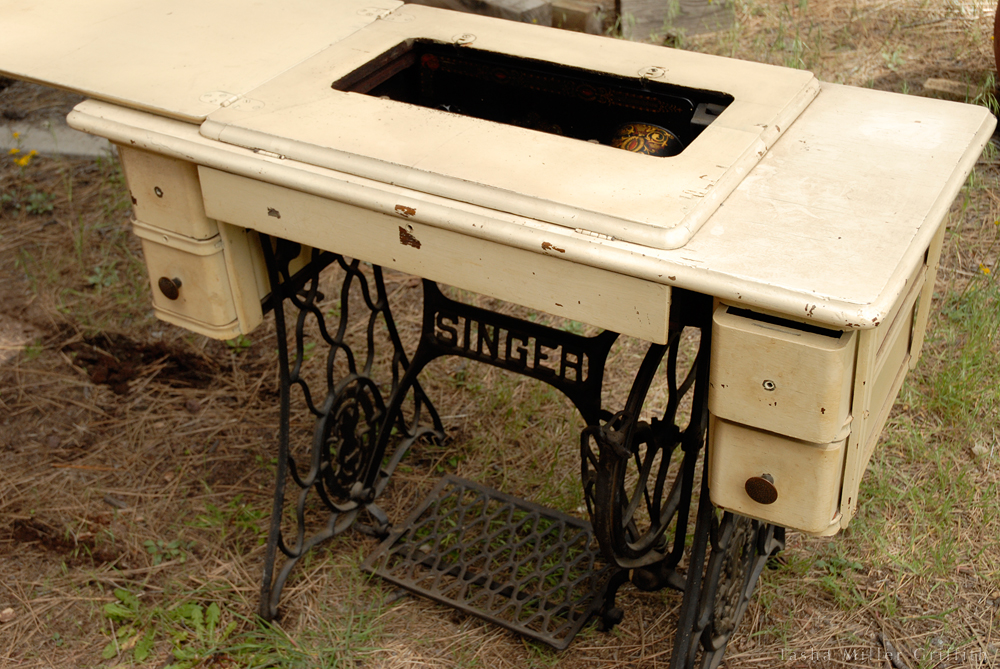
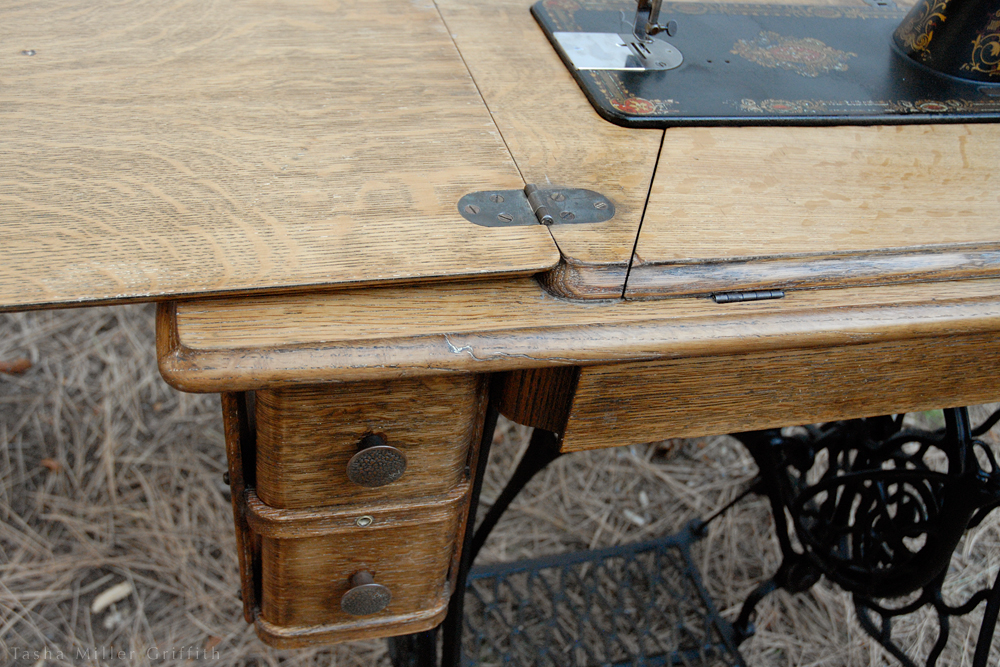
At last, my treadle sewing machine restoration project is done, and at even longer last (depending on how you look at it) I’m sharing it here! This is necessarily a big post. Backstory is at the beginning, practical details are in the middle, words from the heart and pictures of the finished object at the end. I hope you enjoy it!
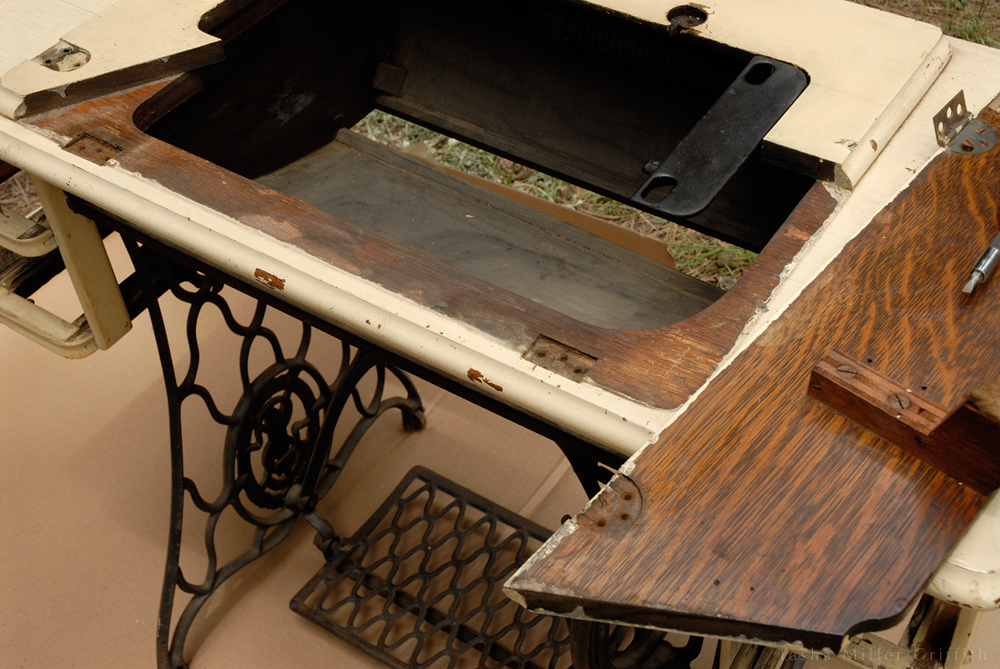
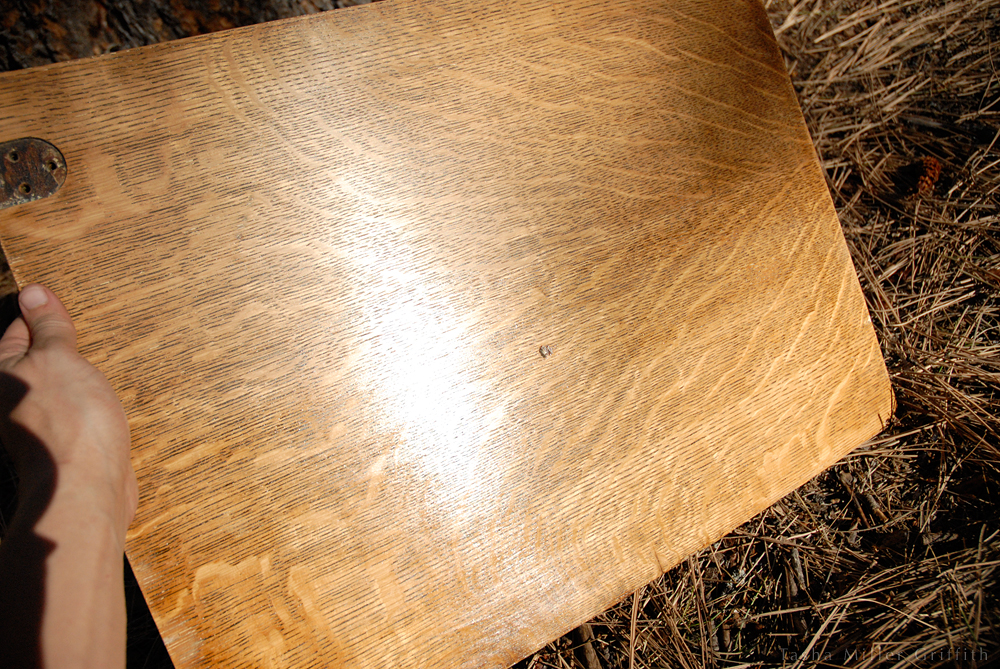
It’s actually much easier to rock the machine up on its hinges and lift it out by loosening screws underneath (as shown in the Seamwork article) before taking out the hardware. But, I really like this photo.
One of my hopes for the article about treadle sewing I wrote for Seamwork this summer was that it would give me the motivational push I needed to get this machine out of the garage. Which it did, but in a longer process than I could have anticipated …
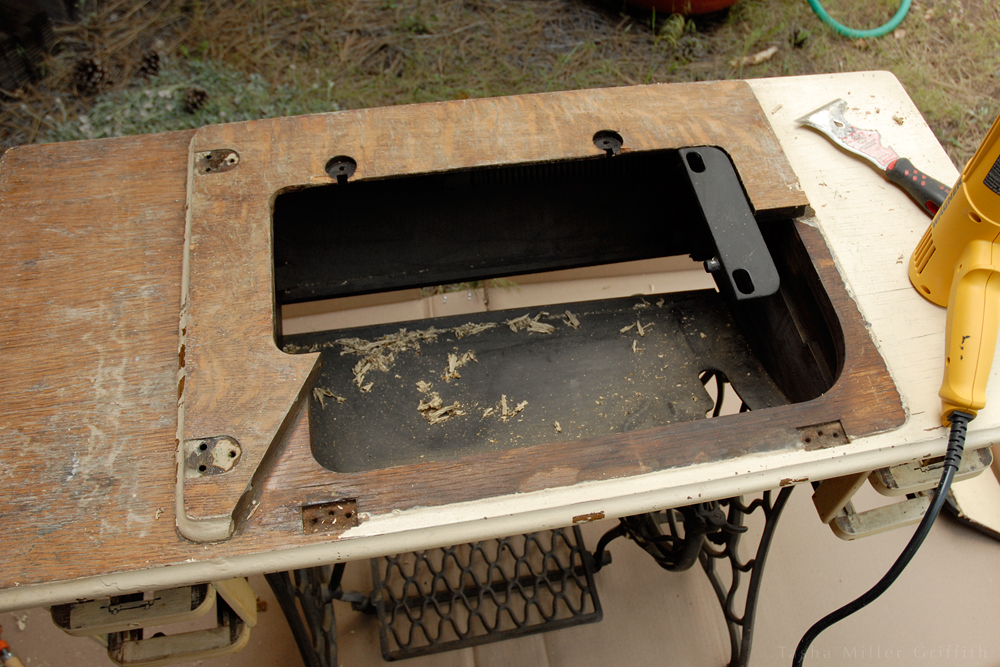
This machine came to me through my husband’s family. It’s remarkably similar to the one my mom inherited, which I learned to sew on. Bryan’s brother took it to the Midwest from Florida for us in his truck, and one summer while we stayed with him during the art fair season, I spent a fair amount of time and elbow grease working over the machine itself, until it was running pretty well and looking pretty good. We brought it back to Flagstaff with us in our truck, and while I really, really wanted to use it, it languished in our garage, becoming the ultimate unfinished object. Because, the cabinet looked like it does below, and I just couldn’t bring myself to bring it in the house until it was refinished—a monumental-feeling task I never seemed to make time for.
I’m really glad I took these pics, at this point it’s kind of hard to believe how bad it looked!
So, with the article ahead, to feature photos of my beautiful restored treadle, it was time to bite the bullet and get after that yellow paint. I did some good old-fashioned library research. The most useful thing I got there was the idea of using a heat gun to take off the paint. (Which I borrowed from a friend. It takes a village to tackle a big project. And, it absolutely would be worth buying a heat gun if you have this much paint removal in your future.)
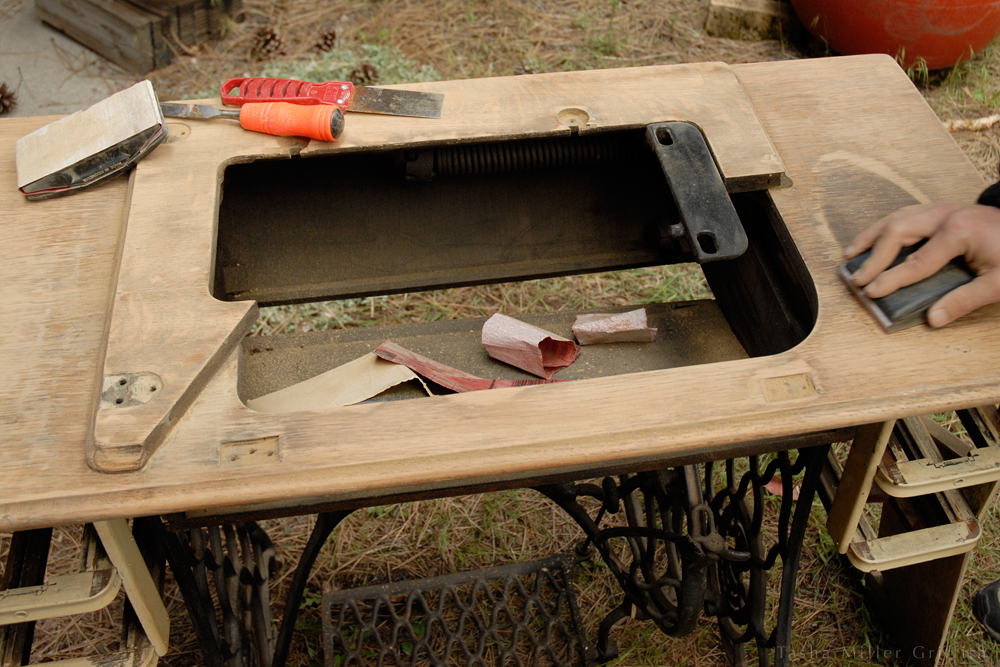
Disassembly.
Since I didn’t find much information besides that idea (which I really liked because it meant I could avoid using chemical strippers), and figured out some things as I went, I’m going to include some tips for removing paint with a heat gun. Feel free to skip ahead if you’re not restoring anything yourself.
Leather gloves and long sleeves are a must, no matter the outside temperature, at least if you’re clumsy like me. My arms and hands would have been covered in little burns from swiping against the heat gun otherwise.
I used a temperature of 850° F. You might need a little hotter or cooler depending on your paint and what’s underneath.
Give yourself an out-of-the-way part of your project to practice on, you’ll definitely get better results as you get the hang of it.
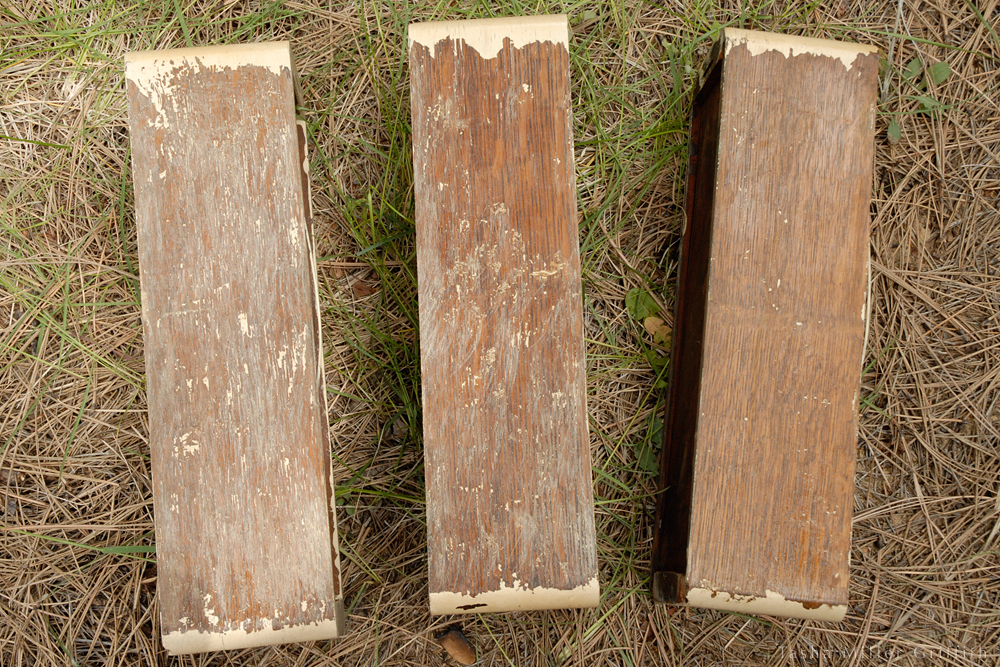
I started with the inside sides of the drawers. First, second, and third attempts from left to right.
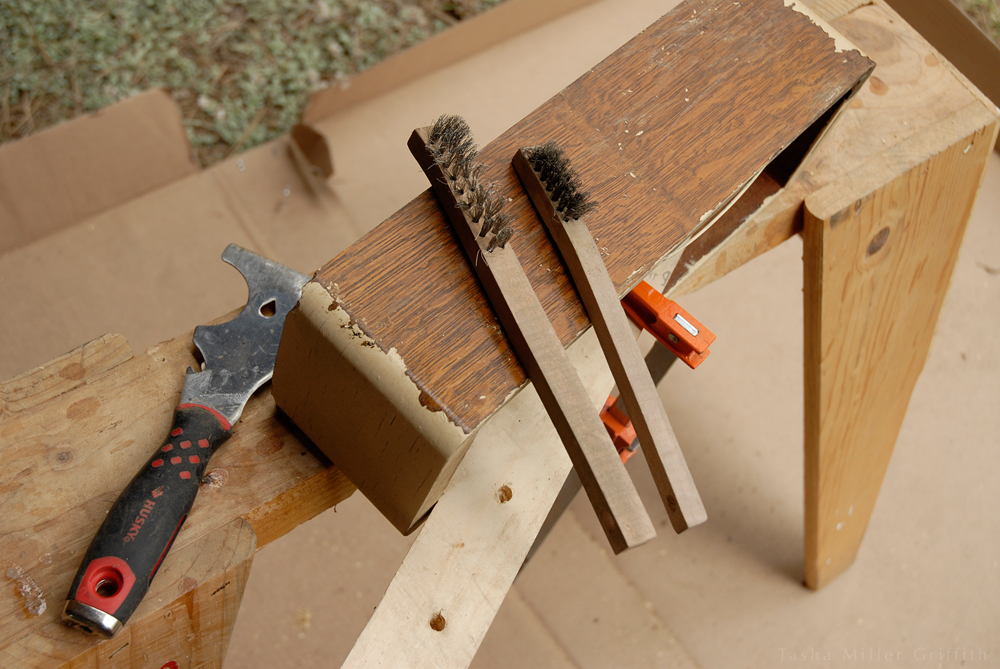
For flat areas, melt a small section thoroughly with the heat gun, then scrape it off using one motion with a flat scraper. Scrape it up and off, not across, the surface, and watch for redeposit of paint. Knock the curls of paint off the scraper frequently, or rub them off on something like a sawhorse as you work.
I found these small wire brushes (purchased at Home Depot) invaluable for getting off leftover flecks of paint, and working around curves and tight spaces. Again, melt the paint with the heat gun, and then use the brush, kind of like you’re brushing your teeth, to flick the paint off. I ran through a few of these, but the softer bristles are better at taking off the paint without scratching the wood below than a tougher brush.
Areas with thin paint and/or worn or damaged finish underneath were much harder to remove than a full coating of paint over the original finish in better shape. I don’t have many tips other than: yes, you can still get the finish off if you’re patient. Take breaks.
Overall, I loved seeing progress, and at some points the removing paint was it’s own reward as I saw what the wood was like underneath. I could also see that my former self was avoiding this project for a reason. There’s no way around it, it was a slog. It was so, so very worth it in the end though.
For the record, I would like to say that although I spent much time cursing this yellow paint and all it stands for, I understand why the painter did what she did. The finish underneath wasn’t in great shape, some parts were water-damaged, and I’m sure restoring it seemed daunting to her too.
Also for the record, I would like to say that I do not, under any circumstances, support the painting of antique furniture. People, just say no! As an alternative, shellac provides a clean finished surface, while showing off the original character of the piece. If you need help, ask a handy neighbor, or a professional.
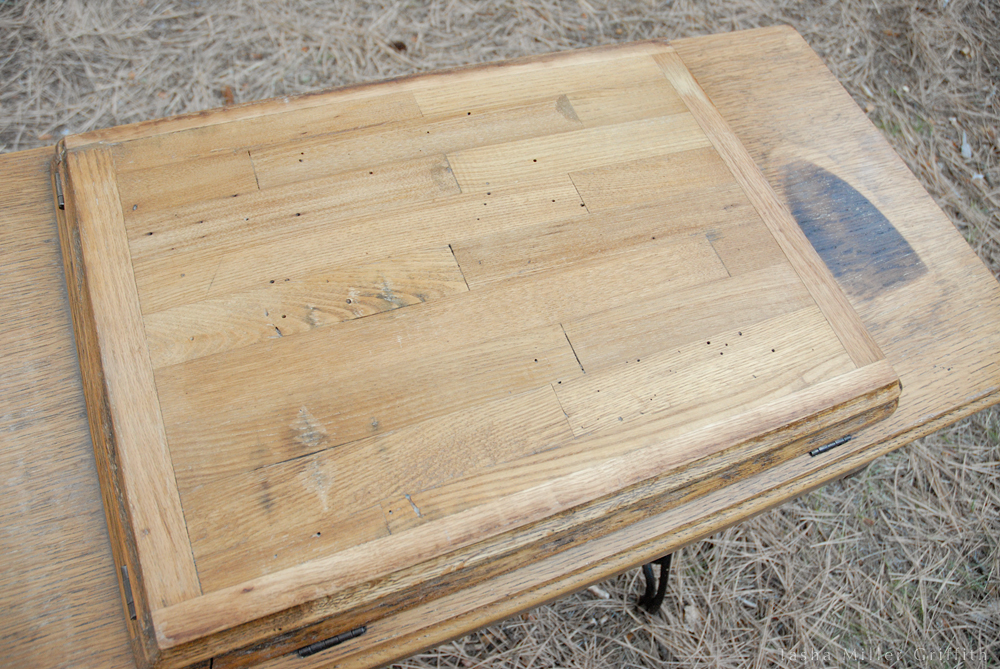
Only one piece of the veneer was too water-damaged to save—the very top, where doubtless a potted plant once sat (I’m not going to rant about that, but, you know, plants on wood=bad idea). So now we know what they put underneath veneer in 1913: pieces of rougher, second-cut wood.
About this time in the project, with the heat-gun-paint-removing not done, Bryan, sensing that the whole thing probably wouldn’t be done in time, stepped in and offered to sand the parts that did have paint removed. This made me feel very loved and supported. But it soon became clear that no matter how much he helped, it just wasn’t possible to finish the restoration in time to take the photos for the article.
So, my mom stepped in and let me borrow her treadle cabinet (carefully restored by my grandparents decades ago). It’s certainly not the first time my mama has saved my behind, and I’m pretty sure it won’t be the last! As luck would have it, the two machines are the same model, made only a year apart. The photos in the article are of the machine I had worked on, sitting in my mom’s cabinet. (Now you know!)
Bryan sanding the top. Under his hand you can see a discovery I loved—a burn mark from an old-school iron—which most certainly did not sand out.
Seeing what a careful job my grandparents did on my mom’s treadle was definitely a motivation to make mine as nice as I could. Once the article was done, I took what bits of time our schedule and the weather allowed to continue working on the cabinet as summer moved into fall. I definitely did a better job with more time to finish this project than I would if I had rushed it, but I still wanted to have a firm goal to keep me going: finishing it and bringing it inside before winter.
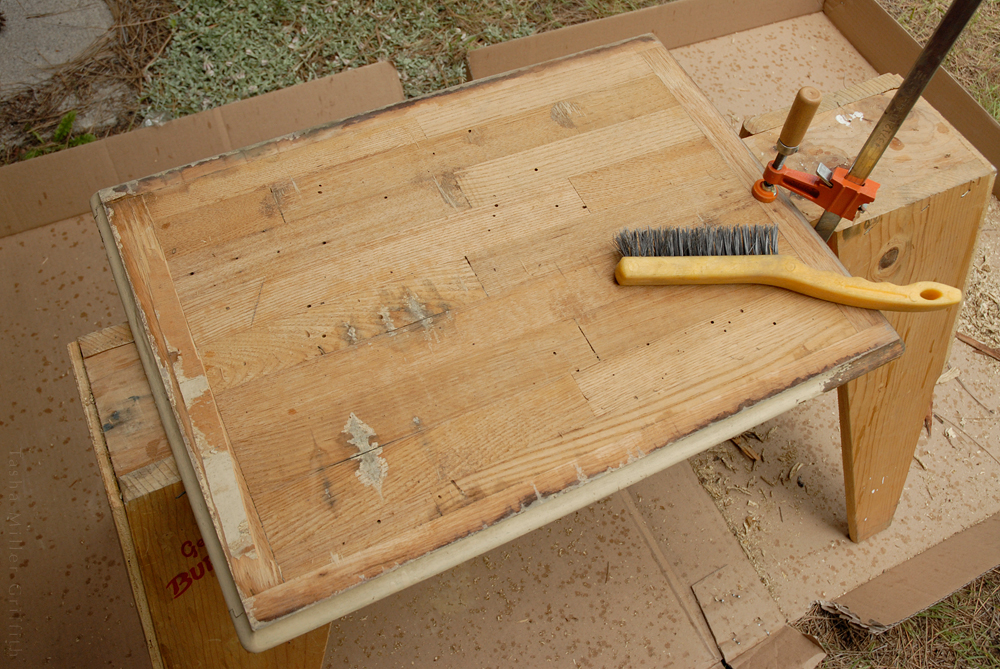
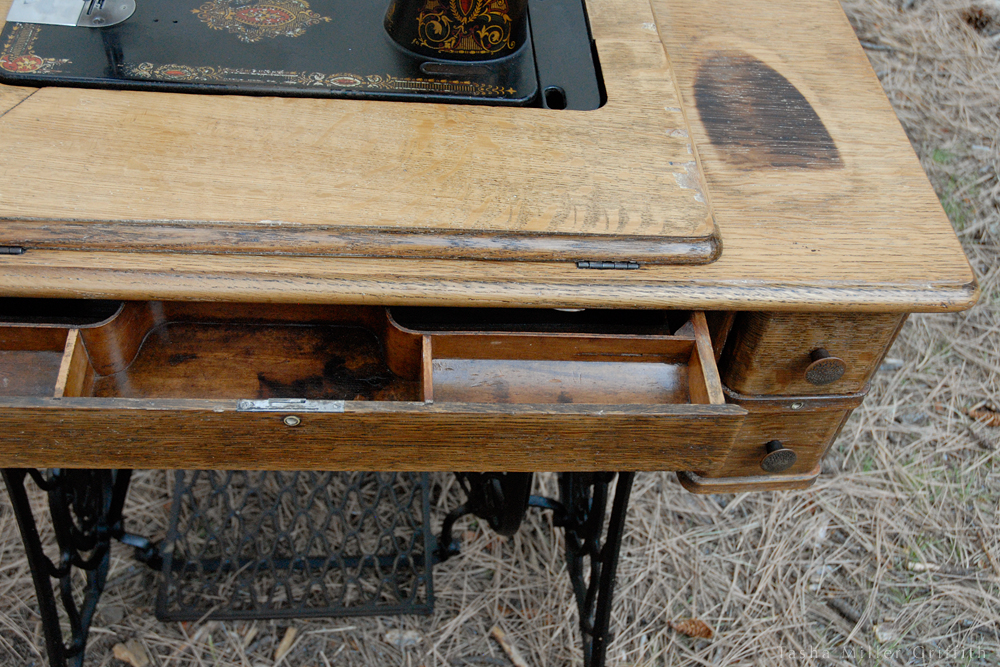
There was a lot of sanding. The original finish under the paint was shellac, which can also soften/be disturbed under the heat gun, and in order to blend the intact finish with the damaged sections, we ended up sanding most of it out. It’s not a very photogenic part of the process, although after working over a section with successively finer grades of sandpaper and blowing off the dust, I could start to see the beauty of the wood revealed.
At every stage, the drawer holders/slides took by far took the longest, being full of tiny parts and impossible angles. I took them off where they attach to the top, but if I had to to do over again, I would separate the vertical supports from the slides as well, and scrape/sand/finish the pieces separately, even though it would mean pulling out old nails and labeling parts to get them back in the right order.
There were many days where I was apparently feeling more like working than documenting, including a lot of gluing and clamping sections of loose veneer, and more sanding.
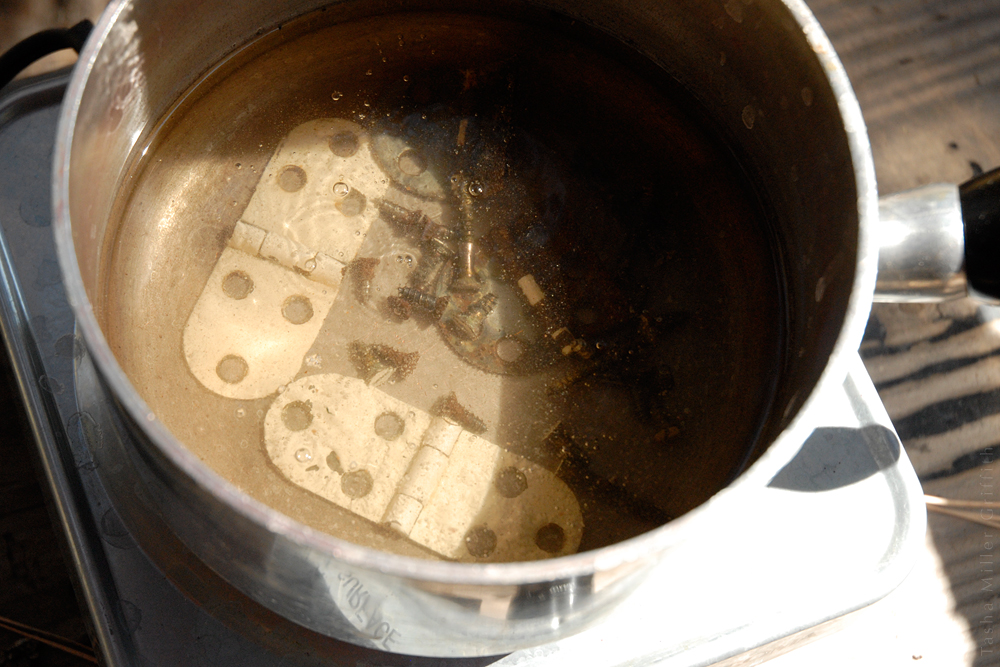
One tip I picked up online (here) which is way to good not to share: baking soda and hot water will remove paint from metal hardware as if a miracle has occurred. If you can soak the metal in the hot water and soda, the paint will actually bubble up and can be pushed off with a rag or your finger. Even pressing a rag wet with the hot solution onto metal parts you can’t take off will usually make it so that you can scrape the paint off with a fingernail. It works unbelievably well.
I dropped the hardware in, went inside to get the camera, and by the time I got back I could see the paint detaching and bubbling up.
I became a big fan of shellac when we were doing a lot of work on our house a few years ago. It gives off less toxic fumes while it’s curing than polymer-based finish, comes from a renewable source (bugs), and sticks to pretty much everything. Although it can be damaged by water and heat, it’s easy to repair and refinish.
Pretty much any wood working book can tell you more than I know about sanding and shellac. I’ll just say that I sanded until everything possible felt satiny smooth, and then applied 3 thin coats of shellac with a cloth pad.
After the shellac had a few days to cure, I rubbed out the finish with fine steel wool. This step was pure magic, rubbing out imperfections and taking the finish from a hard glare to a soft glow.
It’s a little hard to see here, but the top has been rubbed out and the bottom hasn’t yet.
After replacing a few missing screws, the only thing left was cleaning the metal base. I tried wiping it down all over with a wet rag, but it still looked somewhat sad. I couldn’t stand for it to look neglected when the rest now looked so nice. I tried a rag damped with sewing machine oil (my solution for nearly everything treadle-wise) and that did the trick, giving it a very soft sheen and a used-hard-but-cared-for look that goes with the rest of the project.
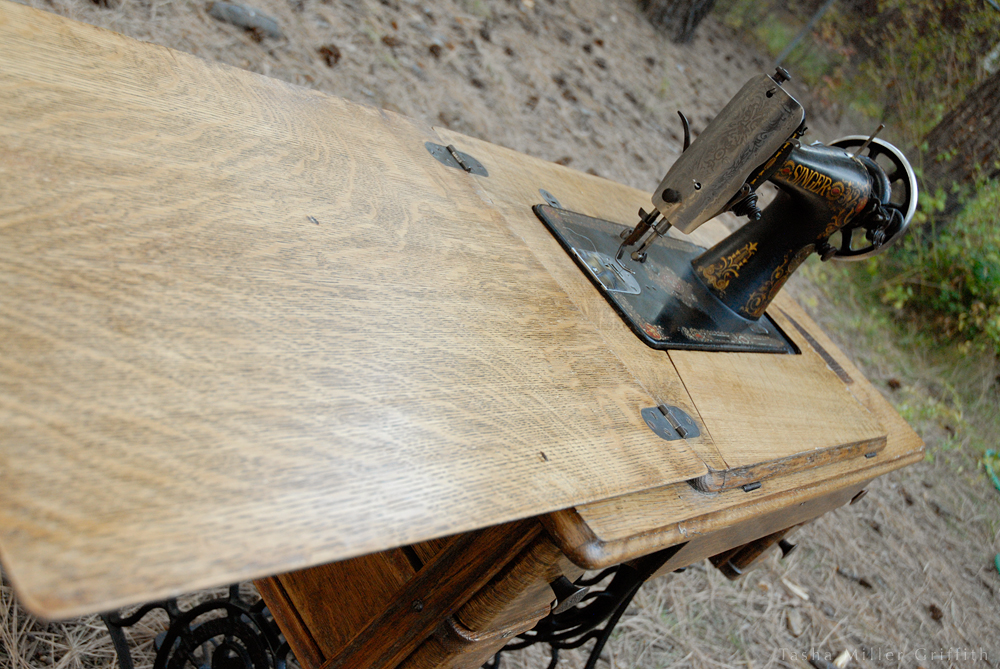
Ready for the big reveal? Here goes:
It’s more like a Victorian with exposed brick and modern fixtures than a meticulously re-created period home. It wears it’s beauty and the trials of it’s long history equally openly, and equally well. It’s actually hard for me to describe how happy this thing makes me, almost like it was a living thing. Such a process of transformation I’ve been through with it!
I decided to keep the exposed-inside top and sand it carefully smooth, rather than apply new veneer.
I sort of hate to tell you this, but you can’t fully appreciate this thing unless you touch it. I couldn’t stop touching it when it was first done. The velvety smoothness seems miraculous after all the time I spent with it when it was in such bad shape.
I don’t know if it’s because I don’t often do projects like, because it waited for so long and then in the end came out so well, or because of a shift in my attitude (probably some of all of those), but this project was so incredibly satisfying. In the final stages, I was really able to appreciate exactly what I was doing while I was doing it, and reveling in both the results and all the work that got me there in felt fantastic.
When I go into my work space in the mornings now, this is one of the first things I see. I still often reach out and touch it at some point while I’m stretching and getting ready for the day, or if I’m sewing with it later I’ll give it an extra caress. It probably sounds like I’m obsessed, but while this is now one of my very favorite physical objects in the world, it’s the experience of having brought it from what it was to what it is that’s my favorite part. The best reward for tackling something big is the satisfaction. Cheers to that!
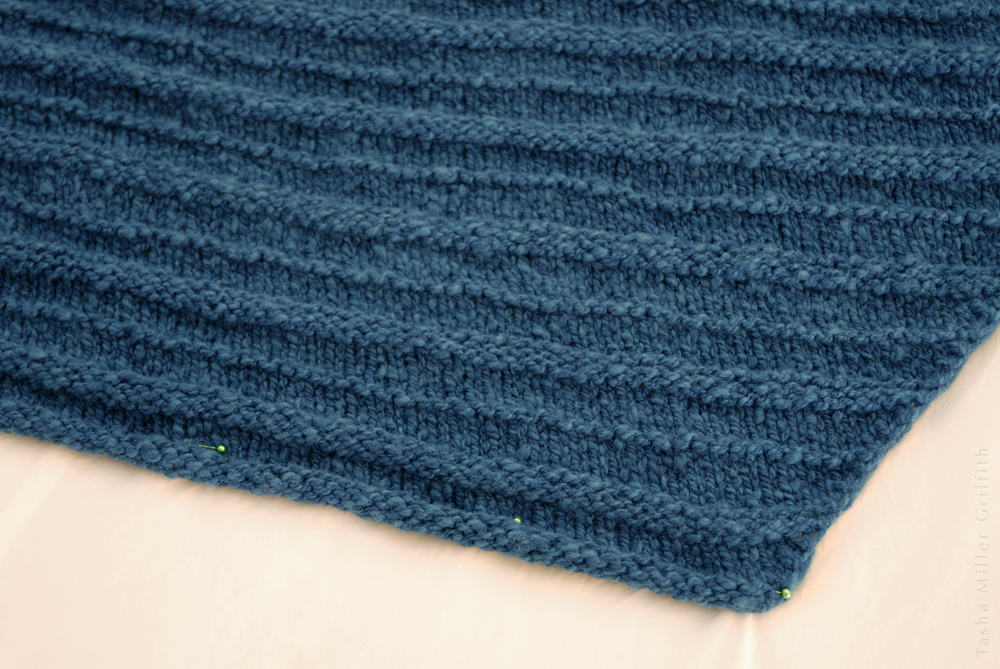
When I mention blocking your knitting, I get a lot of blank looks from my students, and concern about how to do it and what they need to make it happen. Although it can be a magical transformation, it doesn’t need to be mysterious. And although there are a bunch of gadgets (special mats and pins, forms, blocking wires etc.) sold specifically for blocking, you don’t need to use any of those to get good results. Some pins and a place to hold them will do, and sometimes you don’t even need that.
What does blocking mean anyway?
Blocking is actually a simple concept. It just means using water and/or steam to set the final shape of something after you knit it. As you knit, you make a new structure—a fabric—with your yarn. When the fabric gets wet, the yarn has a chance to settle into its new shape. Sometimes it can change quite a bit, expanding or relaxing in response to the tensions (or lack of) that are now on it.
In blocking we take advantage of the fact that the yarn can form new shapes, and influence those shapes in the direction we want. This can be as simple as gently stretching and patting a sweater so that it looks good flat, and leaving it to dry. Sometimes more dramatic blocking is part of what makes a pattern shine, like stretching lace as much as possible to make the most of the open areas in the pattern.
Essentially, blocking is getting your knitting wet, shaping it how you want it to be, and holding it in that shape until it dries.
Why wet?
Yarns, especially wool ones, can change shape much more easily when they’re wet. This is because of the structure of the fibers themselves. (If you’re curious about the science of wool and haven’t seen the wool article I wrote for this month’s Seamwork, check it out!)
You can also stretch/shape your object while it’s dry, and then steam it to set the shape. In general, I prefer the wet method for a few reasons. It’s gentler on the fibers, and gives them a chance to relax before being under tension. It also gives a good idea of what your finished project will be like when it’s washed later. A damp yarn object is easier to shape. And when you finish knitting something, it may have been dragged all over hither and yon and have oils from your hands (or sticky stuff from your toddler) on it, and washing it is probably not a bad idea anyway. (Hey—my favorite method for hand-washing is in that wool article too—good timing!) (And speaking of good timing, Karen posted an eloquent argument this morning about why you should wash/block a swatch before embarking on a big project. This is especially important when you’re making something like a sweater, where the final size/fit/drape is crucial to success.)
Does everything need blocking?
Not really. I do wash all my finished knitting projects, shape them gently with my hands, and then leave them to dry. But not everything needs to be pinned out, or to dry in an exact shape. Socks, for example, are meant to be a little smaller than my foot, and to take on the exact shape of my foot when I wear them, so I don’t see much point in carefully shaping them before wearing.
How do I block something without special gadgets?
Everyone should have sewing pins, they’re useful for all kinds of things. I’m not counting them as special equipment, but, it’s worth getting some with large, easy-to-see heads if you don’t have them already. I like plain flat-head pins for sewing, but they get lost in the structure of hand knits.
The only other thing you need is a surface where your knits can dry that you can pin into. A lot of times I use the same folded piece of flannel that I iron on. An ironing board or a couch cushion covered with a towel are good choices for small projects. For big items I stretch an old sheet over my bed (see below).
I tuck a doubled-over old sheet in tight over the bed covers. That provides enough tension to hold in place when I pin onto it. Plus it protects the covers from pin marks or any dye transfer from the yarn. (Forgive the weird indoor lighting. I wanted to show how I actually do this, but our bedroom is not ideal for photos …)
When your finished project is clean and damp, it’s ready to block. Stretch and shape it with your hands, patting wrinkled areas out, smoothing ridges parallel, etc. Pin in place any pieces that try to shrink back, away from the shape you want.
For this shawl, I pinned it at regular intervals along the straight edge, and intermittently along the other two edges. You may have to move the pins as you smooth out the whole project, and that’s fine. (This is my Indigo Boomerang, made with handspun. More details are on Ravelry, and pictures of it worn are also in this post on slowness.)
For the cowl at the top of the post, I wanted to stretch the lace sections, but not the plain knitting in between. I could have blocked it flat, a couple of sections at a time, and that would probably have worked fine, especially if I steamed it. Instead I decided to experiment with different sizes of rolled up towels, and found a combo which was the right size to block it around. I opened up the lace with my fingers while it was damp, and pinned the two edges parallel.
When your blocked knitting is dry, take out the pins and check out the shape. If there are any parts you’re not happy with, or little pulled areas from the pins, those are great places to steam. Hold your iron over the part you want to adjust (don’t flatten it) and fill it with steam. Then take the iron away and reshape it with your fingers.
Will I have to block my knitting every time I wash it?
Probably not. The most dramatic change takes place the first time the yarn gets wet in its new knitted shape. Unless something extreme happens to it, it will stay more or less how you blocked it, with the additional influence of how it’s worn. Lace may need to be re-blocked to look its crispest, but it won’t go all the way back to how it looked before you blocked it the first time. For most items, a quick smoothing/stretching with your hands, before letting them dry flat is enough. I like to drape bigger things like the shawl over the top of a wooden drying rack, using lower bars of the rack to hold the ends so that no part gets too stretched by gravity, or too folded and wrinkly, while it’s drying.
If your project does dry with wrinkles, a little steam will fix that right up.
I hope this helps demystify blocking for you! The more we can all understand what’s going on with our yarn at various stages and why, the more we can get the results we want. Happy knitting!
Hello and happy October 1 everyone! We’re home, and Bryan’s big exhibit is open. I’m getting back into my own routines and creative practices. I have a backlog of stuff to share with you, but I wanted to start with two very October-first-related items:
The new issue of Seamwork magazine comes out today (the menswear issue—cool huh?) and I have a tutorial in it about how to sew your own leather thimble! It’s coincidentally perfect for:
#slowfashionoctober which also starts today! I think this is a great idea and I’m excited to see what everyone comes up with. I’ll definitely be writing more about “slow” and how I feel about it this month. And I’ve also decided to use it to tackle maybe the slowest-ever project—a sweater that my mom knit for my grandmother, which I’ve tried to make over so I can wear it, but it needs more help. I have a plan, so we’ll see how that goes.
Stay tuned, and hope you’re looking forward to October plans as much as I am!


 When my cousin was about 12 years old, she knit me a scarf. I’m touched by this gesture every time I think about it. That’s a lot of time and effort to put into an object for someone else when you’re that young. The scarf (at left) is great, made from a colorful thick-and-thin yarn, but it’s kind of short. Then one day a couple of years ago I realized that if I added buttons and buttonholes to the ends, it could be a stylish cowl, and I’d probably wear it a lot more. Which I do.