I’ve been thinking a lot about my mending journey lately as I put together slides and videos for online classes. New formats, new adventures, but as always, it’s clarifying for me to explain something to someone else, and to dig through photos of past projects, thinking about what I’ve learned in the meantime.
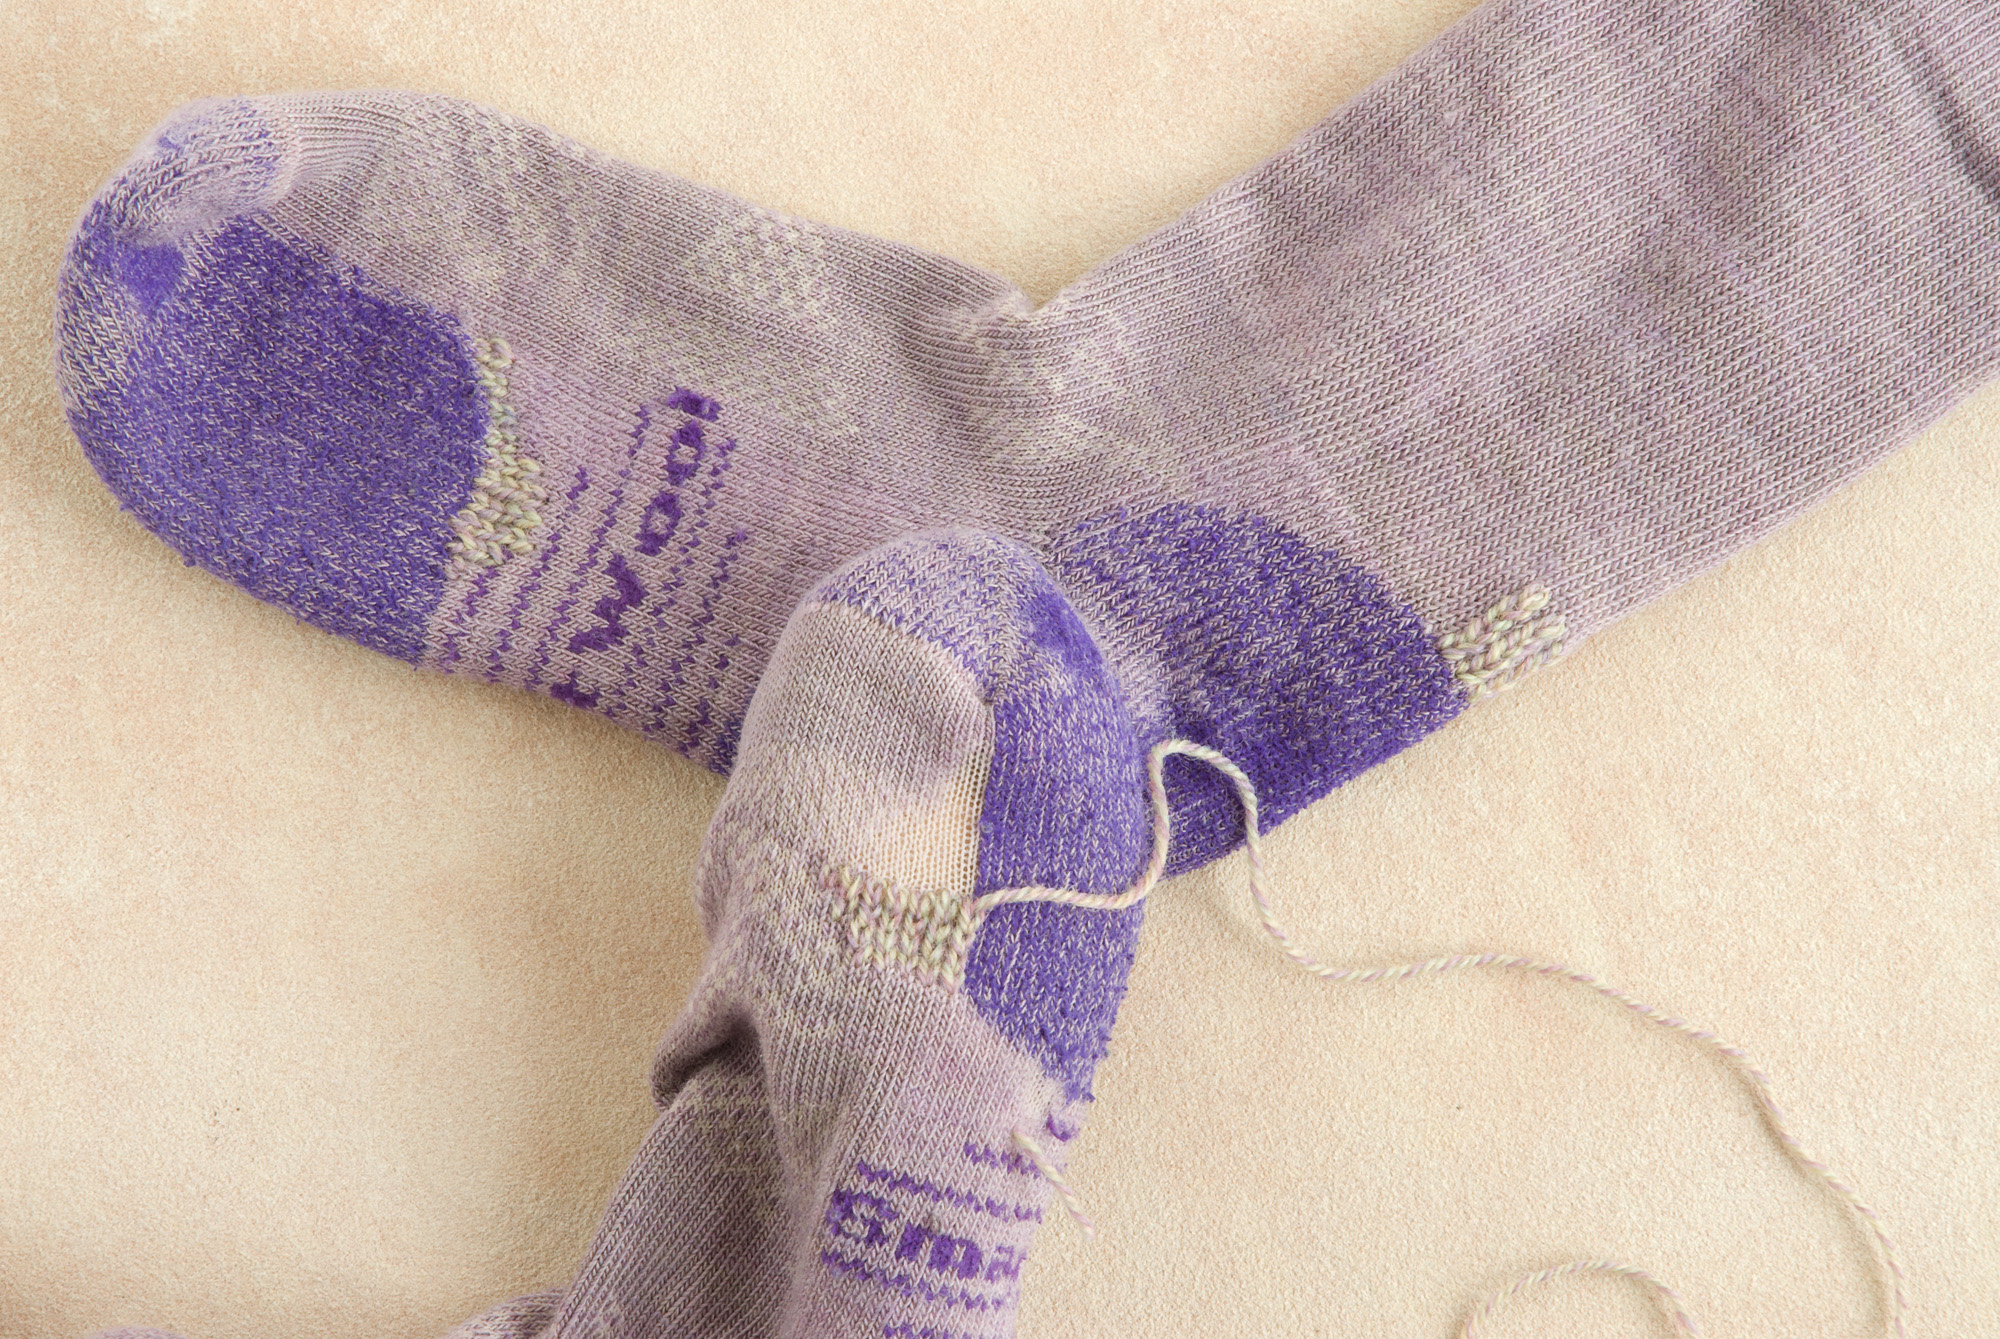
For example, I’d like to share that it turns out, cramming a sock under my sewing machine to put a patch on it works for a while, but if the sock still has life in it and the patched area wears out again, things can get pretty messy, since it’s hard to take off the patch, and covering it again makes a really thick spot.
Multiple patches later …
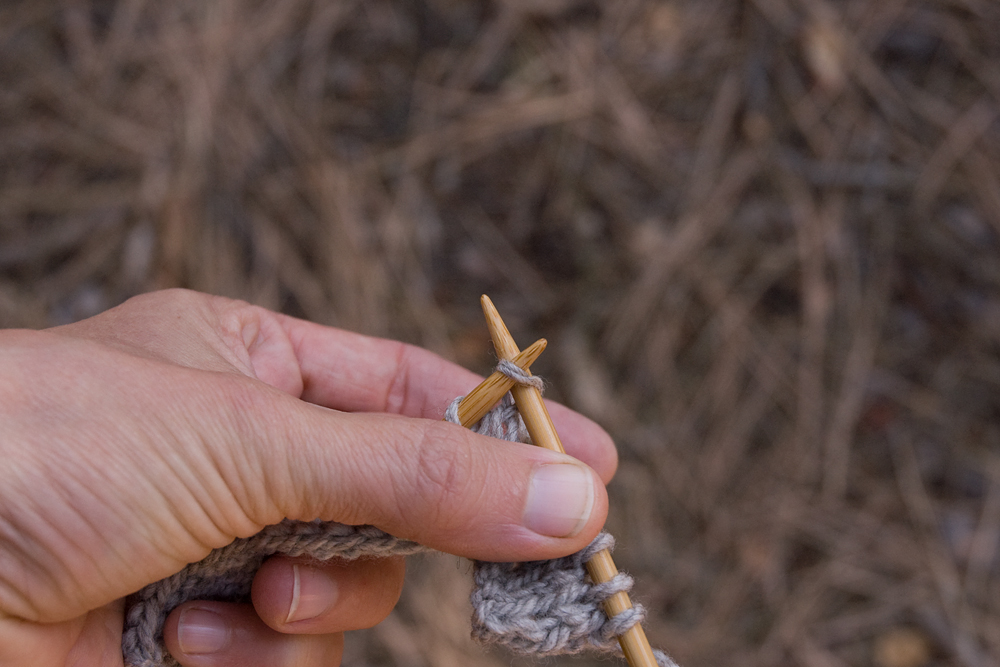
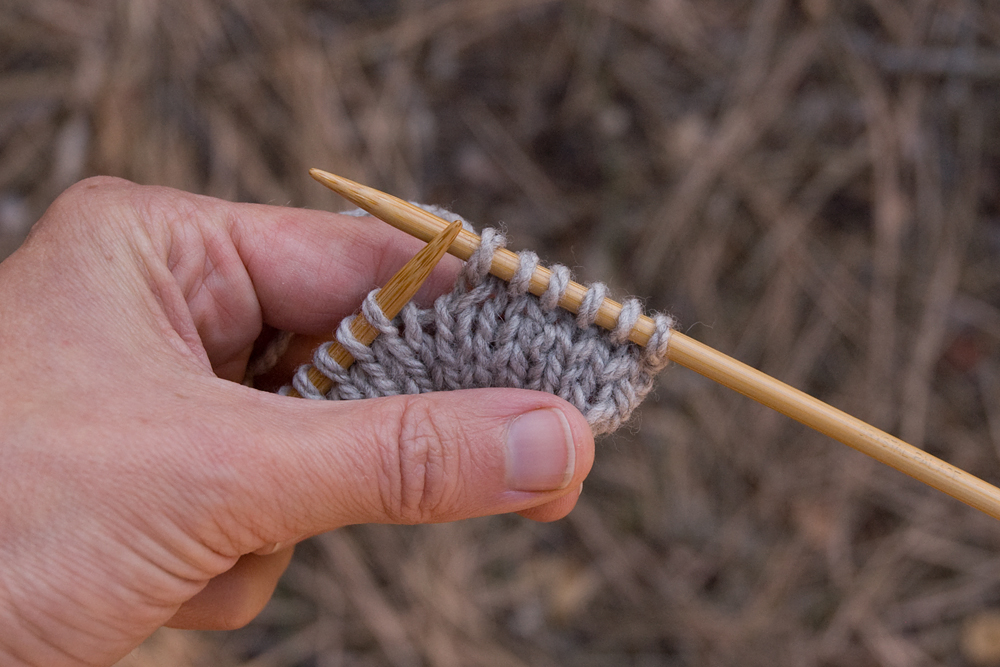
Fortunately, there are lots of other good options! For one, you can use the sewn-knit-duplicate-stitch technique that’s become one of my favorites. Here’s a video I made for North House Folk School with my filmmaker friend Amanda where I walk you through this technique on a sweater knit. It’s definitely easier to practice on a fabric with bigger stitches first. This works on all kinds of knits!
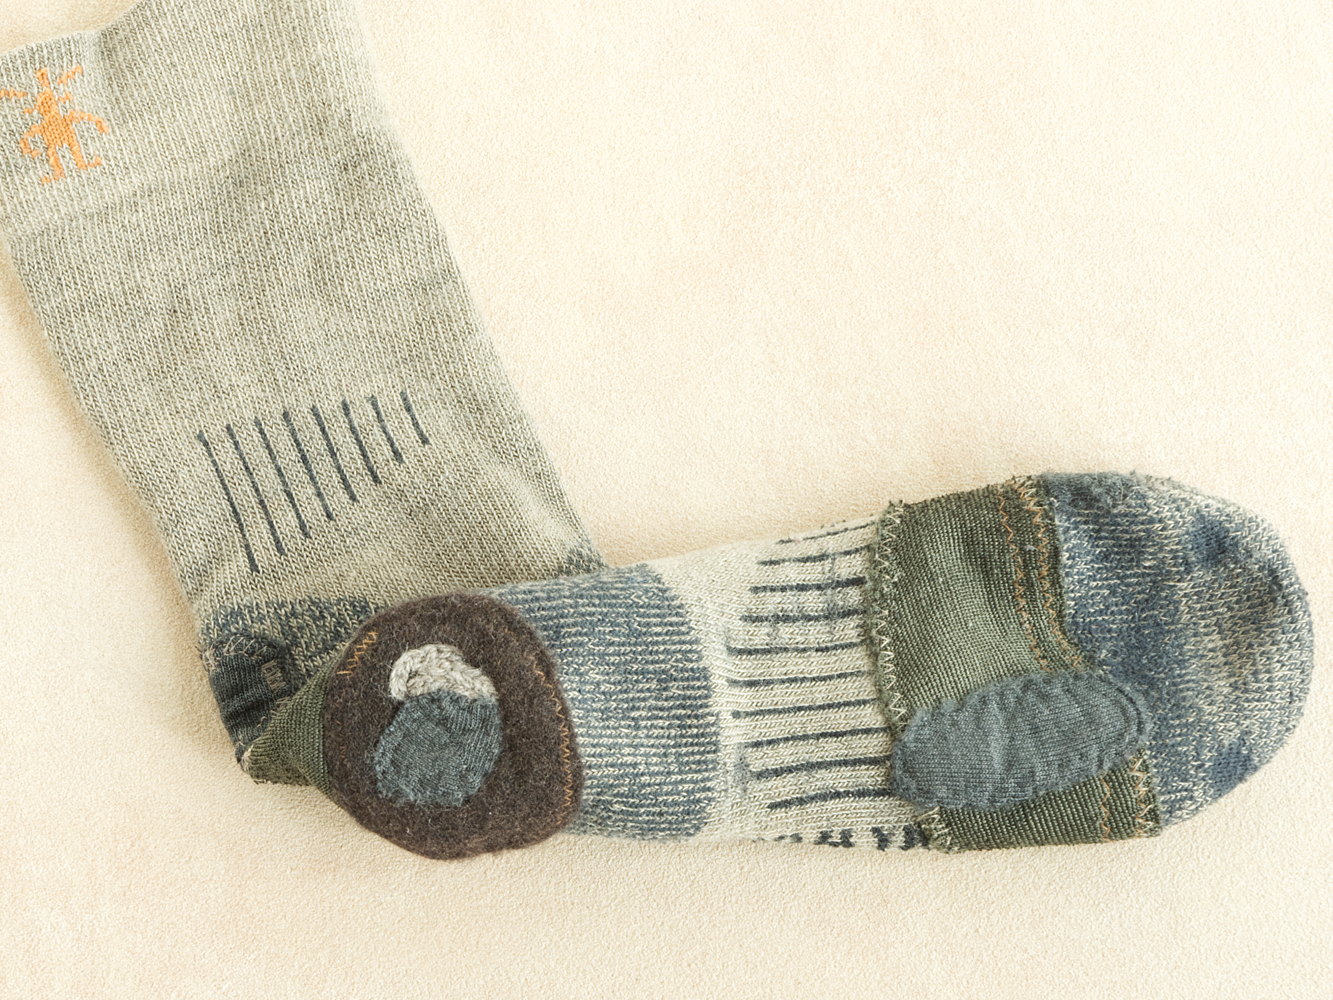
You can even use this for factory-made socks. For those and other fine-gauge knits, try working each new stitch over more than one of the tiny original stitches—for example, treating a block two or four stitches wide and the same number high as one new stitch. (Approximately. It’s fine if you get off by a tiny stitch or two.) I really like this idea for when the wool is gone from a sock but the nylon remains, since it adds new yarn to both sides of the old threads. And, the whole point of mending with the knit stitch (instead of flat woven darning) is that it maintains the stretch and cushy thickness of the original knitted fabric. It’s also easy to add more stitches around the first ones as you need them.
If that seems like not quite your cup of tea, you might try another idea from my North House friend Elise Kyllo—using needle felting to fill in the missing wool. She shows the whole process in this video. (It’s on Facebook, but I’ve had no problems accessing it even though I don’t have an account there.) This technique works best for areas where there are still some threads remaining (either nylon or wool) for the new felted wool to work through and around. Needle felting on its own isn’t usually sturdy enough to fill in an a large hole, unless you wet felt it thoroughly afterwards. And if you’re thinking of patching a large area, also keep in mind that felted fabric is stiff and doesn’t stretch much at all—although that should be fine for the bottom of a sock. And little needle-felted motifs are also a great way to patch small holes in a fine knit sweater.
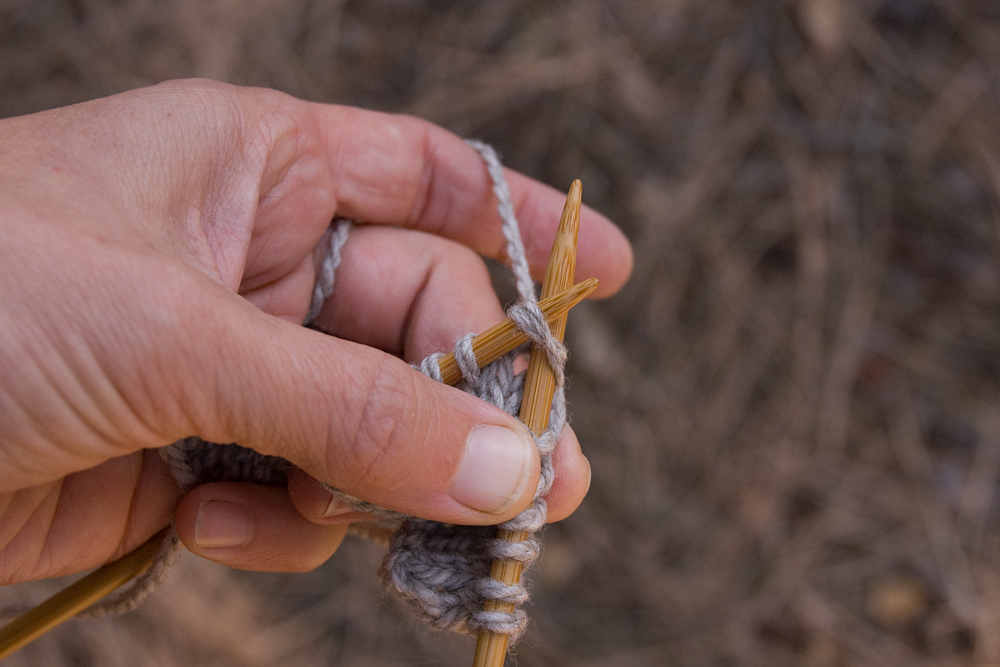
Sewing on a patch is still a good option too, and I’ve gone back to preferring to sew them by hand. It’s easier to do, easier to take off if you need a new patch later, and I just love how the stitches look. In my quest to add more visible hand stitching to my wardrobe, I’ve been experimenting with stitches that work well with the stretch of knit fabrics. I really like zigzagging running stitches for this, and alternating back stitches that essentially make a catch stitch on the inside. I demonstrate the latter style in the video below, along with how much more these stitches can stretch than a plain running stitch across the grain of the knit. (This is a short video I made for my online classes. There’s no sound. Anyone who has the link can see it, but it’s not searchable, not meant to stand on its own without any explanation.)
I now recommend using one of these stitches rather than the catch stitches I used in my original sock mending post, since it’s easy for long stitches on the surface of the mend to snag on things. You may still want to check out that post for more visuals of sock patches though.
One thing I can’t fix is the tendency of mass-produced socks to lose their stretch and get saggy over time. The nylon content is also problematic from the standpoint of microplastics and biodegradability … but I know there are a ton of these socks in circulation, and I fully support mending them. For myself, I’m slowly letting them go from my life as I embrace knitting socks, and lately, spinning my own yarn to knit the socks … it sounds like a process, and it is—an amazing one—taking me towards a deeper understanding of different kinds of wool, and of how to make a durable yarn. It turns out that Merino is actually a terrible choice for socks—it’s super fine, super prone to pilling and felting, and not very durable! Other springy, non-felting, durable wools exist! In fact, this kind of wool is often undervalued or wasted, when it could be going into naturally wonderful socks and other sturdy knits.
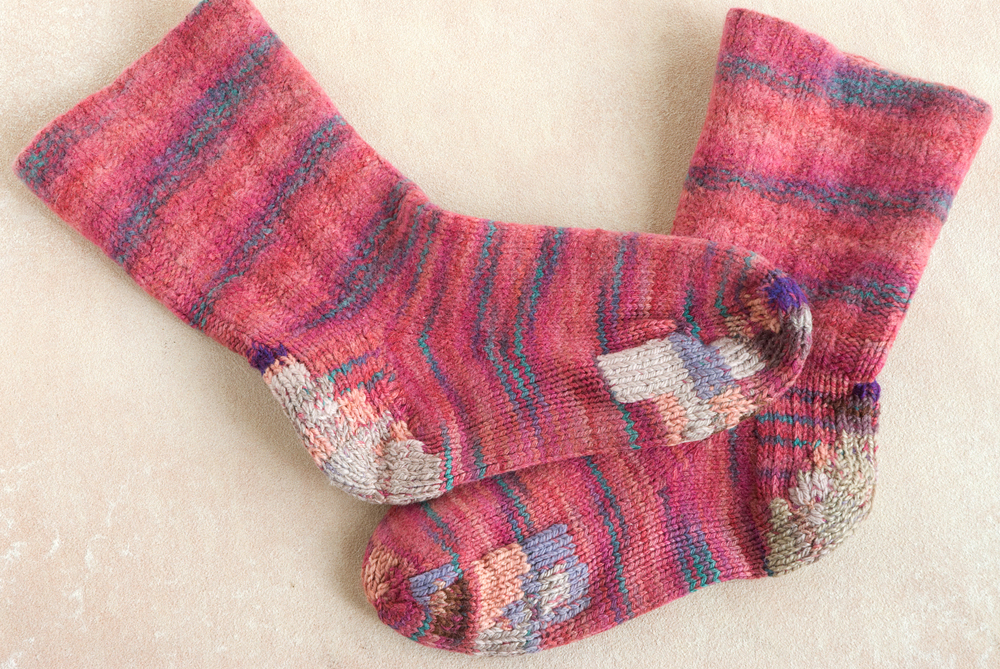
Happily, the tops of good hand knit socks seem to last forever, so as long as I keep repairing the bottoms I’m good to go. I’ve been wearing and mending the socks above since 2012. Still going …
If you want to find out more of what I’ve learned in my mending journey so far, come and join me for a class! You can find upcoming online and in person opportunities on the workshop page.
I’m spending this weekend in Durango, CO with family. We went out walking the other night as a snowstorm was blowing in at dusk. Wide, wet flakes falling gently but with velocity towards my upturned face. We climbed steps up the side of a long hill, and I worried that it would be too dark to comfortably see our way back. But in fact, by the time we turned around, the snow caught and reflected all the light there was all around us, and the steps were clearly outlined white patches with dark rims.
I’m hoping that might be a metaphor for life, that if I can just be patient and trust, I’ll be able to see a path, even in the dark. I’m in the mood for turning over stones, clearing decks, and keeping one eye open for new ideas. Here are some recent and upcoming projects:
New Knitting Pattern
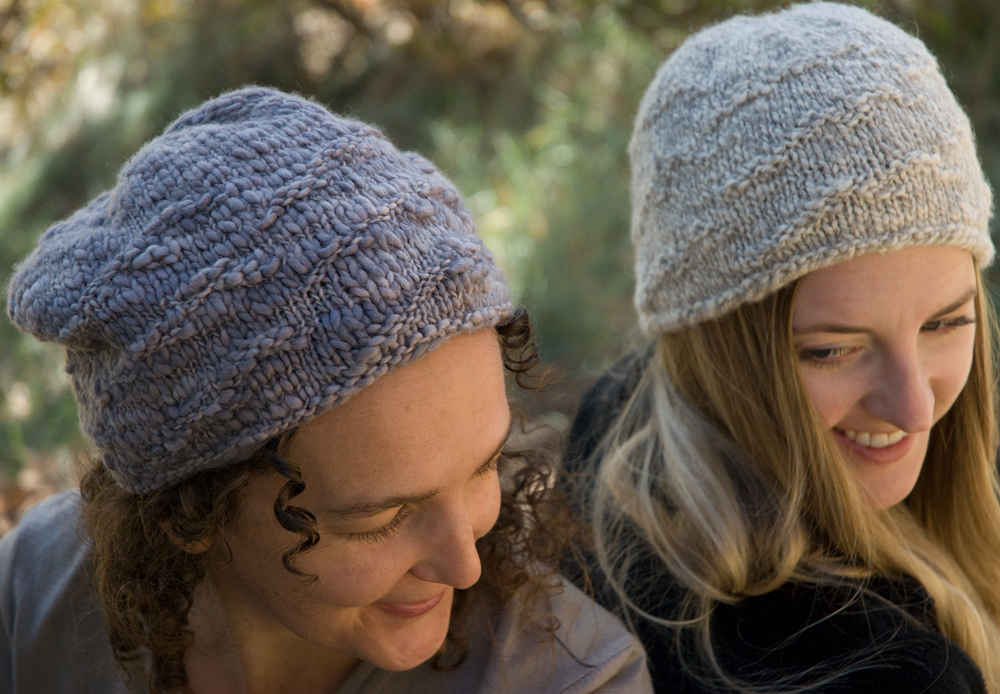
Here’s something I’ve been working on for a while, finally out in the world—I made a “real” knitting pattern! The Cloudscape Hat is now available on Ravelry and on Etsy. It uses bulky thick-and-thin yarn from local dyer Andrea of Spinup Yarns, and it’s also great for handspun yarns. If you like it, please “like” it on either platform to help spread the word.
This was a project which both exercised my creative muscle, and reminded me that it takes a village to do almost anything worthwhile. One new person who very kindly contributed was our friend Gretta who helped with modeling. Musical bonus: Gretta and her husband Kyle are the core of the amazing band Towr’s—not just my favorite local band, but one of my favorite bands anywhere, and really lovely humans.
Arizona Fiber Arts Retreat
In January, after the holiday bustle, this is a relaxing gathering of fiber folk with workshops, a speaker, vendors, and lots of open spin/knit time. Relocated from Arcosanti and in its second year at the Prescott Resort. I’m teaching four different half-day workshops: Fiber + Twist = Yarn (beginning spinning), Finishing for Fiber Artists, and two sessions of Creative Mending—for Woven and Knit fabrics. Workshops do fill up, so register soon to secure your spot!
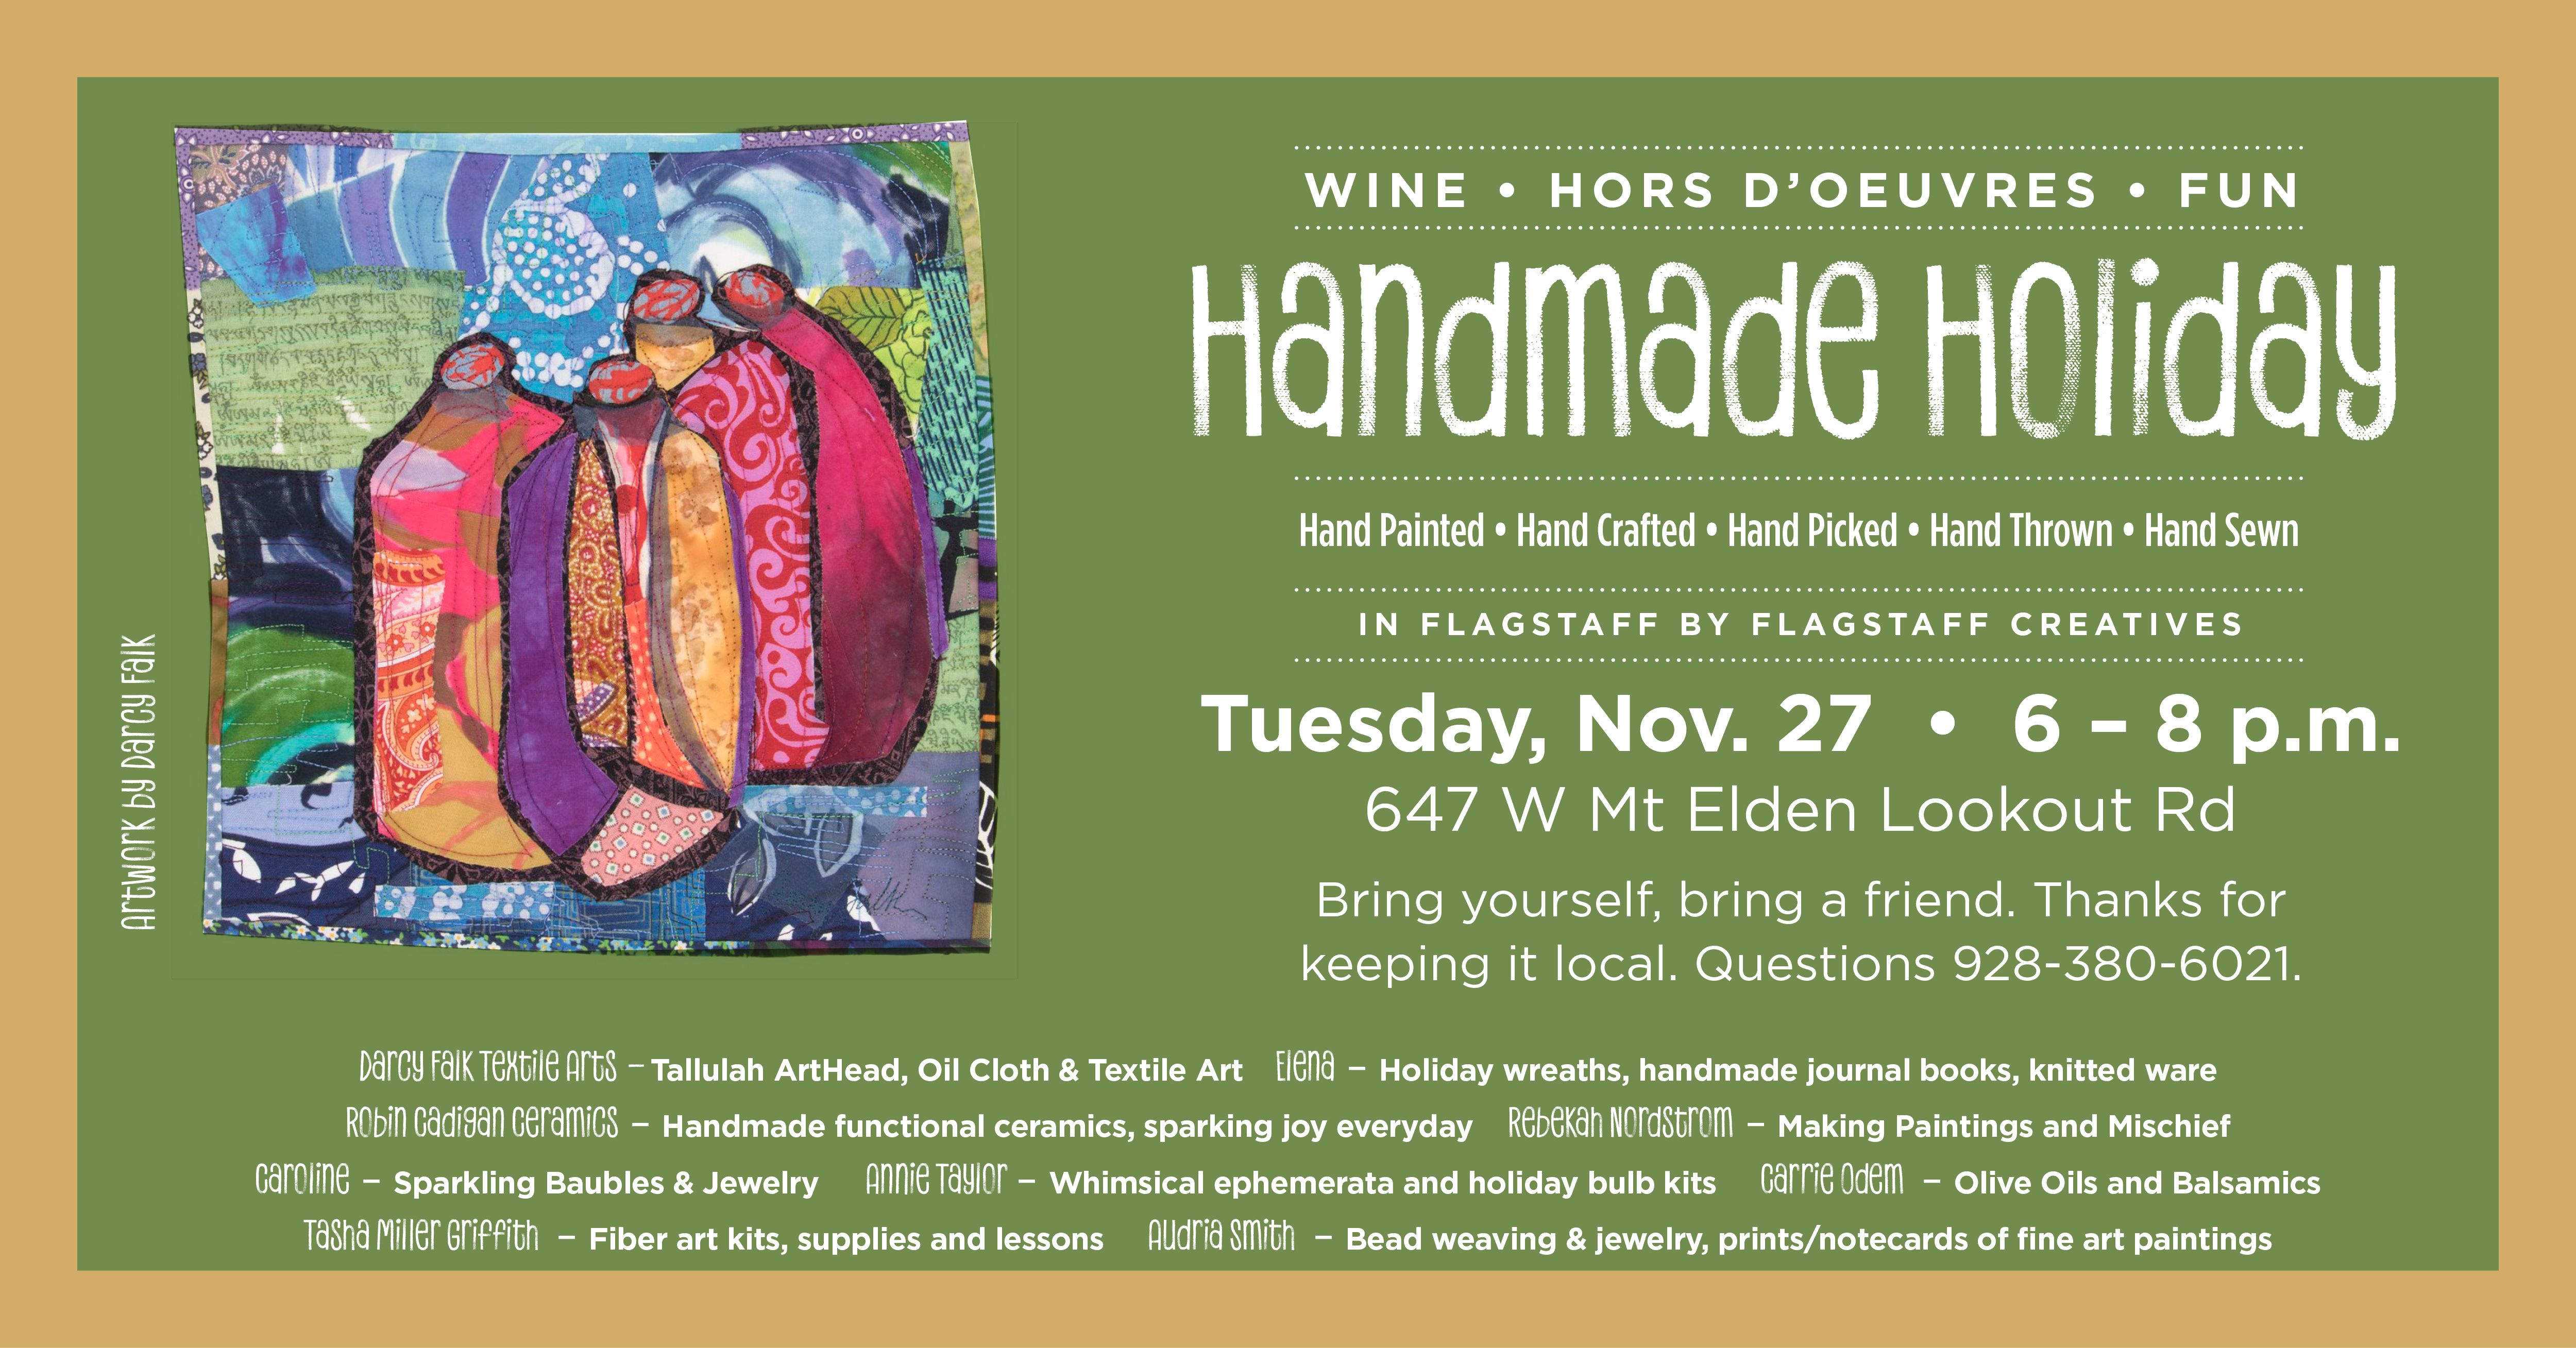
Handmade Holiday Market
I’m happy to be spending this Tuesday night with a bunch of fun & creative local women, showing all kinds of handmade items in this intimate little market (details on the flyer above). I’m bringing goods and gifts for makers, including felting and knitting kits, gift cards for lessons, and some really special fabric. There will be wine, beer, and snacks provided. Come and say hello!
Mending Service
New this fall, I’ve launched a mending service, where (you guessed it) I will fix your treasured textiles! Read all about it here. Questions and thoughts are welcome!
Have you ever wondered where twisted stitches come from, why there are two common ways to decrease a stitch instead of just one, or what the heck is “combination” knitting? Do you get confused when you pick up or transfer stitches and find that they seem somehow different from what you’re used to? Has anyone ever told you that you knit “the wrong way”? If so, keep reading—but let’s get one thing straight right up front—there is no wrong way to knit! (And I am not the only one to say so.) If your way is comfortable for you and produces fabric you like, it’s a good way.
No matter what combination of stitch orientation, wrapping direction, and yarn handling you use, there are certain basic elements of how knitting stitches form that are the same. These influence how you work your stitches as you knit, and how your finished stitches look. Once you understand these basics, you can gain the confidence to handle your stitches however the situation calls for, and maybe even the freedom to try out different ways to knit! If you have your own knitting handy, please get it and follow along looking at the live stitches, I think it will make more sense that way.
Let’s start with the shape of a stitch: when you look at a piece of finished knitting (or the part of in-progress knitting below the needles) each knit stitch looks like a mostly-flat “V” shape, and each purl stitch looks like a horizontal bar. Both stitches are actually just loops of yarn, oriented differently to the ones below. (We’ve talked about that before, and it’s worth mentioning many times—in fact I recommend that you keep thinking about it until you can see it with your eyes closed).
We have knitting needles to hold all the loops we’re still working with until the next row/round, so that they don’t come un-looped. As soon as you put two stitch loops on a needle, they have an orientation, which can be one of only two ways: with the leading side of the stitch (the side which is closest to the tip of the needle holding it) either in front of the needle (closer to you) or in back of the needle (further from you). This is sometimes called stitch “mount,” and the sides of the stitches called “legs,” as if they were riding horses—visualize that if it’s helpful to you.
Leading side in front on the left, leading side in back on the right. We’ll get to the twisted stitches in a minute …
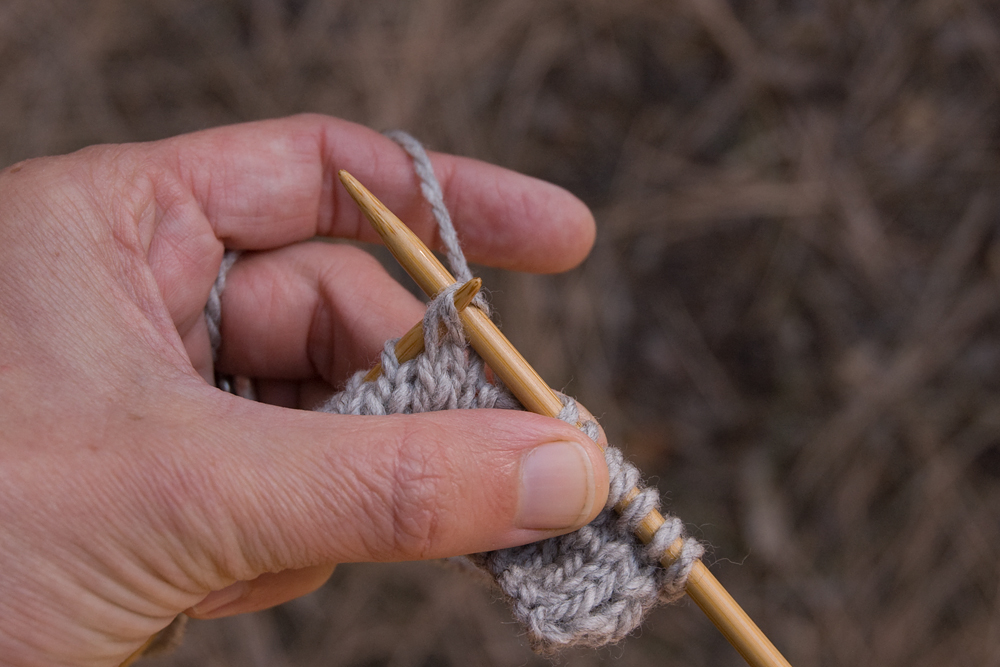
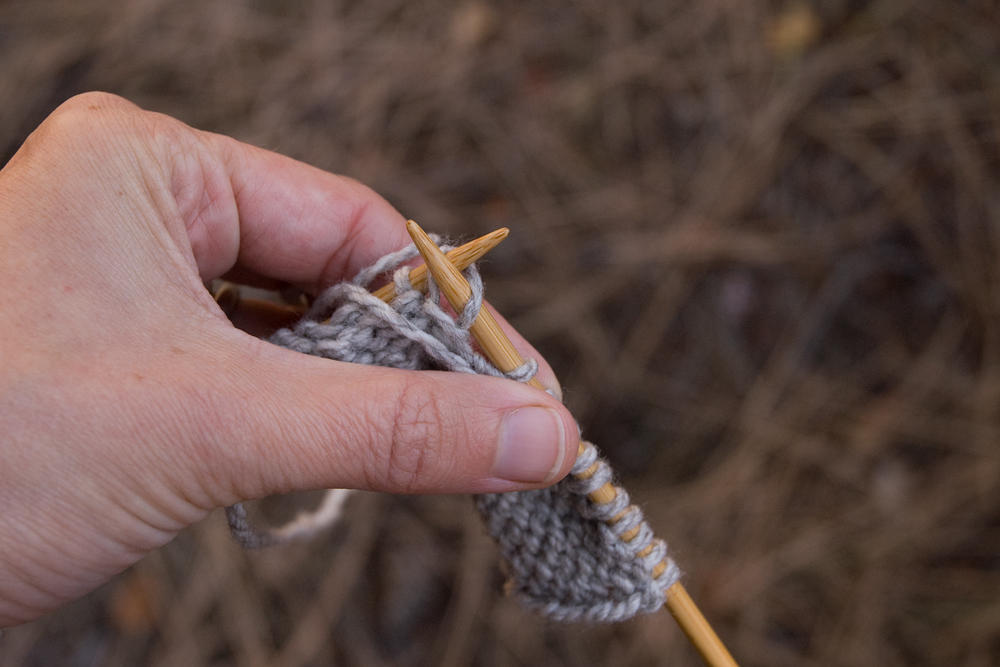
Most American knitters I know expect that the leading side of each stitch will be in front, and most pattern instructions I read assume that it is. With the leading side in front, if you reach the working needle (the needle which is making the stitches, usually the right hand one) into the front of the stitch to knit it, you can see that the stitch is pulled open, and it will make an open, “V” shaped stitch once it is knit. If you reach into the back of the stitch, it feels tighter (this difference is helpful, and noticeable to most knitters even if they’re beginners). If you look closely you can see that the two sides of the stitch are now twisted around each other, and they will remain twisted in the knitted fabric. (Sometimes you want a twisted stitch to tighten up part of your work, but most of the time it’s not the goal.)
Reaching into the front of a stitch with the leading side in front
Reaching into the back of a stitch with the leading side in front
Now look at what happens when the leading side of the stitch is in back. If you reach into the front of the stitch, it feels tight, and the sides of the stitch twist. If you reach into the back, the stitch is open, and will form an open (not twisted) stitch in the fabric. So, it behaves in the opposite way as a stitch with the leading side in front, but the open stitches will be absolutely identical in the fabric. (Side note: twisted stitches formed from these two setups twist in opposite directions.)
Reaching into the back of a stitch with the leading side in back
Reaching into the front of a stitch with the leading side in back
Twisted stitch in the fabric below the needle
We have now discovered a deep truth of knitting: there are only two ways that a stitch can “sit” on the needle, and no matter which way it is, if you knit (or purl) through the leading side, the stitch will be open, and if you knit through the trailing side it will be twisted.
Many knitters first think about these differences when they get to decreases. To Knit Two Together (k2tog),you reach your working needle into two stitches at once, from left to right, through the front of the stitches, and assuming that those stitches have the leading side in front, both stitches will be open,the left one will be on top of the right one, and the decrease will lean to the right.
Knitting two together through the front
If you want a decrease that leans the other way (so that, for example, the shoulders of your sweater will look symmetrical), you could knit two stitches together through the back, so that the right stitch will be on top of the left one. But if your stitches have the leading side in front, that would twist them both and pull the decreasing stitch really tight. This is the reason for the Slip, Slip, Knit (ssk) decrease—if you slip the two stitches (one at a time) to the working needle by reaching into the front (“as if to knit”), it flips them around so that the leading side is in back. Then you can pass them back onto the holding needle with the needles tip to tip (“as if to purl”), and then you are ready to knit them both through the back, so that both stitches will be open, the right one will be on top of the left one, and the decrease will lean to the left. (If you have knitting in front of you right now, you can see this happen before your eyes.)
Slipping a stitch to change its orientation
Knitting two together through the back
All of this works if you are making purl stitches rather than knit, it just may look and feel a little funky if you’re not used to it. You can absolutely purl a stitch through the back side. And you can flip purl stitches around bypassing them between needles. My golden rule for this is: if the needles tips are essentially (or could be) pointing them same way as you are picking up the stitch to transfer it, it will flip the stitch around. If the needle tips are pointing towards each other (tip to tip), you will transfer the stitch without changing its orientation.Note that if you reach into the trailing side of the stitch instead of the leading side to transfer it, you’ll twist it, just like when working it. Play around with it a little bit, you’ll see what I mean.
Setup to work a purl stitch through the back side
Ok, are you with me so far? To review: whether a stitch in knitted fabric is open or twisted depends on these two things: which way the stitch is oriented on the needle, and which way it is knit (through the front or the back). To get an open stitch, always knit or purl through the leading side of the stitch. It’s easy to re-orient the stitches to get the effect you want, by flipping them around with the needles.
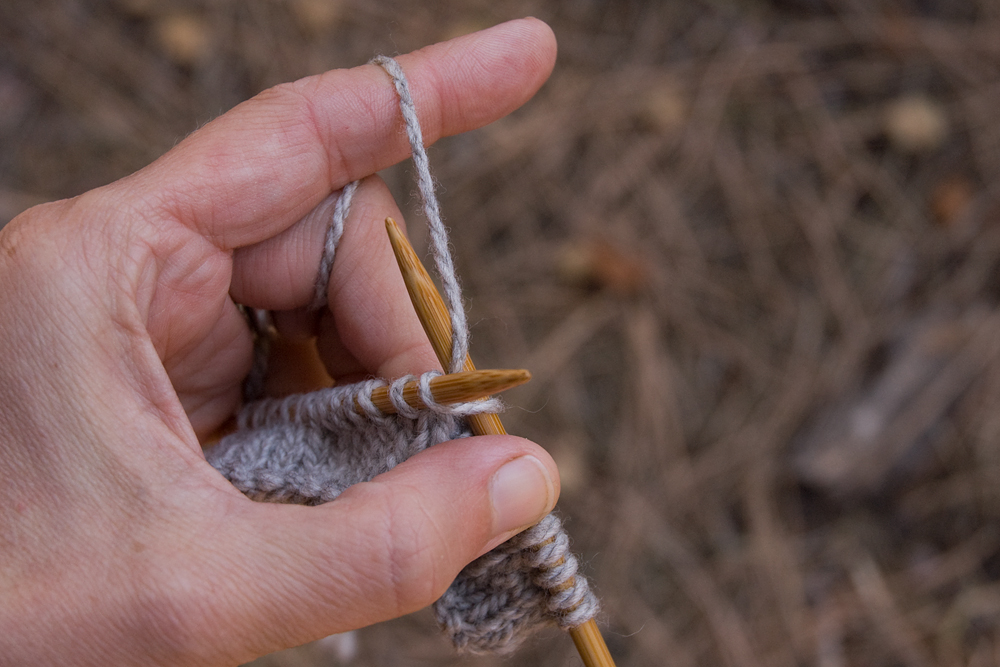
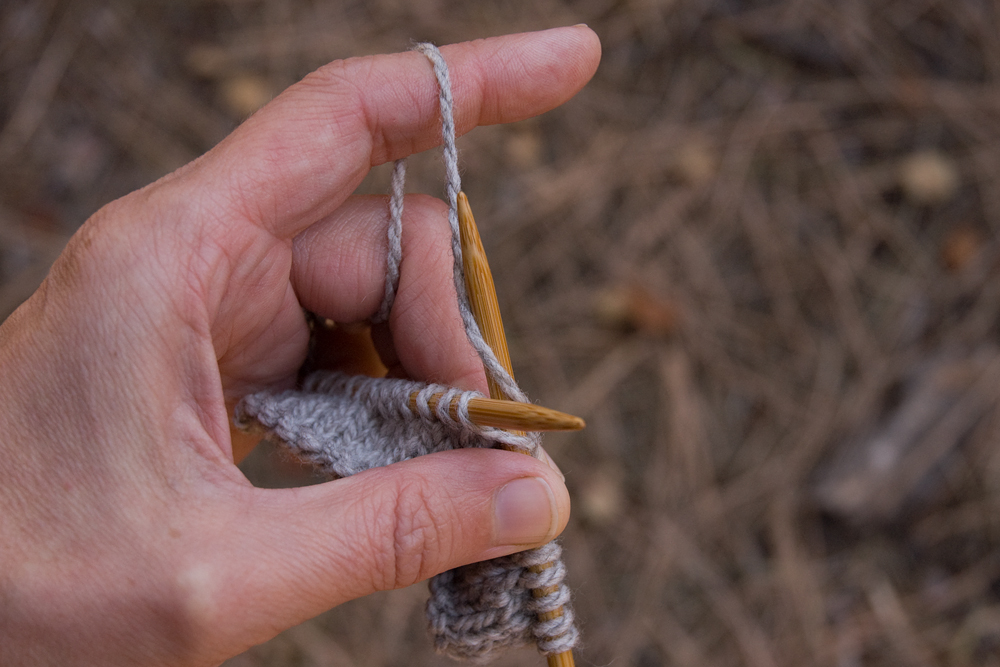
Fair enough, you may think, but how do the stitches get to be oriented one way or another in the first place? Don’t they all just appear with the leading side in front? Excellent question. You may have noticed that there are also two (only two) directions in which you can wrap the yarn around the needle as you make a new stitch. If you’re reading this in the US, you were probably taught that the “right” way to knit is to wrap the yarn from under the needle to the front and over the top (counterclockwise if you are looking at the tip of the needle), and the right way to purl is to bring the yarn from the front up over the top of the needle and down (again counterclockwise).
The wrapping direction applies whether you knit by holding the yarn in your right hand and throwing (English style) or by holding it in your left and picking (Continental style). In the photos below, I’m holding the yarn on the left, but it works with either technique. Even in Portuguese knitting, it may look different, but there are still two ways to wrap the yarn!
Setup to knit a stitch, wrapping the yarn counterclockwise
Setup to knit a stitch, wrapping the yarn clockwise
Here is our second deep truth of knitting: if you wrap the yarn counterclockwise, your new stitches will come out with the leading side in front. If you wrap the yarn the other way (clockwise as you look at the needle tip) when knitting or purling, your stitches will come out with the leading side in back.
(If you had rows, or parts of rows, of mysterious twisted stitches as a beginner, inconsistent wrapping direction followed by not noticing that the stitches were different is probably why.)
Here is where combination knitting comes in. If you knit Continental style, by holding the yarn on the left and picking the stitches from the tensioned yarn, you may have noticed that it’s actually a lot easier to form purl stitches by bringing the working needle in front of the yarn and just pushing it away from you through the existing stitch. This wraps the yarn clockwise around the needle tip, meaning that your stitches for the next row will have the leading side in back. Which is no problem now, right? Just knit them through the back, and they will come out open just like you want them to.
Setup for Continental purl stitch, wrapping the yarn counterclockwise
Setup for Continental purl stitch, wrapping the yarn clockwise
I learned about all this not long after I started knitting, from reading the excellent book Knitting in the Old Way by Priscilla Gibson-Roberts and Deborah Robson. There’s an explanation and handy illustration in the Knitting Methods chapter which shows “Western” style (leading side of the stitch in front), “Eastern” style (leading side in back), and a combined style. The combined style made sense to me, so I used it. Later I learned about Annie Modesitt, probably this era’s biggest champion of combination knitting—and a vocal supporter of the fact that there’s no wrong way to knit. (According to Annie’s blog, it sounds like she’s having an awful time lately. I certainly wish her a quick-as-possible recovery and all the best.)
Knitting in the Old Way also gives a fairly elastic bind-off method which I used for just about everything when I started knitting. It’s easy, and I still like it! All you do is knit two stitches together, then pass the resulting one stitch back to the holding needle, knit it together with the next stitch, and repeat. What it took me a while to realize is that I particularly like the look of this bind-off when the stitches are oriented with the leading side in back and knit through the back—that way they lean gracefully in the direction the bind-off is progressing (towards the left, like an ssk decrease) and make a nice series of open “Vs” along the bound-off edge.
Knit-two-together bind-off, worked through the back
Pop quiz: say you are knitting along with the leading side of your stitches in front, and you want to make this bind-off with the leading side in back, what should you do? As usual, there’s more than one correct answer. You could flip the stitches around one by one with the needles as you come to them. Or, you could wrap the yarn clockwise as you work the stitches of the row/round before the bind-off, so that the stitches come out with the leading side in back already!
I’m guessing that all this still seems confusing if you’re new to it, but I promise it gets much more intuitive after you knit with these ideas in mind for a little while. At this point, I can honestly say that I don’t even consciously notice which way a stitch is oriented when I come to it, my hands just put the needle through the front or the back as needed.
Considering all the variations in knitting style that folks use, before we end here I want to put a vote in for patterns to say “twist the stitch” instead of “knit through back of loop” and “work a left-leaning decrease” instead of “ssk.” Really, it would be so much clearer, and more understandable for those who knit in different ways from the American “standard” way. I will try to follow this principle in my own pattern writing.
Speaking of which, have you seen my Cloudscape Hat pattern? It was in part the inspiration for writing this post. I’ve shared my approach to these fundamentals of knitting in various classes, tried unsuccessfully to get a couple of knitting magazines which you’ve heard of to publish it (Really! Can you believe it?), and finally decided just to put it out here.
As Michel Garcia says about natural dye knowledge, are we going to build a wall around what we know and keep it jealously for ourselves, or are we going to share it freely in the belief and hope that it will grow and flourish as more people are exposed to it? Certainly I think this knowledge is incredibly useful to anyone who knits. If you find this post worthwhile, please share it! Wouldn’t it be great if it got more notice here than it would have in a magazine …
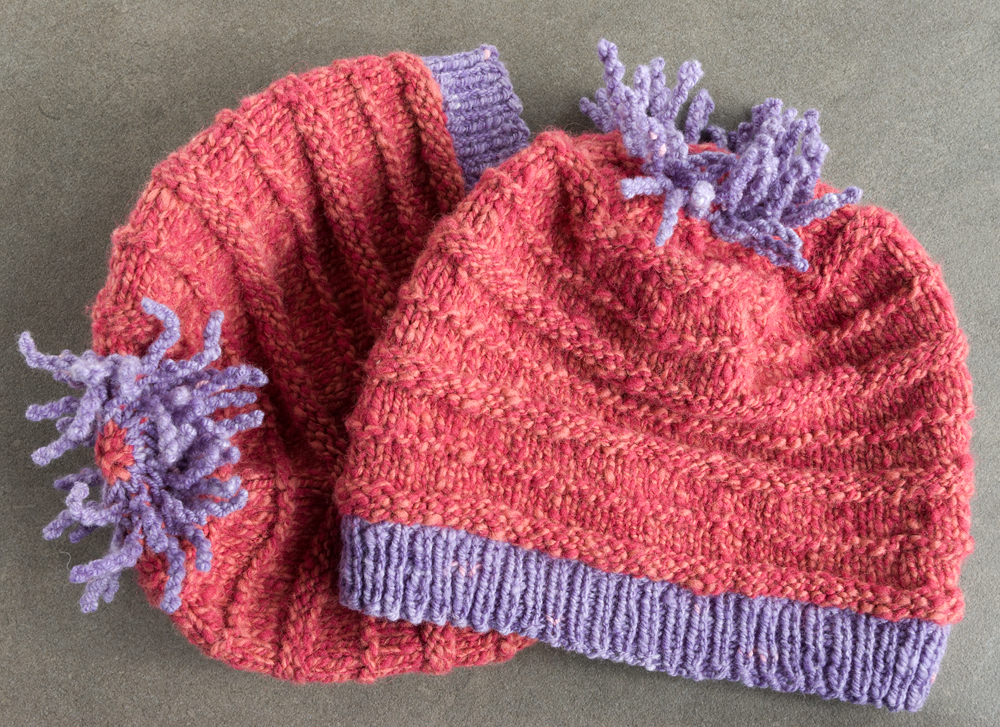
Before it fades too far into memory, I want to share a project which belongs firmly to last year. Looking back, I still can’t quite wrap my head around 2017. How can a year in which I found the news so distressing and depressing that I more or less stopped paying attention to it be the same one in which I met several of my fiber arts heroes, learned a ton, made wonderful connections at John C Campbell Folk School, etc? Of course like so many things, it’s not either/or, it’s both, with many more things in there besides. (I started thinking about either vs. both while Bryan was working onthis project, and it appeared again when I was reading The Courage to Teach by Parker Palmer last summer. And again in this conversation with Brené Brown and Krista Tippett that I was just listening to. I think it may be important.)
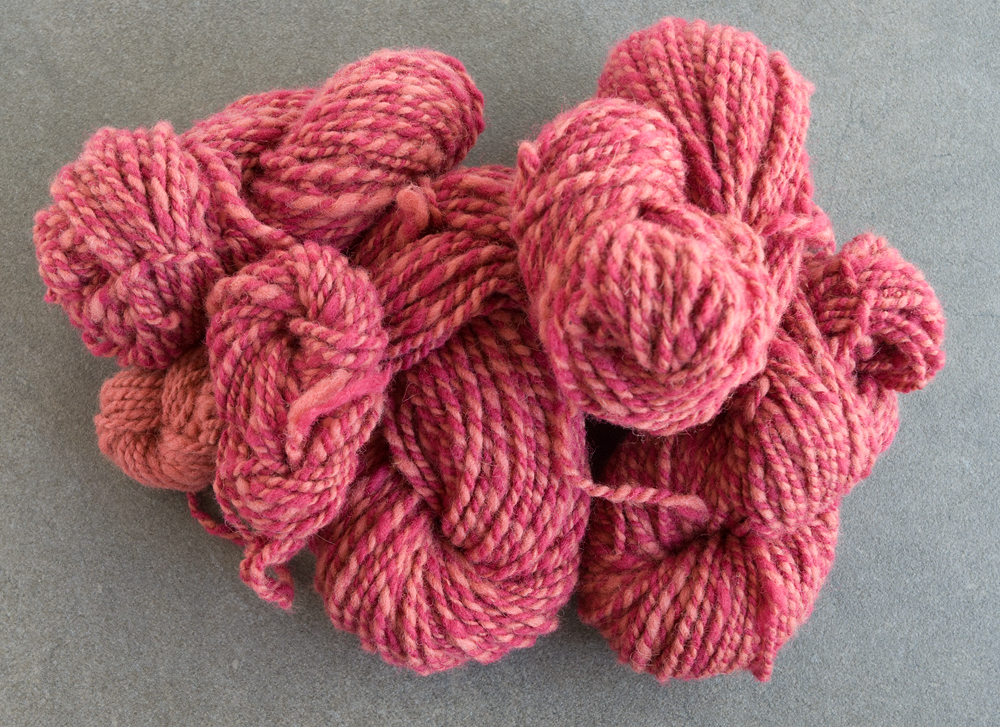
A lot of the both/and of last year is in these little hats. At the beginning of the year I was both saddened by all the events that showed the need for the women’s march, and inspired by all the artists I saw “taking back” the color pink and making beautiful things. I thought a lot about two of my young nieces (then 6 and 8 years old), and what messages they were getting about the world. I wanted to make something for them that would act as some kind of balm, something that would represent what I wish for them; play and adventure and fun and the chance to express themselves as girls, to be wild and strong and free. And for myself, I wanted to make something different than I normally would, something that would be a place to put some of my feelings and transform them into something positive. I got out some pink wool, and started spinning, woolen-style.
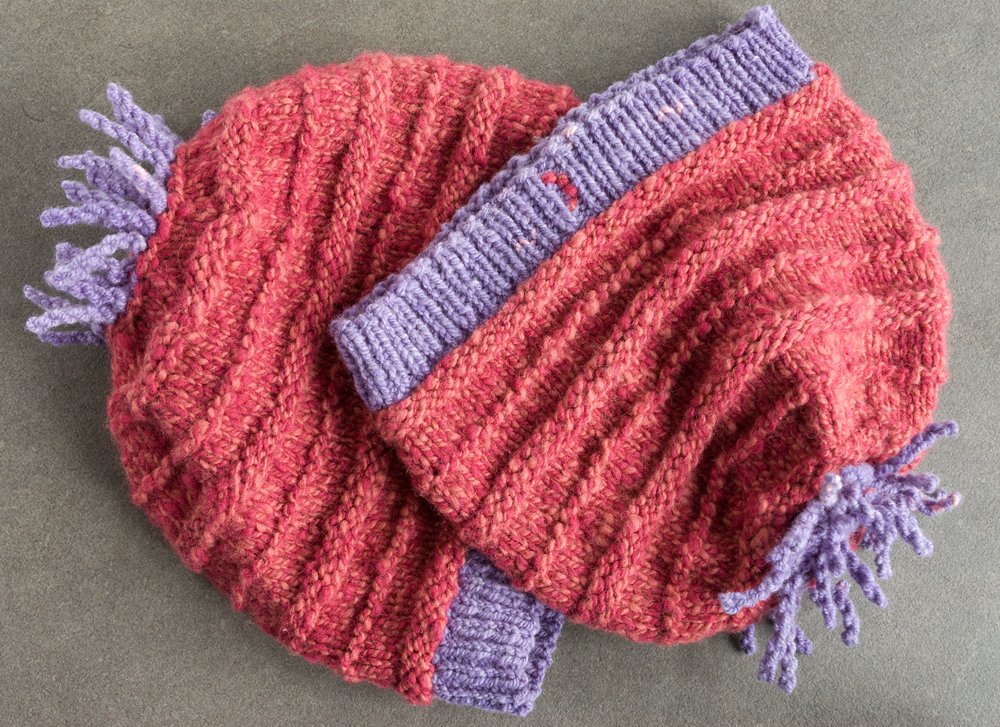
It felt good. And by carving out a little creative time every day and using it to spin, I made enough yarn for two small hats in short order. I decided to also incorporate some springy soft purple handspun yarn that I had traded another local fiber artist for, and cast on the first hat as I traveled to our family craft retreat in late March. The nieces in question were coming to visit us right after the retreat, and I arrived home with both hats mostly knitted, and finished up the last little bits in the evenings after the girls were in bed. Near the end of their visit, I brought out the spinning wheel, showed them how it worked and let them try it, and then gave them the hats. They, and their mama, loved them, which made me feel really good about the whole thing. It doesn’t seem like my place to post pictures which would probably embarrass them later, so you’ll just have to trust me that they looked wonderful, grinning and wearing the hats with their pajamas.
Caption-sized knitting notes: the pattern in the body of these hats is Quaker rib (the same as this shawl which I thought looked great in handspun), and the tendrils at the top are made following the directions from Cat Bordhi’s Anemone Hat pattern.
I hesitated a little bit about posting this, as it brings up some churn-y feelings from last spring, and I’m happy to say that I feel much more solid in general now than I did then. But after typing it out, I’m so glad I did. It gave me some good perspective, and I think I can even put more of name to last year. I’m definitely saying it was a good year, although a hard one. (If you still feel like the world is ending, may I suggest you read this article, and then go make something?)
I have quite high hopes for 2018 too, and some exciting things in the works that I’ll post more about soon. It’s early enough in the year, I’m still happy to wish you all a peaceful and fulfilling trip around the sun. May it be a good one, and with any luck not too hard!
You know how sometimes you see someone, a stranger, and without meaning to, you imagine that whatever they’re wearing and whatever car they drive are the things they have chosen out of all possible options, that these things say something meaningful about their personality and their life? And then you look at yourself, your car, and maybe your clothes, and realize how many other circumstances played a part? I feel like we who make our own wardrobes move slowly (slowly, please cut yourself some slack, it’s going to be a process) towards the point where at least for what we wear it’s true: our clothes say exactly what we want them too. (My car is another story, I don’t know about yours. It does say that I would rather duct tape the mirror back on and buy better food than other possible options …)
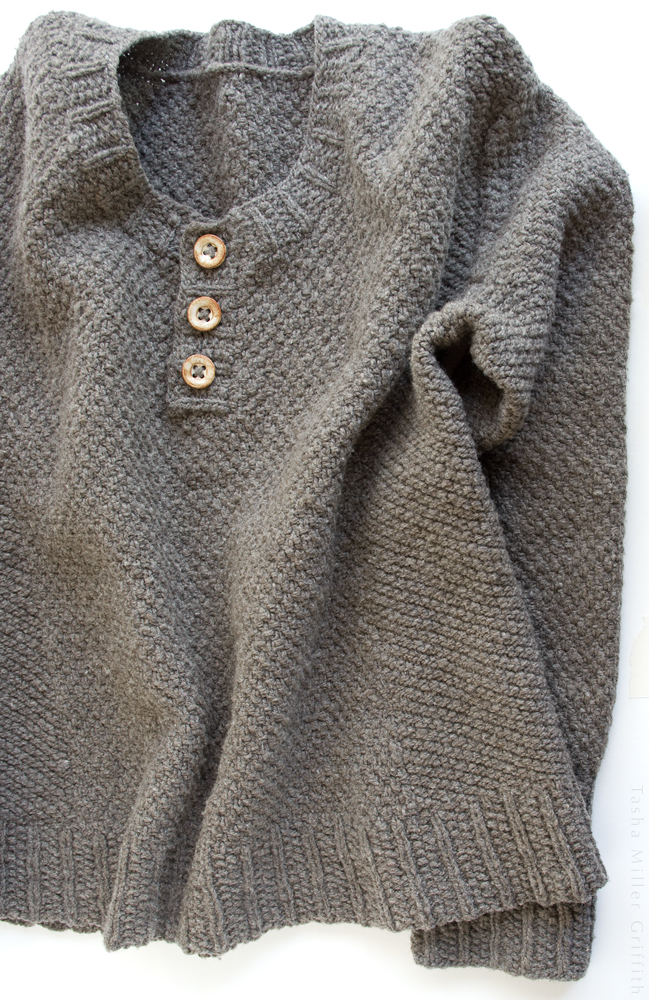
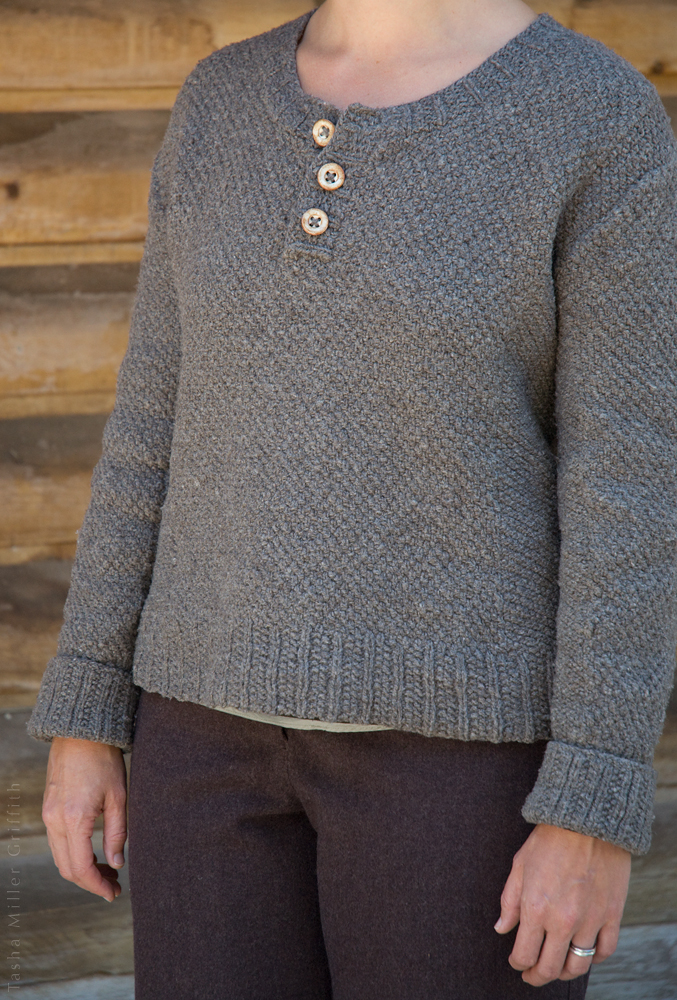
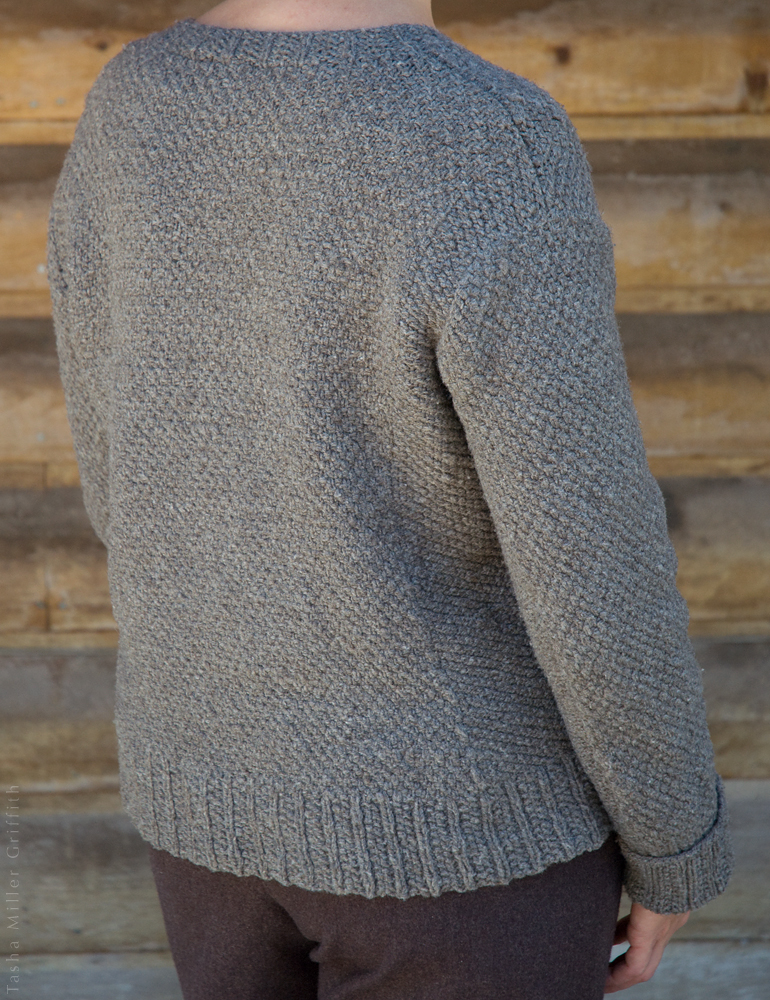
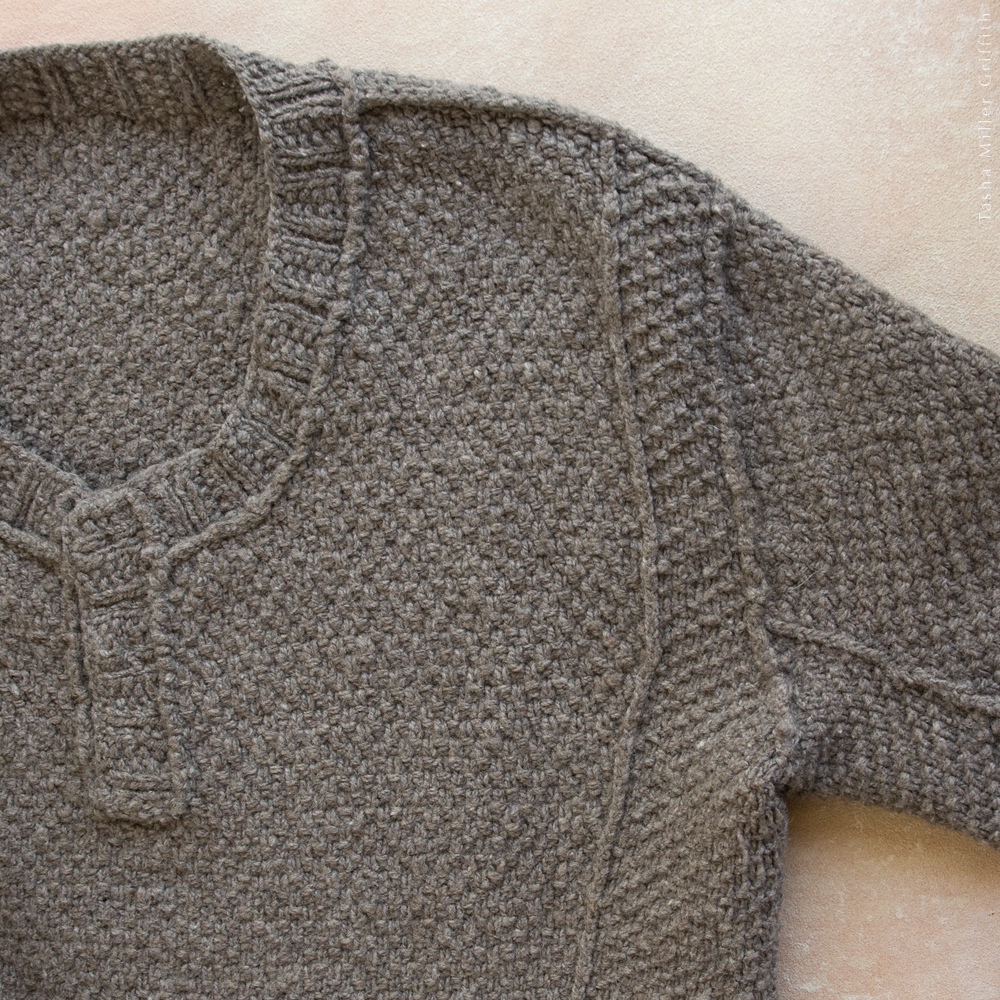
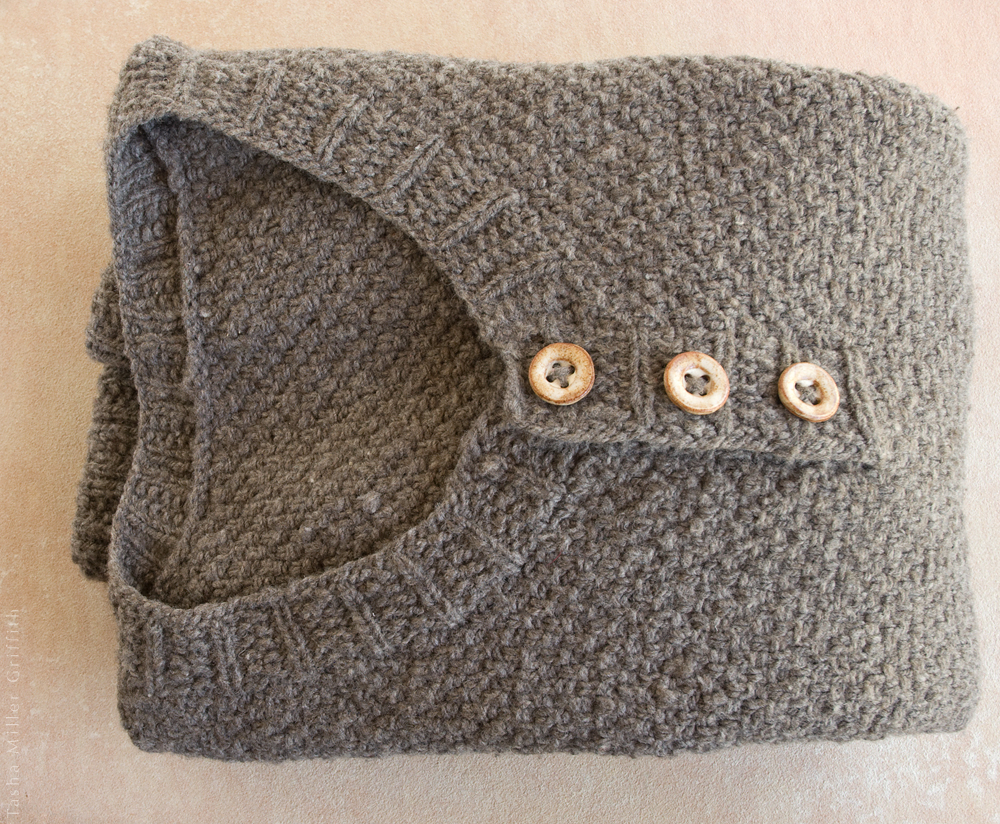
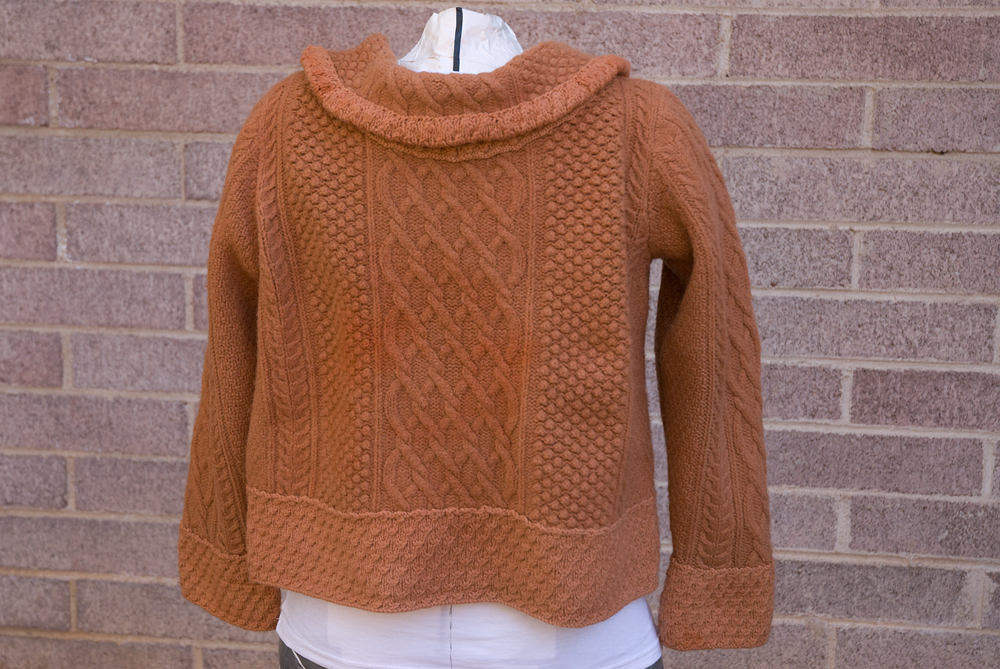
This sweater feels like a step towards what I want to say with my knitting. It’s made with Mountain Meadow Wool (they’re a woman-owned company using US wool from the West, committed to eco-friendly practices) in a sheep-grown color (“natural dark gray”) which I love. I feel like the message that real wool is beautiful and good comes through, even if you saw me and assumed I bought this sweater (although if you saw my car you’d know I couldn’t afford it). You can also see that I love texture and value detail, and hate being cold.
I’m pretty sure this was supposed to be my One Year, One Outfit project for 2016. I started planning it in late 2015, started knitting as spring came around, and brought it with me on the road last summer, but it took until this spring to finish. This was a long knit for a whole lot of reasons. The textured stitch patterns just take longer; there was more stopping and checking and thinking than with plain stockinette or one pattern all over. Sweaters are big, and pretty soon I wouldn’t necessarily take this one everywhere I went. Making something only loosely “inspired by” a pattern (the Cotswold Henley by Meghan Babin) takes a lot of thinking, and measuring, and planning, and sometimes ripping out and knitting again. All totally worth it, but time consuming, and sometimes I ended up not knitting because planning the knitting was daunting and I was too tired or overwhelmed.
When we got home in the fall, I really wanted to keep making progress on it, so at first I decided I would work on the sweater before bed, instead of spinning, until the sweater was done. I love spinning before bed, and it has to be said that I did not love knitting the sweater during that time as much. Sometimes I would just skip it. After a while I realized that, although I’m not the kind who likes having a bunch of projects in progress, this was a false choice—it’s actually healthy for me to have a little knitting and a little spinning going on at the same time. I also realized something about how I like to work that I kind of already knew; knitting is an “and” activity for me. I love knitting while traveling, knitting while hanging out with friends, and knitting at meetings, but I really don’t love sitting quietly by myself and knitting. I’d rather do something else with that time. So I went the other way; I started spinning at night again, and hauling an extra tote bag full of sweater-in-progress with me to social events and anywhere else I could see that I might have some down time. That worked much better, and before long the sweater was actually done!
I believe that it’s done and that I knit it, but I’m having trouble believing that I get to keep it, if that makes any sense. In other words, I got pretty much exactly what I wanted. Of course there are a few things I’ll change in the next version, but there always are. I’ve decided that just shows that I’m still on a journey.
I started wearing it as soon as the last seam was sewn, and it went on quite a few outings this May, and into June in our variable mountain weather. The yarn has pilled some, but I’m hoping that how brilliantly it held up to being ripped out and re-knit (ahem) multiple times in certain sections means that the pills will be temporary and not terminal. I drafted Bryan to take the photos of it on me on the last cool day we’re likely to have until fall, and then carefully packed it away. Getting it out when the weather turns again is going to be such a treat!
There are two different stitch patterns, but they’re hard to see unless you’re really looking. I possibly should have gone with something bolder/more contrast, but then again subtle is my jam …
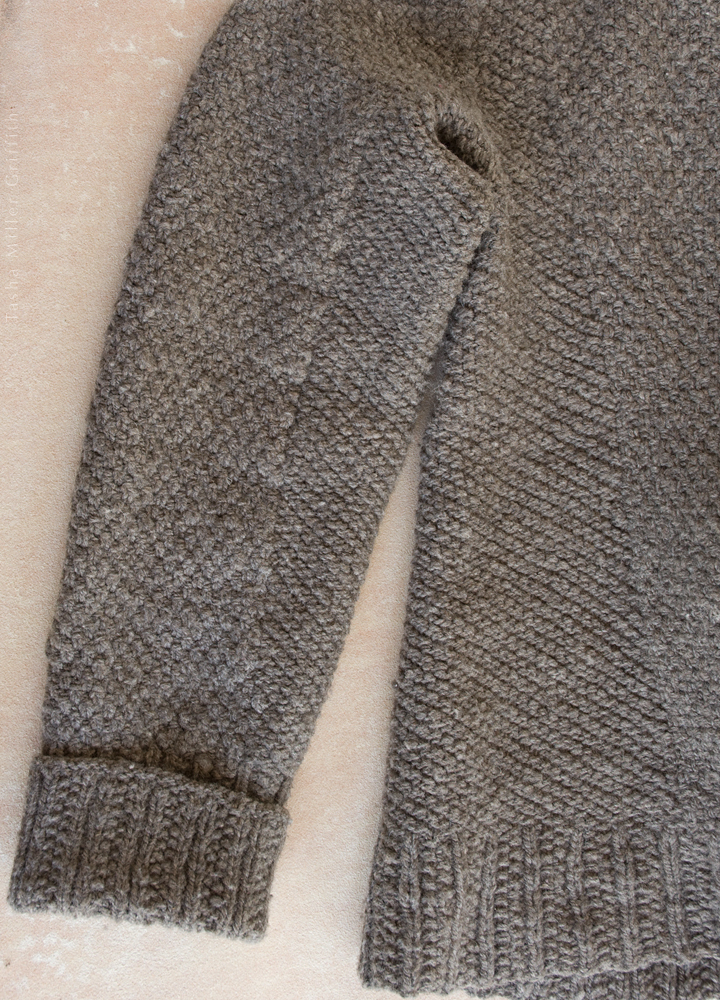
A few knitting notes: I wanted this to fit over my thickest winter shirt/sub-sweater (I hate being cold). I used Karen Templer’s idea of in-the-round “seams”. This is seriously brilliant as far as I’m concerned. Knitting seems so perfectly adapted to be made in the round, to be shaped organically, to be seamless, and I’ve never been willing to give all that up for the structure that seams can add. Now I just might get both! I made a pretty detailed/extensive chart of measurements for various sections of the sweater when I was planning where the “seams” would go and how big the whole thing should be, based on trying on an old sweater and marking it with pins. I’m really looking forward to having that chart and this sweater for planning future sweaters. I’ll be able to look at them and compare pattern measurements and know how big I want the sleeves, or how wide across the shoulders, etc.
Guts: Picked up stitches around the neck/placket, and where the sleeve joins the body. “Seams” closed with mattress stitch between the two stitch patterns vertically in the body, and horizontally near the bottom of the sleeves.
For now, I’m enjoying knitting socks in spare moments. Compared to this sweater, they seem to appear instantaneously! I have a pair almost done already. I think the speed is mostly due to the “and” factor; socks are really suited to occupying my hands while other things are going on. They’re small enough for me to keep the whole project in the bag I usually carry, and I purposefully kept the stitch patterns simple enough that I can keep track without needing to refer to a pattern most of the time—which also means I don’t have to stop much for deep thinking. I could really use some new socks, so I may just make a few pairs before settling down to anything big and complicated again.
I’d love to hear any thoughts you want to share about big versus small projects, or crafts you like to do on your own in a quiet space versus things that are good for groups and busy times, or where you are in your journey of what you’d like your wardrobe to say …
Hello! Life has just been a flood, a river of things lately, but this space has still been on my mind, and now seems like as good a time as any to share a somewhat long-lost project.
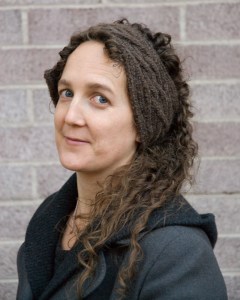
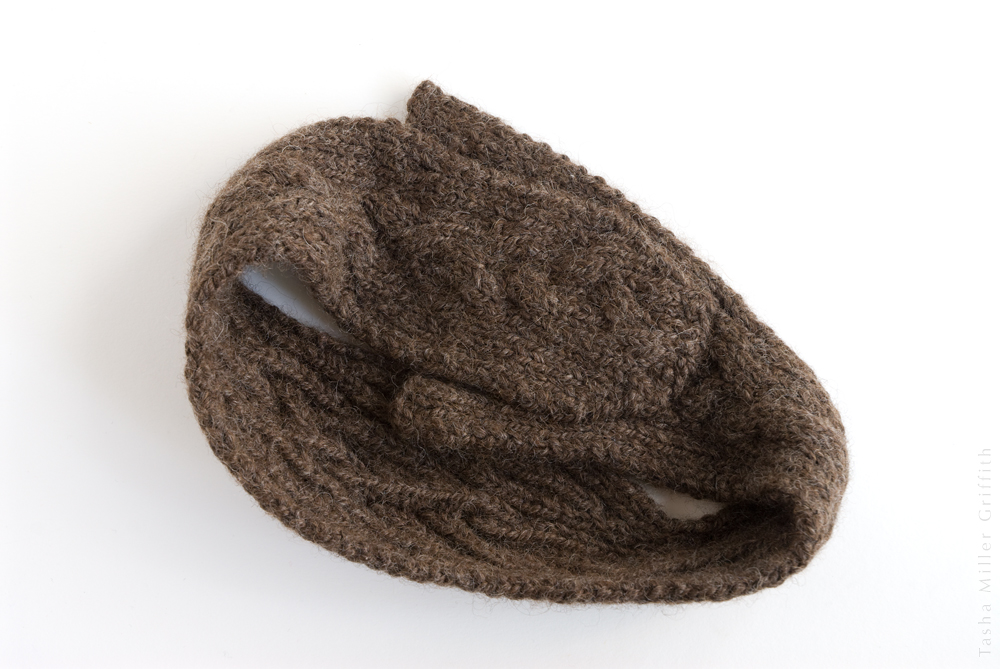
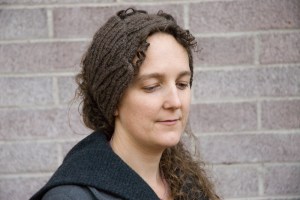
I took a workshop on Versatildeswith Cat Bordhi in July of 2015. As you know if you’ve been reading here for a while, Cat is my knitting heroine—and Cat if you’re reading this I’d like to include a sincere and hearty thank you for all your warmth, humor, and love of knitting and of the world in general that shines through in your classes and projects!
I wanted to make something that I knew I would wear using the Versatilde ideas, and as usual I wanted to experiment, so I sketched this headband and started working on it during the workshop. It didn’t actually take that long to finish knitting it, and it was a fun journey. I’m usually a note-taking, think-it-through kind of person (as you might have noticed), but I really enjoyed Cat’s way of making these, which is much more about enjoying the process and not over-thinking decisions. There isn’t a chart, instead you decide things like when to make cable crossings and increase/decrease at the sides as you go, following a few suggestions to make it flow organically.
I’m not sure if I over-thought it at the end. My original plan was to close it with buttons, but I couldn’t find any that went with the wool and the pattern without distracting from it, so eventually I just sewed it closed. Somehow, it took me the rest of the time until now to get photos of the finished thing and type this up … these things happen.
This yarn is semi-worsted spun Romney from Solitude Wool. I got it because I’m interested in single-breed wools, and I wanted to try some samples for another project, so it was already in my stash. I was also curious how I would feel about Romney next to my face, since it’s more of a “medium” wool, rather than a super fine one like Merino. It turns out it’s totally OK (at least for me, these things are individual of course). At first I could feel a little bit of a prickle, but certainly not enough to keep me from wearing it—if it’s cold I want my ears covered! And I was surprised to find that it softened more in the first wash, so that the prickle was less noticeable. I really like this yarn; it’s wooly, sturdy, and a little bit smooth/slick, and the finished fabric has both some drape and some spring. Also, whatever processing they use, it smells the best—sheepy and soft and clean. I wouldn’t choose this yarn for underwear, but other than it that it would be good for all kinds of things.
My plan worked; I’ve worn this headband quite a bit. It’s especially good for cross-country skiing and hiking when the weather’s cold, since it allows some heat to escape out of the top of my head while protecting my ears from the wind, which can be vicious around here. It stays on well too. And, you know, that art-deco-meets-rustic look is really big in the woods this year, right? But seriously, I’m really pleased with how this came out, and glad I’ll have it in my wardrobe for more cold seasons to come!
I designed this hat for myself, and decided to share the pattern after a friend declared it her favorite thing I’ve ever made. It feels like a really good time to put a little bit of beauty out into the world right now. I’ve been collecting the pieces of this pattern—the photos, the drawings, the yarn specs—in spare slices of time over the past weeks, and now it’s ready to go!
The Star Blossom Hat is mainly seed stitch ribbing, shaped with short rows for a longer back to cover your ears, and designed to be long enough to turn up all around. It has a stockinette stitch top to serve as a background for some sweet and simple embroidery, reminiscent of a cherry blossom or a starburst.
Yarn
Lucky me, I had a big skein of my friend Lauren’s handspun just sitting in my stash. All I remember her telling me about it is, “It’s alpaca.” It was just waiting for this hat I think. Assuming that Lauren didn’t go into production on this and start selling it around the country without telling me, here are the characteristics you want to match in your yarn to get a similar look and feel:
•It’s worsted weight, about 9 WPI.
•It has bounce. 4” of yarn will stretch another ½”, and then easily spring back. It needs a little elasticity so the ribbing pulls in just enough to keep its shape on your head. My yarn has some drape too, like most all alpaca, which is not a drawback here, but also not necessary for this shape to work.
•It’s not too fuzzy. An alpaca yarn with a lot of “halo” effect would obscure the textured stitches and the embroidery, so opt for something fairly smooth.
•It’s a 2-ply yarn, and each ply is a slightly different (natural alpaca) color. It’s also a little bit thick-and-thin, being handspun. Neither of these characteristics is essential to the hat, but both give the texture of the stitches a little more dimension.
•It’s soft enough to comfortably touch my face.
This hat took just about exactly 130 yards of yarn. 150 yards would give you plenty for swatching and margin of error.
Spinning geek details on the original yarn for those interested:
•Angle of twist 27°
•3.5 – 5 twist bumps per inch in plied yarn
•587 yards/pound
Yarn scraps for embroidery:
These are also something I’m lucky enough to have; little bits and pieces from my grandmother’s stash which I’m pretty sure were dyed with natural materials by her or her fiber friends. You can use any scraps you have in colors you like! Or even ask your knitting friends to share and swap scraps. Embroidery is my ultimate use for tiny bits of yarn too beautiful to get rid of. These are singles (one ply) yarns, which gives the stitches a soft fuzzy look.
Gauge
Before blocking I got 5.5 to 6 sts/inch in seed stitch ribbing, and 5 sts/inch in stockinette.
After blocking I got 5 to 5.5 sts/inch in the ribbing (stretched slightly during blocking) and the same 5 sts/inch in stockinette.
Needles:
I think I used US size 4. I knit pretty loosely. Size 5 would probably be a more common recommendation … the point is it doesn’t matter, use the size you need to get the gauge you want!
Sizing
I have a fairly big head, and I hate hats that squish my hair (or worse, my head!). Straight around my forehead, with the measuring tape snug but not tight, measures 22.5 inches, and that’s the size I made the hat (using 5 sts/inch for math). This gives me my personal hat fit of dreams: snug enough to stay on my head, but never tight or uncomfortable. I highly recommend that you measure the hat recipient’s head and take her/his preferences into account. You may have to modify the decreases for the top a bit, but that’s a small price to pay for a hat that really fits!
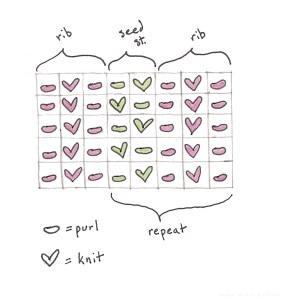
Seed Stitch Ribbing
This is just so nubbly, I’ve been knitting it into everything lately. I wanted a combination of stitches that would look good on the right or wrong side, so the brim of the hat could be turned up, and this is what I came up with. The columns of ribbing are always purl knit purl, with two stitches of seed in between.
It does look a little confusing at first, so put as many markers as you need, until you can see where the ribbing columns are and which are the seed stitches that should always alternate.
Pattern
Cast on 115 stitches (or the number you determined from your head size). You’ll need a multiple of 5 stitches for the seed stitch ribbing pattern. I used this cast on.
Bring the beginning and end of your cast on stitches together, and knit in the round, in the seed stitch ribbing pattern, until the hat measures 6 1/2 inches tall. (If you have extra yarn, you can knit further at this stage, which mean you can make a deeper turn-up in the brim of the hat when it’s done).
Short rows:
Reserve 40 stitches (or about 1/3 of your total stitches if different) which will be the center front of your hat, by placing a marker on both sides of them. Keep knitting around until you are 4 stitches away from reaching the first marker again, and then turn and knit back until you are 4 sts away from the second marker. (Remember to match the patterns to what you see on the wrong side as you work back.)
Continue to work back and forth, each time stopping 4 sts away from the last turning, until there are 5 groups of short rows or 6 “steps” on either side of center front, and about 40 sts in the middle that will be the center back. The back of the hat should measure 8 to 8 1/4 inches tall.
Work around on the right side, integrating the turning stitches. My favorite is Cat Bordhi’s “Thanks-Ma” method, which uses a clever pick up to make the “steps” basically disappear. Cat’s videoexplains it specifically for her sock heel, but I’ve used it on all kinds of things since learning it. Still, if you have another favorite short row method feel free to use that instead.
Then knit one more round on the right side, maintaining the patterns, to smooth everything out.
You shouldn’t need to change the numbers in this section, unless your stitch count is very different from mine. If short rows freak you out, you can also skip them altogether, and just keep knitting in the seed stitch ribbing pattern until the hat is 6 1/2 to 8 1/2 inches tall, depending on how much you want to turn up the brim.
Crown:
Switch to stockinette stitch and knit one round plain (knit every stitch). Place a marker at the beginning of your round.
Round 2: Work a K2tog (decrease 1) at every column of knit stitches from the ribbing pattern (23 times around). Or you can think of it as k2tog, knit 3, repeat around. I just think it looks nice to line up the decreases at the knit columns.
Round 3: Same as round 2 (decrease 23 sts again in the same places, or k2tog, knit 2, repeat).
Rounds 4-8: Knit these 5 rounds plain.
Round 9: Decrease at every column again (k2tog, knit 1, repeat).
Rounds 10-14: Knit these 4 rounds plain.
Round 15: knit every two stitches together all the way around (k2tog, repeat).
Rounds 16-18: Knit these 3 rounds plain.
Round 19 to finish: Continue k2tog until there are only 6 stitches left.
Break the yarn, leaving a tail, and thread the tail on a blunt needle, and through the remaining stitches, continuing in the order you would knit them. Thread the tail through the top of the hat to the inside, and pull the last stitches snugly together. Secure the yarn on the wrong side of the hat.
If your stitch count is different, I suggest trying the same number of decreases in each decrease round as you have knit columns from the ribbing, and using my spacing of plain rounds between. If that doesn’t work or you have questions feel free toget in touch, I’d be happy to help you figure it out! I unraveled my crown twice to come up with this formula. It should have a little curve (like your head), but not be too loose or floppy, to show off the embroidery.
Embroidery
I used just two stitches; the simplest running/satin stitches (in two different groupings), and Colonial knots, both which I explain in this post.
I used pins to visually mark the placement of the five knots nearest the center, and then based the other motifs on those, moving outward.
Tips for embroidery on knits:
Whatever stitching you add will also add some bulk and stiffness to the knitted fabric. You can minimize this by:
•Taking the shortest path on the wrong side between the end of one stitch and the beginning of the next.
•Stretching the fabric gently after every few stitches (minimizes puckering).
•For longer stitches between motifs on the wrong side, catching a little bit of the yarns in the fabric as you go along, so you don’t have long floats that can catch on things (I show this for yarn ends in this post).
That’s all, folks! I really hope you all enjoy this pattern, and if you decide to make it of course I’d love to see! It’s now up on Ravelryas well.
Take care everyone and enjoy your winter!
It’s so tempting for our online lives to show only the bright side; just our beautiful finished projects (neatly ironed), our best ideas translated fluidly into tangible objects. I’ve definitely swept my share of failed makes under the rug, never to see the digital light of day. And actually I think that’s fine too—some things we learn from, and some we just don’t want to talk about. I’m going to talk a little bit about this one though, and see how it goes.
I had so many reasons to love this sweater and try to save it. My mom knit it for my grandma, and after my grandma passed on I took it, thinking I could turn it into something I would wear. It started out as your classic grandma Aran cardigan; white and long and covered in cables and textures, slightly too big for me, with a high neckline and little pearly buttons. Although I’m sure it could have fit right into some people’s wardrobes with minor adjustments, it made me look ridiculous. Maybe I should have stopped right there, but I have a lot of faith that things can be refashioned to work in a new wardrobe (built on a solid foundation of makes that have worked out).
My first attempt to refashion the sweater was a few years ago, and included: shrinking/felting it slightly, dyeing it with tea, widening the neckline, and knitting new bands for the bottom and cuffs. It was a fair amount of effort, and I still didn’t wear it much. It felt strange, and the strain on the neckline proved too much, the yarn started to pop in several places. Not sure what to do next, I put it in a plastic bin in the garage, and there it sat, occasionally nagging at the back of my mind.
I got it out again last fall at the start of Slow Fashion October. What could be a more appropriate project? And I had a plan, in several steps, thought out beforehand, which looked good in my head. I trust those plans and my ability to envision how they will come out.
I dyed more yarn and ribbon in tea. I stitched the ribbon in to reinforce the neckline. I shorted the body and used the extra to add a collar onto the (ridiculously wide) neck. I figured out what stitch pattern I had used before, and knit another piece for the collar, and then another one because the first one didn’t work (actually I think there were three attempts at the collar). I wasn’t convinced it was great, but I also wasn’t able to take a step back from all I had invested, and I went ahead and overdyed the whole thing with madder, hoping for some kind of warm soft brown. It came out, well, salmon, and that’s when I was forced to take a step back.
It wasn’t just the color, it was the spottiness of the color that really got me down. I knew this could be an issue dyeing garments (even though I haven’t had many problems using tea) and I had tried to strategize against splotches, but evidently not well enough. On top of all that, it was inescapably not my style—particularly that blasted collar.
I put it down, knowing it was no good, but not emotionally ready to let it go. It’s been a while since I had a downright project failure, particularly of something that I put this much effort and planning into. I still have plenty of “um, well, I won’t do that again,” learning moments, but at this point in my creating life, the results are usually fixable, or cause just a minor inconvenience in the finished garment. I had kind of forgotten what it feels like to have to give up completely on something that I’d worked so hard on, and how it takes the wind out of your making sails for a while. I definitely felt a little intimidated to start another project after this one.
The best silver lining I can come up with so far is this: that remembering this feeling is good for me as a teacher, in the same way that remembering what it’s like to be a beginner is good for me. There’s one big difference though: being a beginner is super fun if you have confidence you’ll get there in the end, but making a failed project is still no fun at all. I do know that my present confidence and skill is built on a whole bunch of projects that didn’t go very well (to one degree or another). And I’ve reminded myself that no time is ever wasted, as long as you’re making and learning, and enjoying the process. I just finished reading Big Magic by Elizabeth Gilbert, and one of my favorite things about that book is how much she is reassuringly down-to-earth about stuff like this: everyone fails, everyone has droughts of creativity, and crises of confidence (even highly successful authors). What makes the difference is whether we can use the good parts of a bad experience to move forward, or we get so bogged down in the bad parts that we give up on this path entirely and look for another one.
Needless to say, one crummy sweater will not derail me from the path of any of the fiber arts I love. Thinking about this one still stings a bit, mostly because I can still see the potential in some parts of it … but I’ve accepted that I cannot make it into what I want, and I’m ready to put it in the charity pile, and let it go to meet its future, which whatever that may be, is not my responsibility any more. It took a couple months of the sweater sitting in the corner in our bedroom for me to get to this point. To tell the truth I think, with the benefit of a little hindsight, that the whole second attempt was doomed, because the neckline from the first attempt was beyond saving.
But now, I’m ready to take what I learned, leave the sweater behind, and move on. I still trust my instincts, and my ability to plan a project in my head before I start. These skills are built on years of experience, and usually the plan works. Even when it doesn’t, it’s another step moving me forward on a path which I believe in with my whole heart.
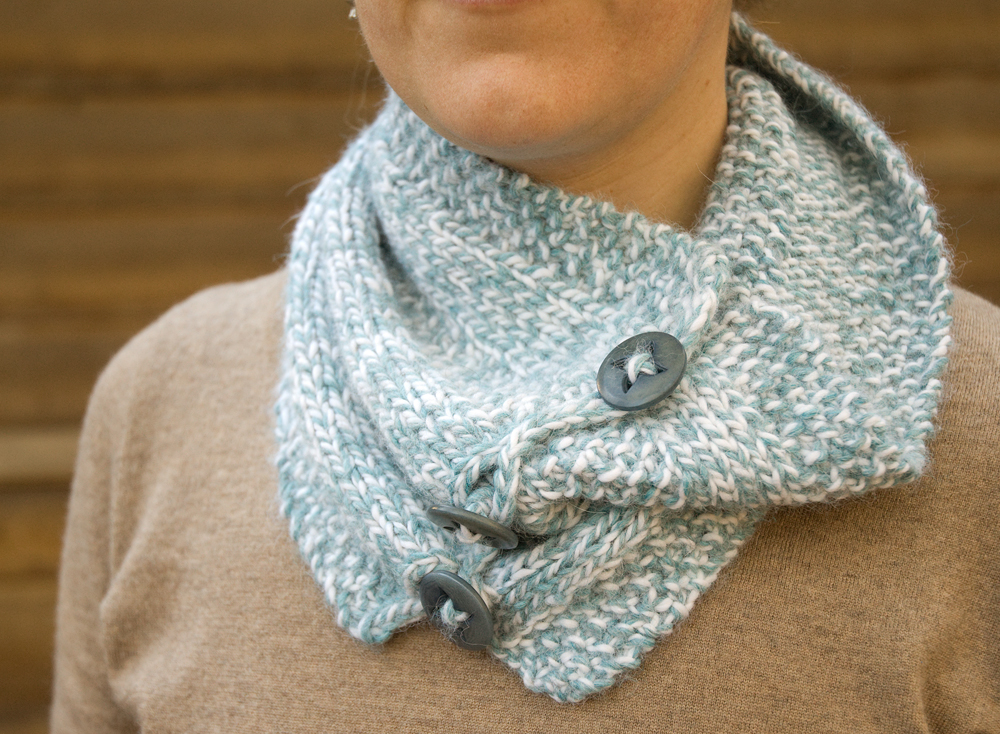
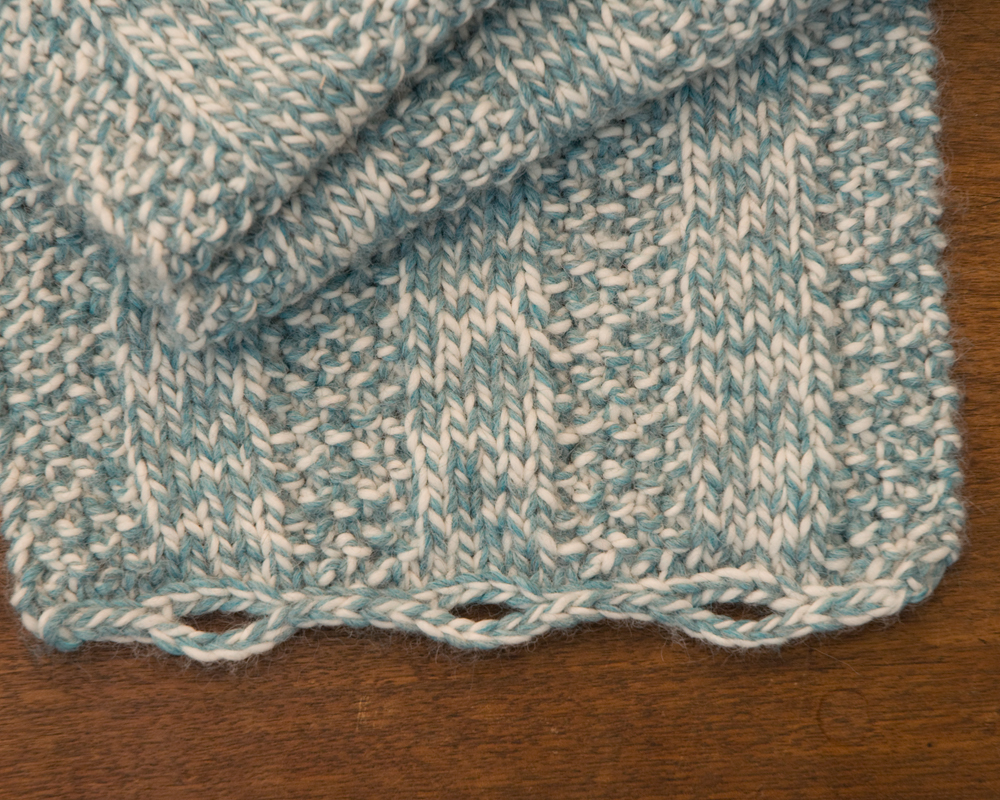
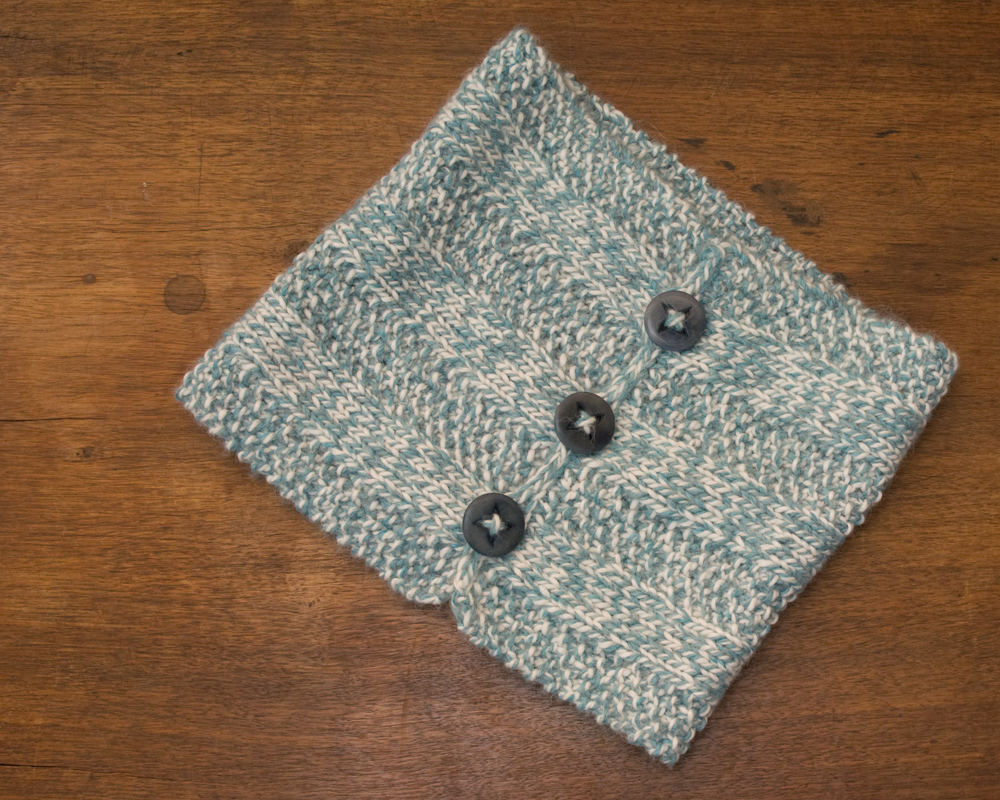
When my cousin was about 12 years old, she knit me a scarf. I’m touched by this gesture every time I think about it. That’s a lot of time and effort to put into an object for someone else when you’re that young. The scarf (at left) is great, made from a colorful thick-and-thin yarn, but it’s kind of short. Then one day a couple of years ago I realized that if I added buttons and buttonholes to the ends, it could be a stylish cowl, and I’d probably wear it a lot more. Which I do.
Then I realized that a cowl like this, just a knitted rectangle with buttons added, would be a perfect second or third knitting project for my students. For when you can knit and purl, but maybe you’d like to make something besides a washcloth using your current skills, before moving on to knitting in the round and all that.
I made a sample one with some seed stitch columns added, and left it at the yarn store where I teach. One day not long ago I was over there, and the owner and one of the employees were telling me about how people ask for the pattern a lot. I was quite surprised. I agreed to write it out. Then I got to thinking, if I’m going to give this pattern to whoever comes into the shop, I’d like to give it to you guys too. So here you go:
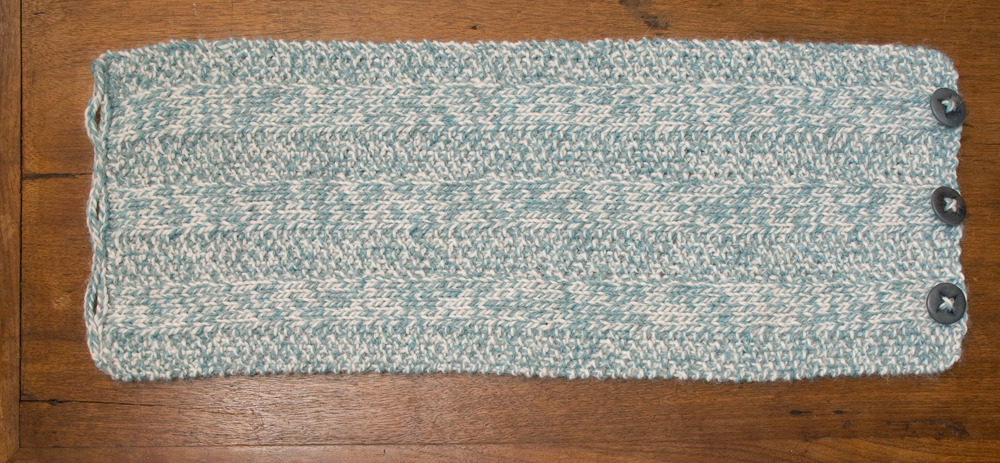
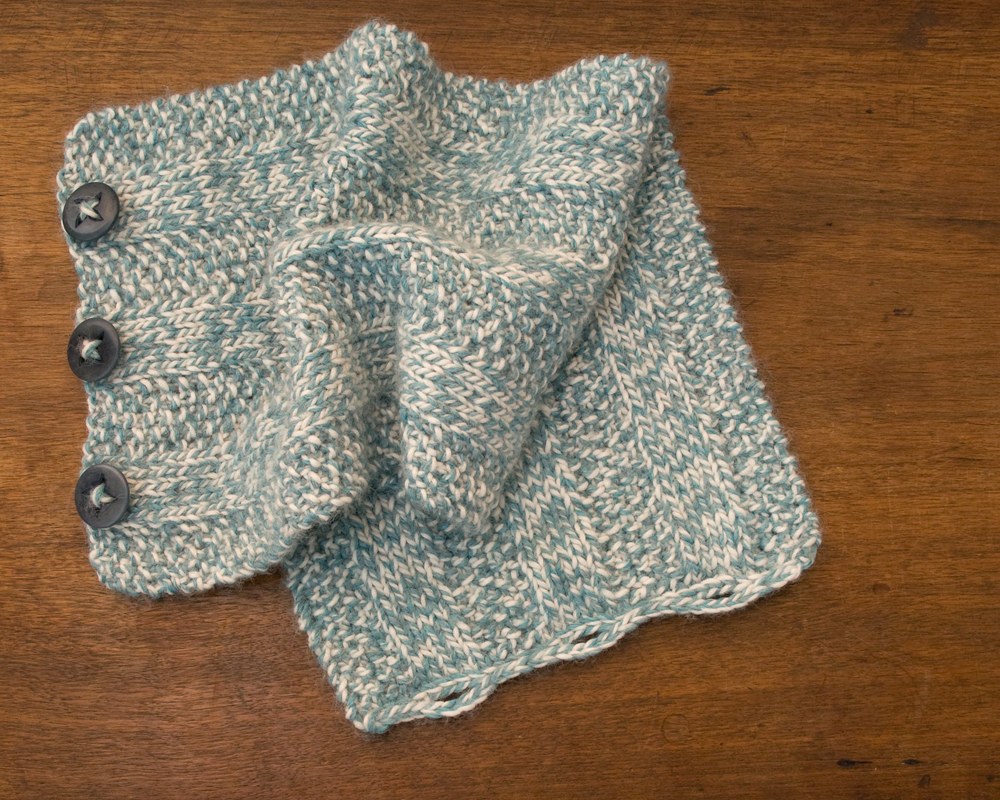
Knitting 102 Cowl Pattern
To make this cowl, you’ll knit a long rectangle, and then use a simple crochet stitch to make buttonholes on one end. Sew buttons on to the other end, and it’s ready to wear!
This concept is very adaptable. It’s easy to vary the yarn, stitch choices, and size to suit your own taste and knitting level.
Materials
Yarn:the sample is made in Cascade Baby Alpaca Chunky, a very soft yarn with a lot of drape and not much bounce. One skein is enough for a small cowl like this. The finished fabric hangs in liquid folds. If you’d like a cowl that will stand up more, choose a yarn with more body and spring.
Gauge: the finished sample has 4 stitches per inch in both stockinette and seed stitch. It’s OK if your gauge comes out a little bit differently, since exact size isn’t super important for this project. It’s still a good idea to make a swatch with your yarn and see if you like how the fabric is coming out, and measure your gauge to get an idea of how big your finished cowl will be.
Needles and Hook: try US size 8 (5mm) knitting needles, but keep in mind that you may need a larger or smaller needle to get the gauge you want (especially if you use a different yarn). You’ll also need a crochet hook in a similar size for the buttonhole loops. In my experience the hook size doesn’t need to be exactly the same for such a small section.
Finished size: the sample cowl is 8 ½“ wide and 22 ½” long. It fits fairly close around my neck, but is big enough to get over my head without undoing the buttons. You can compare the dimensions to any cowl you like to see if this seems like a good size for you.
Directions
Cast on 35 sts (or your stitches per inch x desired size in inches).
Other options: If you’re not quite ready for keeping track of the seed stitch columns, you can also make a perfectly good cowl using garter stitch (knit every stitch, every row) or using seed stitch across the whole piece. (A cowl made with all stockinette stitch—knit one whole row, purl one whole row—will curl up at the edges.)
For the seed stitch pattern, you’ll need an odd number of columns of stitches. In the sample cowl, there are 7 columns of 5 stitches each. You can also vary the number of stitches in each column if that works better with your stitch count.
First row (right side): work in seed stitch for 5 stitches (knit 1, purl 1, knit 1, purl 1, knit 1), and then knit 5 stitches. Repeat this sequence of 10 stitches (2 columns) two more times, and end with 5 stitches of seed stitch.
Note: You may want to put a stitch marker around the needle between the sections to help remember when to switch patterns.
Second row (wrong side):work seed stitch for 5 stitches (knit 1, purl 1, knit 1, purl 1, knit 1), and then purl 5 stitches. Repeat this sequence of 10 stitches (2 columns) two more times, and end with 5 stitches of seed stitch.
Note: this seed stitch in this pattern alternates every stitch between knit and purl, both horizontally and vertically. After set up in the first row, work a knit stitch on top of each purl stitch you see in the seed stitch sections, and vice versa.
Repeat these two rows until you reach your desired length for the cowl.
Bind off—not too tightly or the edge will pucker. Leave a long tail (a couple of feet long) and you can use it to make the buttonhole edge as well.
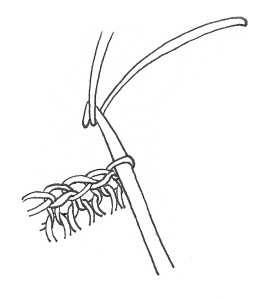
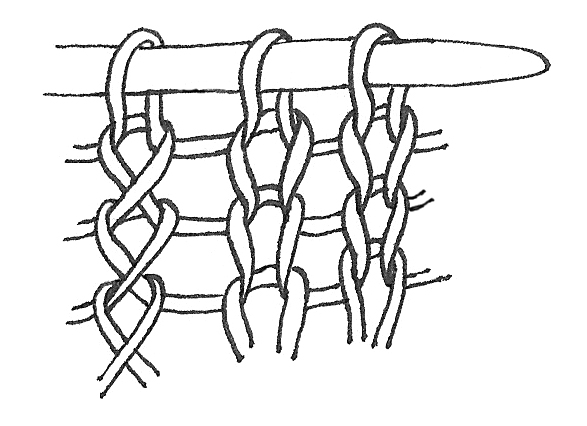
Crochet buttonhole edge
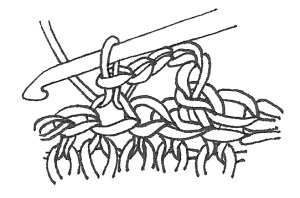
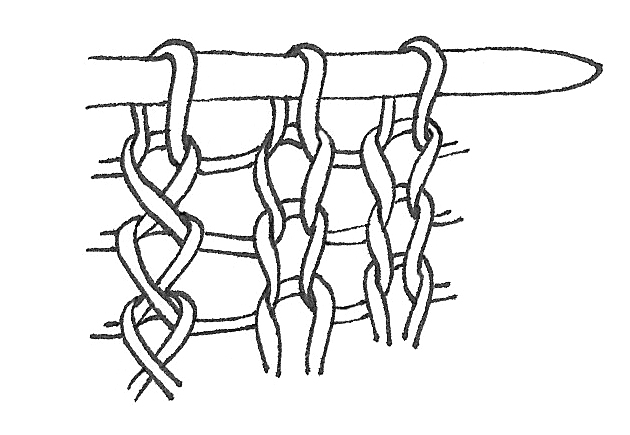
Go into the first stitch of your bind-off with a crochet hook. Pull a small loop of yarn through with the hook. Go into the next bind-off stitch the same way, pull another loop through, and then pull the second loop through the first loop so that you have only one left on the hook.
(I drew these illustrations for my students, who would also have me standing next to them to show them how to do it. If this whole concept of crochet edges is new to you, check out this explanation from Knitty, which covers crocheting on to a knitted edge, as well as the difference between a crochet slip stitch and single crochet stitch.)
Continue in the same way, going into each stitch as you come to it, pulling a loop though it and then through the loop you already have on the needle. This is called a “slip stitch” in American crochet terms.
You’re making a line of crochet stitches, which should look like another bind off row on top of the first one.
When you get to the place where you want to make a buttonhole, chain (pull loops through your working loop one at a time, without connecting to anything else) until you have enough stitches to just fit around your button.
You can make the buttonholes flat to the edge or more of a loop—your choice, depending on where you attach them—but either way they should be just big enough to push the buttons through, otherwise they may come loose while you wear it.
Reattach the chain to the edge by going into the bind-off stitch you choose, and making a slip stitch as you did before.
The sample cowl has three large buttons and buttonholes, which line up with the three stockinette stitch columns.
Sew on your buttons to line up with the buttonholes. I use the same method as I do with sewing thread, except the yarn only goes once each way through the buttons since it’s so thick.
When I mention blocking your knitting, I get a lot of blank looks from my students, and concern about how to do it and what they need to make it happen. Although it can be a magical transformation, it doesn’t need to be mysterious. And although there are a bunch of gadgets (special mats and pins, forms, blocking wires etc.) sold specifically for blocking, you don’t need to use any of those to get good results. Some pins and a place to hold them will do, and sometimes you don’t even need that.
What does blocking mean anyway?
Blocking is actually a simple concept. It just means using water and/or steam to set the final shape of something after you knit it. As you knit, you make a new structure—a fabric—with your yarn. When the fabric gets wet, the yarn has a chance to settle into its new shape. Sometimes it can change quite a bit, expanding or relaxing in response to the tensions (or lack of) that are now on it.
In blocking we take advantage of the fact that the yarn can form new shapes, and influence those shapes in the direction we want. This can be as simple as gently stretching and patting a sweater so that it looks good flat, and leaving it to dry. Sometimes more dramatic blocking is part of what makes a pattern shine, like stretching lace as much as possible to make the most of the open areas in the pattern.
Essentially, blocking is getting your knitting wet, shaping it how you want it to be, and holding it in that shape until it dries.
Why wet?
Yarns, especially wool ones, can change shape much more easily when they’re wet. This is because of the structure of the fibers themselves. (If you’re curious about the science of wool and haven’t seen the wool article I wrote for this month’s Seamwork, check it out!)
You can also stretch/shape your object while it’s dry, and then steam it to set the shape. In general, I prefer the wet method for a few reasons. It’s gentler on the fibers, and gives them a chance to relax before being under tension. It also gives a good idea of what your finished project will be like when it’s washed later. A damp yarn object is easier to shape. And when you finish knitting something, it may have been dragged all over hither and yon and have oils from your hands (or sticky stuff from your toddler) on it, and washing it is probably not a bad idea anyway. (Hey—my favorite method for hand-washing is in that wool article too—good timing!) (And speaking of good timing, Karen posted an eloquent argument this morning about why you should wash/block a swatch before embarking on a big project. This is especially important when you’re making something like a sweater, where the final size/fit/drape is crucial to success.)
Does everything need blocking?
Not really. I do wash all my finished knitting projects, shape them gently with my hands, and then leave them to dry. But not everything needs to be pinned out, or to dry in an exact shape. Socks, for example, are meant to be a little smaller than my foot, and to take on the exact shape of my foot when I wear them, so I don’t see much point in carefully shaping them before wearing.
How do I block something without special gadgets?
Everyone should have sewing pins, they’re useful for all kinds of things. I’m not counting them as special equipment, but, it’s worth getting some with large, easy-to-see heads if you don’t have them already. I like plain flat-head pins for sewing, but they get lost in the structure of hand knits.
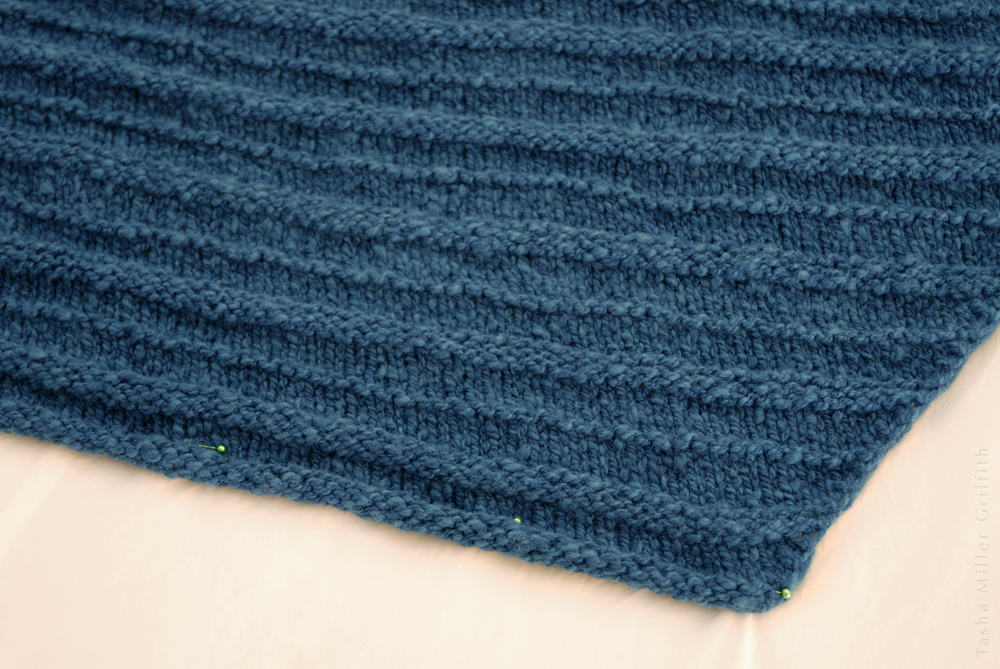
The only other thing you need is a surface where your knits can dry that you can pin into. A lot of times I use the same folded piece of flannel that I iron on. An ironing board or a couch cushion covered with a towel are good choices for small projects. For big items I stretch an old sheet over my bed (see below).
I tuck a doubled-over old sheet in tight over the bed covers. That provides enough tension to hold in place when I pin onto it. Plus it protects the covers from pin marks or any dye transfer from the yarn. (Forgive the weird indoor lighting. I wanted to show how I actually do this, but our bedroom is not ideal for photos …)
When your finished project is clean and damp, it’s ready to block. Stretch and shape it with your hands, patting wrinkled areas out, smoothing ridges parallel, etc. Pin in place any pieces that try to shrink back, away from the shape you want.
For this shawl, I pinned it at regular intervals along the straight edge, and intermittently along the other two edges. You may have to move the pins as you smooth out the whole project, and that’s fine. (This is my Indigo Boomerang, made with handspun. More details are on Ravelry, and pictures of it worn are also in this post on slowness.)
For the cowl at the top of the post, I wanted to stretch the lace sections, but not the plain knitting in between. I could have blocked it flat, a couple of sections at a time, and that would probably have worked fine, especially if I steamed it. Instead I decided to experiment with different sizes of rolled up towels, and found a combo which was the right size to block it around. I opened up the lace with my fingers while it was damp, and pinned the two edges parallel.
When your blocked knitting is dry, take out the pins and check out the shape. If there are any parts you’re not happy with, or little pulled areas from the pins, those are great places to steam. Hold your iron over the part you want to adjust (don’t flatten it) and fill it with steam. Then take the iron away and reshape it with your fingers.
Will I have to block my knitting every time I wash it?
Probably not. The most dramatic change takes place the first time the yarn gets wet in its new knitted shape. Unless something extreme happens to it, it will stay more or less how you blocked it, with the additional influence of how it’s worn. Lace may need to be re-blocked to look its crispest, but it won’t go all the way back to how it looked before you blocked it the first time. For most items, a quick smoothing/stretching with your hands, before letting them dry flat is enough. I like to drape bigger things like the shawl over the top of a wooden drying rack, using lower bars of the rack to hold the ends so that no part gets too stretched by gravity, or too folded and wrinkly, while it’s drying.
If your project does dry with wrinkles, a little steam will fix that right up.
I hope this helps demystify blocking for you! The more we can all understand what’s going on with our yarn at various stages and why, the more we can get the results we want. Happy knitting!

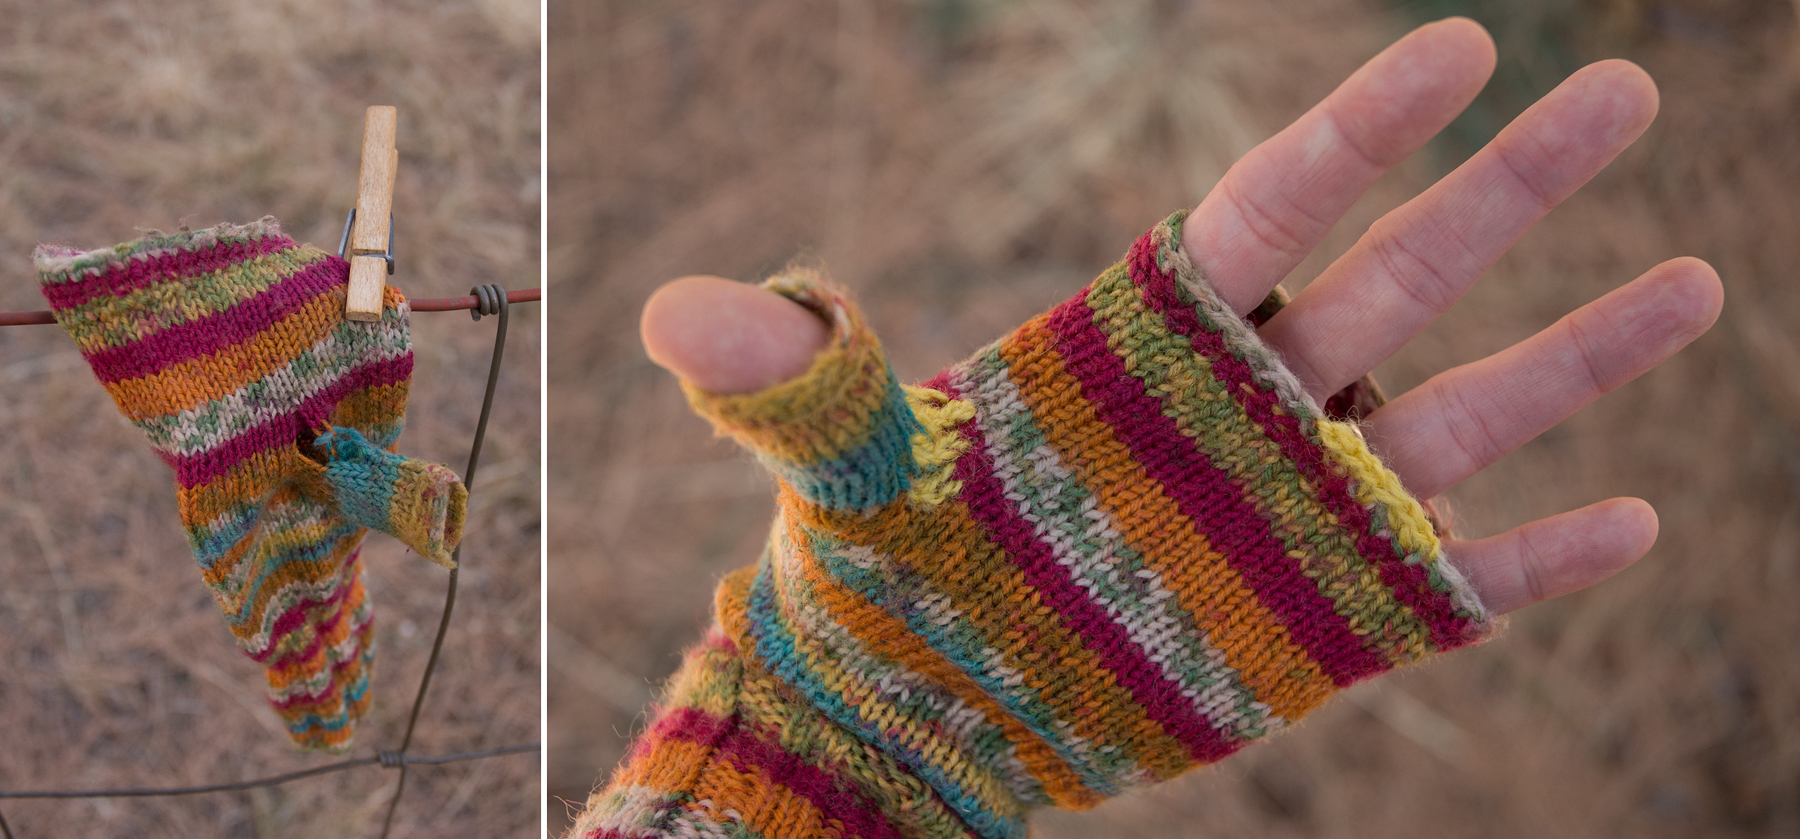


 When my cousin was about 12 years old, she knit me a scarf. I’m touched by this gesture every time I think about it. That’s a lot of time and effort to put into an object for someone else when you’re that young. The scarf (at left) is great, made from a colorful thick-and-thin yarn, but it’s kind of short. Then one day a couple of years ago I realized that if I added buttons and buttonholes to the ends, it could be a stylish cowl, and I’d probably wear it a lot more. Which I do.