Building Blocks of Knitting Stitches

Have you ever wondered where twisted stitches come from, why there are two common ways to decrease a stitch instead of just one, or what the heck is “combination” knitting? Do you get confused when you pick up or transfer stitches and find that they seem somehow different from what you’re used to? Has anyone ever told you that you knit “the wrong way”? If so, keep reading—but let’s get one thing straight right up front—there is no wrong way to knit! (And I am not the only one to say so.) If your way is comfortable for you and produces fabric you like, it’s a good way.

No matter what combination of stitch orientation, wrapping direction, and yarn handling you use, there are certain basic elements of how knitting stitches form that are the same. These influence how you work your stitches as you knit, and how your finished stitches look. Once you understand these basics, you can gain the confidence to handle your stitches however the situation calls for, and maybe even the freedom to try out different ways to knit! If you have your own knitting handy, please get it and follow along looking at the live stitches, I think it will make more sense that way.

Knit stitch orientation drawing

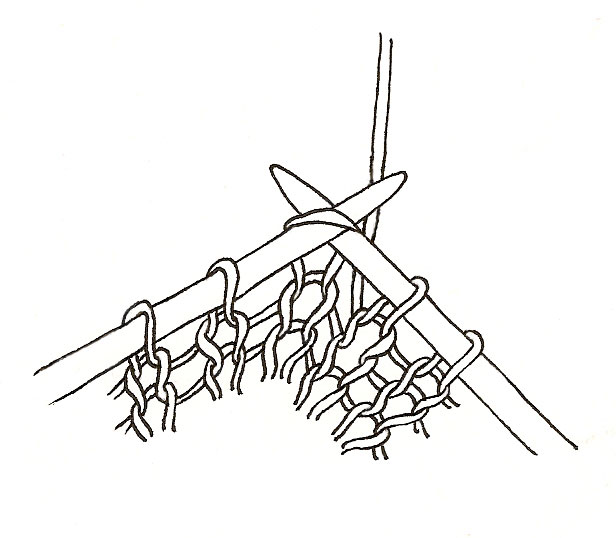
Let’s start with the shape of a stitch: when you look at a piece of finished knitting (or the part of in-progress knitting below the needles) each knit stitch looks like a mostly-flat “V” shape, and each purl stitch looks like a horizontal bar. Both stitches are actually just loops of yarn, oriented differently to the ones below. (We’ve talked about that before, and it’s worth mentioning many times—in fact I recommend that you keep thinking about it until you can see it with your eyes closed).

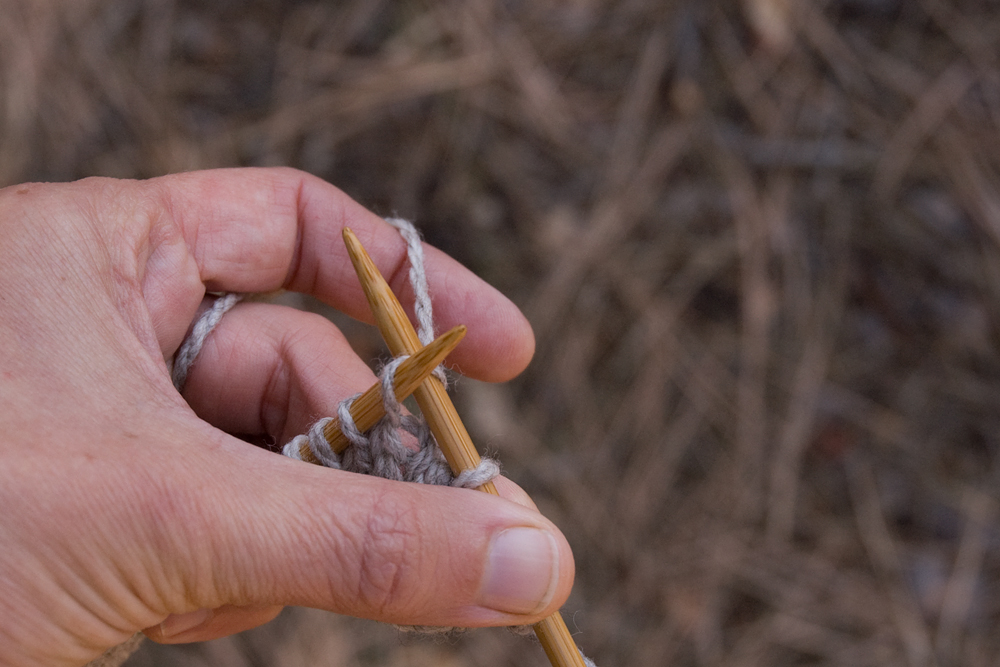
We have knitting needles to hold all the loops we’re still working with until the next row/round, so that they don’t come un-looped. As soon as you put two stitch loops on a needle, they have an orientation, which can be one of only two ways: with the leading side of the stitch (the side which is closest to the tip of the needle holding it) either in front of the needle (closer to you) or in back of the needle (further from you). This is sometimes called stitch “mount,” and the sides of the stitches called “legs,” as if they were riding horses—visualize that if it’s helpful to you.

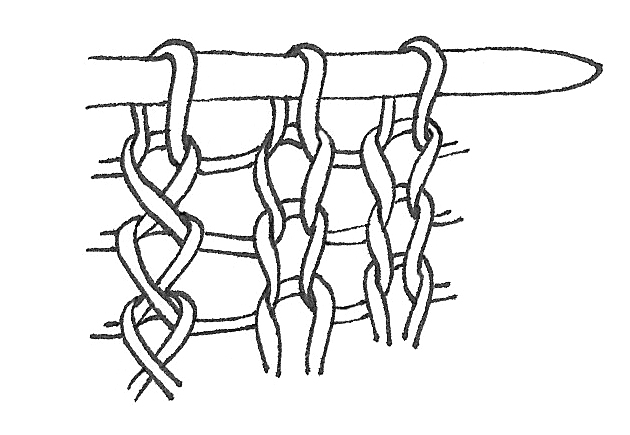
Leading side in front on the left, leading side in back on the right. We’ll get to the twisted stitches in a minute …

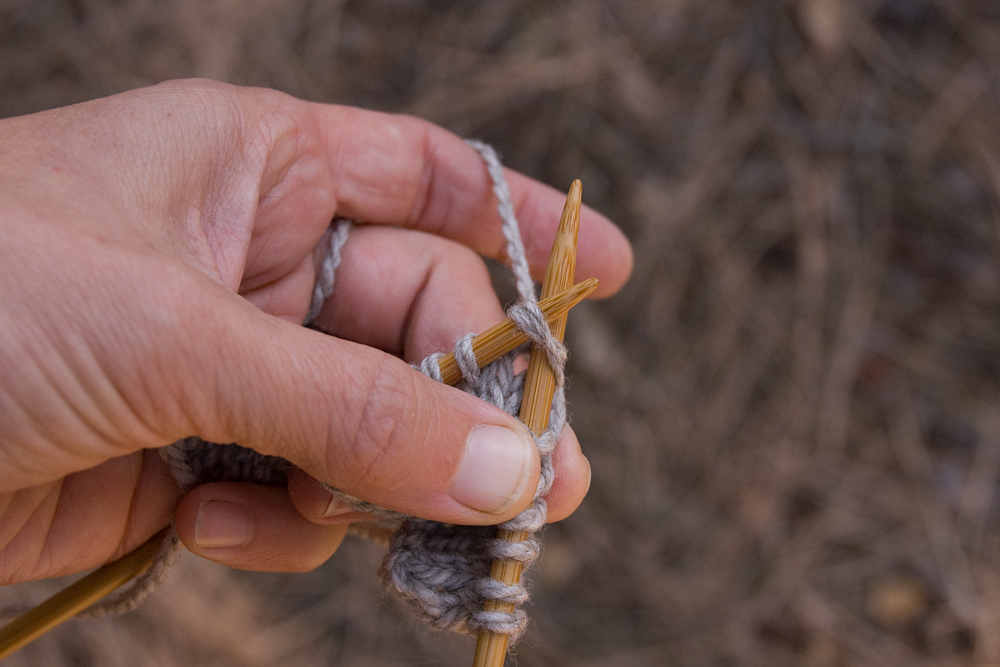
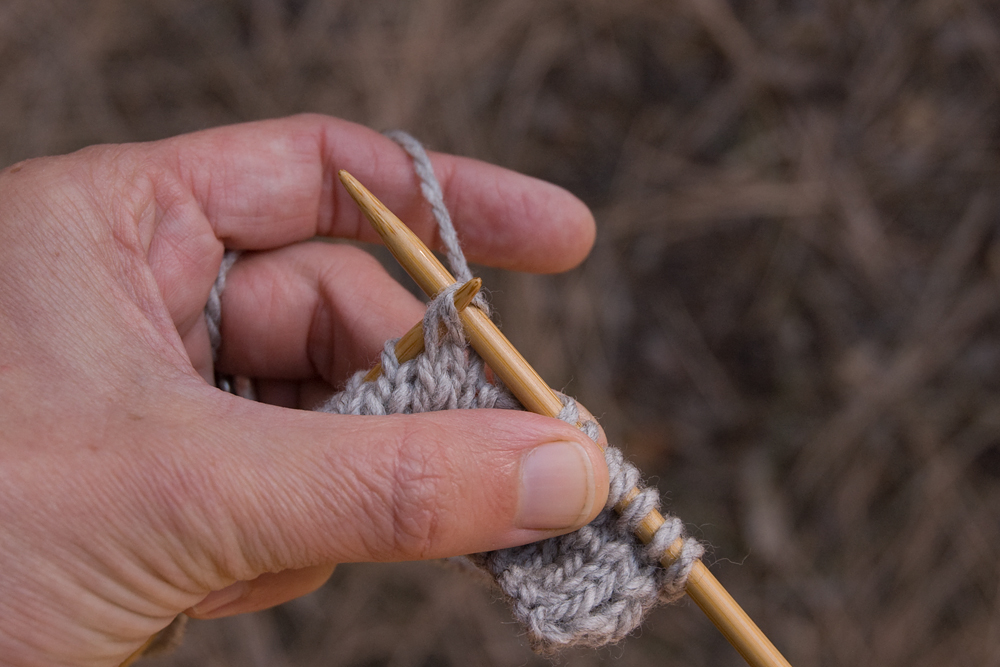
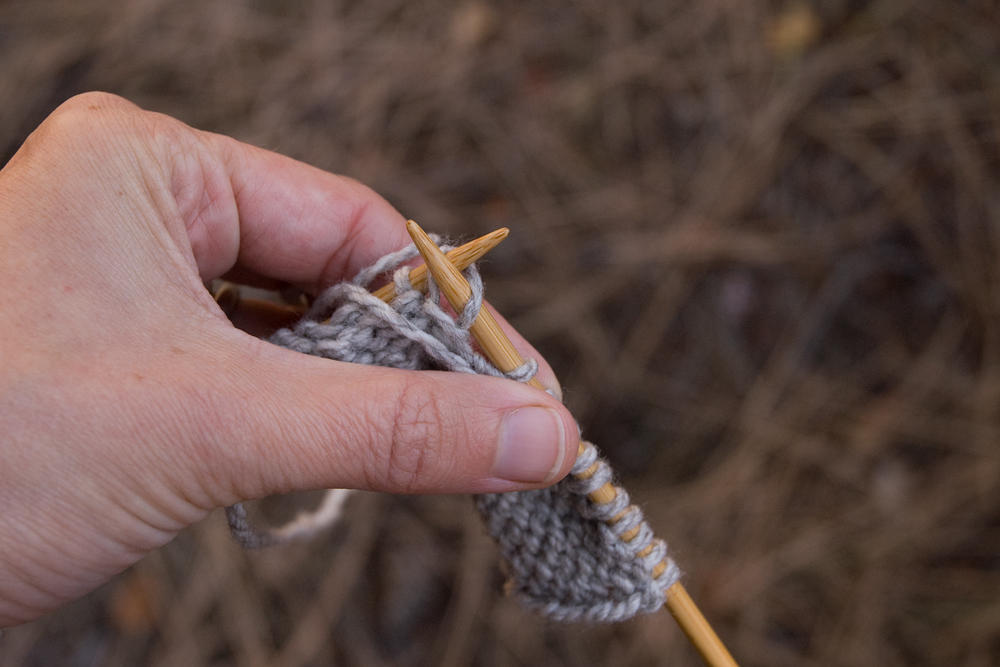
Most American knitters I know expect that the leading side of each stitch will be in front, and most pattern instructions I read assume that it is. With the leading side in front, if you reach the working needle (the needle which is making the stitches, usually the right hand one) into the front of the stitch to knit it, you can see that the stitch is pulled open, and it will make an open, “V” shaped stitch once it is knit. If you reach into the back of the stitch, it feels tighter (this difference is helpful, and noticeable to most knitters even if they’re beginners). If you look closely you can see that the two sides of the stitch are now twisted around each other, and they will remain twisted in the knitted fabric. (Sometimes you want a twisted stitch to tighten up part of your work, but most of the time it’s not the goal.)

Reaching into the front of a stitch with the leading side in front

Reaching into the back of a stitch with the leading side in front

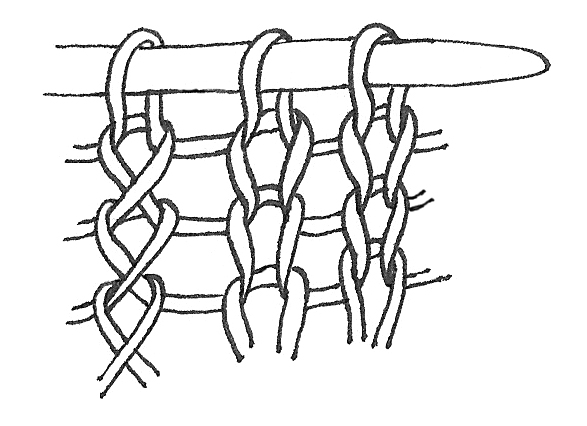
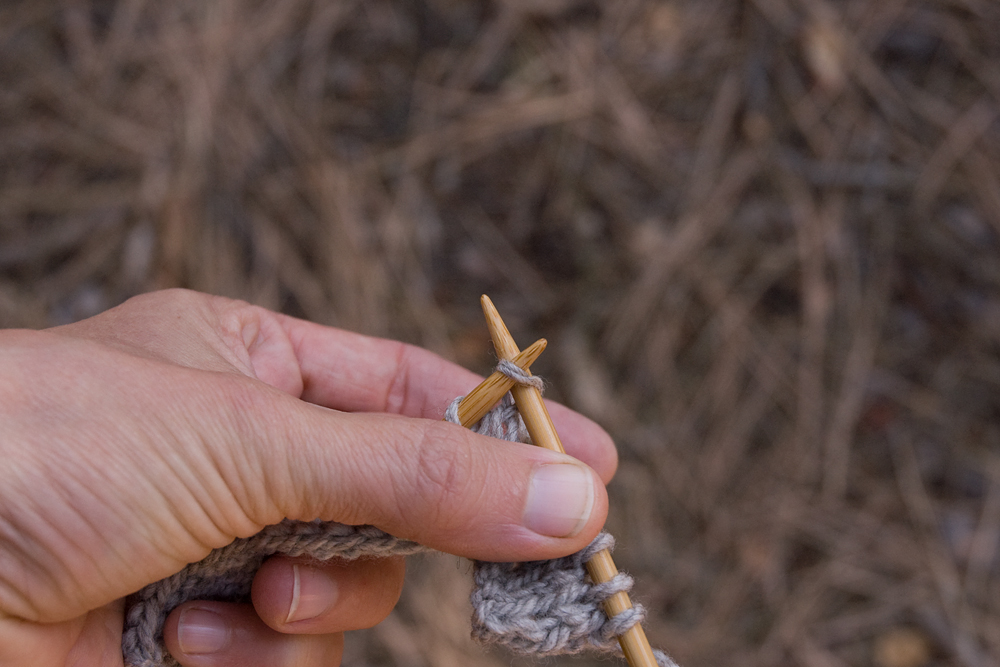
Now look at what happens when the leading side of the stitch is in back. If you reach into the front of the stitch, it feels tight, and the sides of the stitch twist. If you reach into the back, the stitch is open, and will form an open (not twisted) stitch in the fabric. So, it behaves in the opposite way as a stitch with the leading side in front, but the open stitches will be absolutely identical in the fabric. (Side note: twisted stitches formed from these two setups twist in opposite directions.)

Reaching into the back of a stitch with the leading side in back

Reaching into the front of a stitch with the leading side in back

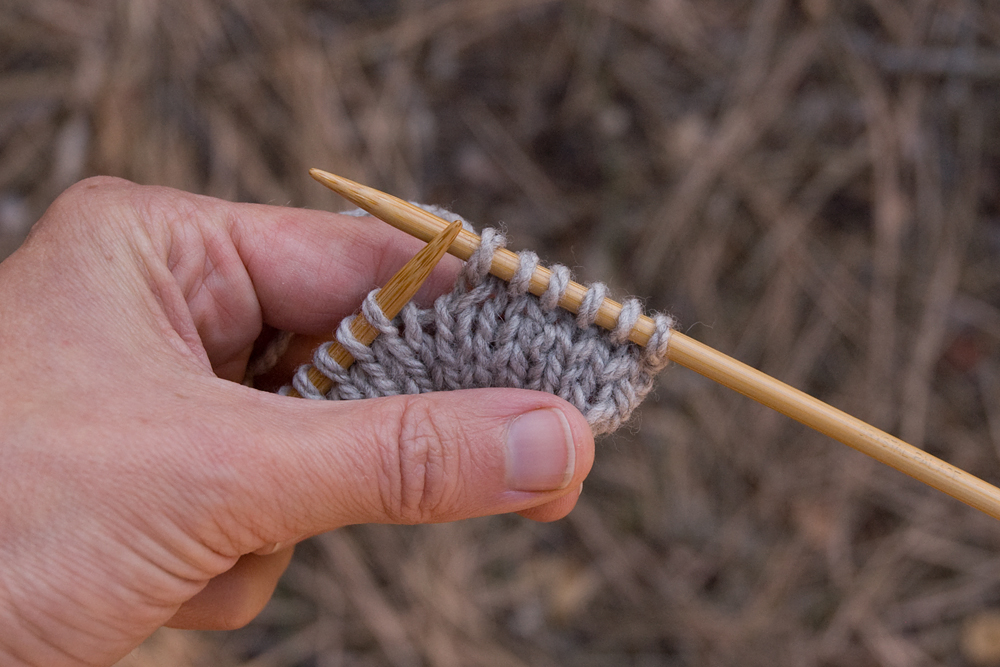
Twisted stitch in the fabric below the needle

We have now discovered a deep truth of knitting: there are only two ways that a stitch can “sit” on the needle, and no matter which way it is, if you knit (or purl) through the leading side, the stitch will be open, and if you knit through the trailing side it will be twisted.

Many knitters first think about these differences when they get to decreases. To Knit Two Together (k2tog),you reach your working needle into two stitches at once, from left to right, through the front of the stitches, and assuming that those stitches have the leading side in front, both stitches will be open,the left one will be on top of the right one, and the decrease will lean to the right.

Knitting two together through the front

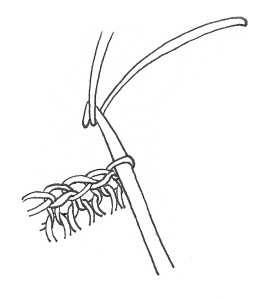
If you want a decrease that leans the other way (so that, for example, the shoulders of your sweater will look symmetrical), you could knit two stitches together through the back, so that the right stitch will be on top of the left one. But if your stitches have the leading side in front, that would twist them both and pull the decreasing stitch really tight. This is the reason for the Slip, Slip, Knit (ssk) decrease—if you slip the two stitches (one at a time) to the working needle by reaching into the front (“as if to knit”), it flips them around so that the leading side is in back. Then you can pass them back onto the holding needle with the needles tip to tip (“as if to purl”), and then you are ready to knit them both through the back, so that both stitches will be open, the right one will be on top of the left one, and the decrease will lean to the left. (If you have knitting in front of you right now, you can see this happen before your eyes.)

Slipping a stitch to change its orientation

Knitting two together through the back

All of this works if you are making purl stitches rather than knit, it just may look and feel a little funky if you’re not used to it. You can absolutely purl a stitch through the back side. And you can flip purl stitches around bypassing them between needles. My golden rule for this is: if the needles tips are essentially (or could be) pointing them same way as you are picking up the stitch to transfer it, it will flip the stitch around. If the needle tips are pointing towards each other (tip to tip), you will transfer the stitch without changing its orientation.Note that if you reach into the trailing side of the stitch instead of the leading side to transfer it, you’ll twist it, just like when working it. Play around with it a little bit, you’ll see what I mean.

Setup to work a purl stitch through the back side

Ok, are you with me so far? To review: whether a stitch in knitted fabric is open or twisted depends on these two things: which way the stitch is oriented on the needle, and which way it is knit (through the front or the back). To get an open stitch, always knit or purl through the leading side of the stitch. It’s easy to re-orient the stitches to get the effect you want, by flipping them around with the needles.

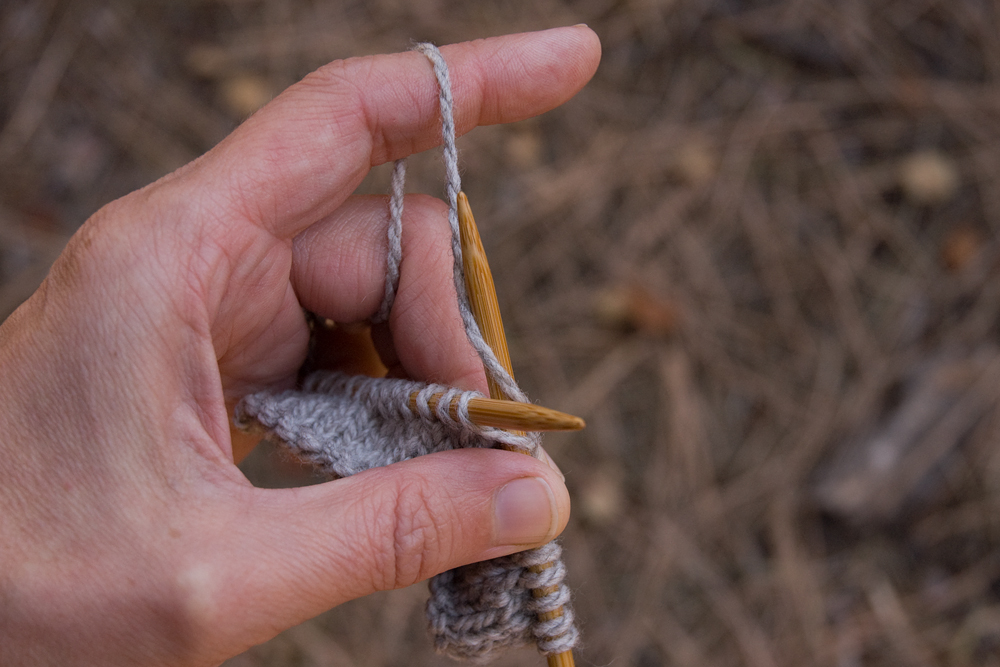
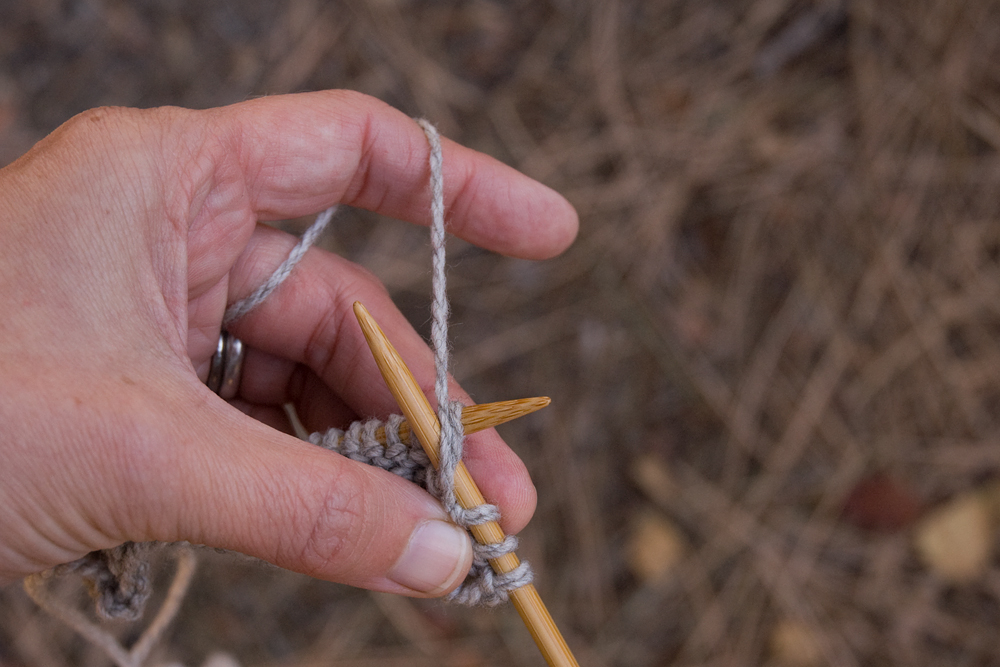
Fair enough, you may think, but how do the stitches get to be oriented one way or another in the first place? Don’t they all just appear with the leading side in front? Excellent question. You may have noticed that there are also two (only two) directions in which you can wrap the yarn around the needle as you make a new stitch. If you’re reading this in the US, you were probably taught that the “right” way to knit is to wrap the yarn from under the needle to the front and over the top (counterclockwise if you are looking at the tip of the needle), and the right way to purl is to bring the yarn from the front up over the top of the needle and down (again counterclockwise).

The wrapping direction applies whether you knit by holding the yarn in your right hand and throwing (English style) or by holding it in your left and picking (Continental style). In the photos below, I’m holding the yarn on the left, but it works with either technique. Even in Portuguese knitting, it may look different, but there are still two ways to wrap the yarn!

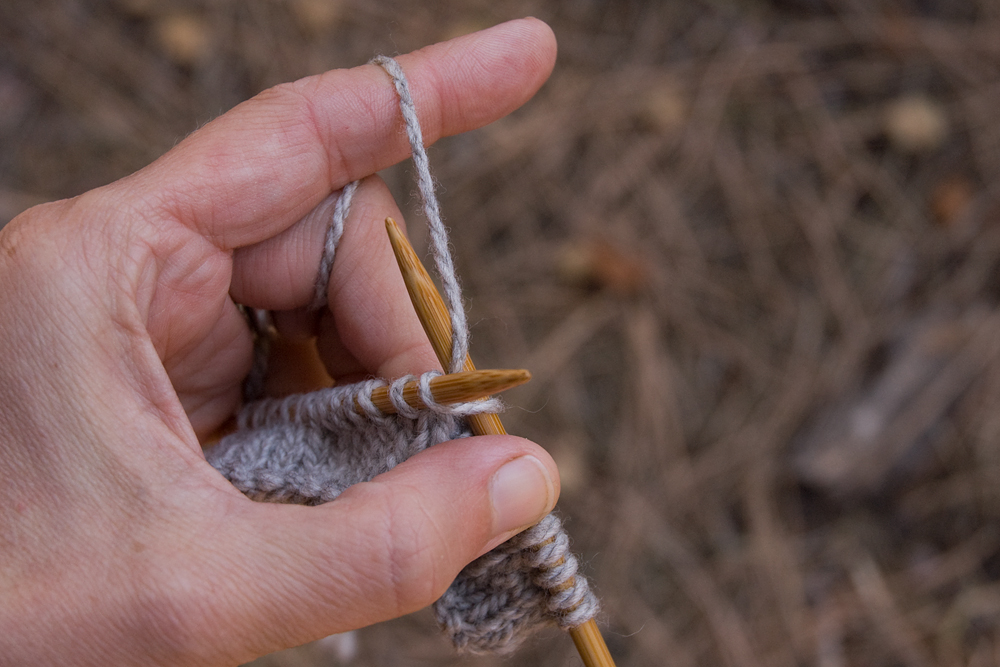
Setup to knit a stitch, wrapping the yarn counterclockwise

Setup to knit a stitch, wrapping the yarn clockwise

Here is our second deep truth of knitting: if you wrap the yarn counterclockwise, your new stitches will come out with the leading side in front. If you wrap the yarn the other way (clockwise as you look at the needle tip) when knitting or purling, your stitches will come out with the leading side in back.

(If you had rows, or parts of rows, of mysterious twisted stitches as a beginner, inconsistent wrapping direction followed by not noticing that the stitches were different is probably why.)

Here is where combination knitting comes in. If you knit Continental style, by holding the yarn on the left and picking the stitches from the tensioned yarn, you may have noticed that it’s actually a lot easier to form purl stitches by bringing the working needle in front of the yarn and just pushing it away from you through the existing stitch. This wraps the yarn clockwise around the needle tip, meaning that your stitches for the next row will have the leading side in back. Which is no problem now, right? Just knit them through the back, and they will come out open just like you want them to.

Setup for Continental purl stitch, wrapping the yarn counterclockwise

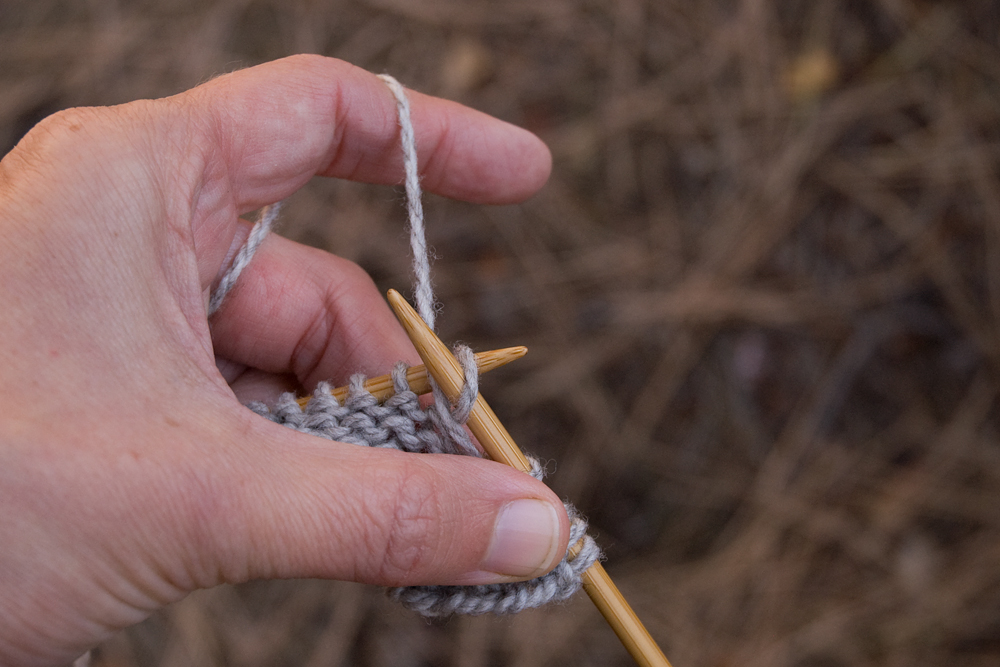
Setup for Continental purl stitch, wrapping the yarn clockwise

I learned about all this not long after I started knitting, from reading the excellent book Knitting in the Old Way by Priscilla Gibson-Roberts and Deborah Robson. There’s an explanation and handy illustration in the Knitting Methods chapter which shows “Western” style (leading side of the stitch in front), “Eastern” style (leading side in back), and a combined style. The combined style made sense to me, so I used it. Later I learned about Annie Modesitt, probably this era’s biggest champion of combination knitting—and a vocal supporter of the fact that there’s no wrong way to knit. (According to Annie’s blog, it sounds like she’s having an awful time lately. I certainly wish her a quick-as-possible recovery and all the best.)

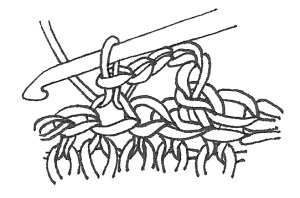
Knitting in the Old Way also gives a fairly elastic bind-off method which I used for just about everything when I started knitting. It’s easy, and I still like it! All you do is knit two stitches together, then pass the resulting one stitch back to the holding needle, knit it together with the next stitch, and repeat. What it took me a while to realize is that I particularly like the look of this bind-off when the stitches are oriented with the leading side in back and knit through the back—that way they lean gracefully in the direction the bind-off is progressing (towards the left, like an ssk decrease) and make a nice series of open “Vs” along the bound-off edge.

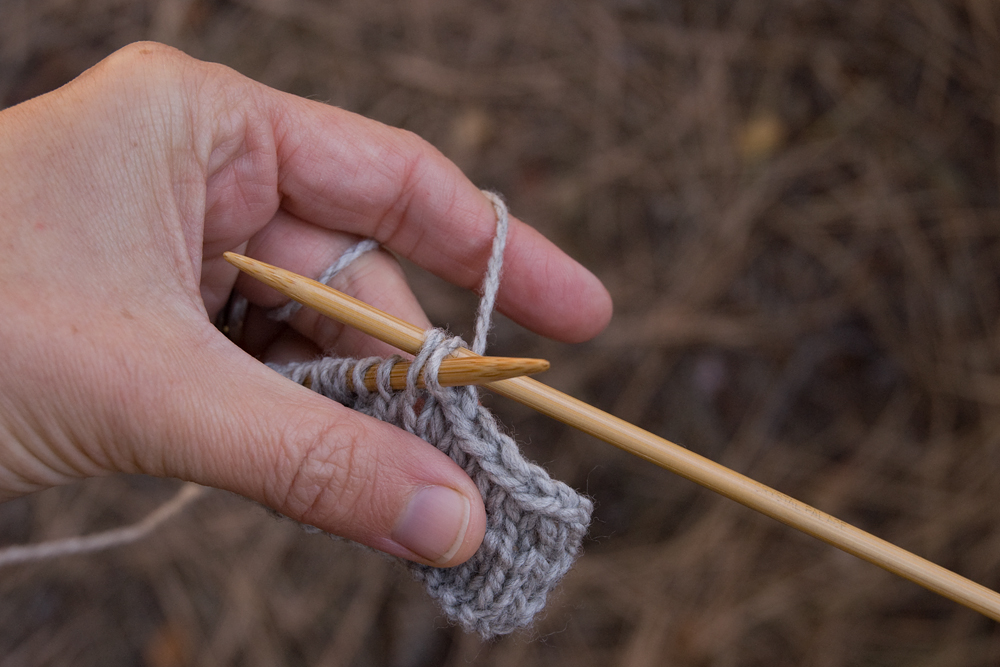
Knit-two-together bind-off, worked through the back

Pop quiz: say you are knitting along with the leading side of your stitches in front, and you want to make this bind-off with the leading side in back, what should you do? As usual, there’s more than one correct answer. You could flip the stitches around one by one with the needles as you come to them. Or, you could wrap the yarn clockwise as you work the stitches of the row/round before the bind-off, so that the stitches come out with the leading side in back already!

I’m guessing that all this still seems confusing if you’re new to it, but I promise it gets much more intuitive after you knit with these ideas in mind for a little while. At this point, I can honestly say that I don’t even consciously notice which way a stitch is oriented when I come to it, my hands just put the needle through the front or the back as needed.

Considering all the variations in knitting style that folks use, before we end here I want to put a vote in for patterns to say “twist the stitch” instead of “knit through back of loop” and “work a left-leaning decrease” instead of “ssk.” Really, it would be so much clearer, and more understandable for those who knit in different ways from the American “standard” way. I will try to follow this principle in my own pattern writing.

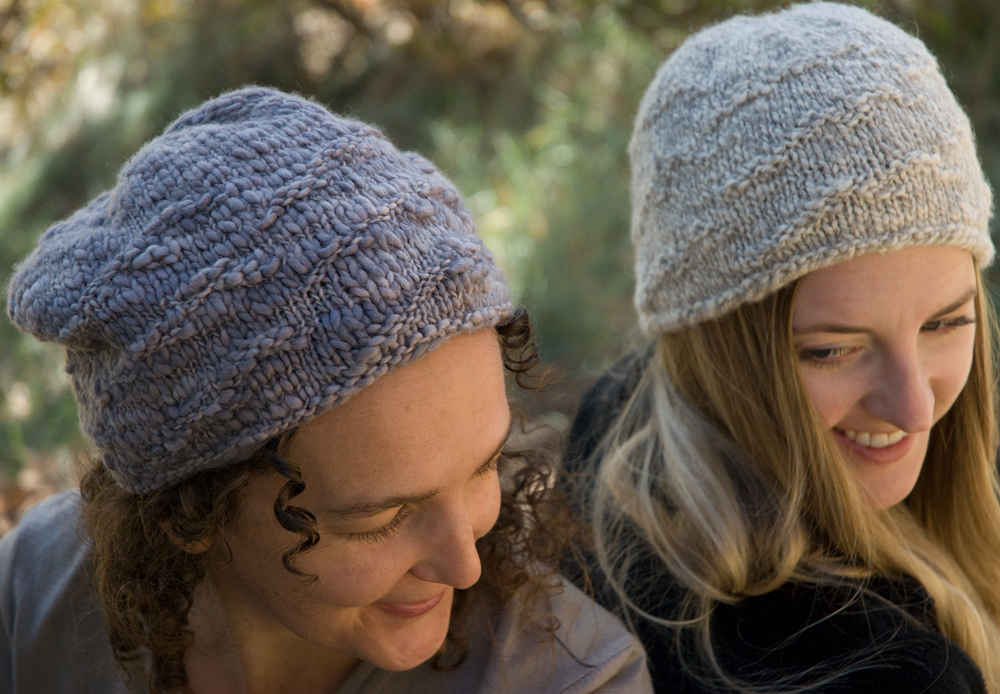
Speaking of which, have you seen my Cloudscape Hat pattern? It was in part the inspiration for writing this post. I’ve shared my approach to these fundamentals of knitting in various classes, tried unsuccessfully to get a couple of knitting magazines which you’ve heard of to publish it (Really! Can you believe it?), and finally decided just to put it out here.

As Michel Garcia says about natural dye knowledge, are we going to build a wall around what we know and keep it jealously for ourselves, or are we going to share it freely in the belief and hope that it will grow and flourish as more people are exposed to it? Certainly I think this knowledge is incredibly useful to anyone who knits. If you find this post worthwhile, please share it! Wouldn’t it be great if it got more notice here than it would have in a magazine …

Cheers, everybody!

Hand-Stitched Badges for Me-Made-May

A beginning embroidery primer, with free patterns.


For the last few years, May has found us around Washington DC. We usually do two art shows there, and in between stay with some dear friends and ride the Metro to visit the sites of our nation’s capitol. The whole time we’re surrounded by so many people (especially from my middle-size-town perspective). Since it’s Me-Made-May, I spend even more time thinking about what those people are wearing than I normally would. It’s easy to get a little bummed out when I look around and consider that, of the hundreds of strangers I can see at any given moment on the subway platform or at a monument, perhaps none of them are wearing anything handmade. But it also got me thinking that maybe they just haven’t considered it, that if they knew there was a whole movement going on, that folks around the country and the world were encouraging each other and posting about their handmade wardrobes at that very moment, maybe it would encourage a few of them to at least think about it.

So I wanted to bring something that said I was participating in Me-Made-May, and/or that I had made part of my outfit, off the internet and onto my physical person where all those strangers could see it. I started to talking to Zoe about it, and she liked the idea too. I owe her big thanks for her support, bouncing ideas around, and of course for putting on this challenge for us again this year! Since MMM is all about stitching, and I’ve been doing a lot of hand-sewing and embroidery lately, here’s what I ended up with:


embroidered mmm badge


You can make them too! I designed these little badges with embroidery beginners in mind, and I’ll walk you through some parts that might be confusing, so even if hand-sewing isn’t usually your thing, you can handle it. If you’re already further along in your embroidery journey, feel free to skip down and glance through the photos, then print the pattern and get started.  Click the link below to get the pattern:

MMM-badges-pattern


materials & tools

You’ll need some felt, and some embroidery floss, thread, or fine yarn.

Wool felt is an ideal material to start stitching on, since it’s forgiving, doesn’t ravel, is thick enough to not need backing, and you can hide ends and extra stitches in the thickness.

The Me-Made-May badge is stitched here in variagated cotton floss, and the “I MADE this!” one in wool thread.  There’s more about the specific threads I used at the end of this post.

You’ll also need a few basic sewing tools: a sharp needle with a long eye, and a small sharp scissors. I always wear a thimble like this one when I’m hand stitching.

Finally, you’ll need a scrap of tissue paper and a fine-point pen to transfer your design to the felt.


thread types

Let’s talk for a minute about the differences between cotton and wool, and floss and thread, for stitching. Wool threads designed for embroidery are often labeled “crewel” (a type of embroidery) and are usually made up of two single strands (called plies) twisted together. This plying is integral to the structure of the thread, and it’s not meant to be separated.


embroidered mmm badge 9


Cotton floss often comes in a loosely twisted bundle of threads, which can be separated to make various thicknesses. This is called “strandable” floss. If you look closely (maybe with a magnifier), each strand of this kind of floss actually has its own two-ply structure. Some cotton threads have a non-strandable structure as well.


embroidered mmm badge 8


Just like in sewing or knitting, the different properties of wool and cotton fibers make a difference to how they work in embroidery. Wool’s crimpy, elastic nature means that it plumps up, filling gaps and making it easier to embroider a smooth satin stitch or a plush knot. Cotton is denser, smoother, and less elastic, meaning you may need more thread to cover the same area, and the stitching will have a tighter, flatter look.


getting started

Put a little piece of tissue paper over the printed pattern you want to make. You can use scraps of tissue, and iron them flat if necessary. Using a fine-point pen that won’t bleed, trace the pattern carefully, including the circle around the edge. Make a single line for thinner shapes and letters, and draw around the outline of thicker shapes. Pin the tissue to your felt, with the pins outside the circle. You’ll stitch right through the tissue and the felt to make the design.


embroidered mmm badge 1


I tried several methods of transferring the patterns to my felt, and this one worked the best. An iron-on transfer pen (not a pencil) also works, but it makes thick permanent marks that are a little fiddly to apply, and must be covered with stitching.

To thread the needle, I use the techniques I shared in this Seamwork article about hand-stitching. I found that it helps to fold over the end of the wool thread, and to wet the end of the cotton floss.

To begin, take a long stitch on the back through the thickness of the felt, coming up near where you want to start. Let a little bit of thread remain on the back surface. You can trim it off later to neaten things up. If possible, take your first stitch as a backstitch to anchor the thread.


embroidered mmm badge 5


General embroidery tips:

  • Stitch in good light! It’s unbelievable what a difference this makes.
    Test out your stitches and thread on a scrap before you start, especially if you are experimenting with new stitches and/or aren’t sure what thickness of thread to use to get the look you want.
  • How even your stitches look depends mainly on how even the tension is between one stitch and the next. Start off slow and even.
  • When moving from one letter or shape to the next one, take a stitch through the thickness of the felt to keep it hidden. To keep long stitches from pulling the next part of the embroidery out of shape, push the needle straight through to the back of the work, then take a long stitch into the felt, coming out on the back near where you want to start again. Then bring the needle up to the front in your next spot.


the stitches

Most of the text in these patterns is made with backstitch. I explain this stitch in that Seamwork article, and in even more detail in this post.


embroidered mmm badge 2


Backstitch tips:

  • Put your needle in right at the end of the last stitch for a solid line.
  • Look ahead at the section you are stitching, and decide whether to divide it into two stitches or three, etc.
  • Think about the path of the thread when you come to corners and curves. Remember that where the needle goes in is the beginning of the current stitch, and where it comes out is the end of the next stitch.


embroidered mmm badge 3


For the scallops around the edge of the Me-Made-May badge, I used a simple straight stitch. Follow the individual lines on the pattern for a looser look that shows off the separate threads, or fill in the whole scallop shape, depending on the thread you’re using and the look you’re going for.


embroidered mmm badge 6


I filled in the thicker lines of text with satin stitch, which is basically a row of straight stitches very close together, so that they look like a solid surface. It’s easier to keep these stitches even and plush-looking if you work them over a base of another stitch. For these patterns I outlined the satin stitch sections in backstitch first.


Straight & satin stitch tips:

  • Backstitch around the outline of all the text, and finish all other parts of the design that use the pattern as a guide, then remove the tissue pattern before you fill in the satin stitch. You’ll be able to see exactly where the stitches are more clearly, and pulling off the tissue will be easier.
  • Cut carefully around the outer circle of the design. Leave the outside of the tissue pinned to the felt for reference and later cutting (you may actually want a few more pins at this point to hold it smoothly). Tear out the part under the badge itself. Pointed tweezers are an ideal tool for pulling out tiny/stubborn pieces of tissue.


embroidered mmm badge 7


  •  I find it easier to keep an even tension if I put the needle all the way through to the back at the end of each stitch, and bring it up again close to the stitch I just made on the same side of the shape I’m stitching. This method is slower to work than the more common technique of taking the needle under on one side of the shape and up on the other side in one stitch. But, it uses less thread and is easier to control, especially when you’re starting out.
    • Stitch as close to the foundation backstitches as possible for a full look. You can even push the foundation stitches to the side with the needle to make more space and keep the line of stitches even.


    embroidered mmm badge 10


    • If your satin stitch comes out a little lumpy, it can help to put the eye of your needle into a row of stitching and move it gently back and forth.


    embroidered mmm badge 11


    • When making satin stitch around curves (like on the D in “MADE”) it helps to make the stitches inside the curve as close together as possible, and fan them out a bit on the outside of the curve, a technique that’s illustrated in detail on Needle ‘n Thread here.


    The round knots around the outside of the “I MADE this!” badge are colonial knots. They’re a variation on a French knot where you loop the thread in a figure eight around the needle before pushing it back into the fabric. I like these because they hold a larger, more textural shape, and can’t come undone as you’re making them. They look especially plump in wool threads.  There are more pictures and explanation about colonial knots on Sarah’s Hand Embroidery Tutorials.


    embroidered mmm badge 13


    finishing

    When you come to the end of a section of thread, bury it through the felt for a short distance and come out on the back. You can trim the ends close, since some thread remains in the thickness to keep your stitches from pulling out.


    embroidered mmm badge 4


    Once all your stitching is complete, cut out the felt circle, once more going carefully around the shape you traced.


    embroidered mmm badge 12


    Sew a pin, a clip, or a magnet to the back, and it’s ready to go meet the world.


    embroidered mmm badge back


    supplies

    I used handmade felt, because I have lots of scraps of it laying around. Use what you can find near you, but if you possibly can, use real wool felt rather than the synthetic stuff. Wool is just so much lovelier to work with, and it will hold up to wear much better. Mine was 2-3mm, or around 1/8” thick.  Weir crafts sells a variety of felt online, including some that’s handmade and some that’s made in USA.

    I discovered two things while looking for threads for this project: there are probably as many small companies and indie dyers making embroidery threads as there are making knitting yarn, and I personally am just not interested in using floss in flat colors. My mom has been into embroidery for as long as I can remember, and a quick dig through just part of her stash resulted in many more beautiful options than I could use.

    For the Me-Made-May badge, I chose two colors of variegated cotton “painter’s threads” from Tentakulum; 121 “Cezanne” and 125 “Matisse.” They’re made in Germany, and available through embroidery suppliers in the US, including Artistic Artifacts. DMC also makes a couple of ranges of variegated floss, which are a lot more common, at least where I live.

    For the “I MADE this!” design, I used some amazing fine crewel wool thread, dyed with natural pigments by Renaissance Dyeing, out of France; color numbers 0309, 1622, 1708, and 2000. Single colors are available in the US through Hedgehog Handworks.  Photos do not do these colors justice; they are good enough to eat!  Any crewel wool or very fine yarn that you like would be a good substitute.


    embroidered mmm badge 14


    In case you’re wondering, while I had plenty of materials to choose from right in front of me, I did do a little searching to see what I could come up with for organic/traceable threads. Renaissance Dyeing looks good on the sustainability front; they use all natural dyes and local wool, it’s just that they’re far away from me. Organic Cotton Plus also sells a line of organic cotton embroidery floss which is grown & spun in Peru and dyed in the USA.

    Personally, I think I’ll be using a lot of the yarn scraps I have lying around, especially for larger designs.  And I think it would be well worth it to buy (or spin!) some natural colored thread, and drop a tiny skein into every dye pot I try.  It takes so little, why not?


    resources

    All you have to do is start searching on Instagram, Etsy, or wherever you get your internet eye candy to find amazing examples of beautiful modern embroidery.  I particularly like Katherine Shaughessy’s crewel work, she has two books with a fun modern aesthetic, and sells supplies and patterns (with some free ones) on her site Wool & Hoop. Yumiko Higuchi also does some of my favorite embroidery. She likes to to mix wool & cotton threads, and her book just published in English (Simply Stitched) does a great job of taking advantage of the properties of both, as well as being full of inspiring designs.

    If you make one of these, I’d absolutely love to see it!  Share it using #mmmay16, #handstitched, or email me a photo. And of course, I’m here to answer questions if I can.

    Happy stitching!


    Knitting 102 Cowl – Free Pattern


    T with simple knit cowl
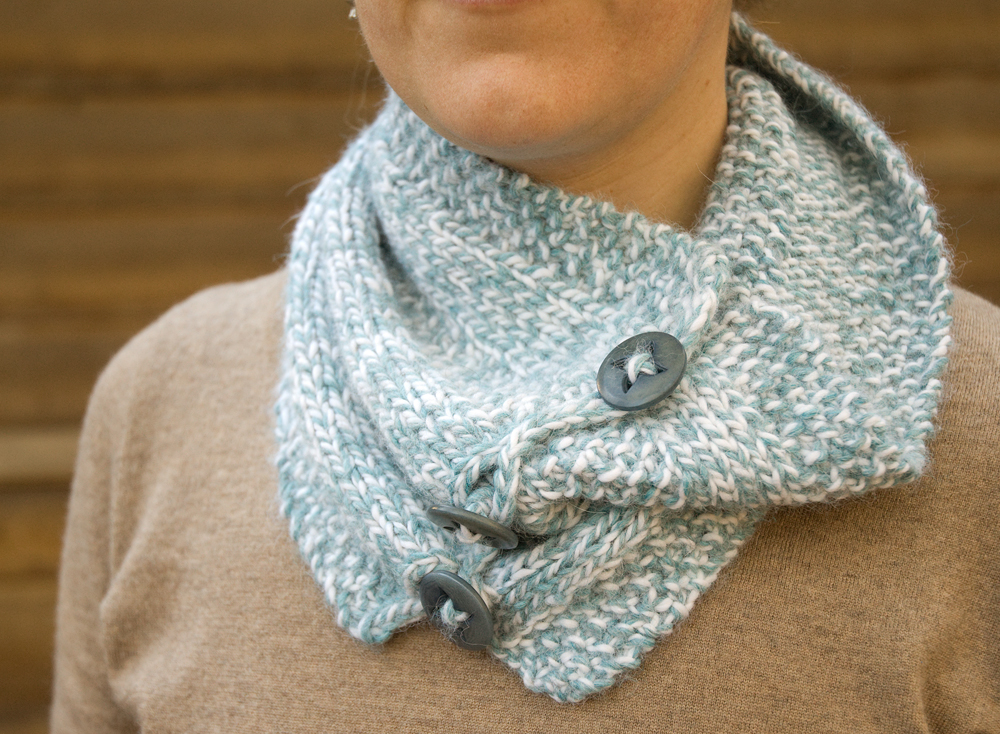
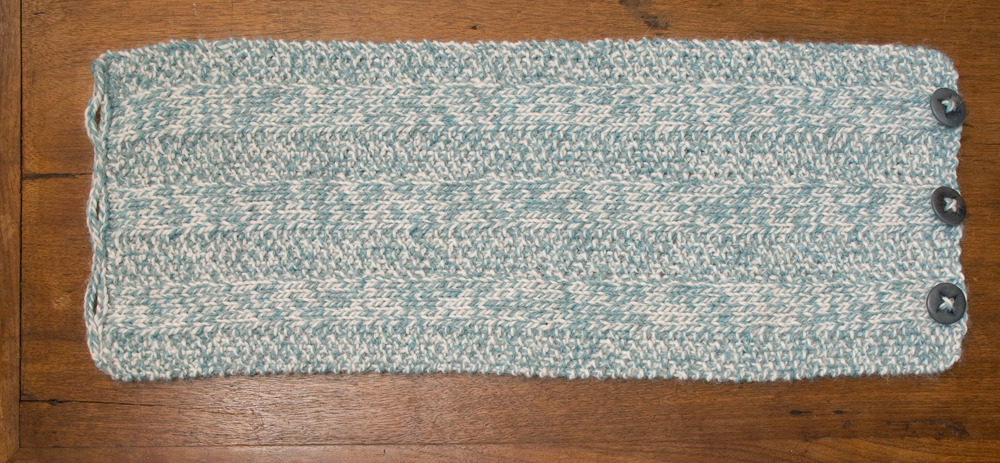
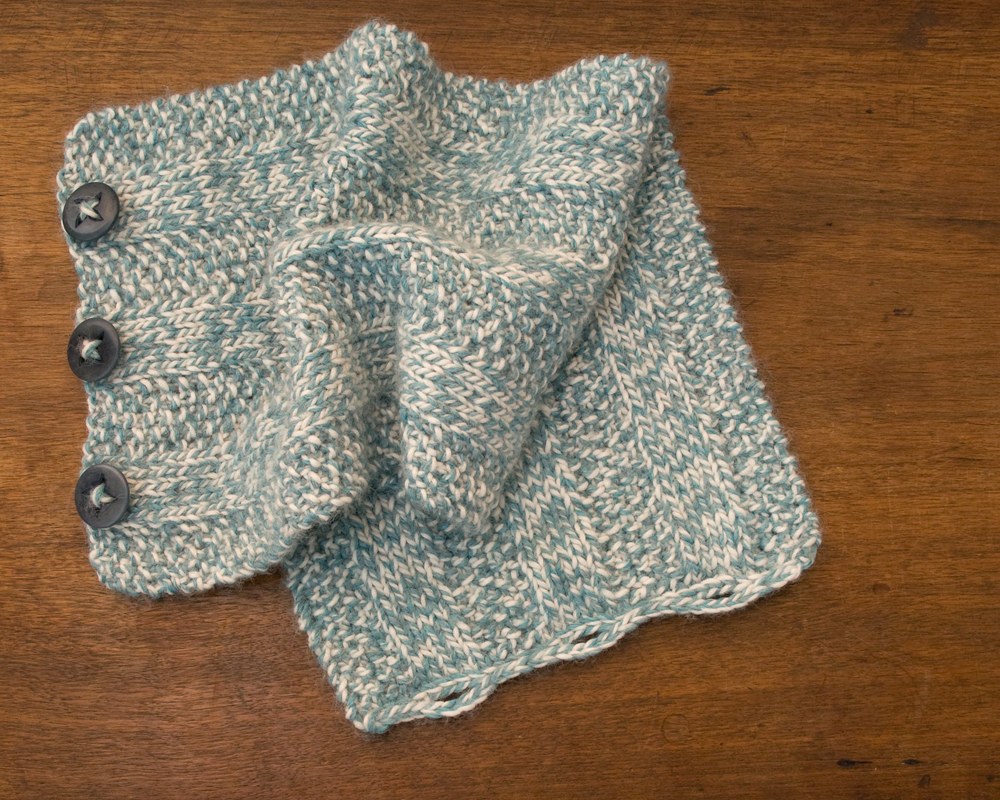
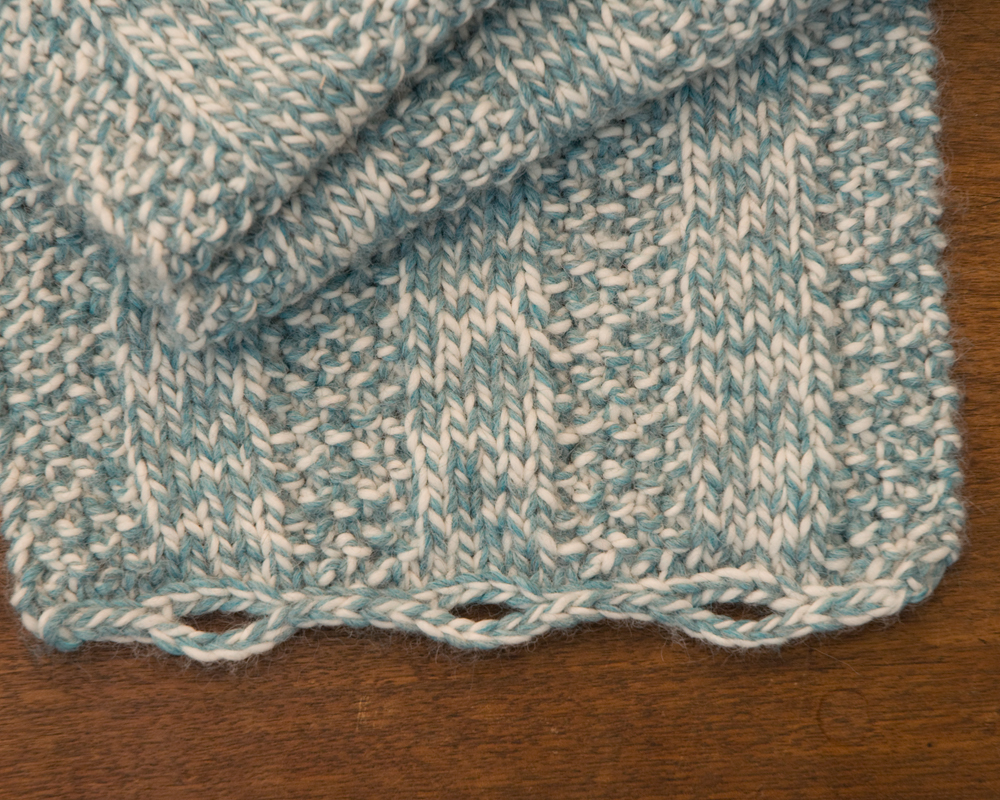
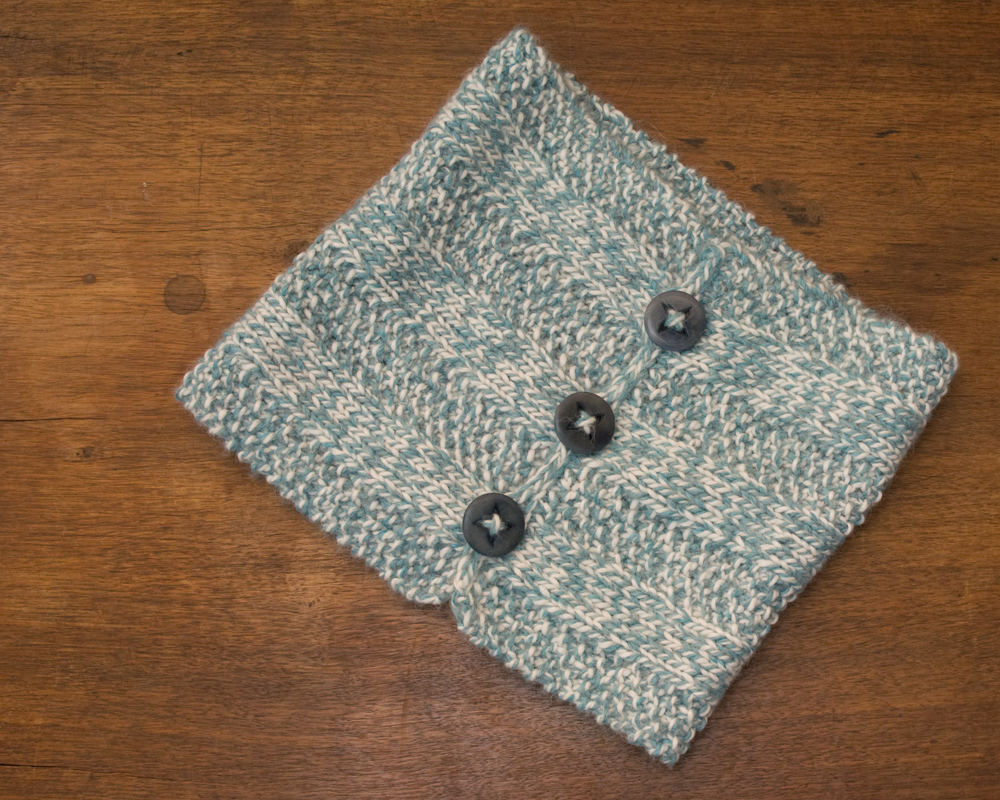
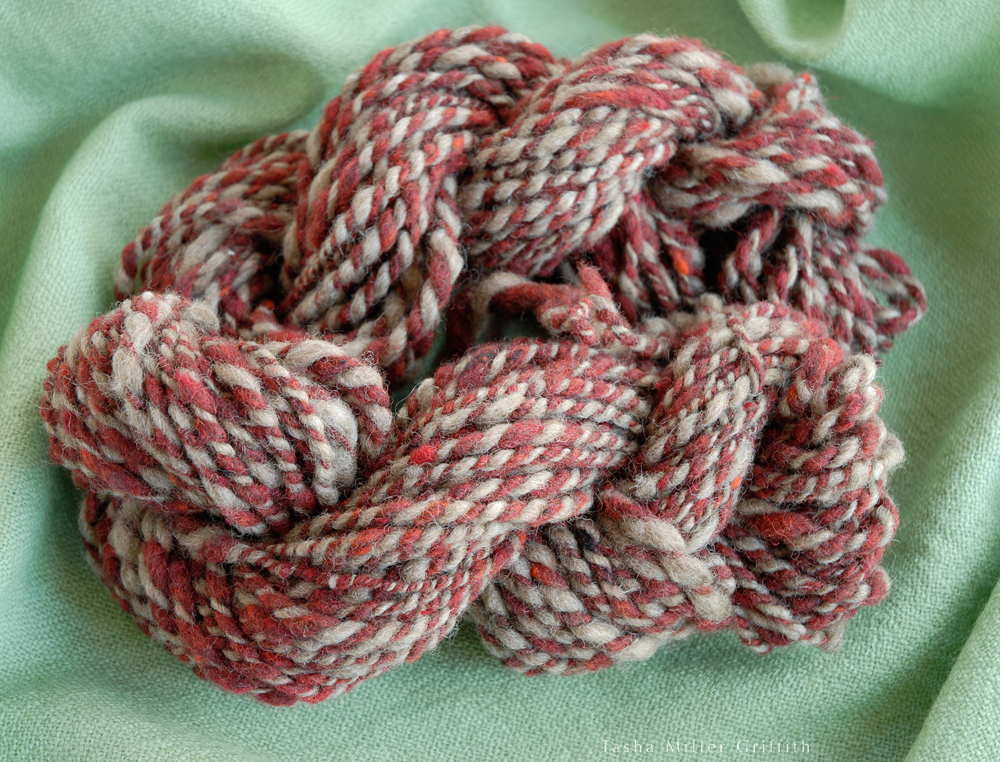
When my cousin was about 12 years old, she knit me a scarf. I’m touched by this gesture every time I think about it. That’s a lot of time and effort to put into an object for someone else when you’re that young. The scarf (at left) is great, made from a colorful thick-and-thin yarn, but it’s kind of short. Then one day a couple of years ago I realized that if I added buttons and buttonholes to the ends, it could be a stylish cowl, and I’d probably wear it a lot more. Which I do.

    Then I realized that a cowl like this, just a knitted rectangle with buttons added, would be a perfect second or third knitting project for my students. For when you can knit and purl, but maybe you’d like to make something besides a washcloth using your current skills, before moving on to knitting in the round and all that.

    I made a sample one with some seed stitch columns added, and left it at the yarn store where I teach. One day not long ago I was over there, and the owner and one of the employees were telling me about how people ask for the pattern a lot. I was quite surprised. I agreed to write it out. Then I got to thinking, if I’m going to give this pattern to whoever comes into the shop, I’d like to give it to you guys too. So here you go:


    Knitting 102 Cowl Pattern


    102 cowl 1


    To make this cowl, you’ll knit a long rectangle, and then use a simple crochet stitch to make buttonholes on one end. Sew buttons on to the other end, and it’s ready to wear!

    This concept is very adaptable. It’s easy to vary the yarn, stitch choices, and size to suit your own taste and knitting level.


    102 cowl 4


    Materials

    Yarn: the sample is made in Cascade Baby Alpaca Chunky, a very soft yarn with a lot of drape and not much bounce. One skein is enough for a small cowl like this. The finished fabric hangs in liquid folds. If you’d like a cowl that will stand up more, choose a yarn with more body and spring.

    Gauge: the finished sample has 4 stitches per inch in both stockinette and seed stitch. It’s OK if your gauge comes out a little bit differently, since exact size isn’t super important for this project. It’s still a good idea to make a swatch with your yarn and see if you like how the fabric is coming out, and measure your gauge to get an idea of how big your finished cowl will be.

    Needles and Hook: try US size 8 (5mm) knitting needles, but keep in mind that you may need a larger or smaller needle to get the gauge you want (especially if you use a different yarn). You’ll also need a crochet hook in a similar size for the buttonhole loops. In my experience the hook size doesn’t need to be exactly the same for such a small section.

    Finished size: the sample cowl is 8 ½“ wide and 22 ½” long. It fits fairly close around my neck, but is big enough to get over my head without undoing the buttons. You can compare the dimensions to any cowl you like to see if this seems like a good size for you.


    Directions

    Cast on 35 sts (or your stitches per inch x desired size in inches).

    Other options: If you’re not quite ready for keeping track of the seed stitch columns, you can also make a perfectly good cowl using garter stitch (knit every stitch, every row) or using seed stitch across the whole piece. (A cowl made with all stockinette stitch—knit one whole row, purl one whole row—will curl up at the edges.)

    For the seed stitch pattern, you’ll need an odd number of columns of stitches. In the sample cowl, there are 7 columns of 5 stitches each. You can also vary the number of stitches in each column if that works better with your stitch count.

    First row (right side): work in seed stitch for 5 stitches (knit 1, purl 1, knit 1, purl 1, knit 1), and then knit 5 stitches. Repeat this sequence of 10 stitches (2 columns) two more times, and end with 5 stitches of seed stitch.

    Note: You may want to put a stitch marker around the needle between the sections to help remember when to switch patterns.

    Second row (wrong side): work seed stitch for 5 stitches (knit 1, purl 1, knit 1, purl 1, knit 1), and then purl 5 stitches. Repeat this sequence of 10 stitches (2 columns) two more times, and end with 5 stitches of seed stitch.

    Note: this seed stitch in this pattern alternates every stitch between knit and purl, both horizontally and vertically. After set up in the first row, work a knit stitch on top of each purl stitch you see in the seed stitch sections, and vice versa.

    Repeat these two rows until you reach your desired length for the cowl.

    Bind off—not too tightly or the edge will pucker. Leave a long tail (a couple of feet long) and you can use it to make the buttonhole edge as well.


    102 cowl 5


    Crochet buttonhole edge
    Go into the first stitch of your bind-off with a crochet hook. Pull a small loop of yarn through with the hook. Go into the next bind-off stitch the same way, pull another loop through, and then pull the second loop through the first loop so that you have only one left on the hook.

    (I drew these illustrations for my students, who would also have me standing next to them to show them how to do it.  If this whole concept of crochet edges is new to you, check out this explanation from Knitty, which covers crocheting on to a knitted edge, as  well as the difference between a crochet slip stitch and single crochet stitch.)


    crochet edge


    Continue in the same way, going into each stitch as you come to it, pulling a loop though it and then through the loop you already have on the needle. This is called a “slip stitch” in American crochet terms.

    You’re making a line of crochet stitches, which should look like another bind off row on top of the first one.

    When you get to the place where you want to make a buttonhole, chain (pull loops through your working loop one at a time, without connecting to anything else) until you have enough stitches to just fit around your button.

    You can make the buttonholes flat to the edge or more of a loop—your choice, depending on where you attach them—but either way they should be just big enough to push the buttons through, otherwise they may come loose while you wear it.

    Reattach the chain to the edge by going into the bind-off stitch you choose, and making a slip stitch as you did before.


    crochet buttonhole v2


    The sample cowl has three large buttons and buttonholes, which line up with the three stockinette stitch columns.


    102 cowl 2


    Sew on your buttons to line up with the buttonholes.  I use the same method as I do with sewing thread, except the yarn only goes once each way through the buttons since it’s so thick.


    102 cowl 3


    Enjoy!  If you make one, I’d love to see it.


    Blocking Knitting Without Special Equipment

    When I mention blocking your knitting, I get a lot of blank looks from my students, and concern about how to do it and what they need to make it happen. Although it can be a magical transformation, it doesn’t need to be mysterious. And although there are a bunch of gadgets (special mats and pins, forms, blocking wires etc.) sold specifically for blocking, you don’t need to use any of those to get good results.  Some pins and a place to hold them will do, and sometimes you don’t even need that.

     
    lupine cowl blocking


    What does blocking mean anyway?

    Blocking is actually a simple concept.  It just means using water and/or steam to set the final shape of something after you knit it.  As you knit, you make a new structure—a fabric—with your yarn. When the fabric gets wet, the yarn has a chance to settle into its new shape.  Sometimes it can change quite a bit, expanding or relaxing in response to the tensions (or lack of) that are now on it.

    In blocking we take advantage of the fact that the yarn can form new shapes, and influence those shapes in the direction we want.  This can be as simple as gently stretching and patting a sweater so that it looks good flat, and leaving it to dry.  Sometimes more dramatic blocking is part of what makes a pattern shine, like stretching lace as much as possible to make the most of the open areas in the pattern.

    Essentially, blocking is getting your knitting wet, shaping it how you want it to be, and holding it in that shape until it dries.


    Why wet?

    Yarns, especially wool ones, can change shape much more easily when they’re wet.  This is because of the structure of the fibers themselves.  (If you’re curious about the science of wool and haven’t seen the wool article I wrote for this month’s Seamwork, check it out!)

    You can also stretch/shape your object while it’s dry, and then steam it to set the shape.  In general, I prefer the wet method for a few reasons.  It’s gentler on the fibers, and gives them a chance to relax before being under tension. It also gives a good idea of what your finished project will be like when it’s washed later.  A damp yarn object is easier to shape.  And when you finish knitting something, it may have been dragged all over hither and yon and have oils from your hands (or sticky stuff from your toddler) on it, and washing it is probably not a bad idea anyway.  (Hey—my favorite method for hand-washing is in that wool article too—good timing!)  (And speaking of good timing, Karen posted an eloquent argument this morning about why you should wash/block a swatch before embarking on a big project.  This is especially important when you’re making something like a sweater, where the final size/fit/drape is crucial to success.)


    Does everything need blocking?

    Not really.  I do wash all my finished knitting projects, shape them gently with my hands, and then leave them to dry.  But not everything needs to be pinned out, or to dry in an exact shape.  Socks, for example, are meant to be a little smaller than my foot, and to take on the exact shape of my foot when I wear them, so I don’t see much point in carefully shaping them before wearing.


    How do I block something without special gadgets?

    Everyone should have sewing pins, they’re useful for all kinds of things.  I’m not counting them as special equipment, but, it’s worth getting some with large, easy-to-see heads if you don’t have them already.  I like plain flat-head pins for sewing, but they get lost in the structure of hand knits.

    The only other thing you need is a surface where your knits can dry that you can pin into.  A lot of times I use the same folded piece of flannel that I iron on.  An ironing board or a couch cushion covered with a towel are good choices for small projects.  For big items I stretch an old sheet over my bed (see below).


    blocking shawl 1I tuck a doubled-over old sheet in tight over the bed covers.  That provides enough tension to hold in place when I pin onto it.  Plus it protects the covers from pin marks or any dye transfer from the yarn.  (Forgive the weird indoor lighting.  I wanted to show how I actually do this, but our bedroom is not ideal for photos …)

     
    When your finished project is clean and damp, it’s ready to block.  Stretch and shape it with your hands, patting wrinkled areas out, smoothing ridges parallel, etc.  Pin in place any pieces that try to shrink back, away from the shape you want.


    blocking shawl 2For this shawl, I pinned it at regular intervals along the straight edge, and intermittently along the other two edges.  You may have to move the pins as you smooth out the whole project, and that’s fine.  (This is my Indigo Boomerang, made with handspun.  More details are on Ravelry, and pictures of it worn are also in this post on slowness.)

     
    For the cowl at the top of the post, I wanted to stretch the lace sections, but not the plain knitting in between.  I could have blocked it flat, a couple of sections at a time, and that would probably have worked fine, especially if I steamed it.  Instead I decided to experiment with different sizes of rolled up towels, and found a combo which was the right size to block it around.  I opened up the lace with my fingers while it was damp, and pinned the two edges parallel.

    When your blocked knitting is dry, take out the pins and check out the shape.  If there are any parts you’re not happy with, or little pulled areas from the pins, those are great places to steam.  Hold your iron over the part you want to adjust (don’t flatten it) and fill it with steam.  Then take the iron away and reshape it with your fingers.


    Will I have to block my knitting every time I wash it?

    Probably not.  The most dramatic change takes place the first time the yarn gets wet in its new knitted shape.  Unless something extreme happens to it, it will stay more or less how you blocked it, with the additional influence of how it’s worn.  Lace may need to be re-blocked to look its crispest, but it won’t go all the way back to how it looked before you blocked it the first time.  For most items, a quick smoothing/stretching with your hands, before letting them dry flat is enough.  I like to drape bigger things like the shawl over the top of a wooden drying rack, using lower bars of the rack to hold the ends so that no part gets too stretched by gravity, or too folded and wrinkly, while it’s drying.

    If your project does dry with wrinkles, a little steam will fix that right up.

    I hope this helps demystify blocking for you!  The more we can all understand what’s going on with our yarn at various stages and why, the more we can get the results we want.  Happy knitting!


    Our Relationship with the Tangible World, or How I Learned to Spin


    first handspun yarn 1

    You may be able to guess what this is … yeah baby, my first bobbin of handspun yarn!


    So it’s like this: My beautiful, wonderful cousin came to visit me (with my beautiful wonderful auntie) and when she went back home, she left her spinning wheel here for me to borrow while she’s at college this spring. Amazing!

    I’ve been thinking vaguely about learning to spin for, um, the past two decades give or take, ever since I first practiced weaving with my grandmother. But it just seemed to take so long, like it would add so much time to my whole knitting/weaving process, so I wasn’t ready to commit. Needless to say, that was before the infinite list.

    In my new post-infinite-list world, starting to spin seems like the perfect choice; an expression of surrender and adventure all at the same time. Since there’s no way to ever finish all the knitting I’d like to (or weaving for that matter), I might as well make some frickin’ yarn!


    first handspun yarn 3


    Spinning is pretty amazing (I’ll talk more about that in a minute), but one of the best parts about it so far is an accidental discovery. In an effort to keep my immediate-onset spinning obsession from taking over my whole life (remember, I’m supposed to be focusing this year), I decided on some rules: I wouldn’t read about spinning except during times when I would normally read something else, and I wouldn’t sit down to spin at odd times during the day. Instead, I would wait until just before bed. So every night at 10 pm, I give myself permission to stop whatever I’m doing, shut off the computer, and spin for up to half an hour before getting ready to sleep.

    Oh people, this has been life-altering. A lot of the work I’ve been doing lately has been very abstract: putting my ideas out there to various people and institutions, basically a whole lot of online research and laboring for hours composing messages, many of which are never answered at all. I do hope that good things will come of it, but it’s basically a frustrating process that leaves me floating in inconclusiveness, and for the most part, kind of grouchy.

    Then at the end of the day, I put all that aside and sit down to learn, to make something real, to interact with the tangible universe. I’m reminded of this quote from Anaïs Nin about letterpress printing (which I found, like a lot of my deep-thought quotes these days, via Brain Pickings):


    The relationship to handcraft is a beautiful one. You are related bodily to a solid block of metal letters, to the weight of the trays, to the adroitness of spacing, to the tempo and temper of the machine. You acquire some of the weight and solidity of the metal, the strength and power of the machine. Each triumph is a conquest by the body, fingers, muscles. You live with your hands, in acts of physical deftness.
    You pit your faculties against concrete problems. The victories are concrete, definable, touchable. A page of perfect printing. You can touch the page you wrote. We exult in what we master and discover. Instead of using one’s energy in a void, against frustrations, in anger against publishers, I use it on the press, type, paper, a source of energy. Solving problems, technical, mechanical problems. Which can be solved.


    Although later this spring I will return this wheel to its rightful owner, I fully intend to keep this night practice going with knitting, or drawing, or something else. At 10 pm the computer shuts off, and I make something real for a little while before bed.

    Some things you may be wondering: yes, the spinning wheel tempts me all day when I look at it, but in a sweet way of something to look forward to. And yes, if we’re going out at night or I think we’ll have guests staying late (I’m not really a late-night person and tend to crash hard if kept up past my bedtime) I find a half an hour earlier in the day to spin. Yes, this is in addition to the hour I still try my best to find every day for personal projects. I’m discovering that the more up-in-the-air my day’s work is, the more real-world-project time I need to stay happy.  I’m also a firm believer in taking the time your life will allow for the things that are really important to you. And yes, when I wake up at night lately I find myself thinking about twist in fiber, which I like much better than mulling over my worries!


    first handspun yarn 2


    Another thing that’s been beautiful about this process (although it sounds funny) is watching myself learn. I suppose I’ve absorbed the mantra I’ve told all my beginning knitting students: “You can do this! Anyone can do it if they just decide to practice it.” I do absolutely believe that this is true, that skill in handcraft is available to anyone who’s willing to start where they are (which a lot of times means training your hands from scratch) and keep practicing. It’s a gift we get just for being human, but it does take work.

    Anyway, I’m cheating at learning spinning—the process is brand new to me but the feel of fibers and their qualities, the look and feel of yarn I’d like achieve, these things I already know. Not that I didn’t have lumps and bumps (you can see them!) and moments of beginner’s frustration which I had to push past, of course I did, and do still. But it’s been a long time since I learned something truly new to me, and maybe because of my teaching experience, but this time I’ve been able to let go of the outcome (a really healthy attitude for a first project in any material, I feel) and enjoy it. I’m a little surprised and pleased every time I sit at the wheel and notice that my technique is a little bit better, the yarn is coming out a little more even, or I just figured out some tiny thing that no one told me, it’s there in the materials and my hands to be discovered. When I first started I couldn’t spin from the imperfectly-carded batts of wool leftover from my early felting days, or treadle with one foot, but now I can do both.


    first handspun yarn 4


    If you’re not interested in being seduced into the wild world of spinning, stop reading now.

    Three compelling reasons to spin:

    Spinning is fast! For some reason I always assumed it was the slowest part of the fiber-to-garment process, but it’s clearly not, due to being a more-or-less continuous flow, rather than a stitch-by-stitch motion. It’s fairly shocking how quickly a newbie like me can make enough yarn to knit something out of.

    You can make yarn that you can’t buy, and the other people doing so are interesting folks!  This, realized while reading Ply Magazine, was one of the final straws for me: I could see myself wanting just such a yarn for such a project, but it wouldn’t exist commercially … I started reading Ply because of an article about how twist protects the fibers in yarn from wear (by Deborah Robson), and ended up reading every. single. thing. in the Twist Issue, even though at that time I had no plan to become a spinner. The way the articles are presented; with differing opinions, and explorations by people digging around the fundamentals of their craft, captivated me. The intricacies of how yarn is made are interesting even if you’re working with the yarn and not making it … but as I read I also became more and more convinced that if this is how spinners think, they are my people, and I must become one.

    Spinning is amazing! There’s something very fundamental about it, an immediate sense of how old and how intrinsic this process is, which draws me in. The rhythm is soothing, and at this point in my learning anyway, it works best if I can concentrate on what’s happening and be present without many words in my head—a lot like meditating, or dancing with someone. Plus you make real yarn from a pile of wool! If that doesn’t seem amazing, then you’re just not paying enough attention.

    I have just two tips so far for other would-be beginning spinners:

    Read the book The Intentional Spinner by Judith MacKenzie McCuin. Although it doesn’t have the variety of perspective you get from reading Ply, she lays out answers to a lot of the basic questions I had with clear photos, fascinating descriptions of fiber, and even ideas for making tools you need using a cardboard box and old knitting needles!

    Try not looking for a second while you’re spinning. I know it sounds crazy, but I tried it after reading an article by Carson Demers in which he said (among other things) that looking up at least part of the time you’re spinning (or knitting!) is much better for your body. And it turns out that (also like dancing with someone) if you take your eyes off what you’re trying to do, even for a couple of seconds, you become instantly so much more aware of all the other information available to your body—in this case what your fingers can tell about the twist and diameter of the yarn you’re making by feel.

    Ok three tips: just try it! Or try something else you’ve been meaning to do, and save it as a treat until the end of the day. I really can’t recommend it enough.

    Winter/Spring 2015 Workshops & Announcements

    tasha's lupine cowl

    Hello everybody! I’ve got some fun opportunities for hanging out with fiber folks and in-person learning coming up that I wanted to share.

    I’m teaching felting again this year at the Fiber Retreat at Arcosanti, AZ, coming up this weekend (Jan 23 and 24)!  My class is full, but there are still spots in other classes, and overall it should be a good time, with vendors, a speaker, and lots of opportunities to just hang out and knit or spin.  If you’re in the area and you’d like a little more info, contact me and I’ll send you some.  (Their website is a little sparse.)

    And, if you’d still like to take a felting class with me in AZ you may be in luck, because I’m also teaching at the newly revamped Flag Wool and Fiber festival this spring, May 30 & 31st!  I’ll be teaching felted flowers and 3D wet felting.  Details about the workshops should be up on their site soon.

    A new year also means new classes at Purl in the Pines.  Beginning Knitting and Sweet Tomato Heel Socks start the last Saturday of January.  Coming February 21st is a class I’m quite excited about, because we’re knitting a pattern of my own design, which I put together just for beginning lace knitters!  It’s called the Lupine Cowl (pictured above).  Please contact the store for more info and to sign up.

    I’m also talking with the folks at LocalWorks (Flagstaff’s maker space) about running some beginner sewing classes there, and hopefully I’ll have more info on that soon.

    While we’re on announcements, I keep meaning to mention (for those of you reading via email) that I’ve been working on the site slowly, starting this summer, and it this point I think it looks about as good as it’s going to unless I break down and pay someone to help with it (what—people do that?).  There are now category pages which hopefully make it a lot easier to find what you’re looking for, and a bunch of hand-carved stamps and typewritten words which have found their way into the digital world, so if you haven’t been in a while, check it out!

    I’m going back to preparing for Arcosanti now, but I hope to see you all soon, either in person or out here on the interwebs!

    Basting: Thread Magic


    new backstitch 1


    I kind of feel sorry for anyone who doesn’t like basting, or thinks they don’t.  It’s a like a magic wand for your sewing.  It keeps things exactly in place for exactly as long as you need it, doesn’t distort your final sewing, doesn’t need to be removed as you go, and can be pulled out when you’re done, leaving no mark behind.

    I fell in love with basting many moons ago, while sewing a collar onto a button-down shirt.  I had all the layers of shirt and collar scrunched together ready to sew, and no matter how many pins I put in, the fabric kept shifting under the sewing machine as I went and getting terribly uneven, and/or folding over and catching pieces of the shirt I didn’t want in the seam.  After ripping it all out and starting over two or three times, I decided to baste it in by hand and see if that was any better.  Held by the basting, the shirt and collar seam went through the machine without a hitch, as nice as I could ask for, on the first try.


    basting stripes


    Basting just means any kind of temporary stitching, meant to hold fabric in place until you can get the final stitching done.  The advantage is that the basting doesn’t have to be neat and even, or strong enough to hold up with wear, so you can concentrate just on the fabric while you’re basting, and then just on stitching when you’re sewing the final seam.

    If I’m in a situation where I want basting, usually it’s because I need more precise control over the fabric, so I baste by hand.  To baste, simply sew running stitches (illustrated at the top).  The stitches can be pretty big and uneven—concentrate on the placement of the fabric layers with each stitch, rather than the stitches themselves.  I like to begin and end with a backstitch, just to keep the basting from pulling apart until I’m done.

    Some good places to use basting are: when you want things to align exactly (like matching stripes), when there are a lot of shifty layers (like the collar seam), or any other time when you want to make sure some part of your project will stay in place while you sew it.  For the soft bra below, I knew there was no way the lace would stay in the folds I wanted against the fabric if it was held only by pins.  Plus, basting allowed me to put everything together on my dress form, seeing exactly how the lace would work on a body, and then take the whole thing off the form and sew it.


    basting lace on form


    finished soft bra lace


    It worked great!  When you’re done with the final seam, you can remove the basting easily.  Pick out the backstitches at the ends and grab one thread tail, then you can often pull out a long basting thread with one pull.  Unless of course you sewed over it in the final stitching, but no worries, that happens.  Just pull out what you can at once, you may have to cut and pick out a few small thread bits.

    Although it may sound like a technique for more advanced sewing, I definitely recommend basting for beginners too.  When you’re just starting out, learning how your machine handles fabric, especially in tricky situations, isn’t easy.  You can baste practically anything that you just can not get to stay in place while sewing on the machine, get much better results, and save yourself a lot of frustration.  According to The Mary Frances Sewing Book, back when most garments were sewn by hand, it was more efficient to baste a seam first, and then sew it, than to sew the final stitches while trying to keep the fabric layers in place.

    Best of luck with your sewing!


    An Interview with Me on ‘So, Zo…’!


    HSM on SoZo


    I’ve been talking to Zoe of the lovely blog ‘So, Zo…’ about the debut of Hello Sewing Machine.  Not only did she agree to feature it, she wanted to interview me!  So if you’re curious about what inspired me to make this e-book in the first place, and of course my thoughts about saving the world, check out this post to read all about it!  Plus, there’s a discount code for you as well . . . hop on over!


    Making Drawstring Bags—Another Option for the Top


    Hello!  There’s been just a little more radio silence around here lately than normal, but hey, that’s what retreats are for, right?  Today let’s jump back in with some thoughts about drawstring casings on bags.  In the second part of Hello Sewing Machine, I guide you though making a drawstring bag and leaving a “buttonhole”—a gap in the side seam for the drawstring to pull through.  That’s probably my favorite way to finish the casing, and one that helps you think about how a piece of fabric becomes a finished project, which is why I chose it for my beginner e-book.  There are lots of other options though, basically any method that encloses the raw edges and leaves a place for the drawstring will work.  One of my proofreaders asked about making a little hem on the sides of the bag instead, and I wanted to present that option here.  In my example, I’m altering a commercially made bag which doesn’t have much in the way of seam finishing, and is not going to stand the test of time.  You can also easily use this technique on DIY bags.  Click on any of the pictures to enlarge for a closer look.


    drawstring bag 1


    On this bag, there’s nothing to keep the raw edges from unraveling.  I’m especially concerned about the area where the drawstring emerges from the bag, because it’s likely to get a lot of wear and tear, which will cause the fabric to unravel faster.

    My first step was to take apart the seam stitching, down to where I wanted the seam to stop for the new finish.  I stitched up to that point and back down (with red thread) to hold all the stitching in place.  Then I took apart enough of the seam holding the casing down to let me make a narrow hem on the edges.


    drawstring bag 3


    If you are making your own bag, just stop sewing the side seam a little ways from the top, and back tack over the seam end.  To figure out where to stop, think about the parts of the casing you need to leave room for at the top of the bag.


    drawstring bag 2


    At the very top is a little extra fabric, usually turned under (or stitched over) so that it won’t unravel.  It serves the same purpose as a seam allowance.  Then you have the inside and outside of the casing (keep in mind we are looking at the bag from the inside), and you will also need a little more room (about 1-2″ or 3-5 cm) for the transition between the hemmed edges and the seam.   Once you figure out where the end of your seam will be, go ahead and overcast the seam edges, continuing a little bit past the point where your seam stops.  Then on each edge above the seam, fold over and press down 1/4″ (or .5 cm) with your iron, towards the inside of the casing.  Fold over the edge again in same direction, using your first fold as a guide, and press in place again.  Then stitch down your hemmed edges, sewing close to the edge with a straight stitch.   Sew across the seam as well, below the top where you stopped stitching, so that all the stress from opening the bag is not on just one point.


    drawstring bag 4


    Next, sew your drawstring casing in place.  Normally I would press a small fold at the top edge towards the inside, and then fold and press down the width of the casing.  Since the casing here is already sewn in place around the rest of the bag,  I opted to replace the original stitching, overlapping it with the red thread.  Make a small back tack at each edge, since those ends won’t be held down by any other stitching later.  Then I used a mock-serger stitch to go over the small raw edge below the casing, since I don’t want it to unravel and lead to my casing pulling loose.


    drawstring bag 6


    A quick note about ends: I like to bury them inside the casing or hem, or wherever there’s a double layer of fabric, so that enough thread remains to keep the stitching from pulling out, but it’s hidden.  I thread the ends on a hand-sewing needle, pull them between the fabric layers for one long stitch, and snip them off where they come out.


    drawstring bag 5


    Here’s an another example of a commercially-made drawstring bag using the same concept.  I think they hemmed the sides of the drawstring first, and then caught them in the side seam, and finished the seam allowances with a serger.  As I said, you have a lot of options!


    drawstring bag 13


    There’s lots more thorough and friendly beginner-oriented directions for sewing seams, overcasting, using your iron to make a casing, and everything else you need to know to plan and sew a drawstring bag in my e-book, Hello Sewing Machine!

    If you have other beginning questions, feel free to let me know, I’m always curious about what’s on your mind.   You can also read my answers to others’ questions in this post on Sew,Mama,Sew!


    Giveaway and Sewing Tips from Me on Sew,Mama,Sew! Today


    smsseamguide


    I’ve been waiting to see what questions everyone would ask on Sew,Mama,Sew! this week.  I admit that I was a little nervous, kind of like when I first started teaching sewing years ago.  What if someone asked a question that I totally didn’t know the answer to?  Actually, I did get one—but it was a very specific one about piping around corners on a pillow, and since I’ve never done that, I think I can be excused.  In general though, all the questions were great!  And really relevant for beginners.

    If you’re wondering about the tension on your sewing machine, or how to clean and oil it, I talked about that.  If you have trouble sewing around curves, or with slippery fabric and knits, I’ve got some tips to help you out.  If you’re not clear about when to finish fabric edges and how, I covered that.  And at the end, there are a few resources to help with fitting and selecting interfacing.  Most of the answers were excerpted or adapted from Hello Sewing Machine, where of course you’ll find a lot more answers to basic sewing questions.

    Phew!  Thanks to everyone who wrote in with questions, it was great to see what readers were curious about.  You can read the answers over on Sew,Mama,Sew! today.

    Plus, I’m offering both a chance to win a free copy of my new e-book, and a coupon code for a discount if you order one on Etsy, so go check it out!

    decoration spool 1