
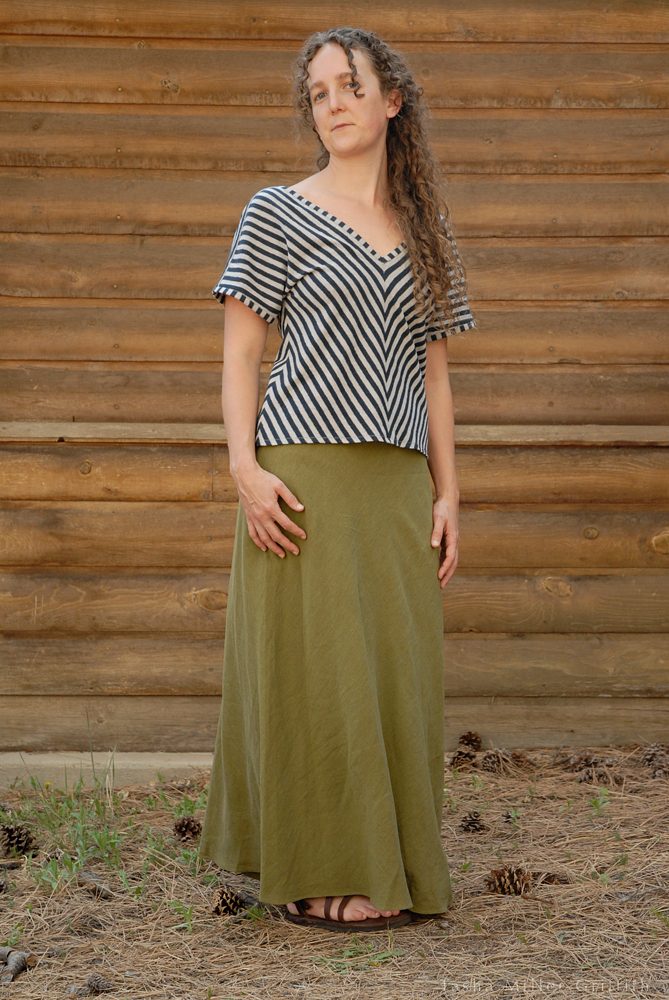
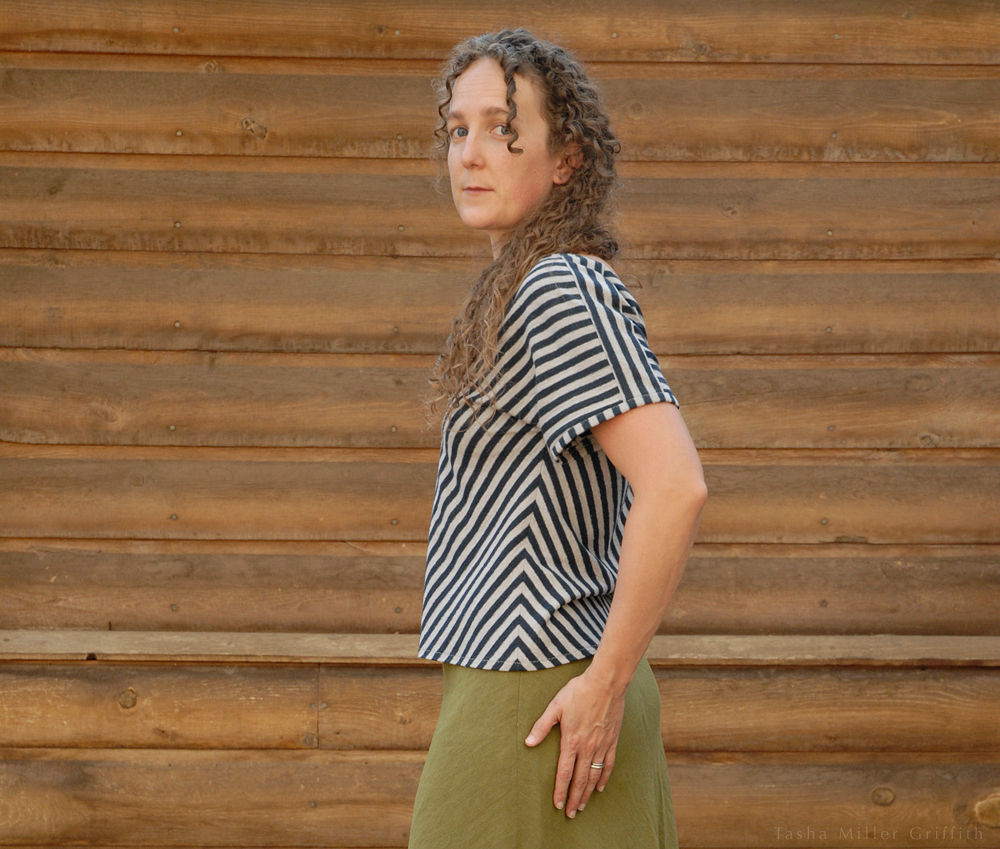
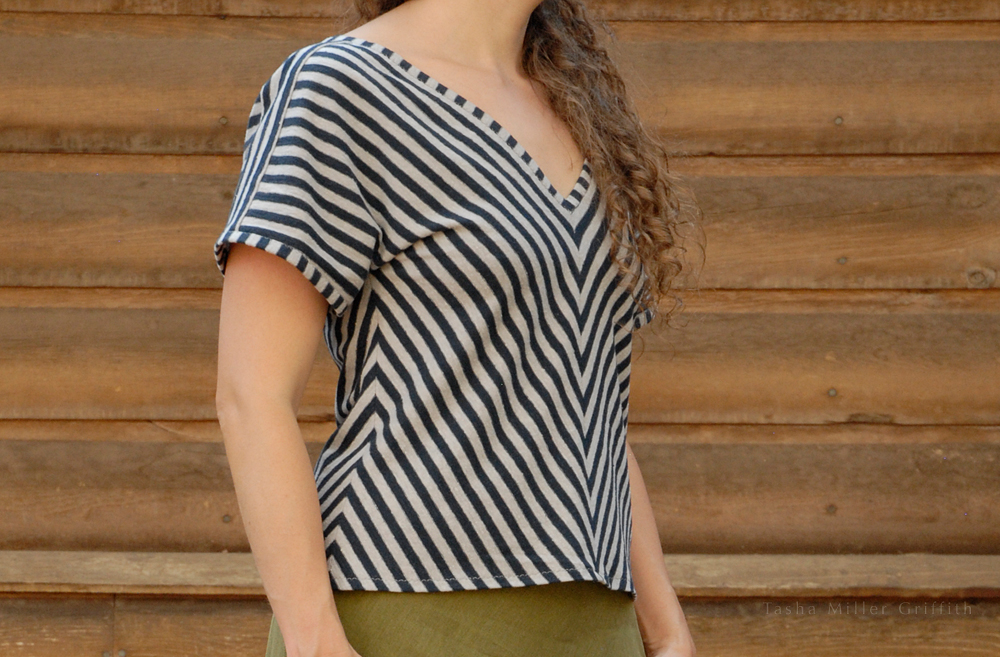
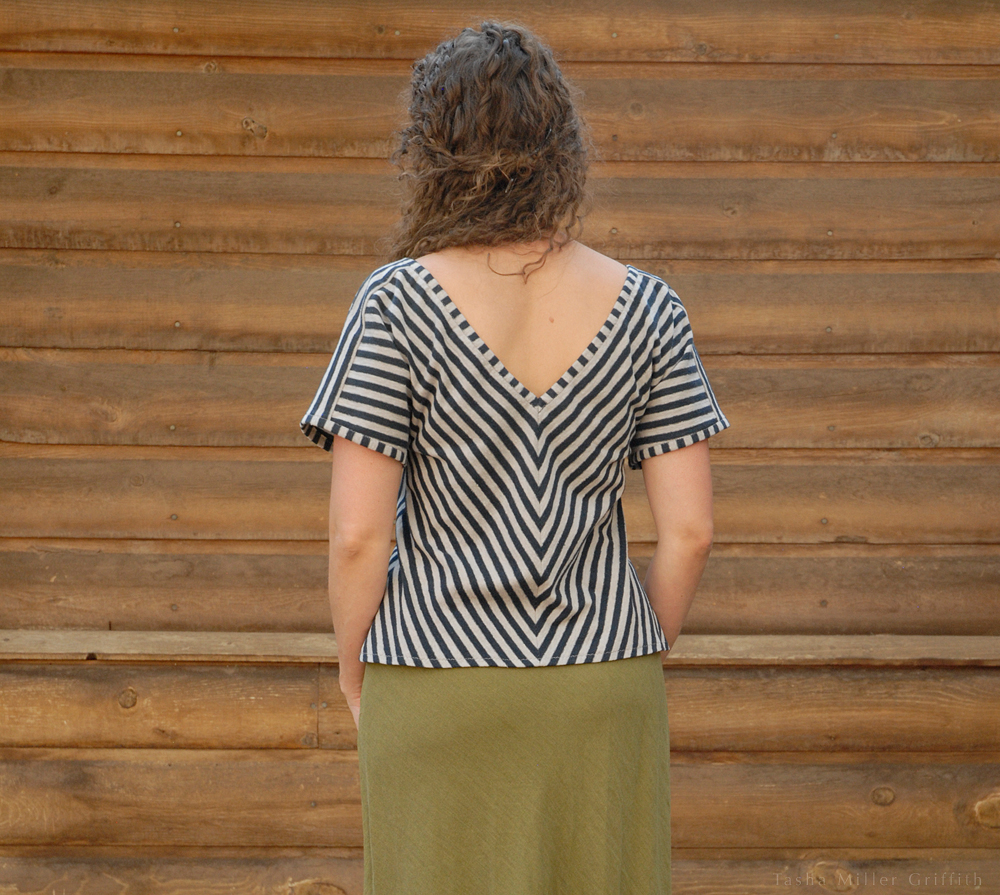
The first picture I saw of the Cabarita Top from Cake patterns must have been one where Steph is wearing the “back” as the front. I’m hardly ever struck by the sudden need to make a pattern exactly as shown, but in this case I knew I needed this top … even though it turns out that’s not exactly what the pattern intended. I also hardly ever make anything trendy … but I love how many chevrons and clever stripe matching I’ve seen in the last couple of years, so I guess it’s a trend I don’t mind being part of. (Fair warning: I’m going to wear this top until it falls apart, whether or not it starts to look dated.)
Anyway, how about some tips for stripe matching first, and then a couple notes on changes I made to the pattern?
The first step of stripe matching is careful cutting & planning. I cut striped fabric in a single layer, so I can see exactly where the stripes on each piece go.
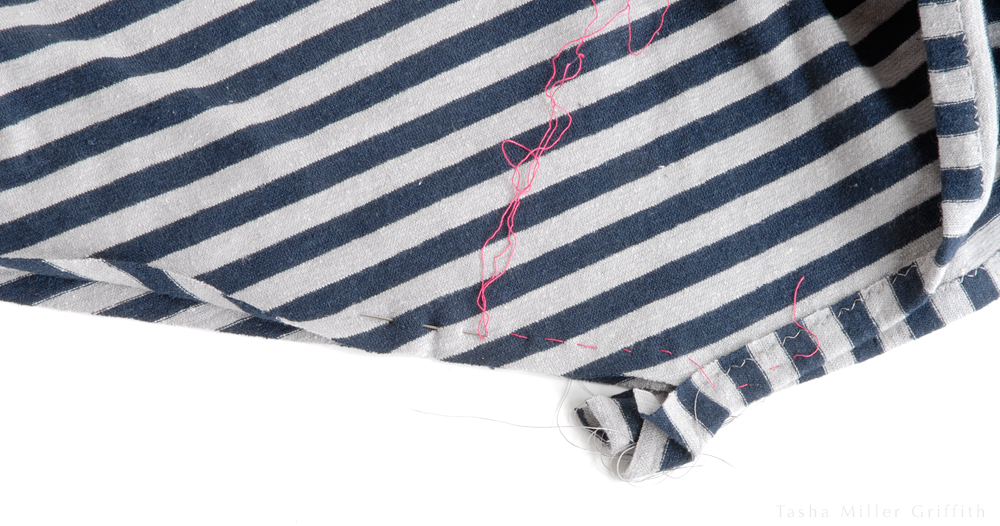
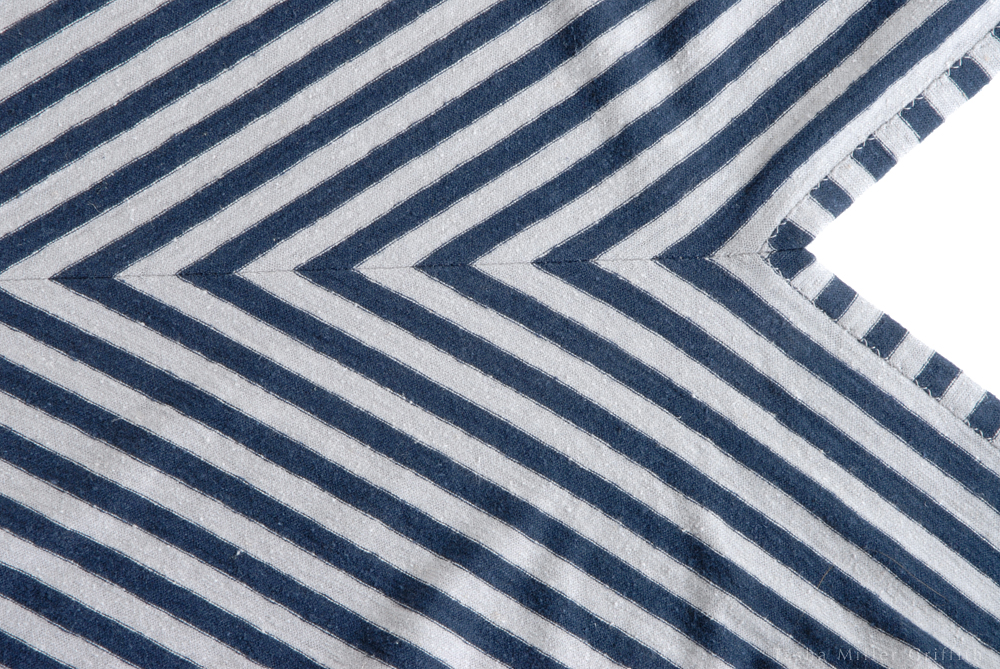
Lay your first pattern piece, the one you most want to match, on the fabric, and trace the stripes onto that pattern piece with a pencil, so you can see exactly where they line up, and then cut them the same, or in a mirror image, on the next piece. I could swear that I took a picture of this step during this project, but apparently I was mistaken. I’ll have to get one next time I’m in the studio. The point is to carefully draw the stripe placement along the seam lines of the pattern piece. Draw both edges of key stripes, so you can see how wide they are and where each edge goes. It may help to use colored pencils that match your stripe colors. For a fairly simple stripe, you can go ahead and cut, and then move the pattern piece as necessary (don’t forget to flip if needed), align the stripes with the ones you drew, and cut again. If you want to match along a seam where two pattern pieces meet (like a side seam between a front and back) you’ll need to transfer your drawn stripes from the first piece you cut to the second one, making sure they are aligned at the bottom. This project was a straightforward one for this part, since there are just four copies of the same piece.
Sometimes, especially with plaid fabrics, or more complex garments with lots of seams, you may have to pick your battles, choosing the most visible/important seams to match stripes on as you’re planning and cutting the fabric. Also keep in mind that if a seam runs in the same direction as a stripe, it’s much much easier to make it look good if the seam runs through a wide area of the same color, than if it’s along the border between two colors or a narrow stripe, where it’s likely to look wobbly.
When you get ready to sew the stripes, my all-time best step for perfect matching is: baste! Don’t worry about exactly matching the seam allowance edges, worry about exactly lining up the stripes. Peel back the fabric and look. As you stitch, check to make sure that the needle goes in and out in the exact same place on the stripe in both layers, and adjust if necessary. You can check, and even try on your project, after basting to see how it’s coming out. You can bet that if your stripes are matched as you baste, they’ll be matched after you sew the seam.
I also use my walking foot for stripes, as a little extra insurance against the layers shifting.
It works:
Just in case you want to make Cabarita hack like this, here’s how I did it:
I compared the v-neck on the pattern to another me-made shirt I like, which suggested I should use the marked neckline for the group of sizes bigger than mine. I forgot that having a V in the back as well (instead of a plain round neck) would give the top more leeway to slip off my shoulders. I ended up adding thin clear elastic, barely stretched as I sewed, all around the neckline in the seam allowance of the binding seam, to keep it hugging in a bit. I like it, but if I cut this again I would use the V suggested for my size for both front and back.
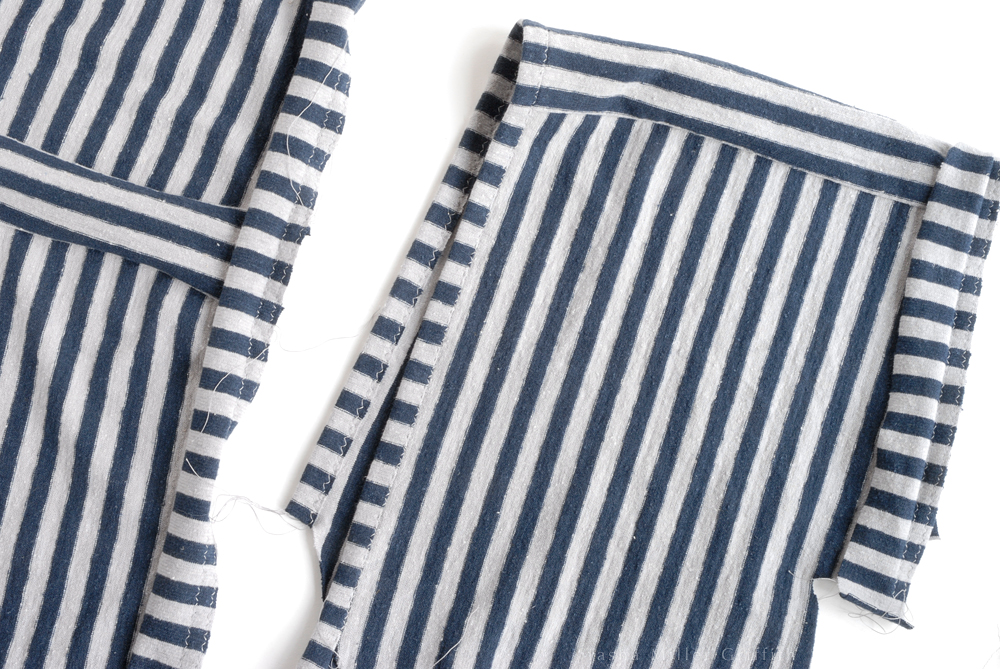
To make the bands at the shoulders, I took an inch off the shoulder from the top down, minus seam allowance, and cut a separate piece 2” wide plus SA, across the stripes. I sewed the extra shoulder piece between the front and back on each side, and then the binding around the neck and sleeves.
I sewed the binding once on the seam, and again near the edge to keep everything flat as it’s washed and worn. Then I flipped the binding around and sewed one last time just along the edge, from the right side. Have I mentioned I’m really liking zigzag as topstitching lately?
This fabric is an organic cotton & hemp blend from The Fabric Fairy. It’s yummy, and I’m looking forward to it getting even softer and drapier as the hemp ages. I decided to use the “wrong” side as the public side, because I love how you can tell that the stripes are knitted in, and how the little rows of purls (for you knitters out there) soften the transitions between the stripes just a bit.
I’m really liking wearing this over tank tops, maybe even more than on its own. I think I like how another layer showing below it breaks up the pattern a bit, but it also could be just because this summer has been generally cool enough that light layers have been a good option.
What about you, what have you been sewing? Any more tips for stripes?

Aaah I love this and may have to shamelessly copy your hack. 🙂 My best tip for cutting and matching stripes is to use the first piece as the pattern for the second (mirror-image) piece — that way it’s not necessary to mark the stripes on the pattern piece, and it comes out perfect because you can align the stripes all around the cut edges. 🙂 Great post!
Thanks Susan! Copy away if you like!
With a stable fabric, I think your method of using the first piece to cut the second one would work well. With a knit like this I’d be afraid I’d stretch or scrunch the fabric a bit & end up with a funny shaped piece …
Yes good point, it’s much more finicky with drapey fabrics! 🙂
top is lovely on you, I adore what you did with the stripes.
and also, thanks for the tip. 🙂
Thanks! And, you’re welcome!
Cool! Here’s my tip: Make two of these, so you can wear the first one out and still have it; it’s really smashing!
Thank you so much for visiting and commenting, I’m honored! People, David Page Coffin likes my shirt!!! Maybe I will make another one …
I really love this top! It looks really really good on you btw.
Hey, thanks!