
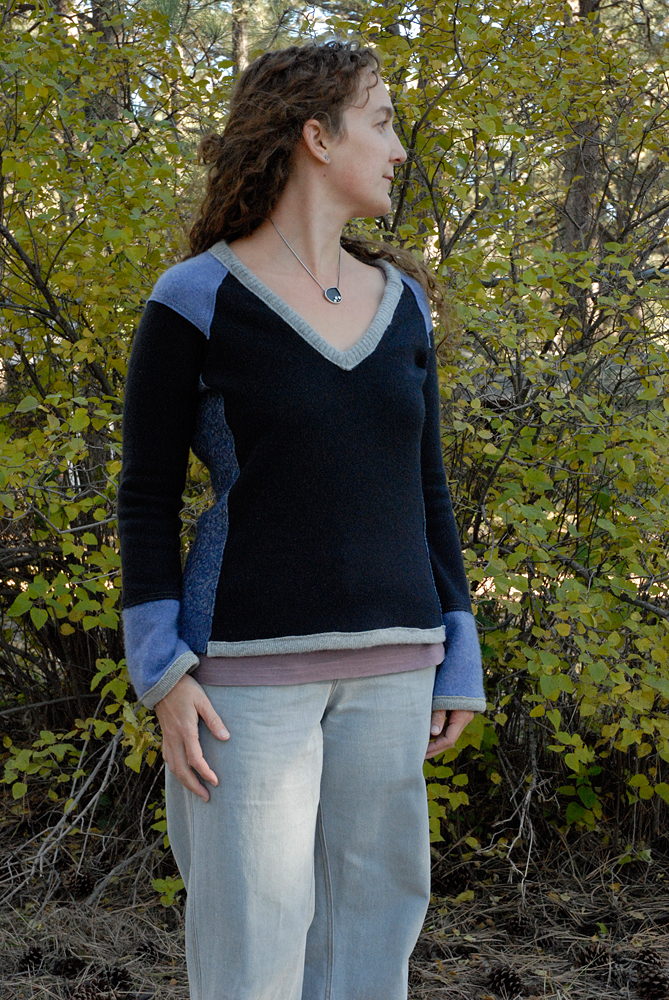
Hello all! I’ve been making and mending just about as much as physically possible around here (in between making hundreds of these little fuzzy hats) ever since I got back to my studio a few weeks ago. Not much has made it up to the blog yet, and I decided to just start with the thing I’m most excited about: my new sweater! I really, really need some more sweater layers for this winter, and I’ve had a plan to make a couple of upcycled ones from various bits and pieces since the spring.
So, here’s the first one! The main part of it came from a deep navy blue, super soft, slightly felted, merino sweater that some friends gave me (on the right below). The fabric is lovely, but the shape was classic sweater that doesn’t work for me—baggy on the sides, gathered in at the bottom—in other words the least flattering possible design for a small pear-shaped girl such as myself. I also have this knit top which I love the shape of, it has princess lines (flattering—yay!) and interesting side panels, it fits me well and since it seems to be on its way out (the problem with thrift store finds) I had already traced a pattern from it. So . . .

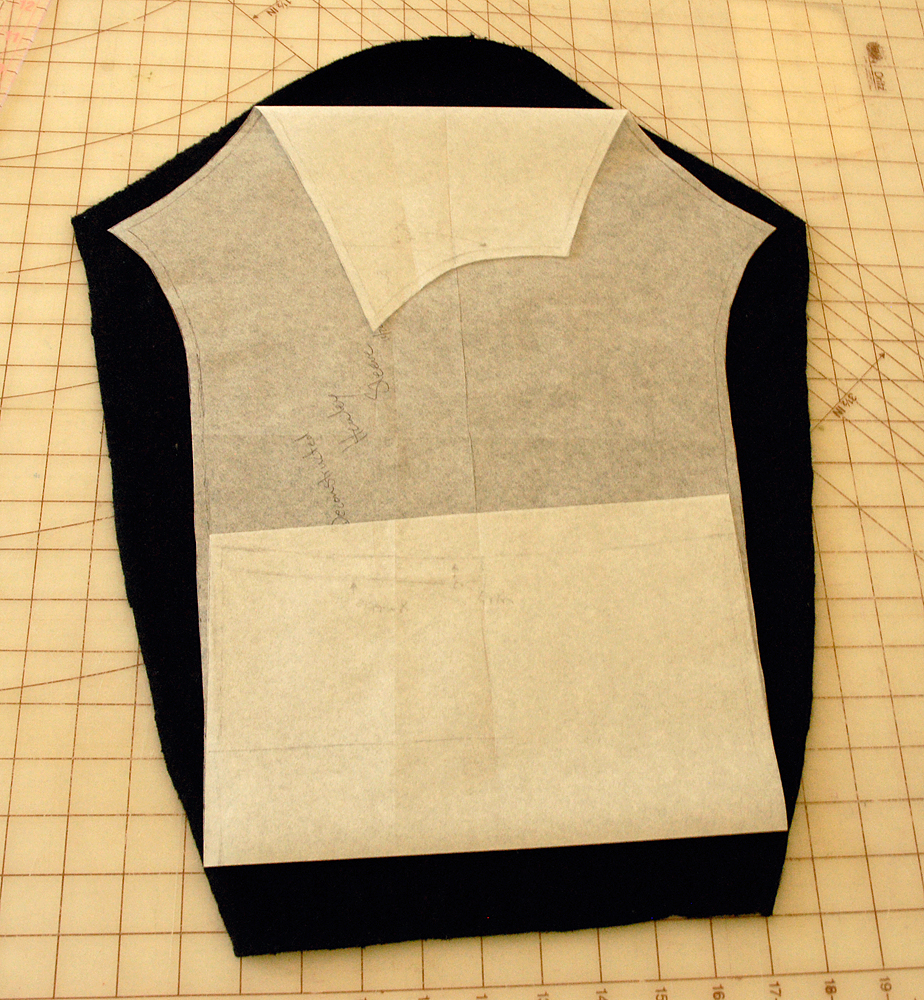 The biggest lesson I have learned so far when recycling/refashioning something old into something new, is to treat the something old as fabric. Unless the alterations you want to make are super duper simple, take the whole thing apart and press it flat and see what you’ve got, and it will be so much less frustrating. You do end up with some odd shaped pieces of fabric, which can lead to interesting piecing and seams. I folded the pattern for the new sleeve to accommodate the fabric from the old sleeve, leaving me two parts to cut from another fabric. I just have to remember to allow for seams when I cut the pieces to add on. I had allowed 1/4″ seam allowances, so I cut the top and bottom sleeve pieces 1/2″ longer than the lines where I cut the middle piece, so there would effectively be a seam allowance on both sides. Make sense? I have screwed up the math on that before . . . but not this time.
It probably won’t surprise you if I point out that I have a lot of scraps of cashmere lying around here, plus old sweaters friends have given me, etc. I chose a dusky purple for the extra sleeve pieces and extra at the back, which also didn’t quite fit on its corresponding piece of ex-sweater.
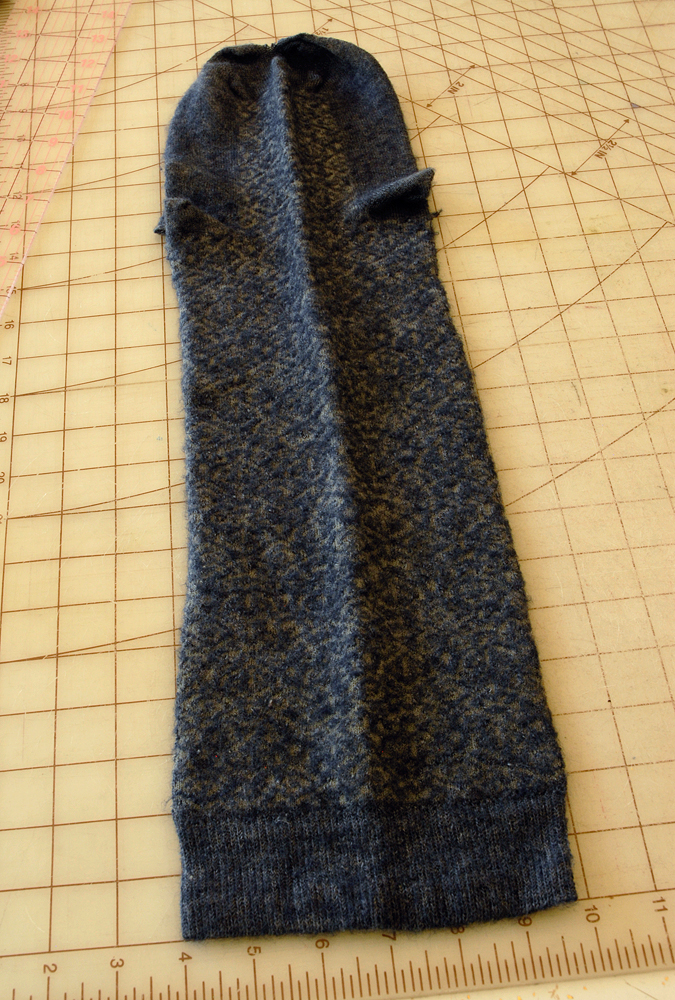 I chose the purple because it matched my material for the sides: socks! My mom was nice enough to buy me these super soft alpaca socks at a fiber festival. I loved the knitted pattern, I love knee socks, I carefully followed the instructions, which were to machine wash and line dry. That’s my default washing mode anyway, so I thought I was good to go . . . but by the second wash they had shrunk to the point where fitting over my calves was no longer an option. (Short strange tangent: this opened up sock reminds me of those animal pelts you see in museums, as if socks ran wild and were hunted for their fur.) Once pressed flat, there was just enough material in each sock leg (including the ribbing) for one side panel of my sweater!
I experimented with sewing the seams flat, and I really like how it came out. I overlapped the two pieces I was sewing together by 1/2″ (the same seam allowance as if I had sewed the seam 1/4″ from each edge, see what I mean?), feeling with my fingers for the edge of the layer underneath, and pinning in place. I sewed a narrow zigzag close to the edge of the top layer, and then again about 1/4″ away, using parts of my machine foot against the edge as guides. I used a walking foot, which I nearly always do for knits.
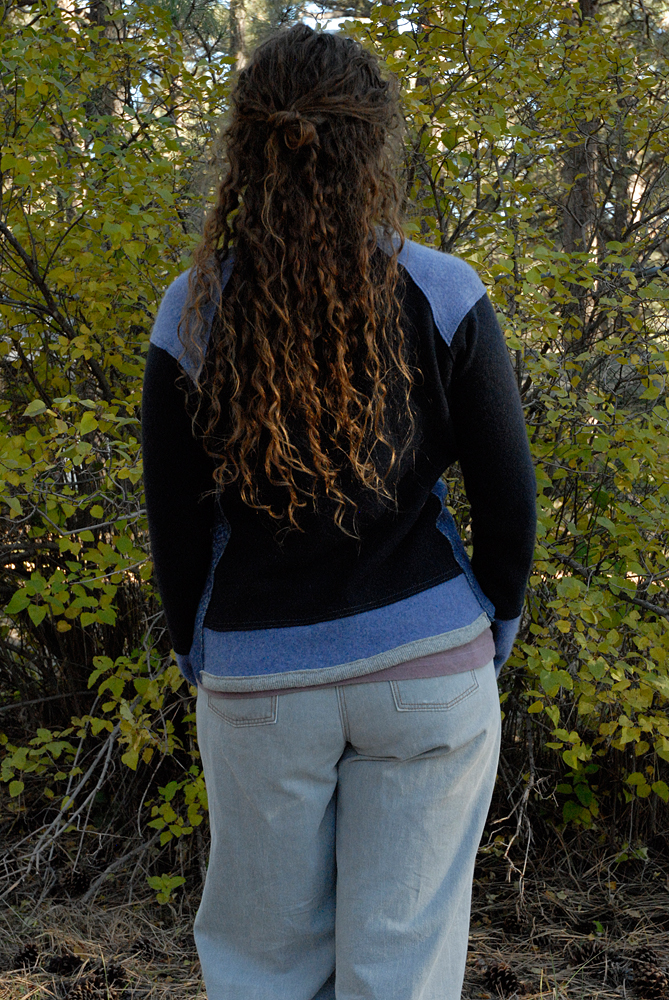
This method turned out to be only just slightly trickier for the curved seams connecting the sides to the front and back, so I did it there too. I really like the slightly deconstructed look this gives it.
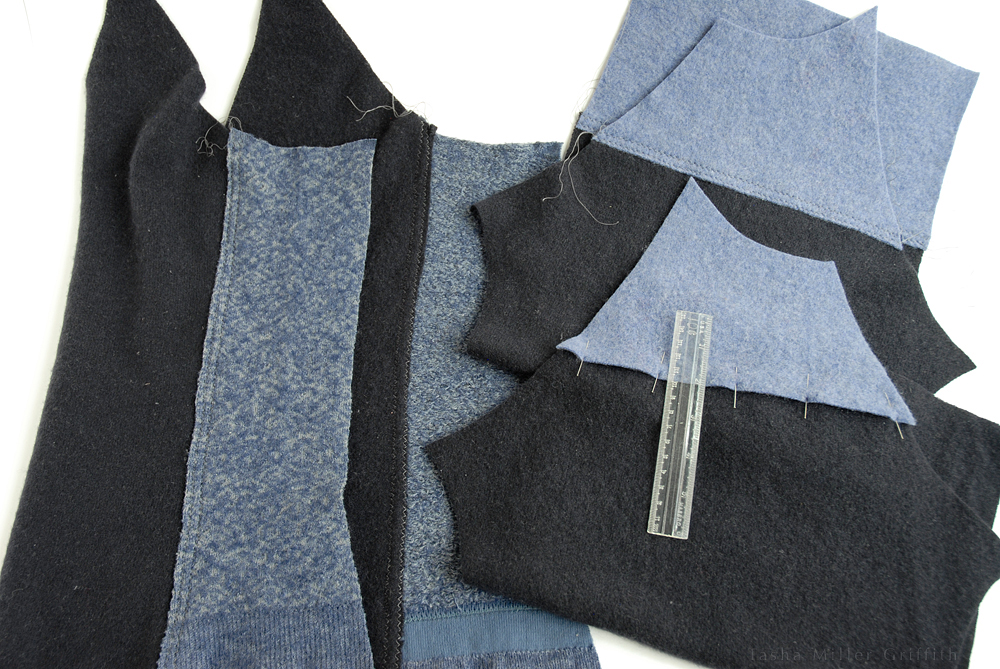
I didn’t do the flat overlapped seams running down the sleeves, it would have been too much scrunching the sleeve up under the machine. I did do it to attach the sleeves to the body though, and because of the raglan construction (not having to put in the whole sleeve in the round) it was pretty easy.
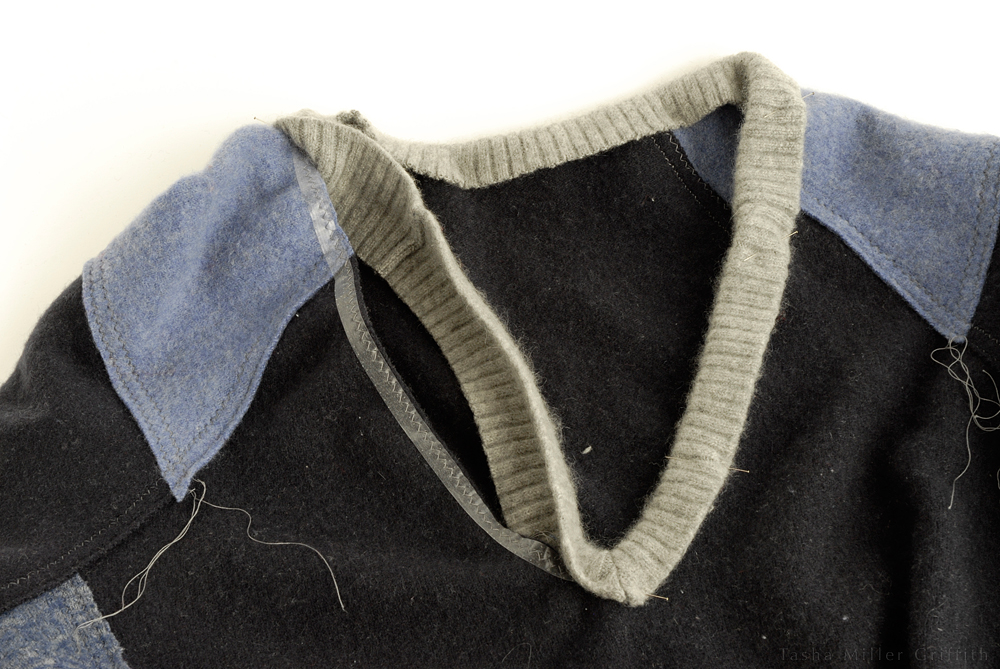
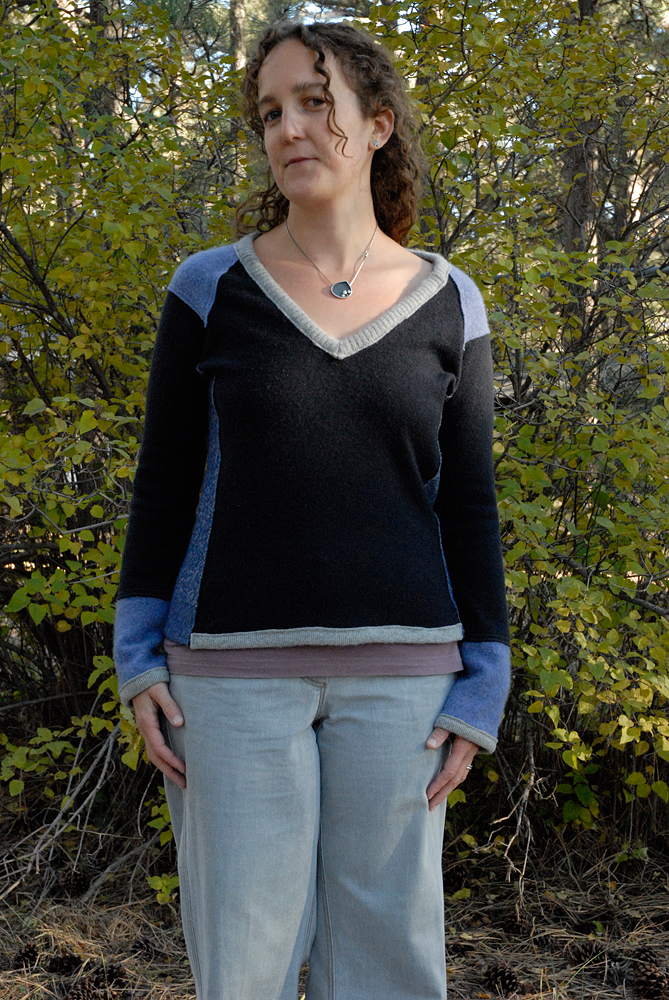
For the neckline, I kept the “v” of the original blue sweater, although in future I might add in some there just to make it a little cozier. I knew that a section of scrap cashmere ribbing wouldn’t do anything much to keep the neckline from stretching all over the place, so I attached 1/4″ clear elastic first, stretching it to ease in the extra fabric and get the neck to lie flat, especially across the top of the shoulders.
 (By the way, I think the colors are truest in the two pictures above. I’ve had trouble getting my white balance and purples to get along.)
So, I zigzaged on the ribbing at the hems and bottom of the sleeves as well, and there you have it. I actually cut pieces for another purple section around the bottom, but I decided that I really liked the sock ribbing as the hem, and I liked the length when I tried it on, it allows another layer to peek out below. And winter is coming, so I’m going to be wearing lots of layers!
I think the saddle shoulders may be my favorite part. I’ve got plans for another franken-sweater using something I knit years ago. I’m really pleased with how this came out, and looking forward to a DIY cozy winter!

great project! you’re giving me good winter sewing inspiration. i have a friend who is my thrift fairy and is always finding me cashmere sweaters that sort of fit but could use tweaking. maybe i will be bold enough to cut some up after reading this 🙂
Sometimes I have cashmere fairies too, I love it when that happens! If you refashion your sweaters I’d love to see a picture, I’m sure you’ll come up with something great.
WOW! LOVE THIS! you are so talented!
Aww, thanks Rebecca! I love it too, I’m having a hard time taking it off . . . I think that means I should make another one!
Oh, I like the patchwork look and the sweater looks so cozy. 🙂
I like your sweater! I can see lots of possibilities in your new direction : )
Me too . . . more on the way! Yeah, super cozy.
Pingback: How to Mend a Small Hole: Sewing a Patch by Hand | Stale Bread into French Toast
Pingback: Four Upcycled Winter Tops | Stale Bread into French Toast