Some Thoughts About Sewing Leggings


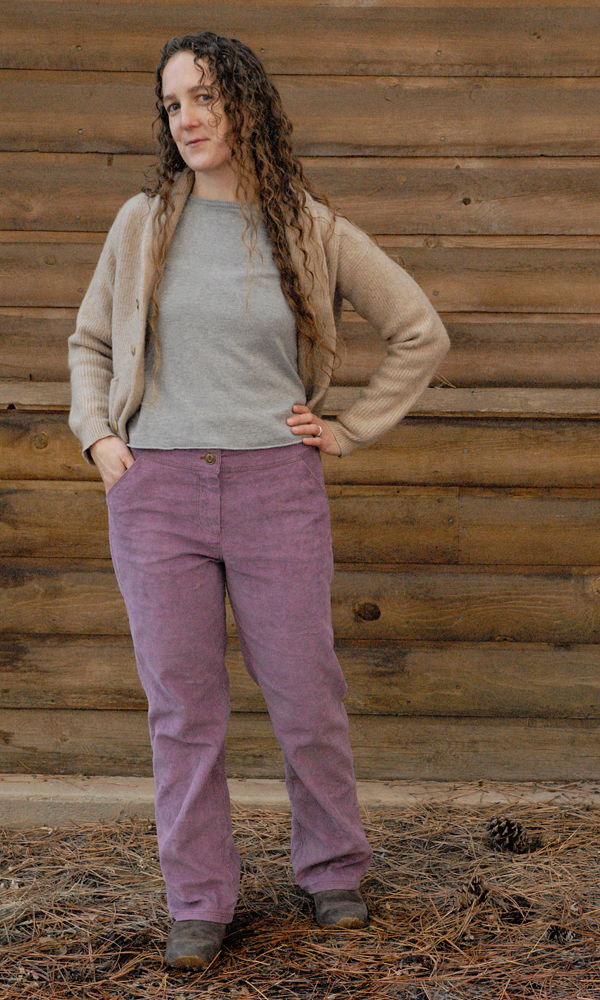
I’ve been wearing leggings more these past two winters.  I love how warm they are under my skirts.  The fit though, often leaves something to be desired, so I decided to try making my own.  Good decision!  These are totally the comfiest pair I own.  I’m more than a little behind on sharing them, but the plus side of that is I can already report that I took them with me on our spring and summer travels last year, and they served me really well as a base layer under dressier clothes when the weather at shows was chilly, for hiking, and as PJs when camping in cooler weather.


green wooly leggings 4


I used the Espresso pattern from Cake.  I love that it’s designed so that you transfer your measurements in both length and width right to the pattern to make your own custom size.  Overall the amount of ease the pattern added worked great for me.  These fit just how I’d like them to: not too tight or constricting, not to loose or wrinkly, but like a second soft wooly skin.  The only problem I had with the way this pattern is drawn out is that it doesn’t allow for curves between the booty and waist.  One look at my body would tell you that a straight vertical line in this area isn’t going to cut it.  After a couple of iterations I ended up taking a huge curving dart out of the center back seam, from the waist down to nothing at the widest point.  But since the fabric is stretchy and I basted the seams together first, it wasn’t hard to do.  (I highly recommend basting the seams if you’re making your first pair.  Long straight stitches are just amazingly easier to pull out than zigzag.  Once I had the fit I wanted, I trimmed the seam allowances to match the new seams, pulled out the basting, and sewed the seams with a narrow zigzag.)


green wooly leggings 2


Once that was settled, I tried them on and marked with pins where I wanted the waistband to sit.  I just don’t like constriction, especially elastic, around my natural waist, and I tend to cut the waistbands of trousers and skirts so that they sit just below my belly button.  I knew that I wanted the leggings to sit a little below that, so they’d layer well with the rest of my wardrobe.


green wooly leggings 3

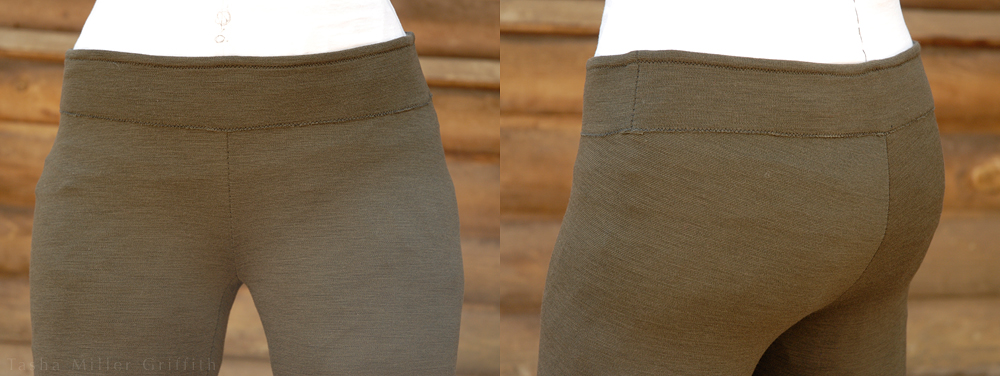
I would NEVER wear only these in public, or show you my booty in leggings on the internet.  And I just need to get this off my chest, because I keep wanting to say it to young women I see on the street: leggings aren’t pants!  But somehow, I’m OK with you seeing the fit on the dressform, even though the whole point of this dressform is that it’s as close to my actual shape as possible … go figure. 


I decided to add a wider waistband, which I hoped would make the top more stable and also give it a little more recovery.  I cut two pieces about an inch less wide than the leggings are at the top, and 3″ deep.  I sewed those pieces together, and then to the inside waist of the leggings, also including clear elastic in the top seam.  Then I flipped the waistband to the outside and zigzagged it in place just over the raw edge, and again at the top just under the seam allowance.  I didn’t want the bulk of another turned-under edge at the bottom, and it’s worked out pretty well, the fabric has fluffed up only slightly around the cut and sewn edge.

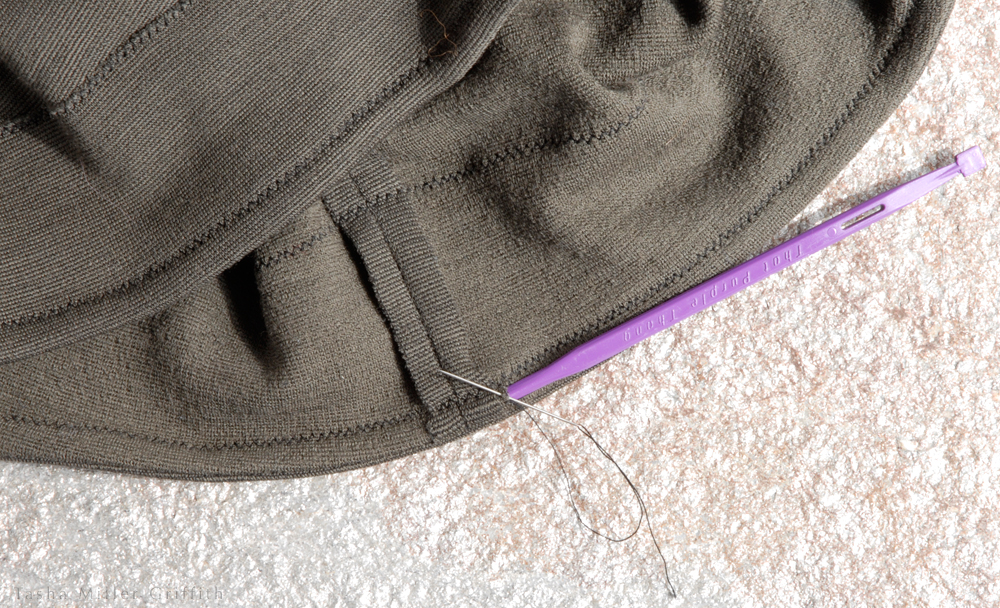
But, they didn’t stay up.  To be clear, I don’t blame the pattern at all for this, since I was off on a choose-your-own-waistband adventure by this point in the process, all learning around the waistband issues is my own responsibility.  And I did fix it; after considering taking things apart and/or adding more elastic, I decided to try a thin ribbon drawstring, a trick that’s worked for me in the past on a strapless elastic top.  Since I already had a small channel at the top of the waistband from the topstitching, I cut a tiny hole there at each side of center front on the inside, and reinforced it with a little hand stitching around.


green wooly leggings 5


Then I used a little safety pin to thread the ribbon around.  When I’m wearing these, I tighten the ribbon to the fit I want, and tie it in a firm bow.  Sometimes by the end of the day, I get ever-so-slightly irritated by the one fairly tight, unmoving place around my hip.  But would I gladly trade that for leggings that stay up all day, exactly where I want them, with no dropping crotch?  Yes, yes I would, quite happily.  And when I make another pair, I may experiment with some stronger elastic at the top.

This fabric is mostly wool, with a little stretchy stuff, from The Fabric Store LA.  They have the best selection of fine wool knits I’ve found (also where I got the lovely stuff for these tops).  It’s a bit vague on the site whether or not their swatching service is up and running, but it totally is, just call them and tell them what you’re looking for.  Last time I got a generous selection of organic wools and leggings-appropriate fabrics.  I went with the pattern recommendation of minimum 5% lycra/spandex added, and chose this green with black, double layer knit.  This is about as thick a fabric as I would use, as you can’t avoid a few wrinkles around the knees, etc., but they’re wonderful to wear!  I love the slightly plush inside of this fabric, it makes the leggings even cozier and comfier.


green wooly leggings 6

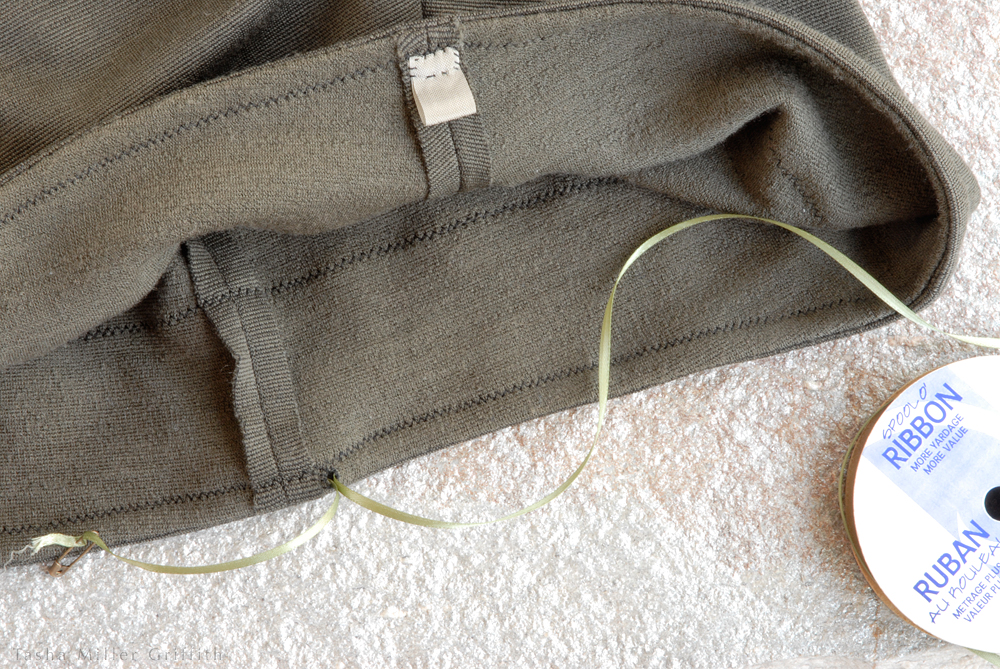
Putting a little tab of ribbon at the back is another idea of Steph’s I like!


I’m definitely a sew-your-own-leggings convert.  A fit this good is hard to argue with.  After years of knowing that the only way to get pants/trousers to fit my legs & booty was to make my own, I’m kind of surprised that it wasn’t more obvious what a difference custom-fit leggings would make … but there you have it.  Plus they only take a yard of fabric (on me), have only one main pattern piece, and once you have the fit down they would make up lightning fast.  What’s not to love?

Update: for what I figured out about elastic at the waist in next versions, and making these from repurposed sweaters, click here.


Things I’ve Sewn: Blue Stripe Trousers


blue stripe trous and wool knits 1


So, after talking about these tops last time, it’s time to talk about the pants!  They’re more of a trouser style (which is good since folks on both sides of the pond can agree what “trousers” means, right?).  I bought this fabric last summer at Nob Hill Fabrics in Albuquerque.  I wasn’t 100% sure about it for trousers, but it looked promising.  In truth, I am not 100% sure about it for trousers now.  But, after the untimely demise of my fantastic purple corduroys (so sad!) I really needed a new pair of pants nice enough to wear at shows (in public where I am supposed to look somewhat professional, or at least not like a bum off the street).  The odds of my finding a pair to buy that fit and that I like are close to zero, so I pulled out the blue fabric.


A pattern epiphany

While I was cutting it, something pretty cool happened.  As I looked at the back waistband pattern, I got a sudden flash of insight: this piece is trying to take in too much curve, and it would be much better as two pieces, with a seam in the middle as well!  So I traced it into two pieces which matched the existing width at the bottom of the waistband, and took in a little more at the top.  If you do this, don’t forget to add seam allowances to the edges at the new seam!  This approach fit the shape of my body so much better that I ended up doing the same thing on the front, so that I now have four waistband pieces instead of two.  A step forward in fit.


pants waistband back pattern pieces


Fitting

This is the next evolution of the traced from-existing-pants-and-extensively-altered pattern I used to make the grey pair.  The main problem with those is that they are a little tight around the crotch seam, especially when I sit down.

I will say that I’ve gotten a lot better at diagnosing what needs fixing in the fit of my trousers in the last year or two.  At first, the fact that every part of the fit affects every other part made it nearly impossible for me to tell what I should change.  But now, after fitting a few pairs, when I try some on I can feel which seams need more or less fabric in order to be comfortable and fit my shape.  So I already knew (from wearing the grey pair) that I needed to let out the front inseam a fair amount.  I wanted to cut the fabric outside of the pattern to make sure I would have enough in that area, so I decided to trace with thread the outline of the pattern.  That way I’d be able to see where my new seam is in relation to the pattern, and transfer my changes back to it for next time (I can always add more paper to the pattern using this method).  This worked great, I could see right where the pattern line was as I worked on the fit.


blue stripe trous cutting inseam


So, I let out the front inseam until it felt comfortable, and then played around with the crotch seam and back inseam to get the look and fit I wanted.  I want the trousers to show that I have a bum, without hugging it too tight, and then drop into a wide leg somewhat reminiscent of 30’s style.  I got pretty close!  To be honest, I may have overdone it on the amount of added room around the inseams, these feel so comfortable that they border on I’m-wearing-my-pajamas-outside.  But when I put them on and sit down it’s sooo nice!


blue stripe trous and wool knits 3


Those back pockets

The back welt pockets are pretty sweet, yes?  This is something I’ve really been wanting in trouser-style pants.  I have one old pair of thrifted Gap wide-leg pants that has them, with little flaps on top too, and I love them.  I almost skipped them for this pair though, just because I was running a little short on time before we left for Texas, and I really needed to get these trousers done.  You know how sometimes, these decisions are made for you, just by the circumstances?  Well, as I got close to finishing the fit, two things became inescapably apparent: I could not figure out any way to get the tips of the back darts to look good (hidden by patch pockets in earlier pairs), and under some conditions, you could see the line of my undies through the fabric.  So, pockets it was, and since patch pockets don’t go with the trouser style I wanted … I basically just kept those Gap pants next to my sewing machine and figured out the steps from looking at them inside and out as I went.  Fortunately, I didn’t hit any major snags.  I have to admit, when I first tried the trousers on after finishing the pockets, my reaction was “no one told me they would look THAT cool!”  I have a few tweaks to make next time, but overall, those back pockets are probably my favorite thing about this make!


blue stripe trous and wool knits 5


Fabric verdict

I had a hunch when I went to add the pockets that it wasn’t the fabric being pulled tight that was showing my undie-lines, it was the fabric being just a little thin and just a little clingy.  I was right.  Now that the pockets are in, you can see that there’s plenty of room for them.  Sometimes you can see a shadow from the pocket lining, but that’s much better!

While this fabric turned out fine, next time I will look for some with just a little more body for making trousers.  I wouldn’t want it to be stiffer, just thick and soft enough to hold its own and skim over curves a little more.

And, did you notice it wrinkles like all get out?  I swear, I pressed the trousers before setting up to take photos, but 10 minutes of adjusting the camera, kneeling by the tripod in the sun and moving around, and it was pointless.  I do think that wrinkles are less noticeable in real life than they are on camera though.


blue stripe trous and wool knits 7


Have I mentioned before that fitting and sewing trousers is a journey, not a destination?  (Hint: yes.)  I’m glad to get these under my belt, and to have a new pair to wear in public this spring.  Happy May Day to all!


Me-Made Purple Corduroys—How Life is Like Fitting Pants

purple cords 1


Where to begin?  I think I could talk about these pants and all their glories and implications well past what you would read.  Well – I think I’ll begin with why they are purple, which will lead right into why they are fitted, which will lead right into why they are the best pants I’ve ever had.

So, a few years ago now, my aunt got this pair of purple corduroy pants, and for some strange reason I fell in love with them at first sight.  I’m not usually into purple, or brightly colored trousers, nevertheless I’ve wanted my own pair ever since.  I found 1 1/2 yards of, get this, lavender hemp and organic cotton corduroy on the NearSea Naturals clearance page!  (It had a “stain” on it, which washed right out.)  Update: although I love love love the idea of this fabric, the color of this fabric, and the resulting pants, the fabric is just not sturdy enough.  I got about a year of good-looking wear out of these before the corduroy pile started coming out, even with washing them inside out and not once putting them through the dryer, and that is just not enough for something I made.  If anyone knows of a source for sustainable, long-lasting fabric, please let me know!  The good news: all the work I did on fitting (keep reading) is already transferred to the pattern and waiting for me to find the next fabric! 

I thought this was the perfect amount of fabric.  I planned to make another pair just like my grey pants, even though I wasn’t sure that wide leg would be the best look for purple corduroys, I would figure out that fit first, and save more close-fitting pants for another day/next fall maybe.  Well – it turned out that all the wide leg pattern pieces would not fit on this much fabric.  To fit them in I had to narrow the legs quite a bit.  Well.  I just tapered the tops of the pattern pieces from the grey pants into the narrower legs, cut them out, and this is what I got.


purple cords fitting


Clearly those fabric saddle bag areas on the sides had to go straight away, that was the easy part.  Getting a better fit through the seat/inner thigh area took a lot more work.  Every day for weeks, my sewing time consisted of: ripping out and re-basting in a slightly different position some part of the crotch seam and/or inseam and/or side seam, trying the pants on, deciding what to rip out next (often the same part).  Although I worked on these only a little bit each day (partly to keep myself from getting frustrated and doing something hasty/stupid), I thought a lot about how life is like fitting pants.  The baking equivalent might be yeast bread, or even macarons.  There are a lot of variables, and each one seems to affect all the others, so that a small tweak in one area can change all kinds of things I would not expect.  But, if I just keep plugging away, trying things, seeing what happens, I will eventually reach a place where I am very happy with the results.


purple cords side


Well – I really could not be happier with this result!  Although I have tweaks to make in the next version (pants are clearly a journey, not a destination) they are the first pair I’ve ever had that really fit and flattered my figure, they’re incredibly comfortable, and I’m ridiculously satisfied with myself when I wear them.

If it wasn’t for the fact that things need washing, (Ok, and I do love skirts, and some days are for grubby clothes, etc.) I might conceivably wear these straight through until they wore out.


purple cords sewing table


Some sewing and fitting things I figured out while making them:

I took out all that extra I added to the back inseam of the grey ones, and then some.  Clearly a different fit requires a different shape.

See that diagonal wrinkle across the back hip in the first fitting?  I tried all kinds of things to get rid of that; letting out the side seam, unpicking the waistband and pulling the pants up, but nothing worked, until I saw something in Patternmaking for Fashion Design by Helen Joseph-Armstrong (which is one of my all-time favorite sewing books, expensive but worth it, I asked for it for Christmas one year).  It was one of my cousin’s textbooks at FIT in San Fransisco, and it shows you how to draft a pattern for just about anything you could ever want to make, plus all kinds of construction techniques.  It’s designed more for the fashion industry that for home sewers, and there’s not a lot about fitting, so I guess it says something that there is a section on pants fitting, where I found an illustration of a similar wrinkle with this note, “insufficient dart intake for dominant buttocks.”  That’s not how I’d like to think about my derriere, but the part about the dart totally worked!  I had been leaving that dart alone since I fit it in the last pants, but clearly it’s not a good idea to start think of any part of the fit as “finished” when I am changing the rest.


purple cords back


purple cords edgestitching


I used my edge stitching foot for the first line of top stitching (with a size 100 topstitching needle, moving the needle slightly to the left), and it worked great!  It was much easier to get an even stitching line with that little guide riding right on the edge.  I am now trying to figure out how I can use a similar guide for for the second line of topstitching, further to the inside..  Anyone know of a foot like that?  I used two colors topstitching and I really like it, one pair of Bryan’s jeans has that look and I decided to try it out.


purple cords inside


I trimmed a bit of the waistband lining before applying the rayon ribbon to the bottom edge, next time I’ll trim a bit more, but I like this finish.

If the legs look a bit long, I left them that way on purpose.  I keep noticing that the hems of cotton pants tend to creep up just a bit over time with washing, usually after I fix them just how I want them.  I’m not sure what the shrinkage of hemp is, but if these don’t get any shorter after a while I can always hem them up a bit more.

By the way, the above shot of the inside waist is probably the closest I got to the actual color, for some reason this purple seems to be hard to capture.

That’s about it, I guess, unless of course you want to talk some more about sewing, body image, and the power of DIY, etc. . . . if you see me around, I’ll be wearing these pants, and feeling happy!


tasha in purple cord pants