How to Pick Up a Dropped Stitch in Knitting


dropped stitch drawing 1


I wanted to show you how to fix hole in a sweater (or other knitted article) and as I started putting words and pictures with how I do it, it became more and more obvious that knowing this first would be extremely helpful.  So, even if you don’t knit, keep reading . . .

A “dropped” stitch is one that falls off a knitting needle, or the thread above it breaks (like a run in stockings) so that it becomes disentangled from the stitch above it.

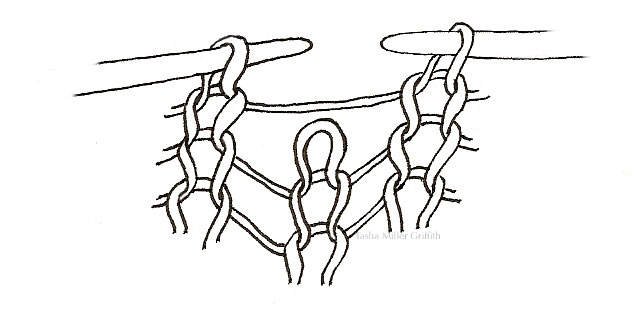
Knitting is just pulling loops through loops.  When one loop pops out of the loop below it, it releases into a long loose bar, and can easily cause a chain reaction.  But please do not panic, it’s almost as easy to pick those loops up again as it was for them to pop out in first place.


dropped stitches 1


If more than one column of stitches is coming undone, first find the last/uppermost intact loop of each column and stick something (like a safety pin or a piece of yarn) though it, to keep that column from unraveling any further while you work on the others.


dropped stitch drawing 2


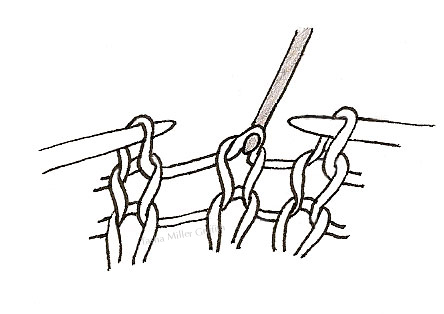
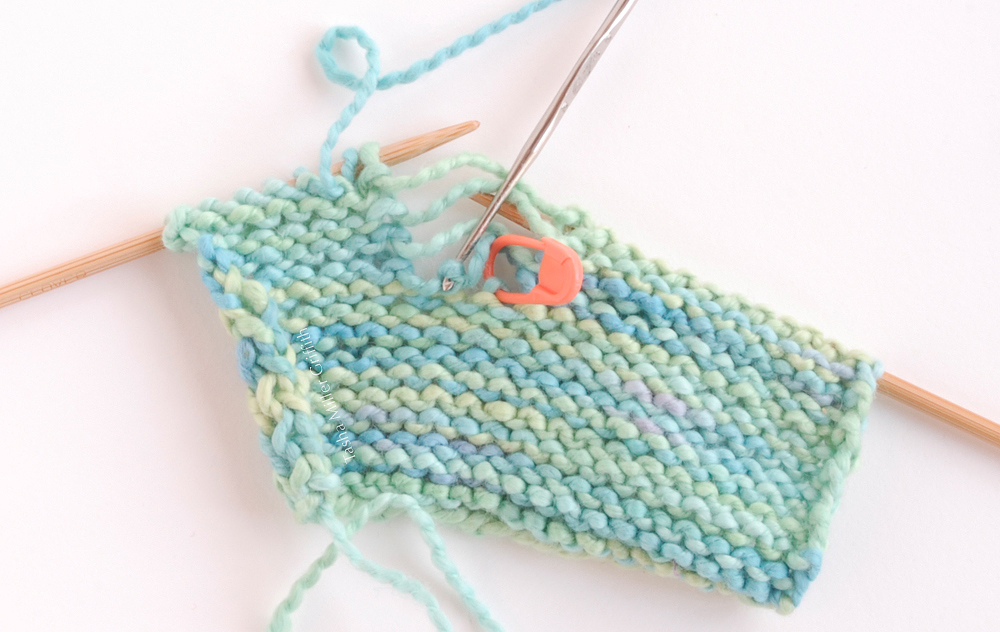
To pick up a stitch, get a crochet hook (mine is tiny – I found it in a heat vent in an apartment we rented in Madison, and it’s been in my knitting bag ever since – a little bigger one will probably be easier to work with).  Stick the hook through the last intact loop, grab the bar above that loop with the hook, and pull the bar through the loop.  It will form a new loop.  Ta da!  I think it’s easiest (and doesn’t cause twisted stitches) to have the hook facing down, grab each bar from above and pull it straight through.  This does mean you’ll need to take the hook out and stick it straight through the new loop to pick up another bar, if your stitch has dropped more than one row.


dropped stitch drawing 3


One refinement; knit stitches are loops pulled toward you, and purl stitches are loops pulled away from you.  So, to pick up a knit stitch, have the bar behind the old loop, and pull it toward you.  To pick up a purl, put the bar in front of the old loop, insert the hook from the back, and pull the bar away from you to make a new loop, as shown above.  That’s it!  Not only can you now pick up stitches, if you’re paying attention you’ll understand the fundamental structure of knitting, and the difference between knit and purl stitches.  Pretty cool, eh?


dropped stitches 3

dropped stitches 4


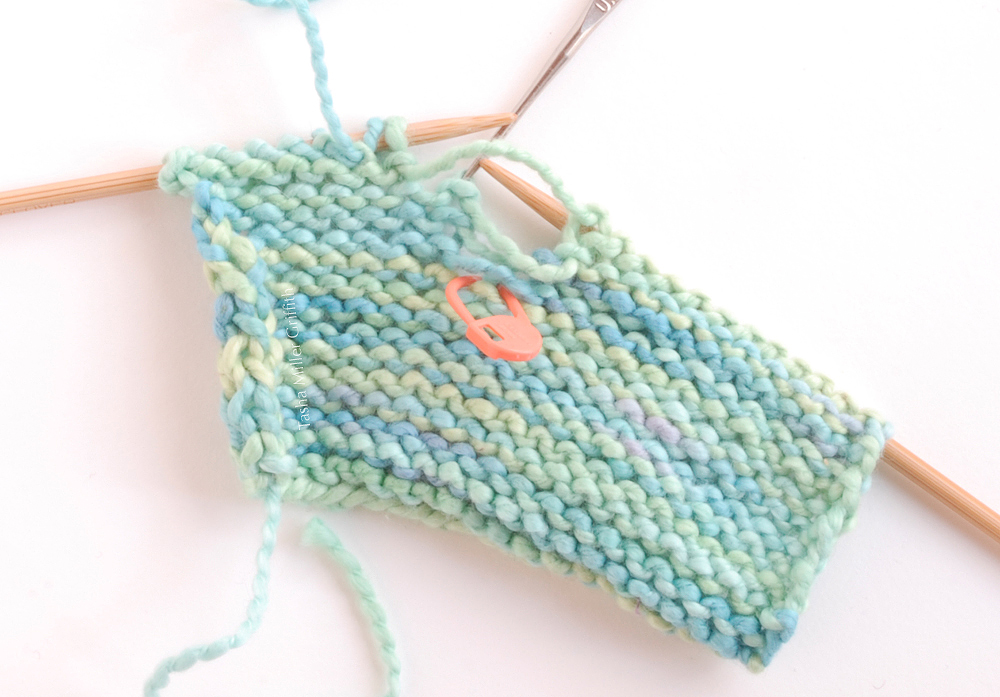
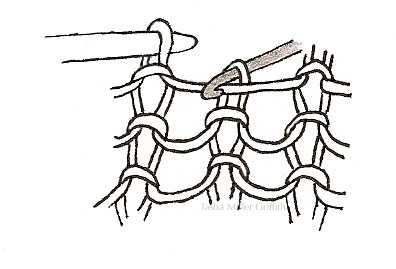
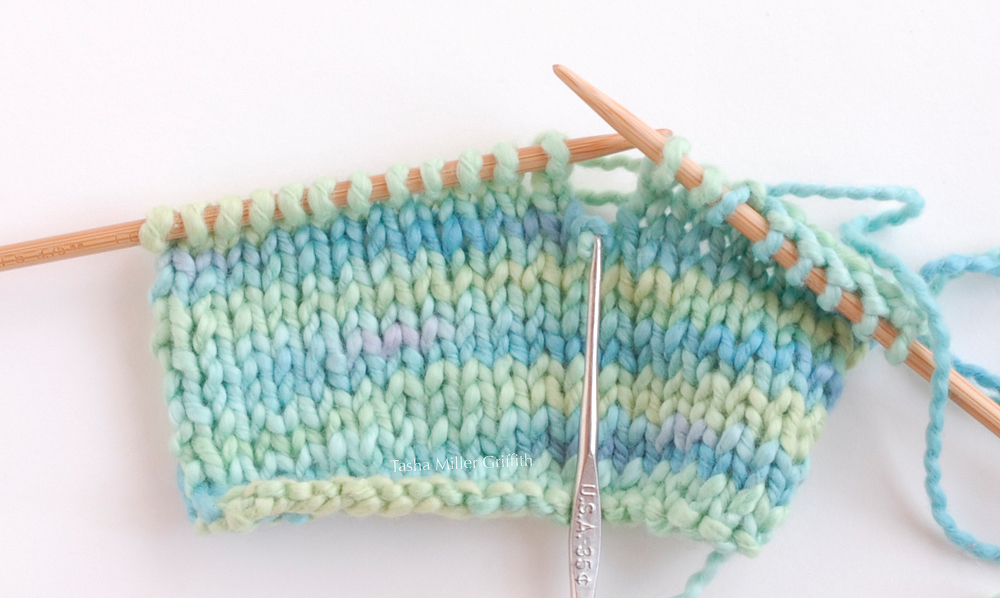
If you’re working with a bigger area of dropped stitches, pick up one column at a time by making a new loop from each bar, making sure to pick up the bars in their natural order.  Move them around with your finger and check which ones connect to the adjacent stitches where to make sure.  The two pictures above show picking up one column of purl stitches.  When you get to the top of a column, put the last loop back on whichever needle is convenient to continue working, you can rearrange them when you’re done.  Make sure that the loop is sitting on the needle the same way as the other ones which did not fall off – flip it the other way and check if you aren’t sure.


dropped stitches 2


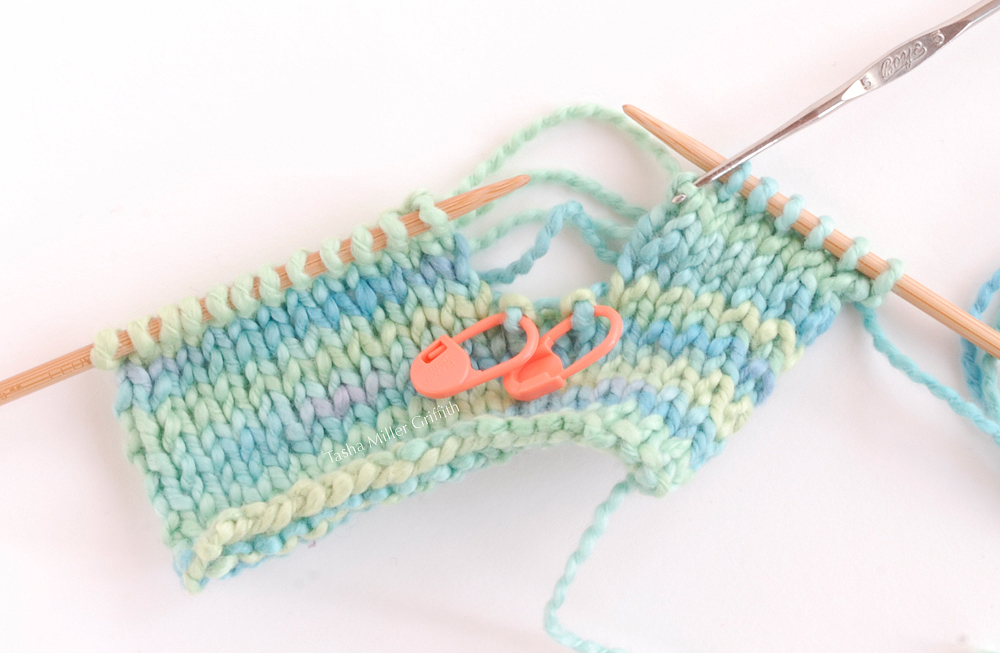
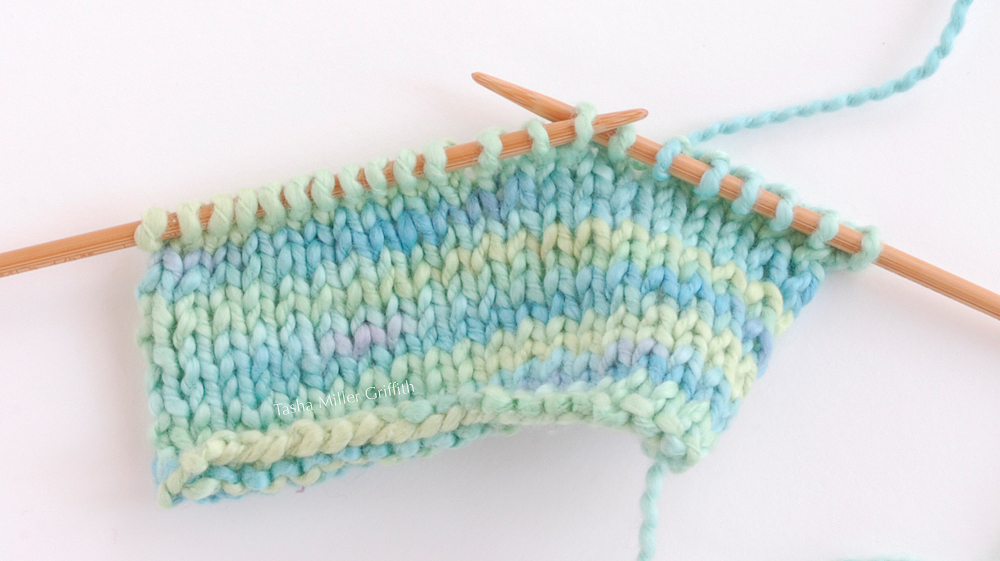
Move to the next column if there is one, and pick up the bars in order again, until all the top loops are sitting on the needles again.  Look to see where the yarn you are working with is coming from, this is always the last stitch you knit.  You may need to pass stitches which haven’t been knit on this row yet back to the left needle to get them ready to work.  Remember to pass them with the needles tip to tip, which won’t twist the stitches.  And we’re done!


dropped stitches 6


Now that dropping stitches and picking them up is not so scary, we come to the second great thing about knowing this: you can do it on purpose to fix other mistakes.  Say you look back and realize that three or four rows previous to where you are now, you knit a stitch when you should have purled it in your pattern.  Instead of ripping out all the stitches you’ve done since then, you can just drop the stitch directly above the mistake, and let it ladder down as far as you need.  Then, you can pick up each stitch as a knit or a purl, whatever you need to make your pattern right – and your mistake is fixed!


dropped stitches 5


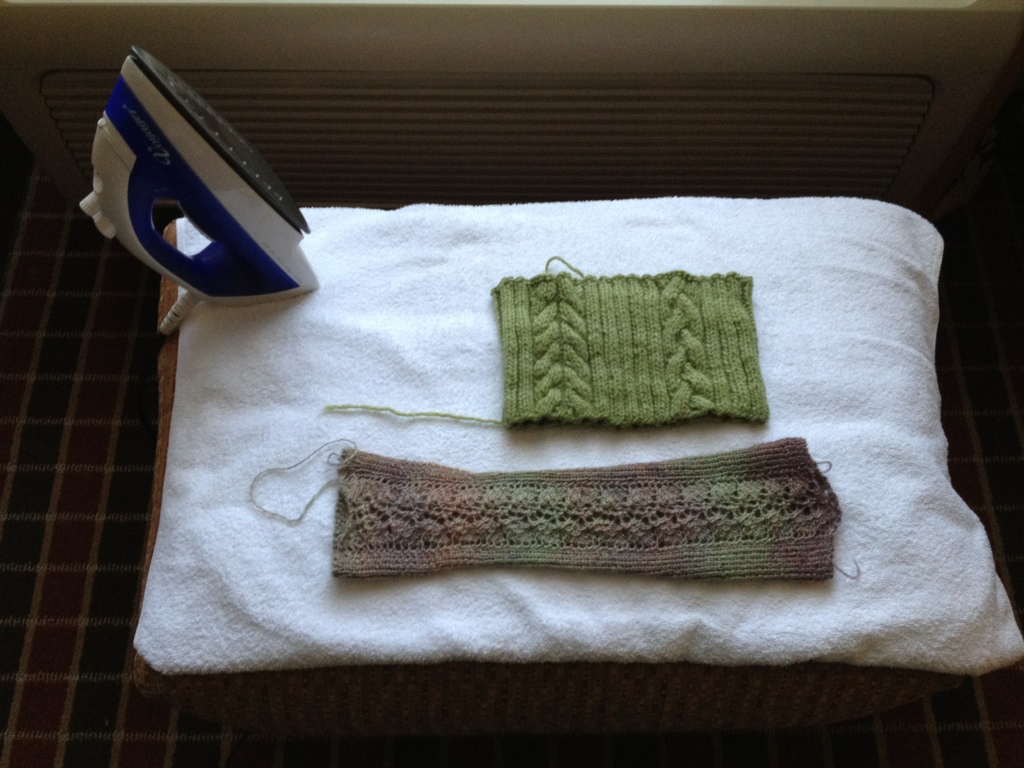
I was mostly done with the photos for this post, and wondering if they were clear enough, when I remembered that I already had drawings, scanned in and ready to go, from the handouts I make for in-person classes – a good thing!

If you have questions about this, or another topic you’d like to see featured here, just let me know.  Happy making!


Yarn as Jewelry


I bought this yarn at a tiny shop in Albuquerque’s Old Town years ago.  It’s hand spun, and there was such a tiny amount on the skein (which I didn’t realize at the time) not even enough for a whole hat!  I ended up using it in part of a hat for Bryan.

But, it’s totally gorgeous!  Just look at it, there are parts that are spun so tightly that it’s basically too much twist, but those parts also give it a bit of shine, and highlight the natural color variations.  I fell in love with it right away, and I was still in love with this little bit I had left.  At some point it occurred to me to wear it as jewelry.  To me this wool yarn is just as beautiful as anything else you might put around your wrist.  So . . .


If you’d like to make one too, it’s quite easy and quick, I made this one (including a small sample and pulling that out) while talking to friends and waiting for dinner!  Just be sure to use a very stretchy cast on and bind off, because the whole thing must stretch over your hand and still fit close around the wrist.  I like “Jeny’s Stretchy Slipknot Cast-On“, I’ve been using it for all kinds of things lately, as it looks good in addition to being super stretchy.  “Jeny’s Surprisingly Stretchy Bind Off” is a little bulkier, but perfect for something like this, or the top cuff of a sock, etc.

I wanted mine to fit close, so I used my wrist measurement minus 10%.  Multiply your desired size by how many stitches per inch you are getting in your yarn, and that’s it!  Mine is 20 stitches around at about 3 sts/inch.  The pattern is purl 3, knit 1, repeat until desired length, or until you run out of yarn like I did.

Bryan called this my “warrior sheep woman cuff”.  I’m, um, calling that a compliment!

What unusual things do you think are beautiful?  Would you like to display or wear them somehow?


Knitting Fall Projects

I started knitting a lot when I started traveling a lot with Bryan. Probably my favorite thing about knitting is still its versatility and portability – how one little bag of supplies can become a garment, and maybe more importantly, provide me with my “make something” fix anytime, anywhere.

On this trip so far I’ve been working on samples for two new classes I’m teaching at my local yarn shop this fall; a cable cowl based on the way my friend Birgitta taught me to knit cables, and lace fingerless gloves from a Churchmouse pattern.

20120912-074231.jpg

Morning light on my hotel room blocking. I neglected to bring pins, so steaming and stretching had to do for the lace. If I wet & pin it at home, I’m pretty sure I can get a little more openness in the leaf lace pattern.

20120912-074500.jpg

I’m definitely indulging my romantic side with these mitts. A student asked me, “But would you wear that?” “Yes,” I responded, “but I do agree that ‘would you wear it?’ is an important question to ask before you start knitting!” What I’ll wear them with is another question . . . This yarn is Jojoland Melody.

20120912-074841.jpg

The yarn for the cowl is Manos del Uruguay Maxima. I love Manos, and this one is dreamy soft with subtle color variations – a sure way to get my attention!

I’m also pretty excited about teaching this class, since Birgitta’s design is set up to make it easy to customize, meaning I can talk about how to play with size, gauge & placement as well as how to make cables!

20120912-075334.jpg

Very special thanks to Mellon Park in Pittsburgh for the backgrounds in this post, as well as being a really lovely spot!

About Gauge in Knitting

One of the things my knitting students have a lot of questions about is gauge, so I thought it would be a good topic for a post.  I am helped out on the visuals here by my aunt Kathy, who gave me a lot of this yarn (thanks Kathy!).  A LOT – I made all this stuff, gave 2 skeins to my friend Becca, and still have the ball you see left.  It’s been interesting for me, since I would normally not make several things from the exact same yarn.

Ok, so quickly, in knitting, gauge is: how many stitches per inch you are knitting.  It varies with the yarn and needles you are using, and with your individual tension, how you hold the yarn, so it will not be the same as the person sitting next to you, even if you are using the exact same materials.

A little math:

Imagine you are making a sweater.  If the pattern calls for 5 stitches to the inch, but you are knitting at 4.5 sts/in (knitters love abbreviations, have you noticed?) and you multiply that by the 200 stitches you need for your sweater.  What can seem like a small difference is suddenly 4″, the difference between it fits or it doesn’t.  It follows that the bigger and/or more fitted the project you are making is, the more important it is to know what your gauge is going to be before you start.  I nearly always make a sample square to test gauge before I start, a big one (maybe a foot square) for an important project, and a smaller one for something that’s easier to take out and start over.

How to measure your gauge:

Each “V” or tiny mountain is one stitch.  Line your ruler up with the starting line between two stitches.  Count the stitches (it helps to have a spare needle or something else smaller than your finger to count with).  If you count over more stitches you’ll get a more accurate measurement, especially if you have halves or quarter stitches in each inch, so count over 2″ or 4″ or however many you can in your sample, and then divide to get your number of stitches per inch.  When measuring, take your sample off the needles, or slide it onto the center cable if you are using a circular needle, or bind it off if you want to keep it.  You can see here how the needle is holding the stitches apart, taking the sample off changes the measurement by 1/2 stitch per inch!

If your gauge is not the same as the gauge in your pattern, you have a couple of options.  One is to try to loosen or tighten your gauge, usually by using a bigger or smaller needle.  If you knit loosely, there’s a good chance this won’t work very well, but you can tighten your stitches by keeping them packed closely together on the needle as you knit each one.  Use a finger on your right hand to keep them from spreading out, and thus using more yarn for each stitch.  This fabulous tip is from Stephanie Pearl-McPhee, by way of Cat Bordhi in her amazing workshop earlier this year (Sweet Tomato Heel workshop, from whence these socks)!

Your other option is to do a little more math.  If you like how your sample looks and think it’s a good thickness and drape for your project, you can figure out the finished size of your project by diving the number of stitches suggested in your pattern by the suggested gauge.  That will give you the size in inches, which you can multiply by your personal gauge to get a new total number of stitches.  Be aware that if you choose this option, you may have to make more adjustments as you go, you might need more or fewer decreases, etc.  Knitting lends itself to experimentation (and taking out small sections, then trying them again) so go for it!

Which leads me to my last point – gauge is all in how you see it.  Yarns knit tighter will yield a thicker and stiffer fabric, which might be great for a cowl that stands up on your shoulders and keeps you warm.  The same yarn knit much looser might make a lacy, drapey scarf.  Or it might not, depending on other characteristics like the fiber and the way it was spun.  Try a little bit and see!

If you are interested, here is the breakdown of the things I made and their gauge.  All were knit by me, the yarn is Fiesta Boomerang (100% superwash Merino, I looked it up and they still make it, although not in this colorway).  The small curved sample and the feet of the socks (which I knit along with a mohair & silk yarn, another awesome tip from Cat’s workshop) are both 5.5 – 6 sts/inch, which for my taste is about ideal for this yarn.  The legs of the socks (pre-that tip about squishing the stitches together) are about 5 sts/inch, or would be if they weren’t ribbing.  The tight square sample was made in preparation for the lace mitt (the tube-looking thing), the tightest I could get this yarn was 8.5 sts/in.  It did make a very firm and stretchy ribbing!  By the way, the gauge suggested on the label was 4.5 sts/in – I don’t know where they get those, but they are often way off what I think is reasonable.  A better guide is the weight of the yarn, especially if you are looking to substitute for another yarn suggested in a pattern.

If you think of anything I haven’t covered, feel free to ask!

Join a Colorwork Class

There’s still room in my colorwork knitting class tomorrow!  We’ll learn fair isle and intarsia techniques, or two ways to use two or more colors as you knit.  If you’re near Flagstaff, come out and knit with us!

To sign up, call Purl in the Pines (our lovely local yarn shop) at 928 – 774 – 9334.

Four Pairs of Hand Knit Socks Arrive in the Mail


Not the kind of thing that happens every day – a small miracle made possible by the connection between two people.

Two summers ago I took a chance, and let a customer leave my art show booth with two large felt bags in exchange for a small check and a promise to pay the rest a little bit at a time.  Over the coming months she restored a good piece of my faith in humanity.  We wrote back and forth a bit with the checks, I fixed her bag when the handles I had bought didn’t hold up to wear.  She and her family visited me again this past summer.

Then yesterday I got this package in the mail from her, she hadn’t written me beforehand, what could it be?

Four pairs of slightly felted hand knit socks.  Plus a lovely sweater that had shrunk too much, all intended for my recycled felt projects.  I have pretty small feet, those socks are going to get worn, and so happily, and then when they wear out they can be part of something else.

It’s the connections we make and the people we trust that give us beautiful unexpected moments.

Cat Bordhi – her Enthusiasm is Inspiring!

Ok, so I admit this is not the greatest picture, but this is me with the amazing Cat Bordhi!  I was lucky enough to take a workshop with her just yesterday.

She’s so open and generous in person!  To her, knitting is an ever-expanding horizon of both fascinating possibility and endless beauty.  And the enthusiasm this creates shines through in everything she does.  I am inspired not only by the myriad super-clever tips and tricks she has, but by her attitude, it reminds me to find the passion in what I do and let it show.   Thank you so much Cat!

If you knit and you have not checked out Cat’s ideas, you are cheating yourself!

Also special thanks to Michele, the owner of my lovely local yarn shop for hosting!