What Are We Doing Here Again Exactly?

Suddenly, after our Lancaster, PA art show, we had time off. That was weird in itself, since we spent all of August at home running around like mad chickens trying to get things done in time, then flew to Detroit, picked up the truck, drove to Pennsylvania, set up the show, etc.

So now, we are in part of the country I’ve only been to once before & know almost nothing about. After doing the laundry, filling up on water, etc., we set off to find something to do with ourselves, get some food & explore the surrounding towns.

20120906-091455.jpg

They still had peaches at Brook Lawn Farm Market – and apples, tiny pattypan squash and fresh lima beans! Oh for a stove! This time last year we were in the Pacific NW, doing 3 shows, hanging out with some of our dearest friends, and cooking up fresh delicious food together. Hard to beat that!

Despite the lack of close friends and cooking equipment, we pressed on, doing some more exploring.

20120906-091755.jpg

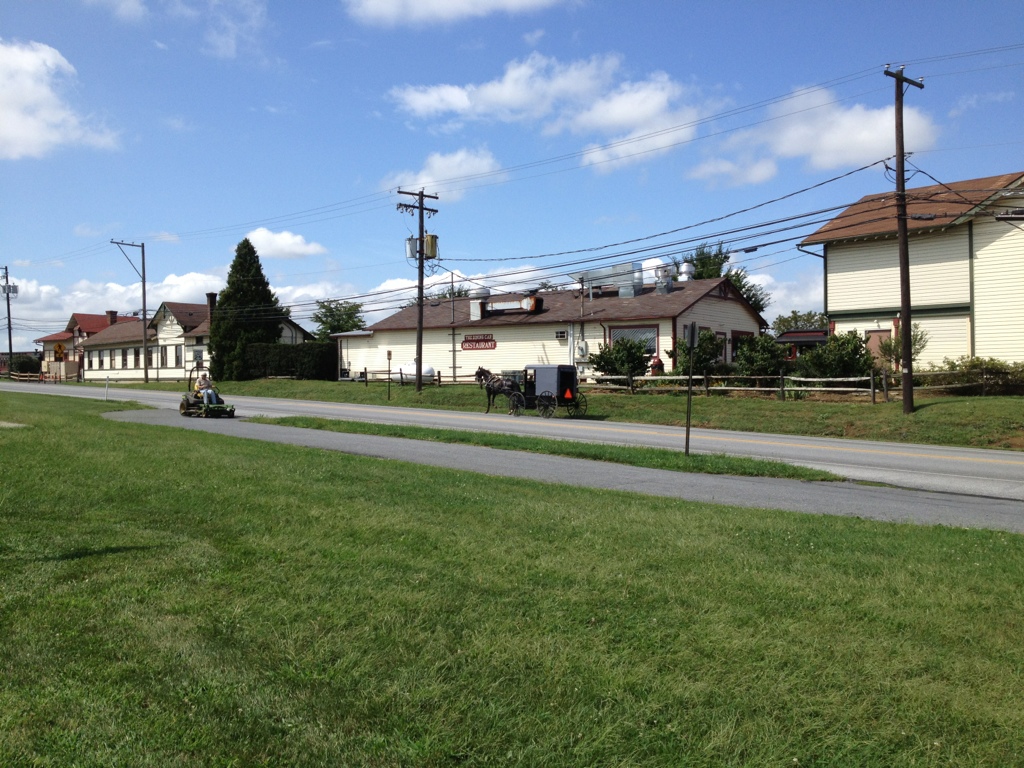
Are you sure we’re still in America?

We bought Bryan a guitar-lele for playing & composing songs on the road. He’s afraid I’ll be annoyed, but so far, staying up singing adds a fun & homey touch, especially when we’re camping out in the Wal Mart parking lot.

20120906-092610.jpg

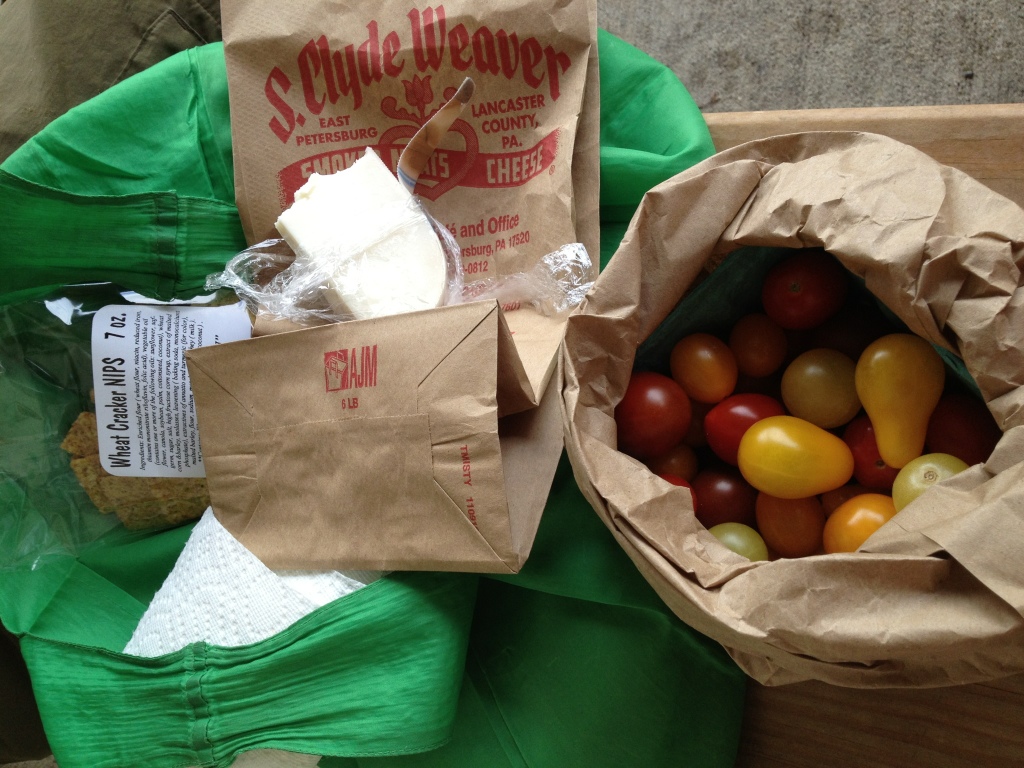
We visited the Railroad Museum of Pennsylvania – really interesting with helpful volunteers. Breaking slightly with our usual pattern of not leaving a museum until they kick us out, we left just before closing so we could make it to the Bird in Hand Farmer’s Market, where we settled on crackers and cheese to go with our tomatoes from the day before. Crusty bread was not available, but goofy T shirts were . . .

20120906-093438.jpg

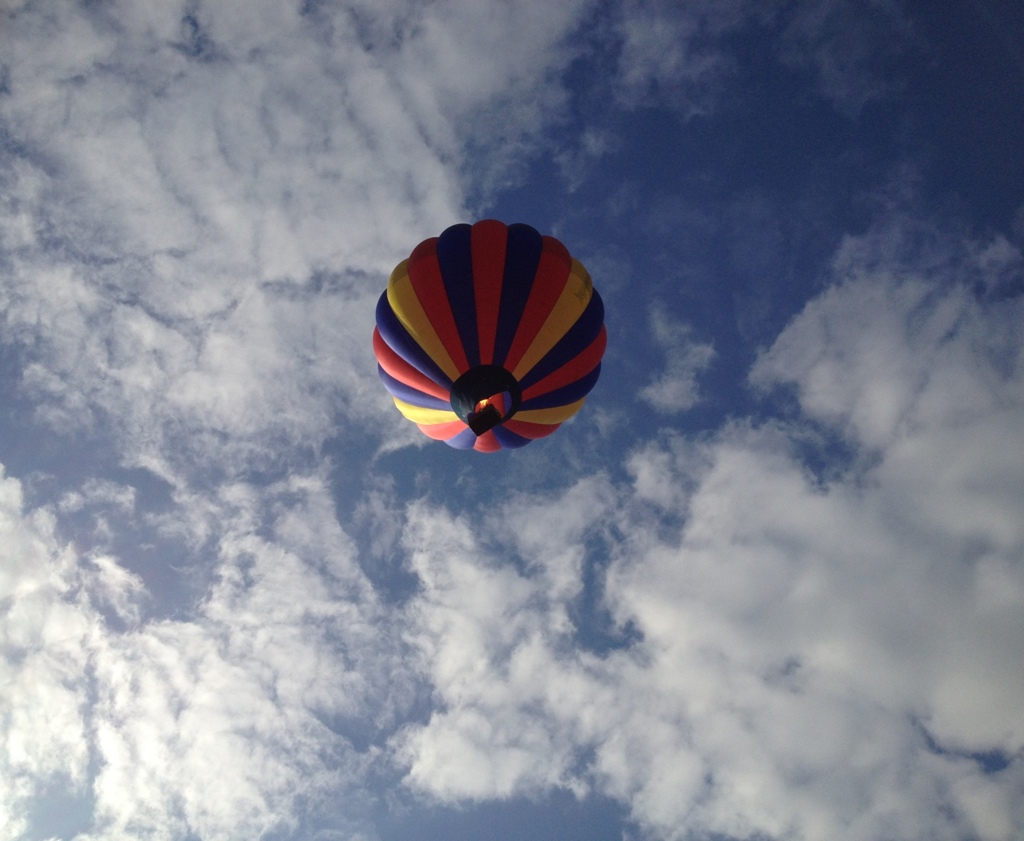
We sat outside and ate and watched the buggies and tourists go by. As we were getting ready to leave, this hot air balloon took off from the next field and went right over our heads.

20120906-093714.jpg

At this point in the year, I’m ready to get off the ride, go home where I can see people I know and play in my studio when I have free time!

But our travel time is not quite up for this fall, there are still a few adventures for us before we head home. We set up for another show this afternoon, so that ought to keep us busy for a few days.

In the meantime, if you hear some tinny guitar music coming from a little white box truck, come over and say hi!

20120906-095920.jpg

Preserving Watermelon, or what I took on our Trip to Michigan


This last month or so was the first time in a long time I got to really settle in at home in the summer.  To me, one thing that settling in means is buying a lot of fresh food, and cooking it up.  Plums just appeared at my farmer’s market a few weeks ago, and my husband loves watermelon.  Plus, I was testing out recipes for raspberry jam, in advance of picking black raspberries as they come into season at my friend’s secret raspberry picking spot.  So, I found myself about to leave town, in the phase known as “eat the fridge,” with a bowlful of plums, 3/4 of a fairly good orange watermelon, part of a jar of jam, etc.

At first this really bummed me out because I cannot stand to waste food, I pride myself on planning so that we’ll eat everything, and it seemed like a bit much to just chow down.

Then I got to thinking, isn’t this the original reason for preserved foods, because you can’t eat everything while it’s fresh?  The plums we’re pretty easy, canned into a delicious compote (more about that later).


Watermelon, though?  A quick search produced this article on The Hip Girls Guide to Homemaking and this one on Mother Earth News.  I basically followed their advice.  Cutting the watermelon into quarters longways definitely made it easier to slice it thinly, and to take out lots of seeds, although more appeared as it dried.  The flavor of these was actually really good, Bryan likened it to watermelon mixed with butternut squash.  I’m still on the fence about whether it was good enough to do again, mainly because it took forever in my oven, where forever is about 5 hours at 170° F, the lowest setting.  After letting it dry overnight, I had to heat it up again because cooled, it was stuck irrevocably to the broiler pan I used as a drying rack.  By the time it reached the “not tacky” stage recommended in Mother Earth News, it was a struggle to get it off the pan, even warm, without leaving about half behind.  The top photo has the most picturesque shreds.  If you happen to have a dehydrator though, it’s a no-brainer, you should definitely try some watermelon.


The thing that I’m most happy about this whole escapade though, was instead of seeing all the food we had as something that had to go before we left, I started thinking of it more like an ongoing process, that tied the food to our trip and to our return.  After I started thinking this way, I bought a loaf of bread, used part of it to finish up the jam, took part of it with us, and froze part to eat when we come back.  I’m looking forward to some French toast with plum preserves!

I’ve also been inspired to think about unconventional road food this summer by Kimberley’s series on The Year in Food.  As we sat on the plane, eating fresh bread, carrots & cheese (the last ones left in the fridge, washed and/or sliced and packed to go) and shreds of dried watermelon, I was a happy camper.  Having my own food, especially interesting food, definitely takes away some of the sardine can/cattle drive feeling of flying these days.

As I type this, we are getting ready to head over and set up for the Ann Arbor Art Fair, in 103° weather.  The dried watermelon is all gone, finished up at the last show.  But writing this post and thinking about our food adventures is putting me in a good mood, hopefully one that will last!

Take the Slow Road

When we’re cruising by on some interstate, all of America looks like a continuous chain of fast food and gas stations, and a background of changing landscapes.

Give me half a chance, though, a day or two when we don’t have to be somewhere in a particular hurry, and I will immediately choose the smaller highways, where speed is limited, giving you the added bonus of actually seeing the quirky shops, restaurants, and farm stands as they pass by.


The America we get nostalgic for is still out there; the lovely independent restaurants (Luisa’s Cafe in Harbert, MI was particularly good), the shops with hand painted signs you won’t find anywhere else, the local color and flavors that make each region unique (like this antique van? limo? parked at a fruit stand a little further up the Red Arrow Highway).


And then again, nothing makes me happier to be living in our current, fresh-food-abundant era than a taste of genuine 1950’s throwback road food.

It’s out there, go find it!

Home is in the Details

In the last week or so, our travels have shifted from camping and/or hotels to staying with a series of generous friends, family and extended family hosts.

I have been thinking a lot about what makes a place seem homey.  It’s the clean soft mismatched towels, the live plants, the smell of good food that’s been cooked, mixed with soap and lotion and a thousand other things that a hotel can’t replicate.  This feeling of home is so welcoming at the same time that it makes me homesick for our own little place.

One great thing about traveling is that it reminds me of all the things I should never take for granted; like ice, hot showers, and that smell of home.

Homemade Granola Bars


In part two of my homemade travel breakfast project, I made some more traditional granola bars – oats, nuts and dried fruit stuck together with molasses and honey.

I learned several things in the two versions of these I’ve made so far.  One is that honey is a much better glue than molasses.  The second is that smaller pieces of nuts, oats, etc. stick together better and are less likely to fall apart later.  Both of these are pretty much logically obvious now that I think about them, but as usual I opted for a more trial and error approach at the beginning.  I like to mix things together and see what happens.

Anyway, here is version 2:

DIY Granola Bars

Mix together in a bowl: 1 cup oats, coarsely ground; one cup walnuts, coarsely ground; 1/2 cup raisins, a pinch of salt.

Heat in a large skillet until warm and liquid: 2 Tablespoons molasses & 2 teaspoons honey.  Turn off the heat.

Pour the oat mixture into the skillet and stir until everything is coated.  Pour out onto a piece of parchment paper and shape into a round or square about 1/2 inch thick with your hands, spatula, rolling pin, etc.  Cut into bars, sticking any bits that fall off back to the outsides, and leave to cool and firm up.  Once they are holding together, you can transfer them to a rack and leave for a while to release any moisture trapped between them and the parchment, before packing them away in a tin or baggies.


These are holding up pretty well so far, they crumble a bit but you can stick them back together.

Adding more honey and less molasses would make a firmer bar, also good if molasses is not your favorite thing.  Bryan claims my current version is for molasses lovers only.  They taste good to me, but then I could eat it with a spoon!

You could also get a more robust bar by using more oats in proportion to nuts, as they seem to stick together better.  Again, this could become a platform for whatever nuts, fruits and spices you like and want to add!  I think these could be fun to make with kids as well, I may try it out the next time I see the nieces.

If you missed part 1, DIY Fruit and Nut Bars, click here or just scroll down to the previous post.

Enjoy!


DIY Fruit and Nut Bars


We’re headed to our next art show today (Brookside in Kansas City, MO) and along with my usual motley assortment of library books (shhh) and projects in progress, I’m packing two versions of these bars!

We eat a lot of Clif bars, Odwalla bars, Larabars, regular old granola bars, etc. for breakfast when we’re in the truck.  By the end of the summer if I never saw another one it wouldn’t bother me, with the possible exception of the Larabar type.  There’s nothing in those besides dates, nuts and spices, and of course they are also the most expensive kind, I usually don’t buy them unless they’re on sale.

This winter on our trip to Oregon I was sitting with our friend Becca when she came up with a brilliant idea – why not make them?  She was eating a bar made at the lodge where we were, which was mostly chunks of dried fruit and nuts held together with honey.  This seemed like such a good idea, and of course so obvious once she said it, it lodged in my brain and fortunately stayed there until I tried it out.

The first version had more dates, and fewer almonds, with none reserved for coating the outside.  It was good, but sticky, and even a little too sweet, despite the fact that there’s not any added sugar.  Here’s version 2:

Date and Almond Bars

Add 8 oz dried, pitted dates to a saucepan in which they barely fit in a single layer.  Grate on top: zest of one orange.  Pour in enough water to make about 1/8″ in the bottom of the pan, just enough so that all the dates have some to soak up.  Bring the water to simmer, then turn off the heat, cover the pan, and leave it for about half an hour, until the dates have soaked up the water and become soft and plump.

Grind 1 cup raw or toasted almonds to a coarse flour with some chunks remaining.  Grind a further 1/4 cup to flour without chunks.

Put the soaked dates in the food processor, and chop/grind until you have a thick puree.  I added a splash of Amaretto to the processor, totally optional, but adds a nice extra flavor.

Scoop out the date puree into a bowl or back into the pan, add the coarsely ground almonds, and mix together into a thick paste.  On a cutting board or parchment paper, sprinkle out about half of the almond four.  Scoop the date/almond paste on top of the flour, sprinkle more almond flour on top of it, and roll out like you would cookie dough to your desired thickness, using the almond flour to keep the bars from sticking to the surface or the rolling pin.

Cut into bars, use the extra almond flour that falls off to coat the edges, let dry for a few hours, and you’re done!


Seeing as how I was making my own fruit and nut bars, I also bought some figs, and made:

Fig and Pistachio Bars

Using basically the same procedure as the date and almond ones.  I needed to cut the stems off the figs, and they weren’t quite as juicy or sweet as the dates.

Add 12 oz dried figs (I used black mission), a little orange zest, about 1/3 of the orange (lemon would also be nice here), 1 Tablespoon of honey, and just a little water as before to the saucepan.

After soaking, there was still a little liquid left, so I brought the pan to a simmer again and boiled it off just for a minute or two, stirring, until it was more like a thin syrup that stuck to the figs.

When I was writing this up yesterday I forgot that I had used slightly fewer pistachios than I did almonds in the date bars, about 3/4 cup in the fig bars, but still 1/4 cup ground to dust the outsides.  This seemed to make sense because the figs were a little drier, and also because I ran out of pistachios!  Of course you can vary the amounts to your own taste and see what you like.

From this point process the figs and grind the pistachios just like the above recipe.


Maybe my favorite thing about this idea is that if I get tired of one kind, I can just add another variation, some spice or a different nut for a new flavor!  I’d love to know your thoughts, what flavor combos would be good?  If you try your own, how did they come out?

Travel tip – Smooth Wrinkles with Water


We are traveling today (I’m actually typing this in the Phoenix airport while waiting to fly home for about a week!) so I thought a tip you can use while traveling would be appropriate.

Have you ever noticed that a little water can make the most stubborn wrinkles relax?  When I’m at home, I usually spray on some water, and then use the iron to dry and flatten the wrinkled area.  When we’re on the road, I may or may not have an iron, or for that matter, a spray bottle.  But I can use a wet washcloth to dab on some water, or even smear it on with my fingers, then use my fingers to smooth and flatten the wrinkled part, and let it dry.  The water relaxes the fibers and gives the fabric some extra weight, making it easier to shape.

You can also use the same principle for clothes that are air-drying.  Smooth and shape the fabric while it’s wet, and you can often skip the ironing.

Happy travels!

On the Road Again

Today we hit the road for Texas, on the first part of our summer art show tour.  For those of you who don’t yet know, my husband Bryan makes a living selling his fine art photographs at juried art shows and gallery exhibits around the country.  In this very truck (stuffed mostly with photo, framing, and display supplies, with personal effects in the nooks and crannies) we make our way across America every summer.

It’s a crazy thing, full of much more hard work and being dirty, and much less glamor than people usually imagine when they’re in our booth.  But it does have its upsides: visiting friends around the country, spending time outside, seeing new places, and the freedoms of being self-employed.  (Freedom provided that you show up to set up your stuff at exactly the right place and time!)

My goal is for this blog to keep going no matter where we are.  While I won’t promise that an occasional urban adventure story or photo from the road will not creep in, I do have photos from my studio on my trusty laptop and I want to continue to bring you projects and tips for a handmade life, even a mobile one!

If you’re curious, I can also add a “Where am I?” widget to the sidebar, so you guys can see where I’m posting from as the summer goes on.

Happy trails to all!