Simple & Satisfying Broccoli Pasta

With Garlic and Chile Flakes


simple broccoli pasta


Basically, I’m still in the same food mode I was when I wrote about the savory tarts (and still making a lot of them!).  Some days I feel like experimenting, and I have been working on a few new recipes, and trying a few others.  But many days, I’m in the mood to make something that won’t take forever, and that I know I’ll like.  Like this!  Broccoli appeared in our CSA store a couple of weeks ago, and I know Bryan likes it, so I always get some when it’s there.  This is one of my favorite ways to eat it.  Add a salad, and you have dinner.  It’s quick enough that I will even bother making it for lunch, if there aren’t enough leftovers in the fridge.


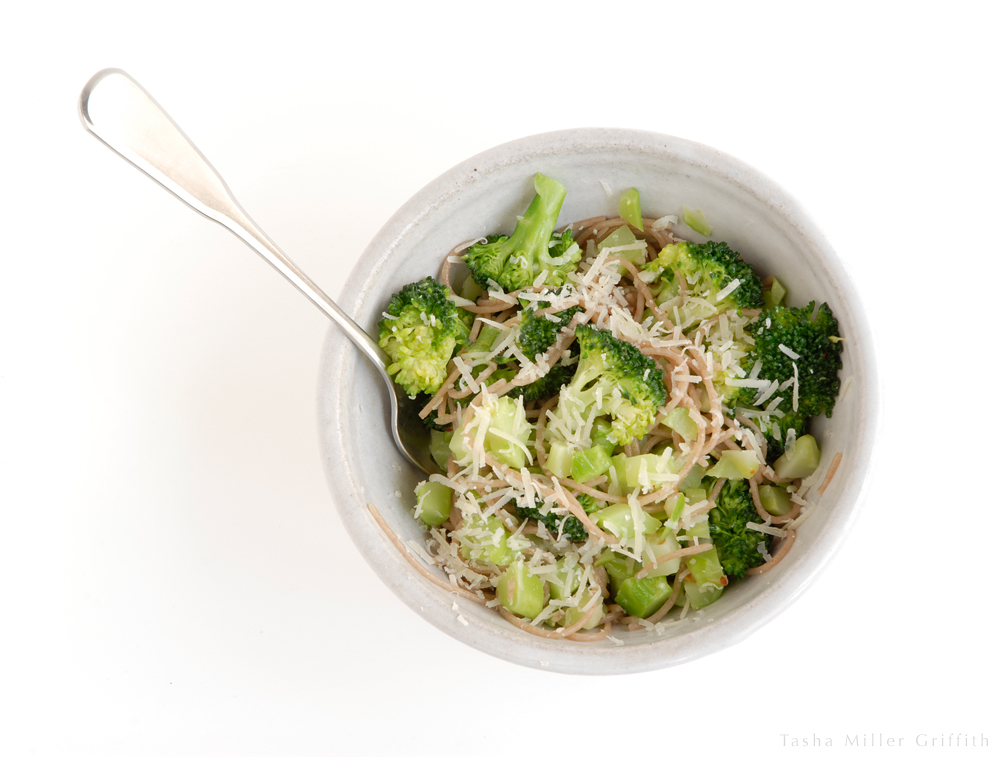
Simple Broccoli Pasta with Garlic and Chile Flakes

adapted from The Joy of Cooking


For dinner-size portions for two, start with two small or one large head of broccoli.  My second favorite thing about this recipe is that when I found it, I learned how to cook and eat the broccoli stems—it always seemed like a waste to just compost them.  The stems just take a bit longer to cook than the florets.  Cut off the florets, and cut them into about equal pieces.  Slice the stem into fairly thin rounds (leave out any of the bottom that seems too tough or stringy), and then dice up the slices.


chopped broccoli


Boil some water, to cook the pasta.  I like the deep nutty flavors of whole wheat or spelt noodles here, but then I like them with just about anything.  Use whatever kind of noodles you like.  For any even simpler gluten-free option, leave out the noodles all together, and serve the broccoli as a side.  The broccoli only takes a few minutes to cook, so you may want to cook the noodles first.  While you’re waiting you can mince a little garlic (I use about 1 small clove per head of broccoli) and grate some Parmesan, or other hard aged cheese of your choice.

To cook the broccoli, you will need a pan with a lid.  I keep a terrible, ancient skillet around because it’s the same size as my favorite one, and therefore functions as a convenient lid.  Add a generous amount of olive oil to the pan, and heat over medium.  When the oil is hot, add the chopped bits of broccoli stem, and sauté for a few minutes.  Then add the florets.  Stir, so that they all get a bit of oil, then pour in a splash of white wine if you have it, or water if you don’t, and cover the pan.

After a couple of minutes, lift off the lid.  The broccoli will have turned bright green.  At this point you want it to be slightly less done than your desired finished dish, taste some and see.  I like it about as far towards raw as I can get and still call it cooked.  When the broccoli is almost as done as you’d like, add the minced garlic and hot chile flakes to taste.  It can be subtle or spicy.

Let the garlic and chile cook for a minute or so, stirring with the broccoli.  The pan lid should be off at this point, to let any remaining liquid evaporate.  Turn of the heat, and add the cooked drained noodles to the pan, along with a little of the grated cheese.  Stir everything together, and add a bit more olive oil and/or cheese if it seems too dry.

That’s it!  Serve with a bit more grated cheese on top.


Simple Homemade Cheese – Goat Cheese and Paneer too!


My friend Tom comes up with some good ideas sometimes (shh – don’t tell him!) especially when it comes to food.  The other day he appeared at my house with some goat cheese he made.  I have been making fresh paneer cheese for Indian food for a while, mainly because we live a fairly small town and (to my knowledge) you can’t buy it here.  So, I already had a method for fresh cheese that’s pretty foolproof and I know works with a variety of different ingredients, and thanks to Tom’s idea, I tried it with goat milk too, and it worked great!  I got a soft fresh goat cheese.

I first learned this method from reading the paneer cheese directions in Laxmi’s Vegetarian Kitchen by Laxmi Hiremath, my favorite Indian cookbook.  Since then I have figured out a few tricks and variations.  One thing I love about this way of making cheese is that you don’t need anything you don’t already have in your kitchen or can’t easily get.  And there’s only one thing you need to know that may not be obvious if you’ve never made cheese before – read on.


fresh cheese 1


Recipe Sketch: Simple Homemade Cheese

Start with milk.  You can use whole or low-fat, cow or goat etc.  If you can get small-batch pasteurized, or non-homogenized milk, it will make a big difference in the texture of the curds and the cheese, for the better.  We used to get local dairy milk in glass bottles in Madison, which worked great.  Organic Valley has a non-homogenized “grass milk” I can get here, which also works great.  Don’t worry if you can’t find anything other than ultra-pasteurized milk though, you can still make cheese!  The only goat milk I could get was homogenized and ultra-pasteurized, and it still worked, as you can see.

Put the milk in pot with room to spare.  You can use whatever portion of milk you happen to have left in the fridge.  Most of what’s in milk is water, so be prepared for to more to become whey than cheese.  I used 1 quart of goat milk and got just over 5 oz of soft cheese, a ball about the size of my fist.

Heat the milk until it starts to boil, stirring occasionally.  Stay around the kitchen for this part, even though it will take a little while for the cold milk to heat, because as soon as it starts to boil it will want to boil over!  I like to put away the dishes or something while I’m waiting.

Also while you’re waiting, get out something acidic to curdle the cheese.  You can use fresh lemon or lime juice, or yogurt, cultured buttermilk, or even vinegar.  Each one will give a little different flavor to the cheese.  One of my favorites is a little lime with a little buttermilk.  Use whatever you have and experiment to see what you like best.

When the milk starts to boil, turn it down to a simmer and add a little bit of your acidic substance of choice.  Stir and wait for about 30 seconds, then if nothing is happening, add a little more acid, stir and wait again.  At some point a separation will occur, instead of milk you’ll have solid curds and translucent whey (yup – little miss muffet).  This is the key to knowing if the separation is complete, the whey will be yellowish and almost clear, you will be able to see distinct white curds floating in it.  The curds may be tiny flakes or huge globs, depending on the milk, but all the white milk solids will be in them, and they’ll be floating in the translucent whey.  I could have sworn I had a picture (from my not-well-lit kitchen) of what it looks like when the curds are huge, but I can’t find it anywhere.  I’ll take one next time it happens.  For this goat milk the curds are tiny.


fresh cheese 2


Once you have curds and whey, turn off the heat and let them rest for a few minutes while you get ready to drain the cheese.  Put two layers of cheesecloth (yup – that’s why it’s called that) in a colander.  If you want to save the whey, put a bowl under the colander.  You can use the whey instead of milk to make pancakes, etc., as a soup stock, or to make other kinds of cheese.

Pour the curds and whey into the colander.  If you want to make a firmer, sliceable cheese, add any flavorings you want at this point, while you can still stir them into the cheese.  For soft cheese you can do it later.  In any case, then gather up the edges of the cheesecloth and tie it together, so that the cheese continues to drain.  I have a long, plastic coated twist tie that I use, one end is twisted into a loop that goes over my faucet, and I twist the other end around the cheesecloth and let it hang it the sink, still inside the colander.  You can also tie the cheesecloth to a wooden spoon or other tool laid across the top of your colander.  You just want the cheese in its cloth to be suspended so it continues to drain.

fresh cheese 3


That’s about it!  Leave your cheese to drain for an hour or more, depending on how firm you like it to be.  If I’m making paneer I want it to be sliceable, so I’ll leave it longer than for soft goat cheese.  You can always open the cheesecloth and check to see if it has reached the consistency you want.  If you’d like it to be firmer, just tie it back up and leave it to drain a little longer.  You can also press the cheese after draining, between two plates with something heavy on top, and leave it in the fridge like that for a few more hours to make it even firmer.  So like I said, lots of options.

Ta-da! Cheese!  You can now scoop it out of the cheesecloth and into a bowl or container to save it.   For soft cheese, you can stir in a little salt or any herbs you would like to add to the flavor.


fresh cheese 4


So there you go, I hope that’s enough to get you started on your own cheese-making adventures!


Ratatouille


This time of year, at least where I live, the market is simply overflowing with fresh veggies.  While the fruits seem to come in a relatively orderly sequence, one replacing another, the vegetables apparently just multiply, more kinds, more flavors, more colors, every week until the frost.

So, a perfect time to make something delicious out of them!  Something full & rich with the flavors of all the late summer bounty.

Ratatouille

Makes enough to feed 4 as a main course

Chop into large chunks (see the next post):

2 medium summer squash; zucchini, crookneck, etc.

2 smallish bell peppers; red, orange, yellow or purple

1 medium yellow onion

4 small or two larger eggplants

1 mildly spicy chile (optional but really good) If your chile happens to be already roasted, add it with the tomatoes.  Otherwise, keep it with the peppers, squash and onion.

This many veggies will not fit in my largest skillet in anywhere close to a single layer, meaning I know they won’t all brown on the edges.  So, I put the chopped eggplant on a baking sheet and toss with a little olive oil, and roast it in the oven at 375° F until soft and slightly browned, about 30 minutes.

Meanwhile, chop the other veggies and put them in a large heavy skillet on high, with more olive oil, enough to keep them from sticking.  Stir occasionally, letting the surfaces of the vegetables get a nice medium brown.

While the veggies are cooking in the skillet, also chop:

4 -5 large tomatoes chopped roughly, or a little more than a pint of small ones cut in half

3-4 cloves of minced garlic

When the veggies in the skillet are just about browned, add the eggplant to them.  Make a clear space in the center of the skillet, add a drizzle of olive oil, and put the garlic in it.  When the garlic just starts to color, mix it in with the rest of the veggies, and add the tomatoes.  Turn the heat down and cook until the tomatoes start to collapse.

That’s it!  Serve with a generous portion of fresh basil (fresh oregano is also nice, although I like basil best), and a few grinds of black pepper on top.  You can salt to taste as well.


This recipe is delicious with risotto, or any cooked grain with a little cheese mixed in, or just with bread and cheese for lunch.


Chard Phyllo Pie, and Experimenting in the Kitchen


Years ago I took an Indian cooking class with my mom at our local community college.  Although none of the recipes from the class became my favorites, the instructor said something which I found wonderfully liberating – use what you have.  If a recipe calls for one vegetable or spice you are out of, just try it with something similar or something you think will taste good.  Sometimes, especially when you are cooking something from a culinary tradition other than your own, it can be easy to think you have to have exactly everything the recipe calls for, in exact quantities.  However, that’s, um, never actually true!

I have been thinking about this lately and wondering how to talk about it here, especially since reading this truly stellar piece about everyday cooking on The Yellow House.  One of the true keys to this kind of culinary freedom and weekday luxury is being able to make something with what you have on hand.

For example, the other day I had chard (thanks to my aunt Barbara, who brought some from her garden all the way to Flagstaff in her cooler!), and phyllo dough, but no kind of cheese I would normally use to make spanakopita.  But I did have a large chunk of Beemster Graskaas (creamy Dutch cheese), and a bit of leftover sharp cheddar.  Hmm, I thought, this may not come out so great, but I think it’s worth a shot (embracing the possibility of failure is essential here).

Well, after a couple of bites, I looked at Bryan and asked, “What do you think?”

“I think I like it better than regular spanakopita.” he said.  So did I!  Keep in mind that our normal spanakopita recipe has been a staple in our house for years now.  This one definitely has more of an American comfort-food feeling, deliciously so.


Chard Phyllo Pie


Makes one 9 x 12 pan, or similar size

Preheat oven to 375° F

1 bunch spinach, kale, chard, or un-identified green from CSA (as long as it’s the kind you cook)

Wash and stem this, my favorite method is to grab the stem with one hand and pull the leafy stuff off with the other hand.  Put the stemmed greens in a pot with a steamer basket and some water in the bottom.  Bring the water to a boil and then turn it down to medium – low heat, let the water simmer until the greens are bright green and relaxed.

Meanwhile, finely chop ½ of one yellow onion and 2 medium garlic cloves

Saute the onion in a litle olive oil over medium heat in a small skillet or pan until it just starts to have a golden color.  Add the garlic and stir and cook for about another minute.

Scrape onion and garlic out of the pan into a bowl.

When the greens are ready, turn off the heat and let them cool for a couple of minutes.  Use tongs to transfer them to a food processor and pulse until pureed (or how you like them).  Add them to the onion bowl.

Also add to the bowl:

–       About 8 oz creamy Dutch cheese (the whole point of this post is to try whatever cheese you like/have!)

–       A little sharp cheddar cheese, or another kind that will add a little more punch to the cheese flavor

–       4 eggs

–        A few grinds of black pepper

–       A pinch of salt

Mix this all together.

Melt (I like to just drop it in the onion pan) 2 Tablespoons butter

Get out your thawed frozen phyllo dough

You may need to cut the phyllo sheets in half. If so, tightly wrap what’s left and put it back in the fridge.  Working quickly, brush a little butter in the pan, lay down a sheet, lightly brush it with butter, lay down the next sheet, etc. until you have used 8 – 10 sheets or half your stack.  Spread on the filling, then repeat with the rest of the phyllo sheets.  If you have some butter left, spread more on the top sheet or two.  Cut the spanakopita into pieces through the top layer of dough, then put in the oven and bake until the top is golden and the filling looks solid where you cut it, about 40 minutes.  With this version the filling will be a little more moist & creamy, definitely let it cook until the top is a rich golden brown.  Let cool for a few minutes, cut through the bottom, and enjoy!


Not every culinary experiment will produce results you want to note down and make again.  But, with just a little practice cooking with what you have & what you can find, every day can be fresh, wholesome, creative – in other words, a small miracle of food at your fingertips.


Preserving Watermelon, or what I took on our Trip to Michigan


This last month or so was the first time in a long time I got to really settle in at home in the summer.  To me, one thing that settling in means is buying a lot of fresh food, and cooking it up.  Plums just appeared at my farmer’s market a few weeks ago, and my husband loves watermelon.  Plus, I was testing out recipes for raspberry jam, in advance of picking black raspberries as they come into season at my friend’s secret raspberry picking spot.  So, I found myself about to leave town, in the phase known as “eat the fridge,” with a bowlful of plums, 3/4 of a fairly good orange watermelon, part of a jar of jam, etc.

At first this really bummed me out because I cannot stand to waste food, I pride myself on planning so that we’ll eat everything, and it seemed like a bit much to just chow down.

Then I got to thinking, isn’t this the original reason for preserved foods, because you can’t eat everything while it’s fresh?  The plums we’re pretty easy, canned into a delicious compote (more about that later).


Watermelon, though?  A quick search produced this article on The Hip Girls Guide to Homemaking and this one on Mother Earth News.  I basically followed their advice.  Cutting the watermelon into quarters longways definitely made it easier to slice it thinly, and to take out lots of seeds, although more appeared as it dried.  The flavor of these was actually really good, Bryan likened it to watermelon mixed with butternut squash.  I’m still on the fence about whether it was good enough to do again, mainly because it took forever in my oven, where forever is about 5 hours at 170° F, the lowest setting.  After letting it dry overnight, I had to heat it up again because cooled, it was stuck irrevocably to the broiler pan I used as a drying rack.  By the time it reached the “not tacky” stage recommended in Mother Earth News, it was a struggle to get it off the pan, even warm, without leaving about half behind.  The top photo has the most picturesque shreds.  If you happen to have a dehydrator though, it’s a no-brainer, you should definitely try some watermelon.


The thing that I’m most happy about this whole escapade though, was instead of seeing all the food we had as something that had to go before we left, I started thinking of it more like an ongoing process, that tied the food to our trip and to our return.  After I started thinking this way, I bought a loaf of bread, used part of it to finish up the jam, took part of it with us, and froze part to eat when we come back.  I’m looking forward to some French toast with plum preserves!

I’ve also been inspired to think about unconventional road food this summer by Kimberley’s series on The Year in Food.  As we sat on the plane, eating fresh bread, carrots & cheese (the last ones left in the fridge, washed and/or sliced and packed to go) and shreds of dried watermelon, I was a happy camper.  Having my own food, especially interesting food, definitely takes away some of the sardine can/cattle drive feeling of flying these days.

As I type this, we are getting ready to head over and set up for the Ann Arbor Art Fair, in 103° weather.  The dried watermelon is all gone, finished up at the last show.  But writing this post and thinking about our food adventures is putting me in a good mood, hopefully one that will last!

Recipe Sketch – Summer Tomato Bruschetta

About time for a post about food, don’t you think?

Although I haven’t had very many opportunities to cook on the road, we’re coming up on the part of summer where there is so much fresh lovely produce, it hardly needs actual cooking.  We found some local heirloom tomatoes last week in Maryland, although they are from the hothouse, they put me in mind of late summer bounty.

Bruschetta is one of those foods that doesn’t need much of a recipe, you can vary it infinitely to suit your taste and what’s available.  It’s also easy to present in a variety of ways; either everything mixed together to spoon on toast, or all the ingredients laid out for everyone to layer on their own.  If you are just learning to cook, it’s a wonderful way to experiment with mixing flavors and proportions.

Summer Tomato Bruschetta

I like the bulk of mine to be tomatoes, the fresher and more colorful the better.  Any size will work, bigger ones cut into smaller pieces will make the bruschetta more juicy than baby tomatoes cut in half.

I also like a lot, a lot of basil, it’s one of my all-time favorite favors.  When we rented in Madison I would get a few little basil plants at the farmers’ market in the spring and keep them going though the season.  If I’m mixing everything together, I stack the leaves, roll them up, and slice the roll into strips to sprinkle in.  If you are setting things out buffet-style, whole leaves are fine.

This is tasty with cheese, but don’t feel limited to mozzarella!  Try any kind you like, or what’s locally available where you are.  My favorite recent find was a goat cheese with the soft texture of brie.  I like not too much cheese, not to overwhelm the tomatoes, but of course you can vary it.  A soft cheese will blend more with the other ingredients, especially if you mix it all in a bowl.

A little olive oil, balsamic vinegar, salt and pepper will really bring the flavors together.  You can set them out if you are doing make-your-own, and drizzle them on top.


A feast so simple to make, you can enjoy it in your hotel room.

Here’s to the coming joys of summer!