Pistachio Pesto


Apparently, it took me all the time since pine nuts were suddenly out of my price range (years!) until this year to figure out that pistachios are the pesto substitution nut to beat all others.  I’m amazed.  It’s so obvious once you taste it.


pistachio pesto 3


It also took me a little while (but not nearly as long) to nail down some quantities for this recipe.  I get in this funny mood sometimes when I’m cooking by taste, where I just want to, um, cook by taste.  Any attempt to quantify what’s going on feels like an unwelcome intrusion of thoughts that might be interfering with my creative process. It’s funny because I’m also a fairly obsessive note-taker.  I guess it’s just hard to take the notes at the same time I’m making the thing … in any case, I tried a few times, and finally got it close, I think.

The worst that could happen is that you’ll also need to make and eat a few batches to nail down the proportions you prefer … that’ll be terrible I’m sure.


pistachio pesto 1


Pistachio Pesto

Makes about 4 servings, enough for each person to have on top of ratatouille (which is fabulous!) or pasta.  Any leftovers are delicious just spread on bread.

I’m convinced that the food processor was invented by someone who needed to make big batches of pesto in a hurry.  It pretty much the perfect tool for this.  Combine in the bowl:

pistachio pesto 41 level cup shelled unsalted pistachios

1 1/2 cups very well packed basil leaves

1/2 cup grated Parmesan Reggiano 

2 large or 3 small garlic cloves

A generous drizzle of good quality extra virgin olive oil

A sprinkle of black pepper

Process until you get close to the texture you want.  Taste and adjust.  I usually end up adding a little more olive oil partway through, even though I prefer it slightly chunky and not too oily.  I find it salty enough from the cheese, but of course you can also add a little salt if you like.  I predict that if you try it, you’ll be converted, the taste is worth the shelling!


pistachio pesto 2


Asparagus Tarts for Spring and Early Summer


asparagus tart


Posting this recipe feels kind of, sort of, almost like cheating. It’s a variation on the savory tart/quiche recipe I’ve been using all the time since this past fall. With the late spring in the Midwest this year, there’s still a lot of asparagus around, and I’d have a hard time thinking of anything easier and more satisfying to do with it than this. I made the tart shown here with about a pound of asparagus, and some fresh thyme. A week or so later, I made another one for a new friend who’s eating gluten free, without the crust, with slightly less asparagus, and adding some leftover potatoes and onions. This really is one of those recipes (my favorite kind) that encourage experimentation and new flavor combinations.


Asparagus Tart Variations


Refer to the original recipe for the cornmeal crust, if making a crust, and more filling ideas.

For the asparagus, either broil it lightly first for more smoky flavor, or simply wash, and chop it into approximately equal diagonal segments, discarding any tough or dried out ends.

Optional: prepare potatoes as for the potato and green chile tart, or use any other leftover cooked potatoes you happen to have around.


For the Filling:

4 eggs

A generous splash heavy cream or milk

A few Tablespoons grated cheese (I like a hard cheese such as Parmesan)

Fresh ground pepper

(Salt is optional, depending on your taste, and saltiness of cheese)

Fresh thyme or other fresh herbs to taste (Tip: if the stems are sturdy enough, you can get most of the thyme leaves off by grabbing the stem near the top and running the fingers of the other hand down the stem from top to bottom.)

Feel free to add an extra egg, and a little more of the other ingredients, if it seems like there’s not enough filling for the veggies you have.

If not using a crust, make sure to grease your pan thoroughly.

Mix the cut asparagus (and potatoes) in with the filling, and pour into the pan/crust. For the second variation, I sprinkled the top with minced garlic and more Parmesan, which puffed and browned as the tart cooked for a tasty crispy top.

Bake at 375° F for about 40 minutes, turning once, until the tart is golden on top, puffed up, and just moist inside when tested with a knife.


Simple & Satisfying Broccoli Pasta

With Garlic and Chile Flakes


simple broccoli pasta


Basically, I’m still in the same food mode I was when I wrote about the savory tarts (and still making a lot of them!).  Some days I feel like experimenting, and I have been working on a few new recipes, and trying a few others.  But many days, I’m in the mood to make something that won’t take forever, and that I know I’ll like.  Like this!  Broccoli appeared in our CSA store a couple of weeks ago, and I know Bryan likes it, so I always get some when it’s there.  This is one of my favorite ways to eat it.  Add a salad, and you have dinner.  It’s quick enough that I will even bother making it for lunch, if there aren’t enough leftovers in the fridge.


Simple Broccoli Pasta with Garlic and Chile Flakes

adapted from The Joy of Cooking


For dinner-size portions for two, start with two small or one large head of broccoli.  My second favorite thing about this recipe is that when I found it, I learned how to cook and eat the broccoli stems—it always seemed like a waste to just compost them.  The stems just take a bit longer to cook than the florets.  Cut off the florets, and cut them into about equal pieces.  Slice the stem into fairly thin rounds (leave out any of the bottom that seems too tough or stringy), and then dice up the slices.


chopped broccoli


Boil some water, to cook the pasta.  I like the deep nutty flavors of whole wheat or spelt noodles here, but then I like them with just about anything.  Use whatever kind of noodles you like.  For any even simpler gluten-free option, leave out the noodles all together, and serve the broccoli as a side.  The broccoli only takes a few minutes to cook, so you may want to cook the noodles first.  While you’re waiting you can mince a little garlic (I use about 1 small clove per head of broccoli) and grate some Parmesan, or other hard aged cheese of your choice.

To cook the broccoli, you will need a pan with a lid.  I keep a terrible, ancient skillet around because it’s the same size as my favorite one, and therefore functions as a convenient lid.  Add a generous amount of olive oil to the pan, and heat over medium.  When the oil is hot, add the chopped bits of broccoli stem, and sauté for a few minutes.  Then add the florets.  Stir, so that they all get a bit of oil, then pour in a splash of white wine if you have it, or water if you don’t, and cover the pan.

After a couple of minutes, lift off the lid.  The broccoli will have turned bright green.  At this point you want it to be slightly less done than your desired finished dish, taste some and see.  I like it about as far towards raw as I can get and still call it cooked.  When the broccoli is almost as done as you’d like, add the minced garlic and hot chile flakes to taste.  It can be subtle or spicy.

Let the garlic and chile cook for a minute or so, stirring with the broccoli.  The pan lid should be off at this point, to let any remaining liquid evaporate.  Turn of the heat, and add the cooked drained noodles to the pan, along with a little of the grated cheese.  Stir everything together, and add a bit more olive oil and/or cheese if it seems too dry.

That’s it!  Serve with a bit more grated cheese on top.


Two Everyday Recipes -or- Revenge of the Quiche


leek potato green chile tart


So this last week I found myself feeling swamped, just completely underwater on things to do.  I’m not sure how it happened, but suddenly not only was there not enough time for all the things I’d like to do (never is), there wasn’t enough for all the things I needed to do.

I’ve been feeling a milder version of this all fall, like I’ve got a lot to do, and while I still want to eat a homemade dinner every night, I don’t necessarily want to make one up from scratch every night.  Much less do I want to make something separate for lunch!  Woe to those who might ask me what’s to eat when I’m feeling overwhelmed . . .

I’ve been making a lot of these (and a lot of soups, too), things that last well beyond the initial meal and are pretty much ready to go subsequently.  I’m calling them tarts, like the savory French tarts.  I kind of wore out my own use and conception of the word quiche in the first year I ever joined a CSA.  That time, Bryan and I split a share with my parents, and my dad and I, who were the main cooks of the project, fell back on quiche again and again as a way to use up all the greens we got.  After that (and discovering more uses for the green stuff), I didn’t make it much.  At all.  For years.

It’s baaaack … and better than before!  I’ve been making a crust with a little cornmeal in it, and a variety of interesting new fillings.  My two current favorites (recipes below) are: leek and potato with green chile, and sweet potato with greens.


Savory Tart Crust with Cornmeal

Note: if you are going gluten free, or just happen to run out of flour, it’s easy to make these recipes crustless.  Just grease your pie pan well, and skip to the fillings.

If you’re making a crust, make it first, so that it has plenty of time to chill.

Mix in a small bowl:

1 cup flour (white, whole wheat, or a mixture, your choice)

1/4 cup corn meal (blue is my favorite)

1/2 teaspoon salt

Using your fingers or a pastry blender, cut in 5 Tablespoons butter until the biggest chunks are pea-sized.  Mix in very cold water just a little bit at a time, until the dough holds together, and then put the dough in the refrigerator.


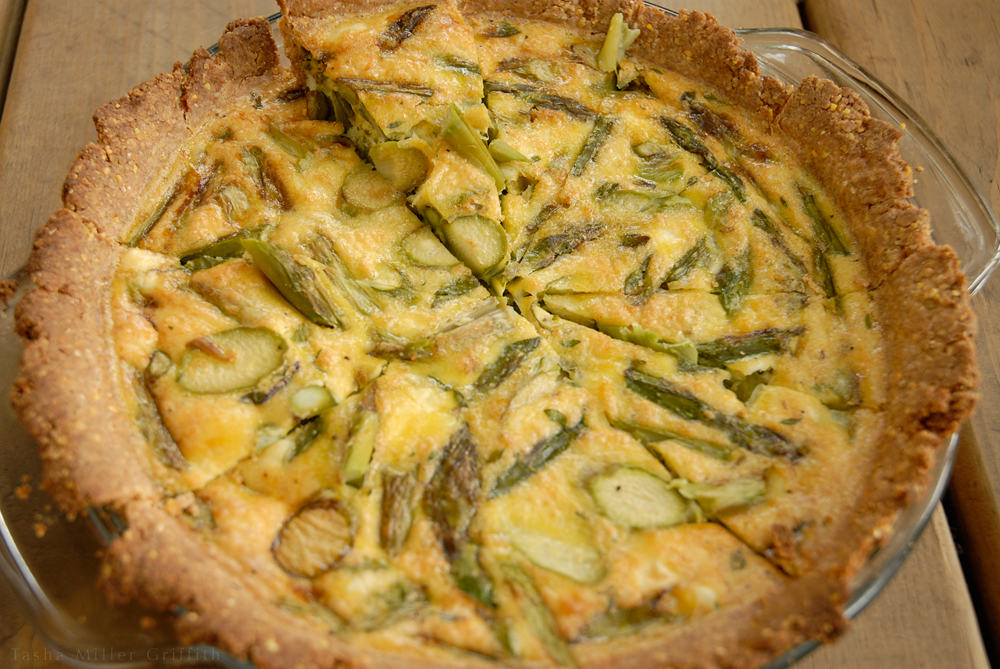
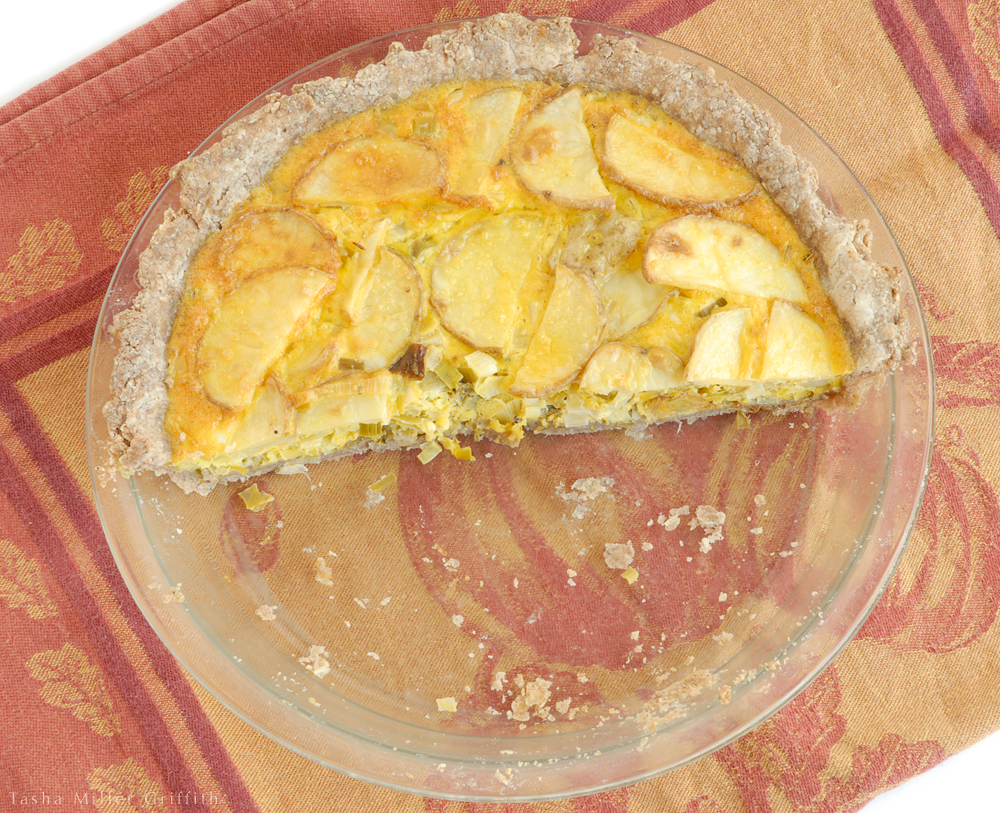
Potato, Leek and Green Chile

Cut off the tops/dark green parts of 2-3 medium-sized leeks.  (Did you know you can use those tops instead of onions for soup stock?  I’ve been doing it all the time lately.)  Slice the leeks in half, rinse out dirt, and chop into fairly thin slices.  Melt 1 Tablespoon butter over med/low heat, add the leeks and a generous splash of white wine or sherry (or water, but I recommend the wine).  Continue cooking, covered, on low, adding more wine if necessary to keep moist, until the leeks are translucent and slightly gooey.  (I got this idea from a recipe for leek confit on Bon Appétit, and it’s been a go-to for leeks since.)

Set the oven to 425° F.  Slice 2 small/medium potatoes fairly thin, skin on (scrub them first).  Place them on a cookie sheet and drizzle with a little olive oil, and salt if desired.   Toss to coat and roast for about 10 minutes, until browned on one side, turn the slices over and roast another 5 minutes or so, until both sides have golden brown spots.  Set aside.

Chop 1-2 roasted green chiles (depending on heat).  (Aren’t you glad you froze some?)


sweet potato greens tart


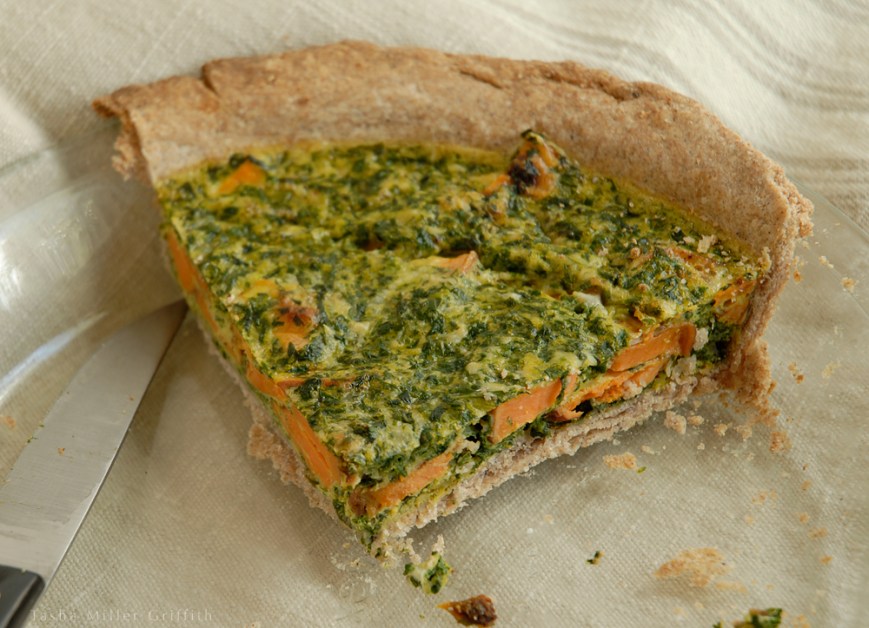
Sweet Potato and Greens

I used kale for this, use 1 bunch of whatever greens you need to get rid of.  Slice or pull the leaves from the ribs, and steam them in a steamer basket over simmering water until bright green and wilted.  Chop or pulse in the food processor depending on how fine you want them chopped.

Roast sweet potatoes the same way as the potatoes above.


Egg Filling & Assembly

Lower the oven temp to 375° F

For either version (or your own creation) get out the crust, and roll it into a rough circle.  It doesn’t need to be too thin, the recipe makes plenty.   I use a 9″ pie pan.  Set the crust in your pan and press it into shape.  If necessary adjust the sides by pulling off overhanging pieces and sticking them in gaps.

Beat together (you can use the pie crust bowl):

4 eggs
Update: I’m not sure how or why, but when I first started making these I thought 4 eggs was plenty … now I don’t, and I almost always use 5. If you find that you’ve made more filling than you intended and it doesn’t seem like there’s enough egg in the mixture, you can even use 6. The whole thing will be thicker and may take a little longer to cook, but it’s up to you!

A generous splash heavy cream

A few Tablespoons grated cheese (seriously, any cheese you have on hand and like is good.)

Fresh ground pepper

(Salt is optional, depending on taste and saltiness of cheese)


Pour a bit of the egg mixture into the bottom of the crust (or the pan if you are going no-crust).  Add your vegetables.  If you are using potatoes I highly recommend putting them on top, so they get nice and browned.  Bake for about 40 minutes, turning once, until the tart is golden on top, puffed up, and just moist inside when tested with a knife.


One of these makes a good part of a dinner, plus a few more lunches/brunches for me and Bryan—hooray!  It might be a good option to stave off the hungry hoards while you work on Thanksgiving dinner, or a good make-ahead family breakfast for a special day.  Enjoy, and Happy Thanksgiving all you Americans!
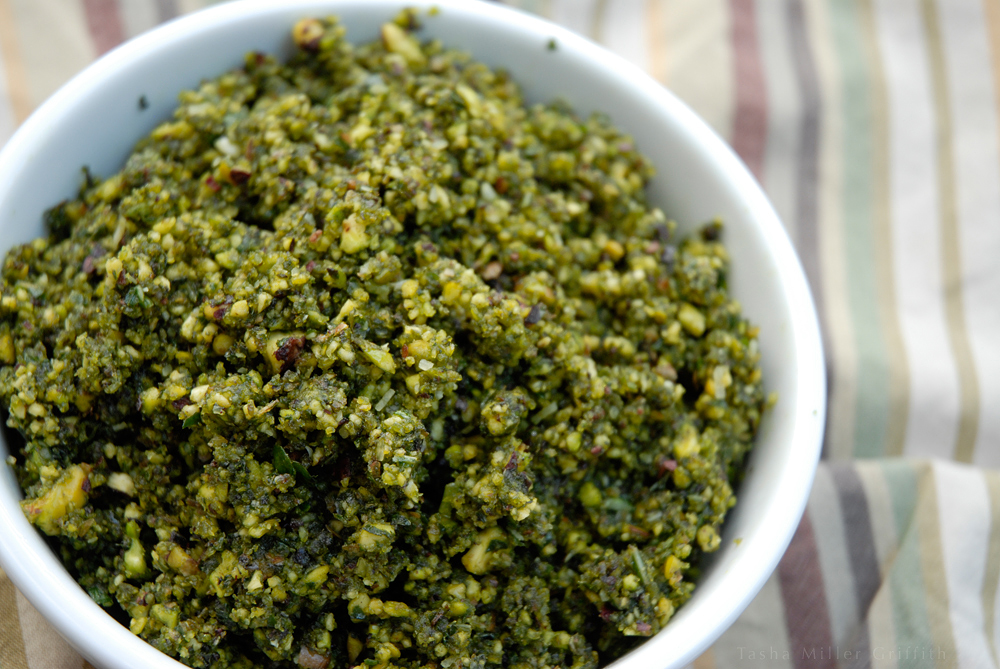
 

Ratatouille


This time of year, at least where I live, the market is simply overflowing with fresh veggies.  While the fruits seem to come in a relatively orderly sequence, one replacing another, the vegetables apparently just multiply, more kinds, more flavors, more colors, every week until the frost.

So, a perfect time to make something delicious out of them!  Something full & rich with the flavors of all the late summer bounty.

Ratatouille

Makes enough to feed 4 as a main course

Chop into large chunks (see the next post):

2 medium summer squash; zucchini, crookneck, etc.

2 smallish bell peppers; red, orange, yellow or purple

1 medium yellow onion

4 small or two larger eggplants

1 mildly spicy chile (optional but really good) If your chile happens to be already roasted, add it with the tomatoes.  Otherwise, keep it with the peppers, squash and onion.

This many veggies will not fit in my largest skillet in anywhere close to a single layer, meaning I know they won’t all brown on the edges.  So, I put the chopped eggplant on a baking sheet and toss with a little olive oil, and roast it in the oven at 375° F until soft and slightly browned, about 30 minutes.

Meanwhile, chop the other veggies and put them in a large heavy skillet on high, with more olive oil, enough to keep them from sticking.  Stir occasionally, letting the surfaces of the vegetables get a nice medium brown.

While the veggies are cooking in the skillet, also chop:

4 -5 large tomatoes chopped roughly, or a little more than a pint of small ones cut in half

3-4 cloves of minced garlic

When the veggies in the skillet are just about browned, add the eggplant to them.  Make a clear space in the center of the skillet, add a drizzle of olive oil, and put the garlic in it.  When the garlic just starts to color, mix it in with the rest of the veggies, and add the tomatoes.  Turn the heat down and cook until the tomatoes start to collapse.

That’s it!  Serve with a generous portion of fresh basil (fresh oregano is also nice, although I like basil best), and a few grinds of black pepper on top.  You can salt to taste as well.


This recipe is delicious with risotto, or any cooked grain with a little cheese mixed in, or just with bread and cheese for lunch.


Recipe Sketch: Vietnamese Noodle Salad with Pan-Marinated Tofu


Last summer when we were at the Cherry Creek Arts Festival, I fell in love with this salad.  Instantly it was the only thing I wanted to eat on a hot day – it’s cool, it’s nutritious, the lovely clean flavors of the sauce and herbs on top make it so refreshing.  I’m pretty sure I got it (from a local restaurant’s stand at the festival) all three days we were there, and I’ve been seeking it in other cities ever since.  This week, I was sitting on the couch, thinking about all the other things I have to do and wondering what on earth to make for dinner, flipping through my recipe book, when I remembered this salad – being home in warm weather was the perfect time to try making it myself!


Vietnamese Noodle Salad

Noodles: I used very thin rice stick noodles. I’ve also seen this served with slightly thicker clear or white noodles.  Whatever kind you can find, check the package directions, boil just until tender (usually only a few minutes), then rinse under cold water.

Veggies; any or all of the following: shredded carrots, thin sliced bell pepper, cucumber, zucchini . . . almost all of the versions I’ve had include bean sprouts and shredded lettuce.  Tip: rinse bean sprouts in a generous spray of very cold water to get them at their tastiest and crispiest.  For my version, I sauteed the bell pepper and zucchini strips briefly over high heat, just to get little caramelized edges, then let them cool.  If it’s really hot out, you could just leave all the veggies raw and avoid turning on the stove!

Pan-marinated tofu: this seems like a good time to include this technique, which I use pretty much every time I make tofu.  Start with extra-firm tofu.  Cut it into slices, rectangles, triangles, whatever you like.  In a large skillet, heat a generous splash of peanut oil (sorry about the no-measuring for this part, I just don’t!) over medium heat.  When it’s getting hot, add in a splash of soy sauce, a splash of rice vinegar or lime juice, and a small spoon of brown sugar.  Stir around until the sugar dissolves, then add the tofu.  Stir the tofu around, then shake the pan occasionally while the liquid evaporates.  Keeping the heat on med-low, and stirring when you first put the tofu in will help keep it from sticking to the pan.  Once the liquid is gone, a nice caramelized crust will form on the tofu – yummy!  I haven’t found a better way than to flip each piece over once the bottom is brown and crispy.  If there are patches of sauce left, steer the flipped pieces onto those.  You can also add a little more of the marinating ingredients if necessary.  When both sides have a lovely golden crust, you’re done!  Flip the tofu out onto a plate to cool.  I did this one day as an experiment, and I have done it every time since, when I make tofu for Pad Thai, curry, etc.  Side story: once I was hanging out with my brother while he was grilling brats.  He said it’s the juice dripping down from the meat and being shot back up by the fire that makes it taste good.  Sometimes I think of this technique as giving the tofu some tasty juice of its own.  Ok, back to the noodle salad.


Herbs and peanuts: whatever veggies and other ingredients you choose, this and the sauce are key to the flavor of this dish!  Coarsely chop a generous handful of fresh mint, basil, and cilantro.  Finely chop some raw or roasted unsalted peanuts.

Sauce:  start with equal parts maple syrup, soy sauce, lime (or lemon) juice, and water.  For one person’s lunch-size bowl, use about a tablespoon of each.   Taste and adjust.  You can also add a clove of minced garlic and/or a little hot sauce if you wish.  What I love about this is the clean clear flavors, but some friends liked it better with a LOT of hot sauce. Hat tip to theKitchn for what to put in this sauce!

Assembly:  put the bean spouts and cooled noodles in the bottom of a bowl.  A wide shallow bowl would be ideal, since the sauce tends to sink to the bottom (otherwise, stir it up).  Top with veggies, herbs, tofu and peanuts, and pour sauce over the whole thing.  Enjoy!

Variations:  I made it the next day with an fried egg on top, also super tasty but not quite as cooling.  Of course you could add stir-fried meat as well, or practically anything else you like.  Pickled vegetables? It can easily be vegan, gluten free, or not, really the sky’s the limit here!


Enjoy!  I can’t go without mentioning the dessert I made for this meal, roasted strawberry coconut milk popsicles from The Year in Food.  Dude.  These were incredible!  I’ve been dying to make them and I was so happy I finally could.  My only note would be to lightly crush or grind the cardamom.  I love it when a recipe opens up whole new ideas, I never would have thought to roast a strawberry.  My whole house was filled with an explosion of strawberry jam smell so wonderful that I couldn’t stand to spoil it by cooking anything else at the same time.  They look cool too, I couldn’t resist taking my own picture!  Anyways.  Get out there and eat some summer!


Recipe Sketch – Summer Tomato Bruschetta

About time for a post about food, don’t you think?

Although I haven’t had very many opportunities to cook on the road, we’re coming up on the part of summer where there is so much fresh lovely produce, it hardly needs actual cooking.  We found some local heirloom tomatoes last week in Maryland, although they are from the hothouse, they put me in mind of late summer bounty.

Bruschetta is one of those foods that doesn’t need much of a recipe, you can vary it infinitely to suit your taste and what’s available.  It’s also easy to present in a variety of ways; either everything mixed together to spoon on toast, or all the ingredients laid out for everyone to layer on their own.  If you are just learning to cook, it’s a wonderful way to experiment with mixing flavors and proportions.

Summer Tomato Bruschetta

I like the bulk of mine to be tomatoes, the fresher and more colorful the better.  Any size will work, bigger ones cut into smaller pieces will make the bruschetta more juicy than baby tomatoes cut in half.

I also like a lot, a lot of basil, it’s one of my all-time favorite favors.  When we rented in Madison I would get a few little basil plants at the farmers’ market in the spring and keep them going though the season.  If I’m mixing everything together, I stack the leaves, roll them up, and slice the roll into strips to sprinkle in.  If you are setting things out buffet-style, whole leaves are fine.

This is tasty with cheese, but don’t feel limited to mozzarella!  Try any kind you like, or what’s locally available where you are.  My favorite recent find was a goat cheese with the soft texture of brie.  I like not too much cheese, not to overwhelm the tomatoes, but of course you can vary it.  A soft cheese will blend more with the other ingredients, especially if you mix it all in a bowl.

A little olive oil, balsamic vinegar, salt and pepper will really bring the flavors together.  You can set them out if you are doing make-your-own, and drizzle them on top.


A feast so simple to make, you can enjoy it in your hotel room.

Here’s to the coming joys of summer!