Almond Paste Stuffed Dates


stuffed dates 1


Happy Midwinter everyone!  Light is sparkling off the snow here, and I’m quite excited that it’s coming back – after this we get just a bit more sun every day until the glories of summer  – no wonder so many cultures have celebrations around this time.

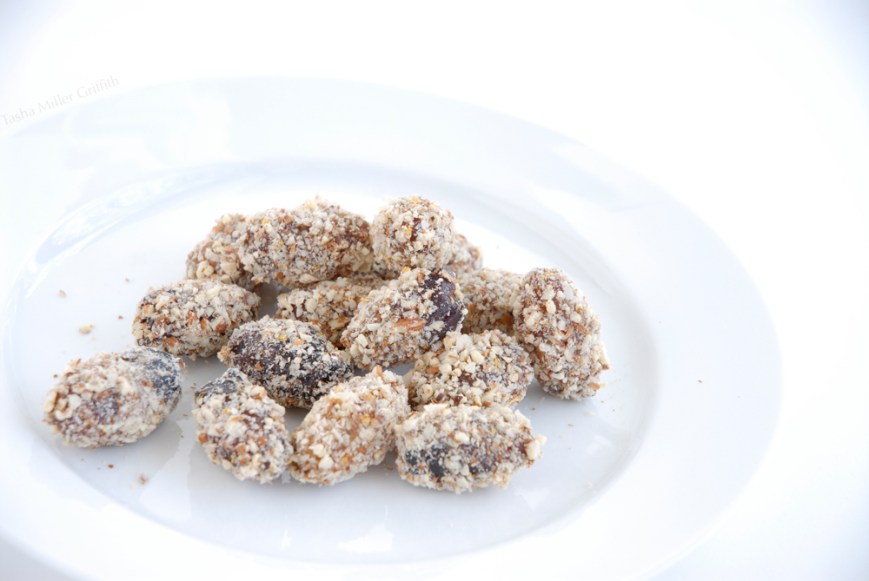
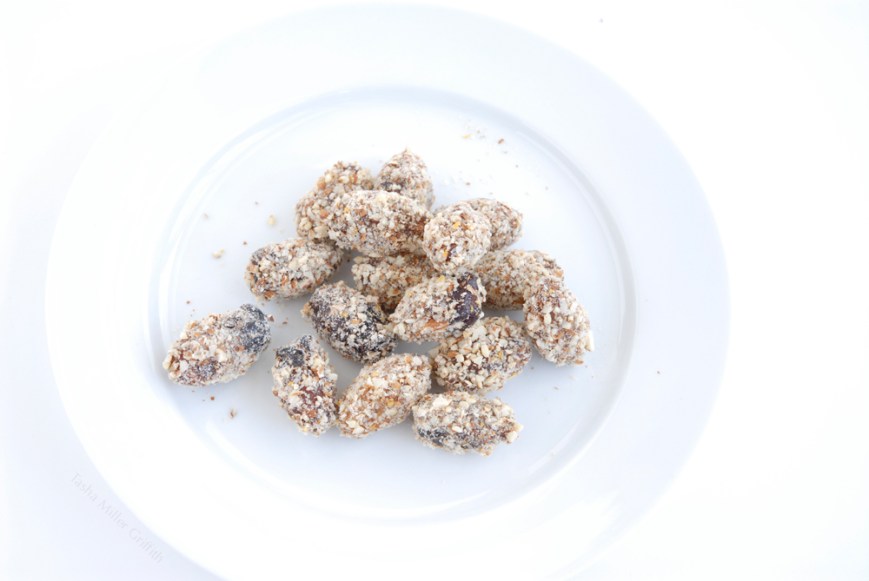
Whether you need some homemade gifts ASAP because the world did not in fact end today, or you had all that figured out long ago and just want a new winter treat to share with friends and family, I’ve got you covered.  These dates, soaked in brandy and orange juice, stuffed with almond paste and rolled in almonds, are fun to make and taste quite impressive!  They should be gluten-free as well, check the label on your almond paste to make sure.  We get Black Sphinx dates from Arizona Date Gardens – they’re wonderful.  Note: if you can find them sold in a plastic clam shell box, those are the freshest, gooiest dates you can imagine – and too soft for this recipe, they’ll just fall apart!  Use the regular, sold in a plastic bag or bulk bin kind here.


Almond Paste Stuffed Dates

adapted from two recipes in different editions of The Joy of Cooking


Pit, if not already done for you, 30 dates.  I like to use a “one clean hand” method, keeping a pairing knife in my dominant hand, and using the other hand for all the messy stuff; grabbing a date, holding it while I slice through it to the pit, pulling out the pit and tossing it in the compost, squeezing the date closed again and putting it in the bowl.  It sounds complicated but actually it’s pretty simple and efficient, especially if you have everything close by.

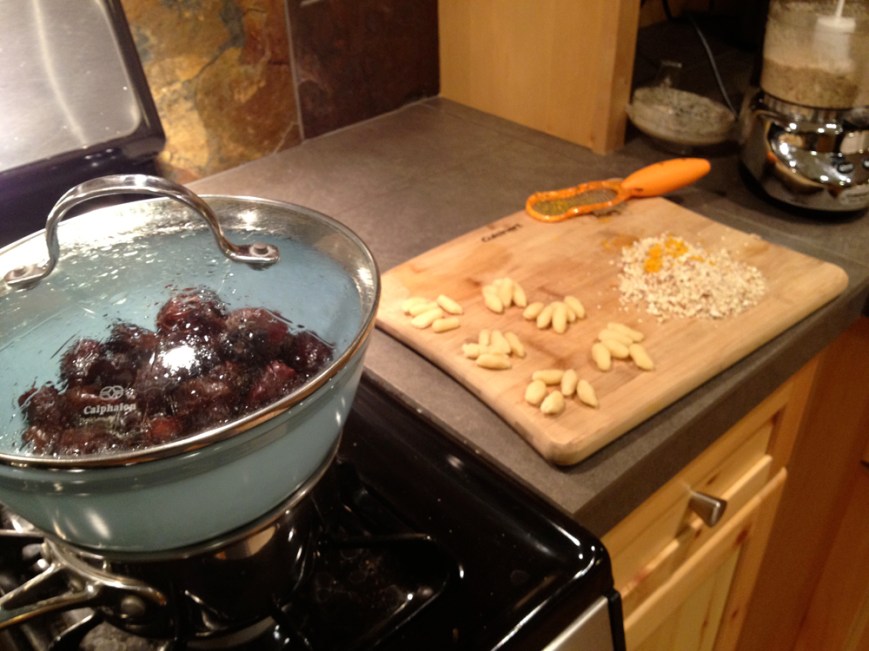
Place your pitted dates in the top of a double boiler.  I don’t actually own one, I use a pyrex bowl on top of a small pot of water, and the lid from another pot to cover the bowl.  Use whatever setup works, just make sure all the parts are heat safe and that nothing is in danger of falling over.

Pour over the dates: 1/4 cup brandy and 2 Tablespoons orange juice.  Bring the water in the bottom pot to a simmer, and let the dates heat in the brandy and OJ for 15 – 20 minutes (depending on how moist your dates are to start with), stirring them occasionally to make sure they all get a chance to soak up some yummy liquid.  They are done when the skins are curling off, you’ll see what I mean.

While the dates are cooking, pinch off pieces of almond paste and squish them to be about the size and shape of date pits.  They can be a little bigger, but not too much, or the dates won’t close around them.  Note: marzipan and almond paste are often sold side by side in the baking aisle of the grocery store.  Almond paste has more almonds and less sugar than marzipan, so it’s a better choice here because the dates are quite sweet on their own.

Also prepare the coating: grind about 1/2 cup almonds (some small chunks can remain but there should also be finer pieces – I do mine in a small food processor).  Add a pinch of sugar, a pinch of cinnamon and the zest of 1/2 orange.  Stir the coating together and put it on a cutting board or a plate for rolling.  Have a plate or piece of wax or parchment paper nearby to place the finished dates on.


stuffed dates 3

Hmm, iPhone pic, one of my goals for 2013 is to figure out how to take good pictures in my kitchen . . .

When the dates are done and cool enough to handle, pick them up one by one and peel off the large sections of skin that easily come off.  You don’t have to get all the skin off, but do get a fair amount so that the almonds will stick.  Place a piece of almond paste in the middle of each date, squeeze the date closed around it, and roll the surface in the almond mixture, then place the finished date aside.  You may have guessed that there are no clean hands for this part, but you do get to lick your fingers at the end.  As an extra bonus, there may be a little date-and-orange-steeped brandy left in the top of the double boiler when you finish the dates.  I highly recommend you drink this when no one is looking – it’s divine.

Let the dates dry for a few hours or overnight, then store them airtight.  I’ve never had any left to see how long they last, I would guess at least a few weeks in the fridge, and I ship them without fear.


stuffed dates 2


Enjoy!  And have a lovely solstice.

A Good Veggie Stock, and Drawing More Regularly

Two things that have eluded me until recently come together!

The stock, I don’t know, I’d just never been happy with any that I’d tried, it was one of only maybe two times that the Joy of Cooking has outright failed me, I wasn’t sure what other recipes to try . . . I finally “got” it when reading Deborah Madison’s Greens Cookbook, for some reason the way she explained using the veggies you have and tailoring the stock by adding say ginger and garlic for curry soup, etc., made more sense to me than essentially the same advice I’d read other places . . . so I just started making it, using “basic” vegetables and adding whatever seemed good or to go with the soup.  Hooray!

The drawing, it’s something I continually mean to do more of, and occasionally set specific goals and/or read books about it from the library, but for some reason it’s hard for me to keep up on any kind of regular basis.  I know, I KNOW that if I would just practice I would get smoother and better and eventually I could make little sketches that look like what I see, which is a goal of mine (I do my own illustrations for knitting handouts, which involves drawing the human hand, but very slowly and only when I’m in the exact right mood, ie almost never).  Then just this week I happened upon this post in which Jess shares some “maps” she made for parties, little plans with drawings and words about what she plans to make and how to arrange it.  This idea clicked with me immediately since I am such a visual learner, I think images enter my brain on a fast track while words need translating first.  So I started making them as plans for the day or the week, drawing the parts that are easily visualized.  I’ll show you some – later.


For now: Recipe Sketch (real sketch this time!):


See what I mean?  The drawings don’t have to be perfect, the point is not that they achieve any particular proficiency at all (good thing because my first potato looked more like a mutant amoeba), the point is that I’m practicing and if I keep practicing I will necessarily get better!  I’m in love with these visual lists, I find them really playful, letting my brain roam in new directions rather than just spitting out one item of “to do” after another.

It seemed like a good time to bring these two together since stock is one of the few foods NOT crying out for me to photograph it.  And, if you’re cooking anything vaguely traditional for Thanksgiving, you’re likely to have a lot of these ingredients on hand.

Do you draw for fun, or add visuals to other things?  Please share what you put in your veggie stock, I’d love to have more ideas!


Ratatouille


This time of year, at least where I live, the market is simply overflowing with fresh veggies.  While the fruits seem to come in a relatively orderly sequence, one replacing another, the vegetables apparently just multiply, more kinds, more flavors, more colors, every week until the frost.

So, a perfect time to make something delicious out of them!  Something full & rich with the flavors of all the late summer bounty.

Ratatouille

Makes enough to feed 4 as a main course

Chop into large chunks (see the next post):

2 medium summer squash; zucchini, crookneck, etc.

2 smallish bell peppers; red, orange, yellow or purple

1 medium yellow onion

4 small or two larger eggplants

1 mildly spicy chile (optional but really good) If your chile happens to be already roasted, add it with the tomatoes.  Otherwise, keep it with the peppers, squash and onion.

This many veggies will not fit in my largest skillet in anywhere close to a single layer, meaning I know they won’t all brown on the edges.  So, I put the chopped eggplant on a baking sheet and toss with a little olive oil, and roast it in the oven at 375° F until soft and slightly browned, about 30 minutes.

Meanwhile, chop the other veggies and put them in a large heavy skillet on high, with more olive oil, enough to keep them from sticking.  Stir occasionally, letting the surfaces of the vegetables get a nice medium brown.

While the veggies are cooking in the skillet, also chop:

4 -5 large tomatoes chopped roughly, or a little more than a pint of small ones cut in half

3-4 cloves of minced garlic

When the veggies in the skillet are just about browned, add the eggplant to them.  Make a clear space in the center of the skillet, add a drizzle of olive oil, and put the garlic in it.  When the garlic just starts to color, mix it in with the rest of the veggies, and add the tomatoes.  Turn the heat down and cook until the tomatoes start to collapse.

That’s it!  Serve with a generous portion of fresh basil (fresh oregano is also nice, although I like basil best), and a few grinds of black pepper on top.  You can salt to taste as well.


This recipe is delicious with risotto, or any cooked grain with a little cheese mixed in, or just with bread and cheese for lunch.


Asian Coleslaw Recipe Sketch


This is a family recipe in a few ways.  I first got obsessed with this salad a couple of years ago when one of my aunts was making it a lot.  Hers was inspired by two different recipes (neither for Asian coleslaw), which I bothered her until she sent me, I thought it was so good I couldn’t stop thinking about it.  I have been making my version of her salad (below) for long enough that it’s established its own pattern in my head of what “Asian Coleslaw” is like.

So, during our craft retreat, another aunt decided to make “Asian Coleslaw” with some veggies left in her fridge.  Great!  I offered to help, and had to laugh as soon as she started putting things in.  Parsley?  Olive oil instead of peanut or sesame?  If you’re putting that, why not add this cauliflower?  No?  As it became more and more clear that our visions differed (and of course her version was also delicious) I realized that here was one of my own lessons coming back to me, of course you can make it with whatever you have and whatever you like!  Please feel free to experiment.


Asian Coleslaw

This much will feed four as a side.

Combine in a bowl:

1/2 small cabbage (your favorite kind) shredded

3 medium carrots, grated

1/4 cup chopped cashews (peanuts and or/sesame seeds would also be good)

3 green onions/scallions, chopped fine (optional)

1/2 cup chopped cilantro (and/or parsley or other herbs)

Dressing (I make this in my little food processor):

1 Tablespoon shallot, or 2 cloves of garlic

1 Tablespoon fresh ginger

2 Tablespoons toasted sesame oil (you can also use peanut)

Juice of one small lime (or splash of rice vinegar, although I like lime better)

2 – 3 Tablespoons soy sauce or tamari

2 teaspoons sugar or maple syrup

Squirt of hot sauce (or add serrano or another hot chile)

Process the dressing until everything is combined and chopped fine (you could also mince the solid ingredients by hand and combine everything in the bowl).  Pour the dressing over the salad, toss, and you are done!  This also keeps quite well in the fridge for several days.


I realized as I was thinking about posting this recipe that’s a really a year-round salad.  I tend to think of it almost more for winter, since the ingredients are still readily available, and it provides a little something fresh when almost everything seems warm and stewed.  But, it also makes me think of my cousin (sweating out the Brooklyn summer without AC) and everyone stuck in the Midwest heatwave – a tasty way to get your veggies without ever turning on the oven.  I’m still making it here, even though our monsoon-season weather has been exquisite, so close to perfect that I keep sitting on the (brick) front steps with my laptop to feel the breezes.   I’m telling you, the world’s best weather is in the mountain southwest, once it starts to rain.

One last note, my DIY envelope tutorial was featured on KP’s blog today!  We became friends in person (when we lived in the same country) now I love keeping up with her fun projects and lovely photos (plus she has a recycle project challenge)!


Chard Phyllo Pie, and Experimenting in the Kitchen


Years ago I took an Indian cooking class with my mom at our local community college.  Although none of the recipes from the class became my favorites, the instructor said something which I found wonderfully liberating – use what you have.  If a recipe calls for one vegetable or spice you are out of, just try it with something similar or something you think will taste good.  Sometimes, especially when you are cooking something from a culinary tradition other than your own, it can be easy to think you have to have exactly everything the recipe calls for, in exact quantities.  However, that’s, um, never actually true!

I have been thinking about this lately and wondering how to talk about it here, especially since reading this truly stellar piece about everyday cooking on The Yellow House.  One of the true keys to this kind of culinary freedom and weekday luxury is being able to make something with what you have on hand.

For example, the other day I had chard (thanks to my aunt Barbara, who brought some from her garden all the way to Flagstaff in her cooler!), and phyllo dough, but no kind of cheese I would normally use to make spanakopita.  But I did have a large chunk of Beemster Graskaas (creamy Dutch cheese), and a bit of leftover sharp cheddar.  Hmm, I thought, this may not come out so great, but I think it’s worth a shot (embracing the possibility of failure is essential here).

Well, after a couple of bites, I looked at Bryan and asked, “What do you think?”

“I think I like it better than regular spanakopita.” he said.  So did I!  Keep in mind that our normal spanakopita recipe has been a staple in our house for years now.  This one definitely has more of an American comfort-food feeling, deliciously so.


Chard Phyllo Pie


Makes one 9 x 12 pan, or similar size

Preheat oven to 375° F

1 bunch spinach, kale, chard, or un-identified green from CSA (as long as it’s the kind you cook)

Wash and stem this, my favorite method is to grab the stem with one hand and pull the leafy stuff off with the other hand.  Put the stemmed greens in a pot with a steamer basket and some water in the bottom.  Bring the water to a boil and then turn it down to medium – low heat, let the water simmer until the greens are bright green and relaxed.

Meanwhile, finely chop ½ of one yellow onion and 2 medium garlic cloves

Saute the onion in a litle olive oil over medium heat in a small skillet or pan until it just starts to have a golden color.  Add the garlic and stir and cook for about another minute.

Scrape onion and garlic out of the pan into a bowl.

When the greens are ready, turn off the heat and let them cool for a couple of minutes.  Use tongs to transfer them to a food processor and pulse until pureed (or how you like them).  Add them to the onion bowl.

Also add to the bowl:

–       About 8 oz creamy Dutch cheese (the whole point of this post is to try whatever cheese you like/have!)

–       A little sharp cheddar cheese, or another kind that will add a little more punch to the cheese flavor

–       4 eggs

–        A few grinds of black pepper

–       A pinch of salt

Mix this all together.

Melt (I like to just drop it in the onion pan) 2 Tablespoons butter

Get out your thawed frozen phyllo dough

You may need to cut the phyllo sheets in half. If so, tightly wrap what’s left and put it back in the fridge.  Working quickly, brush a little butter in the pan, lay down a sheet, lightly brush it with butter, lay down the next sheet, etc. until you have used 8 – 10 sheets or half your stack.  Spread on the filling, then repeat with the rest of the phyllo sheets.  If you have some butter left, spread more on the top sheet or two.  Cut the spanakopita into pieces through the top layer of dough, then put in the oven and bake until the top is golden and the filling looks solid where you cut it, about 40 minutes.  With this version the filling will be a little more moist & creamy, definitely let it cook until the top is a rich golden brown.  Let cool for a few minutes, cut through the bottom, and enjoy!


Not every culinary experiment will produce results you want to note down and make again.  But, with just a little practice cooking with what you have & what you can find, every day can be fresh, wholesome, creative – in other words, a small miracle of food at your fingertips.


Recipe Sketch: Vietnamese Noodle Salad with Pan-Marinated Tofu


Last summer when we were at the Cherry Creek Arts Festival, I fell in love with this salad.  Instantly it was the only thing I wanted to eat on a hot day – it’s cool, it’s nutritious, the lovely clean flavors of the sauce and herbs on top make it so refreshing.  I’m pretty sure I got it (from a local restaurant’s stand at the festival) all three days we were there, and I’ve been seeking it in other cities ever since.  This week, I was sitting on the couch, thinking about all the other things I have to do and wondering what on earth to make for dinner, flipping through my recipe book, when I remembered this salad – being home in warm weather was the perfect time to try making it myself!


Vietnamese Noodle Salad

Noodles: I used very thin rice stick noodles. I’ve also seen this served with slightly thicker clear or white noodles.  Whatever kind you can find, check the package directions, boil just until tender (usually only a few minutes), then rinse under cold water.

Veggies; any or all of the following: shredded carrots, thin sliced bell pepper, cucumber, zucchini . . . almost all of the versions I’ve had include bean sprouts and shredded lettuce.  Tip: rinse bean sprouts in a generous spray of very cold water to get them at their tastiest and crispiest.  For my version, I sauteed the bell pepper and zucchini strips briefly over high heat, just to get little caramelized edges, then let them cool.  If it’s really hot out, you could just leave all the veggies raw and avoid turning on the stove!

Pan-marinated tofu: this seems like a good time to include this technique, which I use pretty much every time I make tofu.  Start with extra-firm tofu.  Cut it into slices, rectangles, triangles, whatever you like.  In a large skillet, heat a generous splash of peanut oil (sorry about the no-measuring for this part, I just don’t!) over medium heat.  When it’s getting hot, add in a splash of soy sauce, a splash of rice vinegar or lime juice, and a small spoon of brown sugar.  Stir around until the sugar dissolves, then add the tofu.  Stir the tofu around, then shake the pan occasionally while the liquid evaporates.  Keeping the heat on med-low, and stirring when you first put the tofu in will help keep it from sticking to the pan.  Once the liquid is gone, a nice caramelized crust will form on the tofu – yummy!  I haven’t found a better way than to flip each piece over once the bottom is brown and crispy.  If there are patches of sauce left, steer the flipped pieces onto those.  You can also add a little more of the marinating ingredients if necessary.  When both sides have a lovely golden crust, you’re done!  Flip the tofu out onto a plate to cool.  I did this one day as an experiment, and I have done it every time since, when I make tofu for Pad Thai, curry, etc.  Side story: once I was hanging out with my brother while he was grilling brats.  He said it’s the juice dripping down from the meat and being shot back up by the fire that makes it taste good.  Sometimes I think of this technique as giving the tofu some tasty juice of its own.  Ok, back to the noodle salad.


Herbs and peanuts: whatever veggies and other ingredients you choose, this and the sauce are key to the flavor of this dish!  Coarsely chop a generous handful of fresh mint, basil, and cilantro.  Finely chop some raw or roasted unsalted peanuts.

Sauce:  start with equal parts maple syrup, soy sauce, lime (or lemon) juice, and water.  For one person’s lunch-size bowl, use about a tablespoon of each.   Taste and adjust.  You can also add a clove of minced garlic and/or a little hot sauce if you wish.  What I love about this is the clean clear flavors, but some friends liked it better with a LOT of hot sauce. Hat tip to theKitchn for what to put in this sauce!

Assembly:  put the bean spouts and cooled noodles in the bottom of a bowl.  A wide shallow bowl would be ideal, since the sauce tends to sink to the bottom (otherwise, stir it up).  Top with veggies, herbs, tofu and peanuts, and pour sauce over the whole thing.  Enjoy!

Variations:  I made it the next day with an fried egg on top, also super tasty but not quite as cooling.  Of course you could add stir-fried meat as well, or practically anything else you like.  Pickled vegetables? It can easily be vegan, gluten free, or not, really the sky’s the limit here!


Enjoy!  I can’t go without mentioning the dessert I made for this meal, roasted strawberry coconut milk popsicles from The Year in Food.  Dude.  These were incredible!  I’ve been dying to make them and I was so happy I finally could.  My only note would be to lightly crush or grind the cardamom.  I love it when a recipe opens up whole new ideas, I never would have thought to roast a strawberry.  My whole house was filled with an explosion of strawberry jam smell so wonderful that I couldn’t stand to spoil it by cooking anything else at the same time.  They look cool too, I couldn’t resist taking my own picture!  Anyways.  Get out there and eat some summer!


Recipe Sketch – Summer Tomato Bruschetta

About time for a post about food, don’t you think?

Although I haven’t had very many opportunities to cook on the road, we’re coming up on the part of summer where there is so much fresh lovely produce, it hardly needs actual cooking.  We found some local heirloom tomatoes last week in Maryland, although they are from the hothouse, they put me in mind of late summer bounty.

Bruschetta is one of those foods that doesn’t need much of a recipe, you can vary it infinitely to suit your taste and what’s available.  It’s also easy to present in a variety of ways; either everything mixed together to spoon on toast, or all the ingredients laid out for everyone to layer on their own.  If you are just learning to cook, it’s a wonderful way to experiment with mixing flavors and proportions.

Summer Tomato Bruschetta

I like the bulk of mine to be tomatoes, the fresher and more colorful the better.  Any size will work, bigger ones cut into smaller pieces will make the bruschetta more juicy than baby tomatoes cut in half.

I also like a lot, a lot of basil, it’s one of my all-time favorite favors.  When we rented in Madison I would get a few little basil plants at the farmers’ market in the spring and keep them going though the season.  If I’m mixing everything together, I stack the leaves, roll them up, and slice the roll into strips to sprinkle in.  If you are setting things out buffet-style, whole leaves are fine.

This is tasty with cheese, but don’t feel limited to mozzarella!  Try any kind you like, or what’s locally available where you are.  My favorite recent find was a goat cheese with the soft texture of brie.  I like not too much cheese, not to overwhelm the tomatoes, but of course you can vary it.  A soft cheese will blend more with the other ingredients, especially if you mix it all in a bowl.

A little olive oil, balsamic vinegar, salt and pepper will really bring the flavors together.  You can set them out if you are doing make-your-own, and drizzle them on top.


A feast so simple to make, you can enjoy it in your hotel room.

Here’s to the coming joys of summer!

Homemade Granola Bars


In part two of my homemade travel breakfast project, I made some more traditional granola bars – oats, nuts and dried fruit stuck together with molasses and honey.

I learned several things in the two versions of these I’ve made so far.  One is that honey is a much better glue than molasses.  The second is that smaller pieces of nuts, oats, etc. stick together better and are less likely to fall apart later.  Both of these are pretty much logically obvious now that I think about them, but as usual I opted for a more trial and error approach at the beginning.  I like to mix things together and see what happens.

Anyway, here is version 2:

DIY Granola Bars

Mix together in a bowl: 1 cup oats, coarsely ground; one cup walnuts, coarsely ground; 1/2 cup raisins, a pinch of salt.

Heat in a large skillet until warm and liquid: 2 Tablespoons molasses & 2 teaspoons honey.  Turn off the heat.

Pour the oat mixture into the skillet and stir until everything is coated.  Pour out onto a piece of parchment paper and shape into a round or square about 1/2 inch thick with your hands, spatula, rolling pin, etc.  Cut into bars, sticking any bits that fall off back to the outsides, and leave to cool and firm up.  Once they are holding together, you can transfer them to a rack and leave for a while to release any moisture trapped between them and the parchment, before packing them away in a tin or baggies.


These are holding up pretty well so far, they crumble a bit but you can stick them back together.

Adding more honey and less molasses would make a firmer bar, also good if molasses is not your favorite thing.  Bryan claims my current version is for molasses lovers only.  They taste good to me, but then I could eat it with a spoon!

You could also get a more robust bar by using more oats in proportion to nuts, as they seem to stick together better.  Again, this could become a platform for whatever nuts, fruits and spices you like and want to add!  I think these could be fun to make with kids as well, I may try it out the next time I see the nieces.

If you missed part 1, DIY Fruit and Nut Bars, click here or just scroll down to the previous post.

Enjoy!


DIY Fruit and Nut Bars


We’re headed to our next art show today (Brookside in Kansas City, MO) and along with my usual motley assortment of library books (shhh) and projects in progress, I’m packing two versions of these bars!

We eat a lot of Clif bars, Odwalla bars, Larabars, regular old granola bars, etc. for breakfast when we’re in the truck.  By the end of the summer if I never saw another one it wouldn’t bother me, with the possible exception of the Larabar type.  There’s nothing in those besides dates, nuts and spices, and of course they are also the most expensive kind, I usually don’t buy them unless they’re on sale.

This winter on our trip to Oregon I was sitting with our friend Becca when she came up with a brilliant idea – why not make them?  She was eating a bar made at the lodge where we were, which was mostly chunks of dried fruit and nuts held together with honey.  This seemed like such a good idea, and of course so obvious once she said it, it lodged in my brain and fortunately stayed there until I tried it out.

The first version had more dates, and fewer almonds, with none reserved for coating the outside.  It was good, but sticky, and even a little too sweet, despite the fact that there’s not any added sugar.  Here’s version 2:

Date and Almond Bars

Add 8 oz dried, pitted dates to a saucepan in which they barely fit in a single layer.  Grate on top: zest of one orange.  Pour in enough water to make about 1/8″ in the bottom of the pan, just enough so that all the dates have some to soak up.  Bring the water to simmer, then turn off the heat, cover the pan, and leave it for about half an hour, until the dates have soaked up the water and become soft and plump.

Grind 1 cup raw or toasted almonds to a coarse flour with some chunks remaining.  Grind a further 1/4 cup to flour without chunks.

Put the soaked dates in the food processor, and chop/grind until you have a thick puree.  I added a splash of Amaretto to the processor, totally optional, but adds a nice extra flavor.

Scoop out the date puree into a bowl or back into the pan, add the coarsely ground almonds, and mix together into a thick paste.  On a cutting board or parchment paper, sprinkle out about half of the almond four.  Scoop the date/almond paste on top of the flour, sprinkle more almond flour on top of it, and roll out like you would cookie dough to your desired thickness, using the almond flour to keep the bars from sticking to the surface or the rolling pin.

Cut into bars, use the extra almond flour that falls off to coat the edges, let dry for a few hours, and you’re done!


Seeing as how I was making my own fruit and nut bars, I also bought some figs, and made:

Fig and Pistachio Bars

Using basically the same procedure as the date and almond ones.  I needed to cut the stems off the figs, and they weren’t quite as juicy or sweet as the dates.

Add 12 oz dried figs (I used black mission), a little orange zest, about 1/3 of the orange (lemon would also be nice here), 1 Tablespoon of honey, and just a little water as before to the saucepan.

After soaking, there was still a little liquid left, so I brought the pan to a simmer again and boiled it off just for a minute or two, stirring, until it was more like a thin syrup that stuck to the figs.

When I was writing this up yesterday I forgot that I had used slightly fewer pistachios than I did almonds in the date bars, about 3/4 cup in the fig bars, but still 1/4 cup ground to dust the outsides.  This seemed to make sense because the figs were a little drier, and also because I ran out of pistachios!  Of course you can vary the amounts to your own taste and see what you like.

From this point process the figs and grind the pistachios just like the above recipe.


Maybe my favorite thing about this idea is that if I get tired of one kind, I can just add another variation, some spice or a different nut for a new flavor!  I’d love to know your thoughts, what flavor combos would be good?  If you try your own, how did they come out?

Recipe Sketch – Carrot and Raisin Salad


Carrot & raisin salad 2


For this recipe, I wanted to give a nod to the fact that we don’t really follow recipes.  At least I don’t.  At least not usually.  You know what I mean?  I read one and think, “That’s a good idea!” and I may even refer back to it while I’m cooking, but I’m not using any of the exact quantities specified, I am leaving things out, and I am putting in things that aren’t called for.

Of course, there are also the nights when I just want to settle down and cook something from exact notes, especially my own exact notes, about what to put in and how much.

But, I think being more experimental, at least some of the time, is a great way to learn about cooking, about flavors, and about what you like.  And some recipes, like this one, seem made for a non-measuring preparation every time, even after I have figured out just how I like them.

So, at least some of the time, I’m going to post in the form of a recipe “sketch” that acknowledges the fact that many of us are going to make our own version anyway, as well we should.


Carrot & raisin salad 1


Recipe Sketch – Carrot and Raisin Salad

Grate some carrots, on the biggest holes in your grater.  These make up most of the volume of the salad, so grate as many as you need for about as much salad as you want.

Add some raisins.  Pour some in and mix to see if you think it’s enough.

Grate in citrus zest.  I like lime the best, but Meyer lemon is also lovely.  Squeeze on a little juice of the same citrus.

Salt.  It seems weird, but a small (not tiny) amount of salt is totally what makes this come together.

That and heavy whipping cream.  Actually, mixing the cream with crème fraîche is even better.  I like to add just enough to make a little liquidy dressing for the carrots and raisins.

Mix, taste and adjust.

I love these flavors!  A little salty, a little sweet, a lot of fresh.  Also, a fantastic way to use up carrots from your fridge right before you leave town.  And a good use of multicolored carrots.  Sometimes I think I buy heirloom vegetables just for the colors.

So what about you?  Do you “follow” recipes?