Me-Made Purple Corduroys—How Life is Like Fitting Pants

purple cords 1


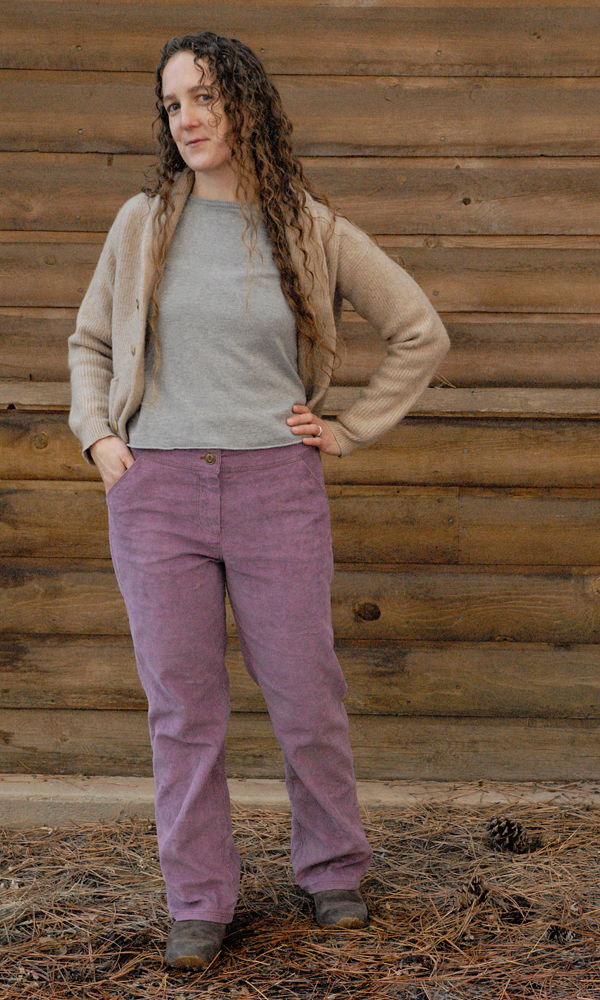
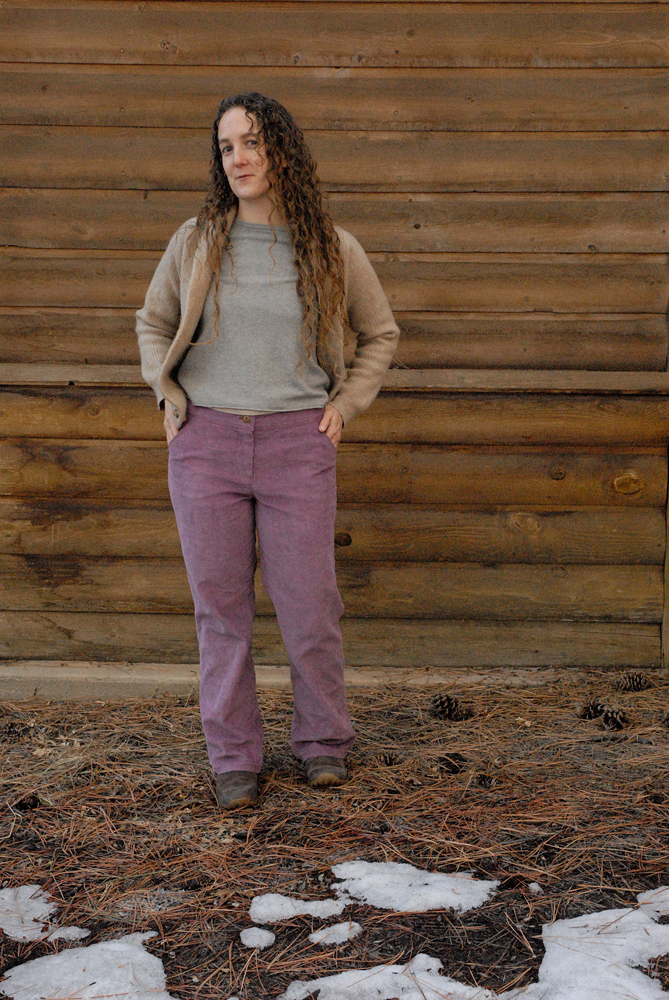
Where to begin?  I think I could talk about these pants and all their glories and implications well past what you would read.  Well – I think I’ll begin with why they are purple, which will lead right into why they are fitted, which will lead right into why they are the best pants I’ve ever had.

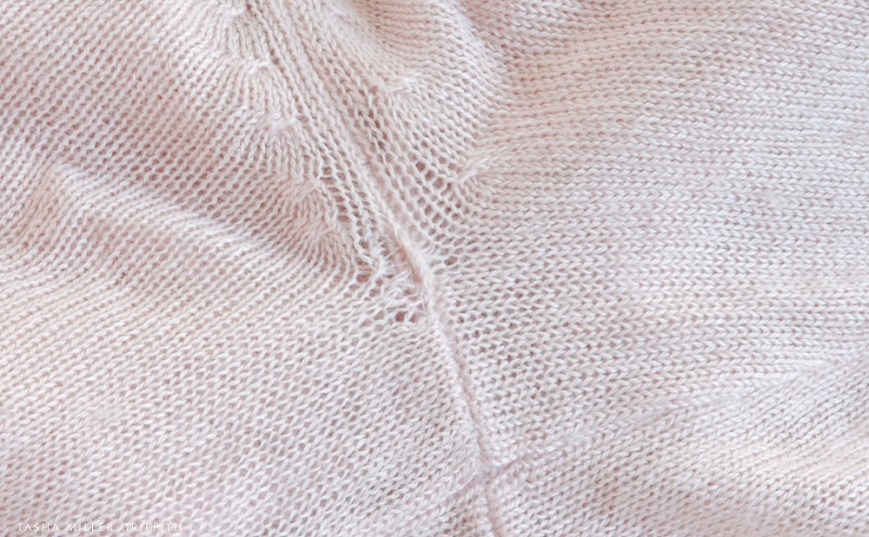
So, a few years ago now, my aunt got this pair of purple corduroy pants, and for some strange reason I fell in love with them at first sight.  I’m not usually into purple, or brightly colored trousers, nevertheless I’ve wanted my own pair ever since.  I found 1 1/2 yards of, get this, lavender hemp and organic cotton corduroy on the NearSea Naturals clearance page!  (It had a “stain” on it, which washed right out.)  Update: although I love love love the idea of this fabric, the color of this fabric, and the resulting pants, the fabric is just not sturdy enough.  I got about a year of good-looking wear out of these before the corduroy pile started coming out, even with washing them inside out and not once putting them through the dryer, and that is just not enough for something I made.  If anyone knows of a source for sustainable, long-lasting fabric, please let me know!  The good news: all the work I did on fitting (keep reading) is already transferred to the pattern and waiting for me to find the next fabric! 

I thought this was the perfect amount of fabric.  I planned to make another pair just like my grey pants, even though I wasn’t sure that wide leg would be the best look for purple corduroys, I would figure out that fit first, and save more close-fitting pants for another day/next fall maybe.  Well – it turned out that all the wide leg pattern pieces would not fit on this much fabric.  To fit them in I had to narrow the legs quite a bit.  Well.  I just tapered the tops of the pattern pieces from the grey pants into the narrower legs, cut them out, and this is what I got.


purple cords fitting


Clearly those fabric saddle bag areas on the sides had to go straight away, that was the easy part.  Getting a better fit through the seat/inner thigh area took a lot more work.  Every day for weeks, my sewing time consisted of: ripping out and re-basting in a slightly different position some part of the crotch seam and/or inseam and/or side seam, trying the pants on, deciding what to rip out next (often the same part).  Although I worked on these only a little bit each day (partly to keep myself from getting frustrated and doing something hasty/stupid), I thought a lot about how life is like fitting pants.  The baking equivalent might be yeast bread, or even macarons.  There are a lot of variables, and each one seems to affect all the others, so that a small tweak in one area can change all kinds of things I would not expect.  But, if I just keep plugging away, trying things, seeing what happens, I will eventually reach a place where I am very happy with the results.


purple cords side


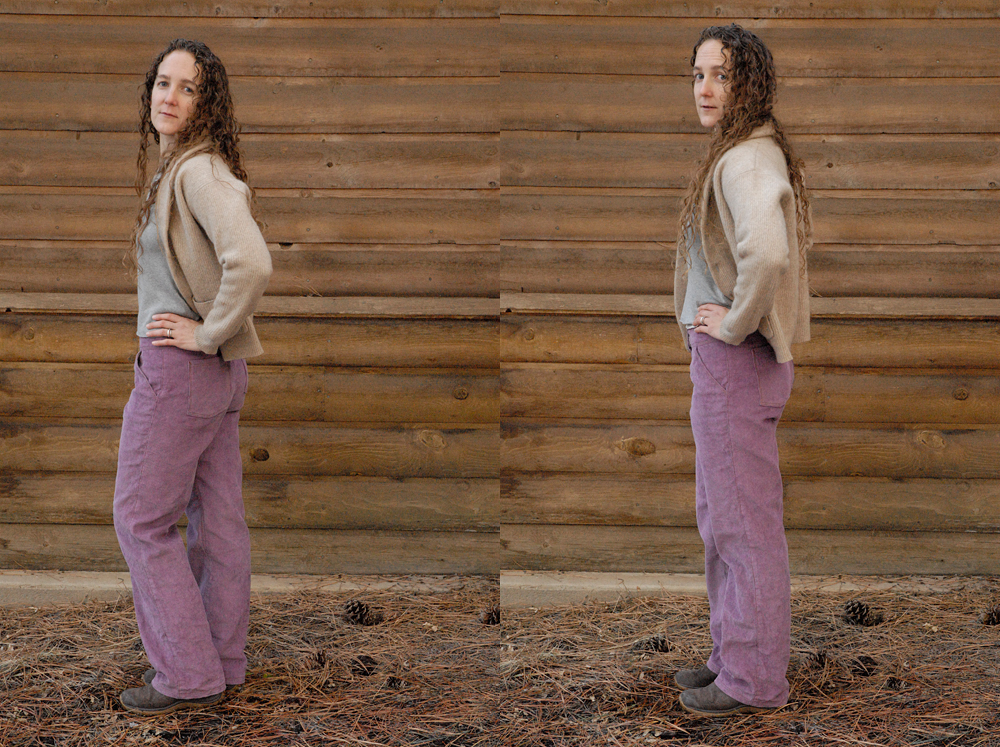
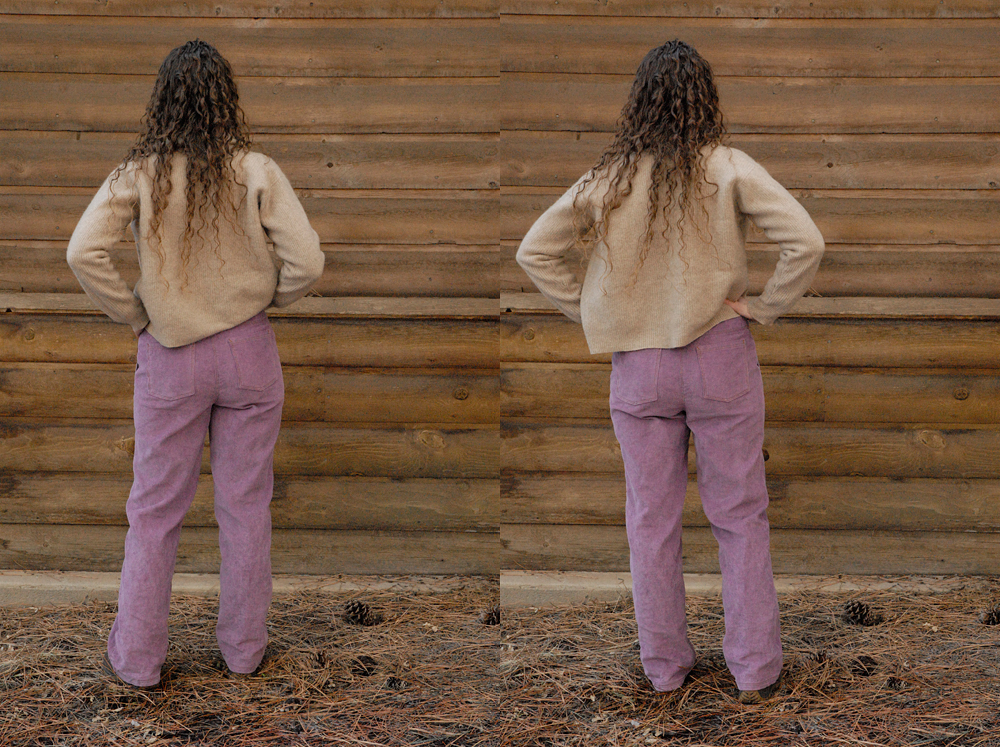
Well – I really could not be happier with this result!  Although I have tweaks to make in the next version (pants are clearly a journey, not a destination) they are the first pair I’ve ever had that really fit and flattered my figure, they’re incredibly comfortable, and I’m ridiculously satisfied with myself when I wear them.

If it wasn’t for the fact that things need washing, (Ok, and I do love skirts, and some days are for grubby clothes, etc.) I might conceivably wear these straight through until they wore out.


purple cords sewing table


Some sewing and fitting things I figured out while making them:

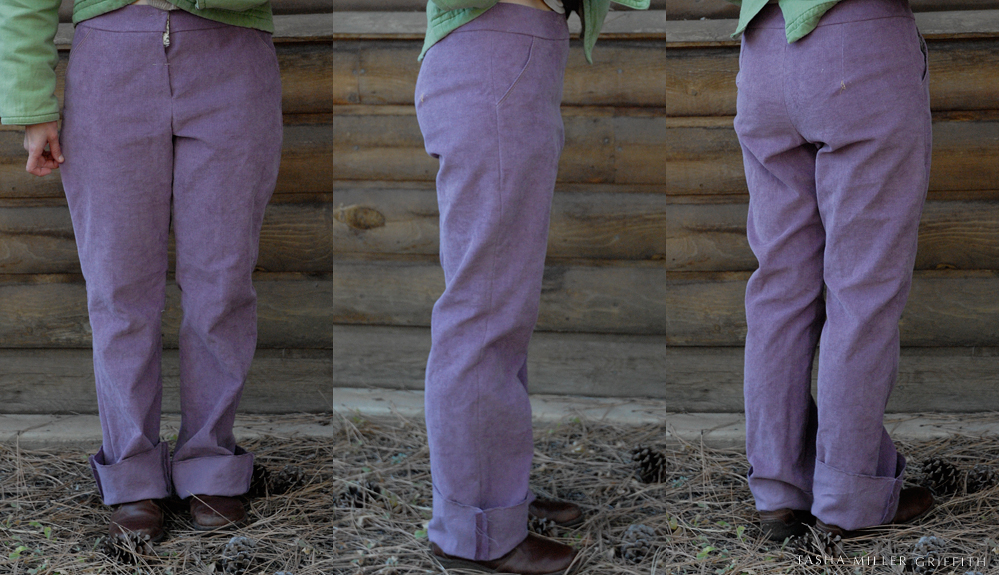
I took out all that extra I added to the back inseam of the grey ones, and then some.  Clearly a different fit requires a different shape.

See that diagonal wrinkle across the back hip in the first fitting?  I tried all kinds of things to get rid of that; letting out the side seam, unpicking the waistband and pulling the pants up, but nothing worked, until I saw something in Patternmaking for Fashion Design by Helen Joseph-Armstrong (which is one of my all-time favorite sewing books, expensive but worth it, I asked for it for Christmas one year).  It was one of my cousin’s textbooks at FIT in San Fransisco, and it shows you how to draft a pattern for just about anything you could ever want to make, plus all kinds of construction techniques.  It’s designed more for the fashion industry that for home sewers, and there’s not a lot about fitting, so I guess it says something that there is a section on pants fitting, where I found an illustration of a similar wrinkle with this note, “insufficient dart intake for dominant buttocks.”  That’s not how I’d like to think about my derriere, but the part about the dart totally worked!  I had been leaving that dart alone since I fit it in the last pants, but clearly it’s not a good idea to start think of any part of the fit as “finished” when I am changing the rest.


purple cords back


purple cords edgestitching


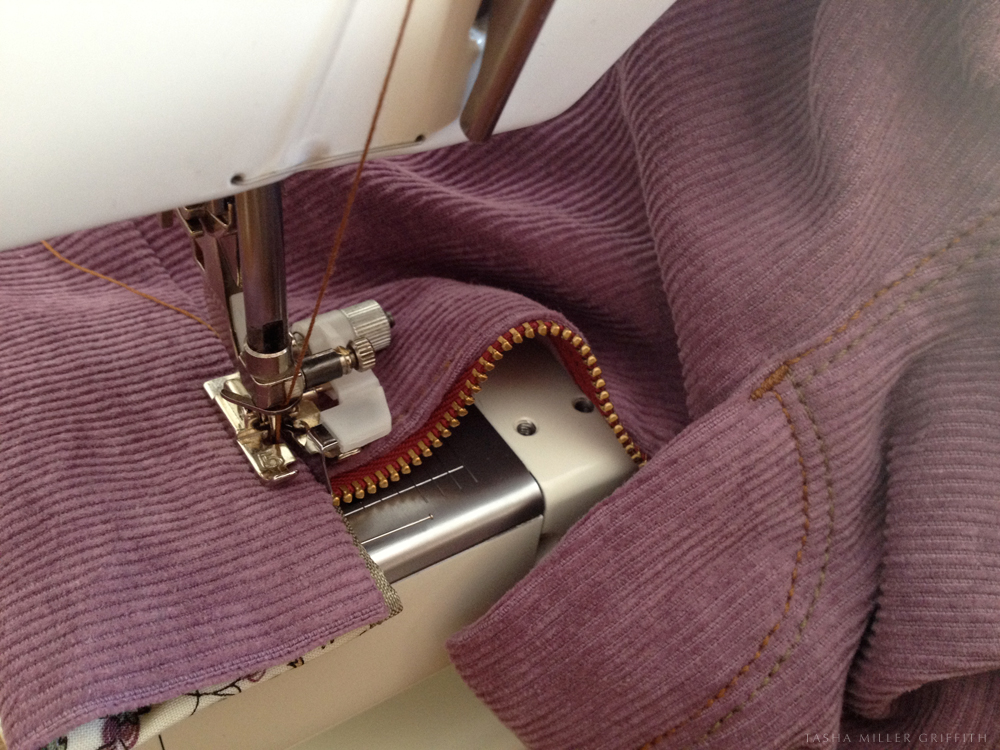
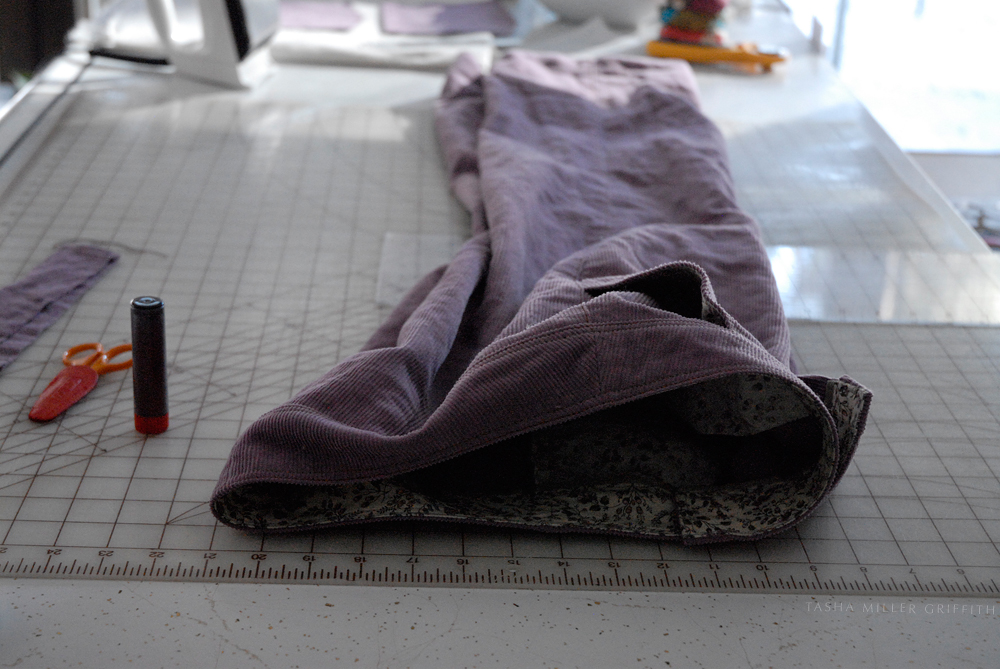
I used my edge stitching foot for the first line of top stitching (with a size 100 topstitching needle, moving the needle slightly to the left), and it worked great!  It was much easier to get an even stitching line with that little guide riding right on the edge.  I am now trying to figure out how I can use a similar guide for for the second line of topstitching, further to the inside..  Anyone know of a foot like that?  I used two colors topstitching and I really like it, one pair of Bryan’s jeans has that look and I decided to try it out.


purple cords inside


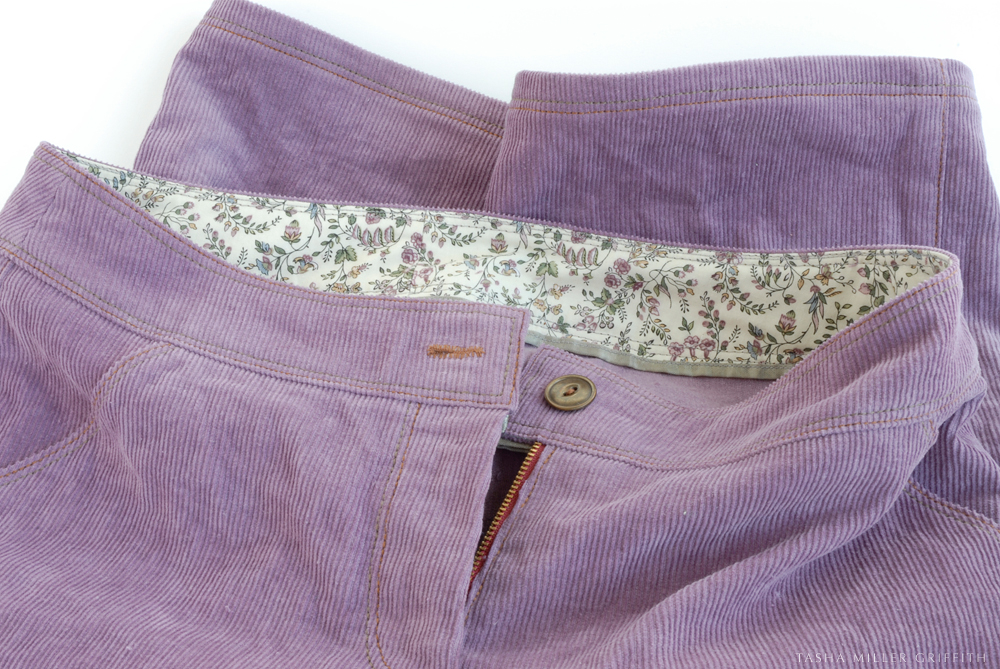
I trimmed a bit of the waistband lining before applying the rayon ribbon to the bottom edge, next time I’ll trim a bit more, but I like this finish.

If the legs look a bit long, I left them that way on purpose.  I keep noticing that the hems of cotton pants tend to creep up just a bit over time with washing, usually after I fix them just how I want them.  I’m not sure what the shrinkage of hemp is, but if these don’t get any shorter after a while I can always hem them up a bit more.

By the way, the above shot of the inside waist is probably the closest I got to the actual color, for some reason this purple seems to be hard to capture.

That’s about it, I guess, unless of course you want to talk some more about sewing, body image, and the power of DIY, etc. . . . if you see me around, I’ll be wearing these pants, and feeling happy!


tasha in purple cord pants


How to Fix a Small Hole in a Knit – Glorious Mending

fix sleep pants 1


Before I lose anyone who doesn’t currently have a sweater to fix, I’d like to mention a couple of really interesting things about mending and repair I’ve come across while working on this post.  The first one is Tom of Holland’s Visible Mending Programme, which is based on darning knits and on the idea that mending is something to be proud of.  Pretty much needless to say, I love this idea and it’s implications.  The second one is about fixing all kinds of other things, I saw it just yesterday (via Boing Boing via Root Simple) it’s a project by Paulo Goldstein called Repair is Beautiful in which he repairs all kinds of things (like a lamp, a chair, headphones) in unusual and beautiful ways.  I love the aesthetic of his project, it says all kinds of provocative things about repair, not just that it can be lovely and unusual to look at, but also he’s calling attention to the repairs, asking you to think about what it means to fix something.  Check it out, the pictures are way better than my description.

So, after all that, just an invisible mend for today – kind of disappointing I know, sorry!  I do have some ideas for visible mending of a couple of things now in my to-fix pile, and I’ll share them as they are done, but sometimes, you just need to repair a little hole.  The idea for his post started a month or so ago, when I realized that two of my favorite light sweaters/tops were sprouting holes under the arms.  Not big enough holes to need filling in/darning, but still enough to need fixing before they got out of hand.  Sometimes I even happen to catch a problem when it’s still a thread that’s about to break, like the one near the arrow below.  Most of the time, I don’t notice until it’s more like the hole on the left.


knit fabric fix 1


If you do find a weak thread that’s still intact, you can “trace” along it, following its path with a new stronger thread.  This is a fine gauge sweater, and I had sewing thread almost exactly the same color, so I used that.  You can also try embroidery floss or yarn of various types and thicknesses to get something close to your garment yarn, or something you like as a contrast.  There will probably be at least one stitch that is only made up of the mending thread, so if you want it to be invisible, choose something as close as possible to the original yarn of the garment.


knit fabric fix 2


We’re now looking at the sweater from the inside.  I like to start a repair like this by anchoring the thread somewhere where you won’t see it, like in the seam or in the back of a nearby intact knit stitch, with a couple of back stitches.  Then I start picking up the parts of the sweater that are coming apart.  Can you see how the thread and needle are following the path of the weak stitch?  In this case, that’s all I need, so I’ll go back to the seam, take two more back stitches, bury and clip the thread, and I’m done.

Ok, how about a hole that’s progressed a little further?  Also illustrated further down is a small hole with one broken thread, keep scrolling down for that one.


knit fabric fix 3


The first step here is to pick up the fallen stitches as much as possible.  Remember when I said that knowing how to pick up a dropped stitch in knitting would help you figure out how to fix things?  (Incidentally, I learned I new tip from my resident photography expert to make the photos from that post clearer, so I went back and edited them, it should be easier than ever to see what’s going on.  You can click on those photos, and the ones in this post to enlarge them as well.)


knit fabric fix 4


I’m not going to lie, it helps to have a really small crochet hook, or another tool with a tiny hook on the end.


knit fabric fix 5


It may also help to use a safety pin to hold any stitches that may pop loose while you work on the rest.


knit fabric fix 6


When you have picked up as many of the stitches as you can, it’s time to stitch the hole closed.  Start by anchoring the thread with backstitches again, in this case in the nearby seam.


knit fabric fix 7


For a small hole right near the seam like the one in this pink sweater, I basically stitch the sides of the hole to the seam, making a couple of passes and trying to keep my sewing stitches looking as much like the knitting as possible, which often involves going back and forth and going though each knitting stitch more than once.  Again resist the temptation to pull the thread very tight, or you’ll pucker the fabric.


knit fabric fix 8


If the hole is in the middle of an area with no seams, still start by picking up any dropped stitches that you can.  Take the anchoring backstitches through only the wrong side part of a nearby stitch, so that they don’t show from the outside.  Bury the thread between backstitches by moving diagonally, again piercing the stitches and not going all the way through to the front side.  In a garment with thicker yarns, you can fix the hole first and bury the yarn ends later, the body and friction of the thicker yarn will usually keep them from unraveling, although of course you can also do backstitches if you wish.  In any case, avoid pulling the mending yarn too tight or the fabric will pucker.

If the hole is too big to look good when pulled almost closed, it’s time to darn it, which will make a more visible patch.  (Look up “darn a sock” if you aren’t sure how.  You could start with Zoe’s post about it, which is where I first found out about Tom of Holland as well).


kitchener stitch 1


The mend will be most invisible if you can mimic the structure of the knitting.  The knitting term for this is Kitchener Stitch.  If you search for it, you’ll find all kinds of diagrams and instructions, but the only way it ever makes sense to me is just to look at the knitting and follow the path of the yarn.  Start a couple stitches away from the hole to make sure that you catch all the threads around it, and to practice moving the needle the way that the yarn goes.  When you get to the missing area, try to keep the pattern going.  This will involve going through a stitch above and a stitch below the hole, then the next stitch below with the same stitch above, or a similar pattern.  I’ll say it one more time, the mending yarn needs to replace some of the yarn that broke, so let it be there and don’t pull too tight.


kitchener stitch 2


kitchener stitch 3


fix sleep pants 2


I fixed the sample from the right side, and the cream knit pants from the wrong side.  You can do either one, whatever works best for you.  Just check the public side if you are working from the inside, and make sure no stitches that you don’t want to show are showing.


kitchener stitch 5


fix sleep pants 3


For a little hole like these, we’re just about done!  If you are tracing the knitting stitches with mending thread, keep going past the hole to make sure that you catch all the stitches which the broken one was connected to.  End with a couple of backstitches to make sure that everything will stay in place, and leave a short tail of the mending thread or yarn on the wrong side so that they don’t pull out.  With thicker yarns, you can use a sharp needle to bury the mending yarn, and any leftover ends of the original yarn, by piercing the back side of the nearby stitches.


fix sleep pants 4


kitchener stitch 7


The finished repairs.  Believe it or not, the arrow points to the replaced stitch in the cream knit.  The green sample still has two ends to bury in the back.


knit fabric fix 9


fix sleep pants 5


kitchener stitch 6


If you have questions about mending something, or an unusual repair you made to share, I’d love to hear about it, do share!


Simple Homemade Cheese – Goat Cheese and Paneer too!


My friend Tom comes up with some good ideas sometimes (shh – don’t tell him!) especially when it comes to food.  The other day he appeared at my house with some goat cheese he made.  I have been making fresh paneer cheese for Indian food for a while, mainly because we live a fairly small town and (to my knowledge) you can’t buy it here.  So, I already had a method for fresh cheese that’s pretty foolproof and I know works with a variety of different ingredients, and thanks to Tom’s idea, I tried it with goat milk too, and it worked great!  I got a soft fresh goat cheese.

I first learned this method from reading the paneer cheese directions in Laxmi’s Vegetarian Kitchen by Laxmi Hiremath, my favorite Indian cookbook.  Since then I have figured out a few tricks and variations.  One thing I love about this way of making cheese is that you don’t need anything you don’t already have in your kitchen or can’t easily get.  And there’s only one thing you need to know that may not be obvious if you’ve never made cheese before – read on.


fresh cheese 1


Recipe Sketch: Simple Homemade Cheese

Start with milk.  You can use whole or low-fat, cow or goat etc.  If you can get small-batch pasteurized, or non-homogenized milk, it will make a big difference in the texture of the curds and the cheese, for the better.  We used to get local dairy milk in glass bottles in Madison, which worked great.  Organic Valley has a non-homogenized “grass milk” I can get here, which also works great.  Don’t worry if you can’t find anything other than ultra-pasteurized milk though, you can still make cheese!  The only goat milk I could get was homogenized and ultra-pasteurized, and it still worked, as you can see.

Put the milk in pot with room to spare.  You can use whatever portion of milk you happen to have left in the fridge.  Most of what’s in milk is water, so be prepared for to more to become whey than cheese.  I used 1 quart of goat milk and got just over 5 oz of soft cheese, a ball about the size of my fist.

Heat the milk until it starts to boil, stirring occasionally.  Stay around the kitchen for this part, even though it will take a little while for the cold milk to heat, because as soon as it starts to boil it will want to boil over!  I like to put away the dishes or something while I’m waiting.

Also while you’re waiting, get out something acidic to curdle the cheese.  You can use fresh lemon or lime juice, or yogurt, cultured buttermilk, or even vinegar.  Each one will give a little different flavor to the cheese.  One of my favorites is a little lime with a little buttermilk.  Use whatever you have and experiment to see what you like best.

When the milk starts to boil, turn it down to a simmer and add a little bit of your acidic substance of choice.  Stir and wait for about 30 seconds, then if nothing is happening, add a little more acid, stir and wait again.  At some point a separation will occur, instead of milk you’ll have solid curds and translucent whey (yup – little miss muffet).  This is the key to knowing if the separation is complete, the whey will be yellowish and almost clear, you will be able to see distinct white curds floating in it.  The curds may be tiny flakes or huge globs, depending on the milk, but all the white milk solids will be in them, and they’ll be floating in the translucent whey.  I could have sworn I had a picture (from my not-well-lit kitchen) of what it looks like when the curds are huge, but I can’t find it anywhere.  I’ll take one next time it happens.  For this goat milk the curds are tiny.


fresh cheese 2


Once you have curds and whey, turn off the heat and let them rest for a few minutes while you get ready to drain the cheese.  Put two layers of cheesecloth (yup – that’s why it’s called that) in a colander.  If you want to save the whey, put a bowl under the colander.  You can use the whey instead of milk to make pancakes, etc., as a soup stock, or to make other kinds of cheese.

Pour the curds and whey into the colander.  If you want to make a firmer, sliceable cheese, add any flavorings you want at this point, while you can still stir them into the cheese.  For soft cheese you can do it later.  In any case, then gather up the edges of the cheesecloth and tie it together, so that the cheese continues to drain.  I have a long, plastic coated twist tie that I use, one end is twisted into a loop that goes over my faucet, and I twist the other end around the cheesecloth and let it hang it the sink, still inside the colander.  You can also tie the cheesecloth to a wooden spoon or other tool laid across the top of your colander.  You just want the cheese in its cloth to be suspended so it continues to drain.

fresh cheese 3


That’s about it!  Leave your cheese to drain for an hour or more, depending on how firm you like it to be.  If I’m making paneer I want it to be sliceable, so I’ll leave it longer than for soft goat cheese.  You can always open the cheesecloth and check to see if it has reached the consistency you want.  If you’d like it to be firmer, just tie it back up and leave it to drain a little longer.  You can also press the cheese after draining, between two plates with something heavy on top, and leave it in the fridge like that for a few more hours to make it even firmer.  So like I said, lots of options.

Ta-da! Cheese!  You can now scoop it out of the cheesecloth and into a bowl or container to save it.   For soft cheese, you can stir in a little salt or any herbs you would like to add to the flavor.


fresh cheese 4


So there you go, I hope that’s enough to get you started on your own cheese-making adventures!


Michigan Winter in Pictures


michigan winter 5


Out here in Flagstaff, winter is (assuming it snows enough) bright days with the sun bouncing light from the snow everywhere, white too bright to look at and deep dark shadows.  Ponderosa pines collecting snow in huge clumps in their needles, and then when the sun comes out, dropping them with a window-shaking thud on the roof over my head, or on my actual head while I’m shoveling.  It’s getting your skiing in before the snow melts down, and watching the flakes float past my studio windows when it snows again, which is one of my very favorite things about this room.

In Michigan, from whence we just returned, winter is different.  And to me, totally beautiful.  The bare branches against a grey sky are a delicate tracery of subtle colors and shades, more muted but lovely scenes are in the dried branches, the white fields.  After spending the morning playing with my little nieces, I escaped outside with only my camera.  I got that “what are you finding out here to make the picture worth your freezing fingers?” look from at least one Midwesterner I ran across, but that’s the beauty of something unfamiliar, seeing the hibernating landscape with my fresh eyes, I saw worthwhile photos everywhere.

The landscape also meshed well with these thoughts from Kimberly at The Year In Food:

And I love darkness, in the sense that this is a season of long, dark nights, quiet, rest, hibernation. There’s merit to embracing it rather than fighting it and I try my best to do so each year. Perhaps easier said and done from the mild coast of California than in the thick of a midwest winter. But that season of rest is here, nonetheless: the fallow land, the bare trees, the grey skies, the long nights, the snowy mountains off to the east and north. Let’s embrace it, friends.

I often find myself this time of year longing for warmth, summer, light and long days of it.  But seeing a new winter landscape reminds me of the beauty that is here right now, a quiet one perhaps, but one worth enjoying just as it is.  Here’s to embracing your season, wherever you are!


michigan winter 1


michigan winter 2


michigan winter 3


michigan winter 4


Wishing You a Happy 2013

happy new year postcard


This postcard was printed on this mechanical press, at the Public Museum of Grand Rapids, MI.  I could have watched this press all day.  The volunteer printer flung the big wheel to get it started, then kept it going with the foot pedal while he moved the cards in and out.  All the parts moved fluidly, rolling the ink across a plate and printing a card in the time it took him to place a blank one.  It reminded me of two things I love; treadle sewing machines from a similar era (the late 1800s), and the below quote from Anaïs Nin which appeared, with more excerpts, on Brain Pickings:


You pit your faculties against concrete problems. The victories are concrete, definable, touchable. A page of perfect printing. You can touch the page you wrote. We exult in what we master and discover. Instead of using one’s energy in a void, against frustrations, in anger against publishers, I use it on the press, type, paper, a source of energy. Solving problems, technical, mechanical problems. Which can be solved.


grand rapids museum printing press


Here’s wishing you all a new year full of joy, handcraft, and solvable problems!