Another Way to Rip Seams


pocket seam ripping 1


If you’re going to make anything, it’s fairly certain that you’ll have to un-make and re-make part of it at some point.  It’s not bad, it’s just part of the process.  In sewing, this involves seam ripping.  It’s an essential skill for makers, and especially those who are interested in refashioning, repairing, upcycling, etc.

Although some folks rip stitches fast and furious with razor blades, I have always stuck to my trusty seam ripper.  Recently I’ve been using it in a slightly different way on straight and zig-zag seams, with really good results.

seam ripping 2014 0


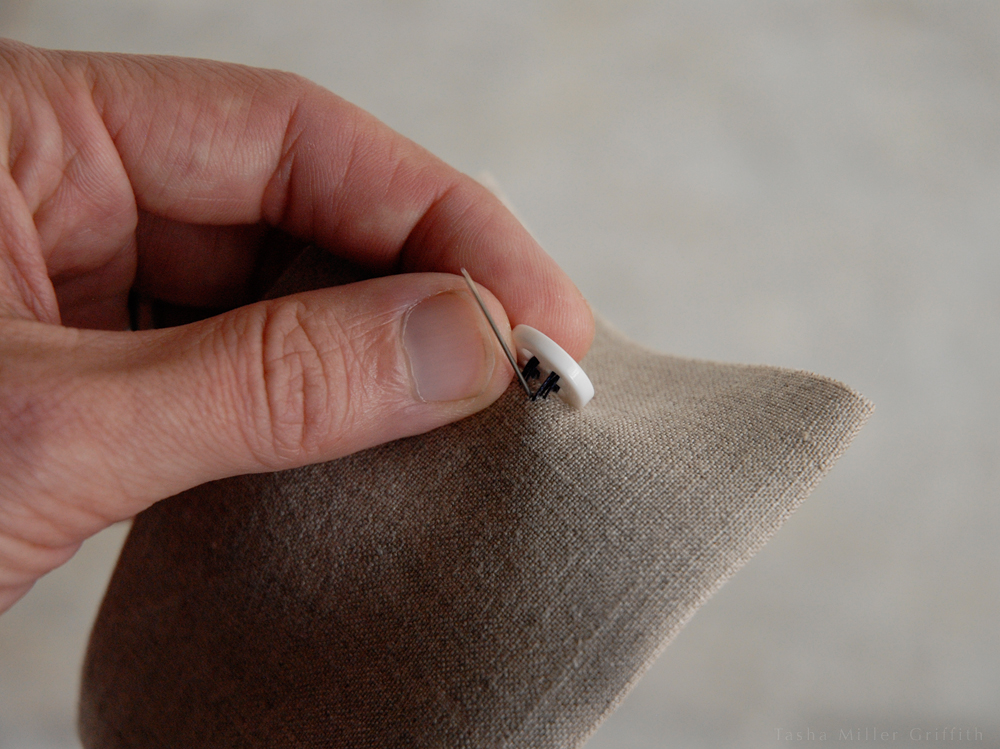
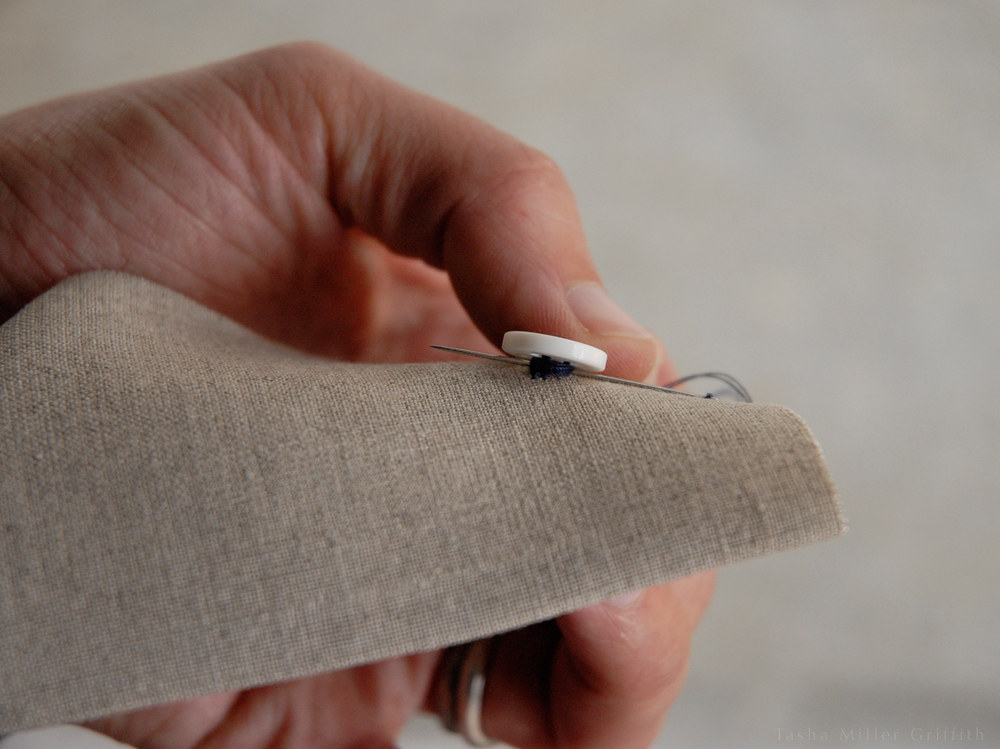
The photo at left shows classic seam-ripper technique.  Slide the seam ripper into the seam, use the pointed part to pick up a stitch or two, and slide them into the blade in the middle of the ripper to cut.  Once you have a couple of stitches cut, pull the seam open and you will be able to see and cut more without harming the fabric.


seam ripping 2014 1
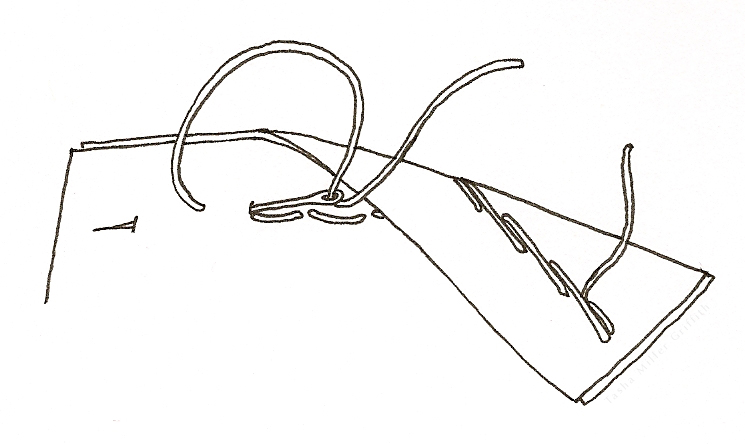
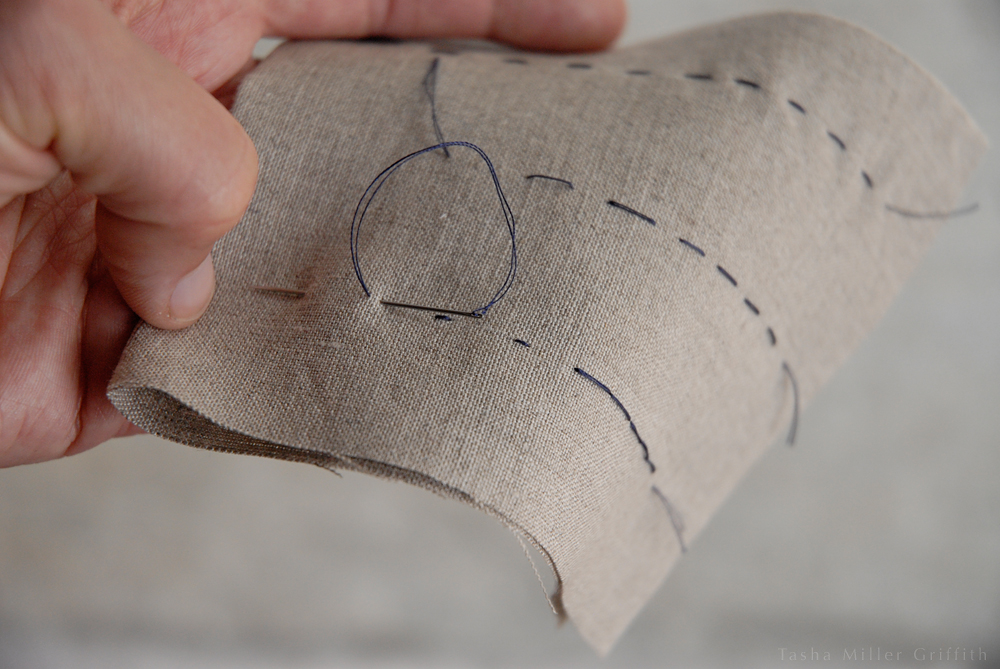
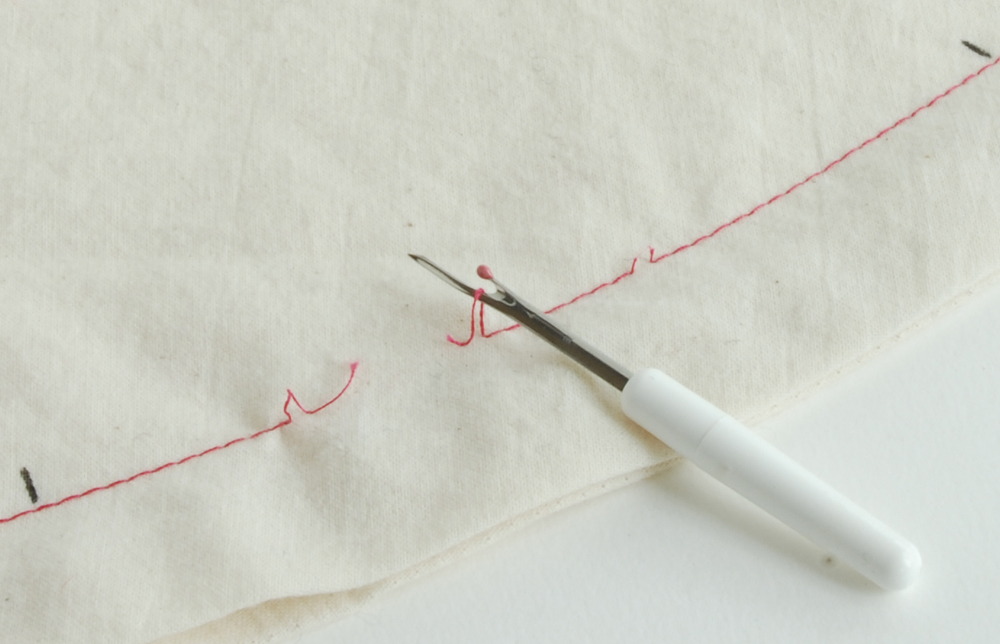
For this technique though, everything stays flat, which is especially nice if you have a delicate fabric or it’s hard to see the stitches in the seam.  Use the ripper to cut a stitch, and then another one 1 -2 inches away, creating a small thread section with cut ends.  Then use the long prong of the ripper to pull a few stitches up and out of the back thread without cutting them.  You may need to do this one by one if the stitches are small.  The object is to get a little tail that’s long enough to hang onto with your fingers.


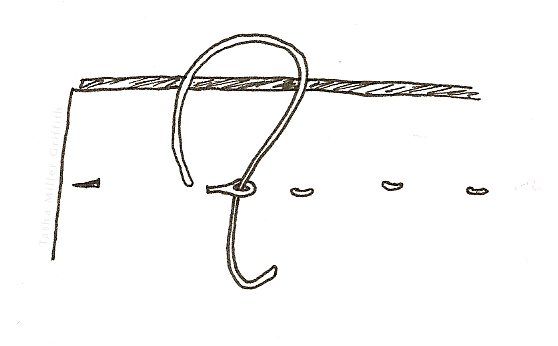
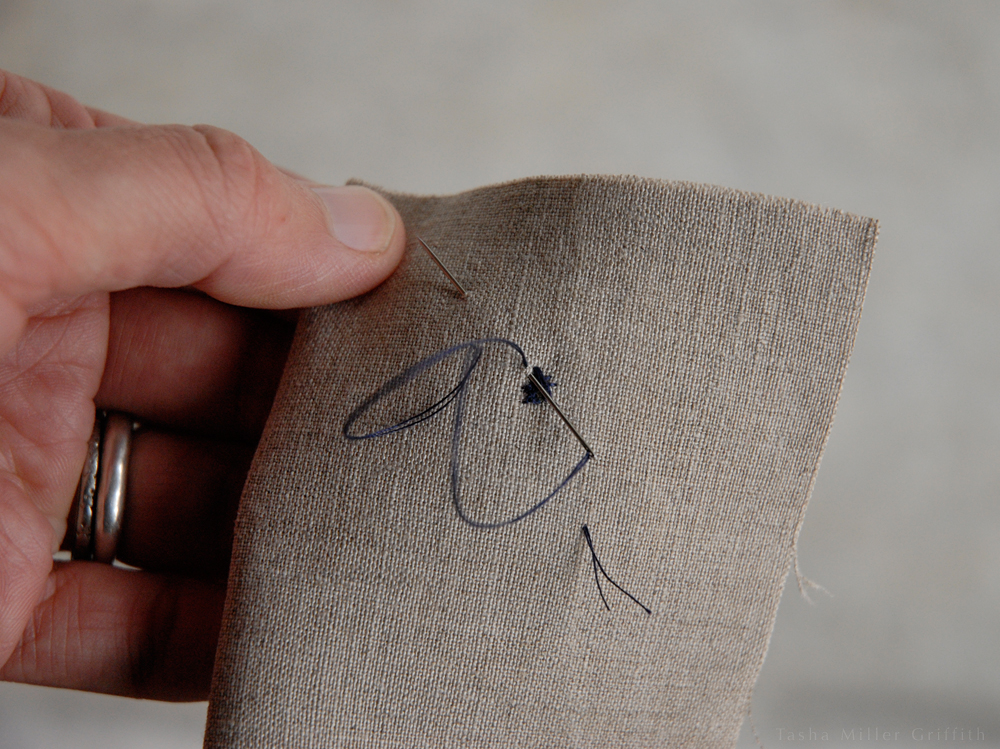
Once you get a tail, grab it with one hand, hold the fabric with the other, and pull the the thread section out in one go!  Pulling close to the plane of the fabric, instead of straight up, will make it easier.


pocket seam ripping 3


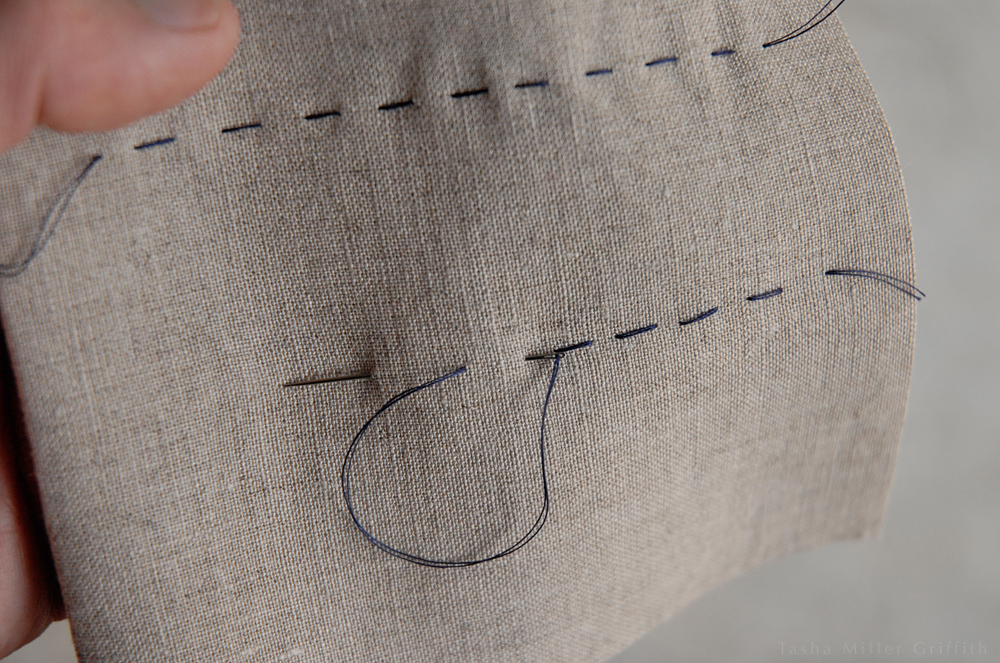
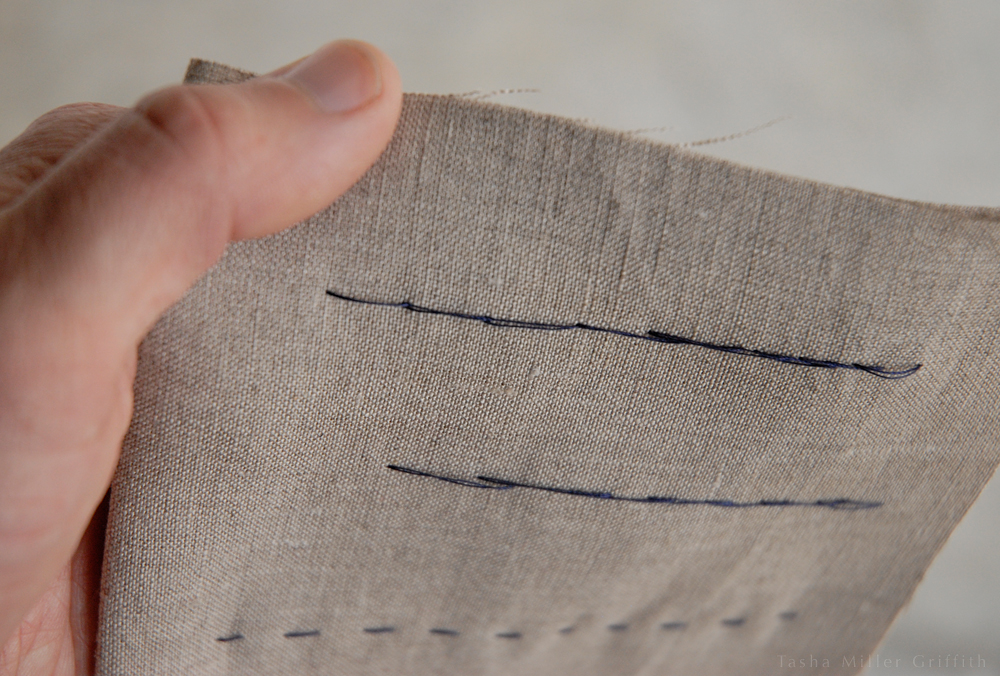
If you flip the fabric to the back you’ll see that the stitches on the other side, which were held in place by the ones you just pulled out, are now free.  All you have to do is cut a stitch a little way down the seam and you can use the free thread to pull out another section.  Every time you pull out a section, flip the fabric over and you’ll find a tail ready to pull out the next section.  I find this quite fast, and it also creates fewer tiny thread ends that you’ll have to clean up.


pocket seam ripping 4


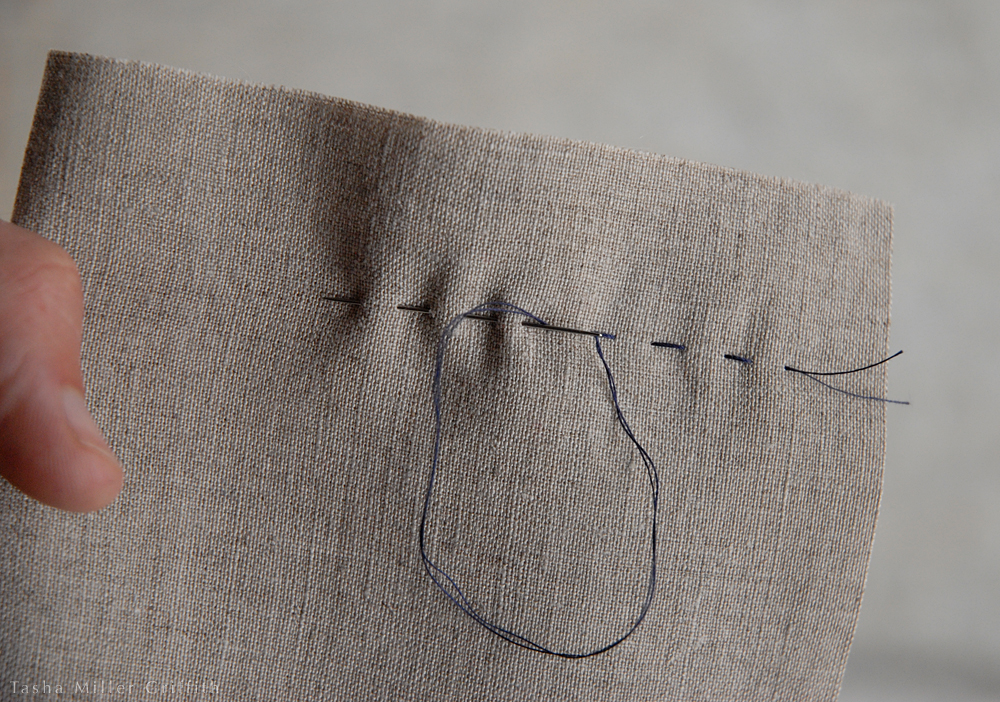
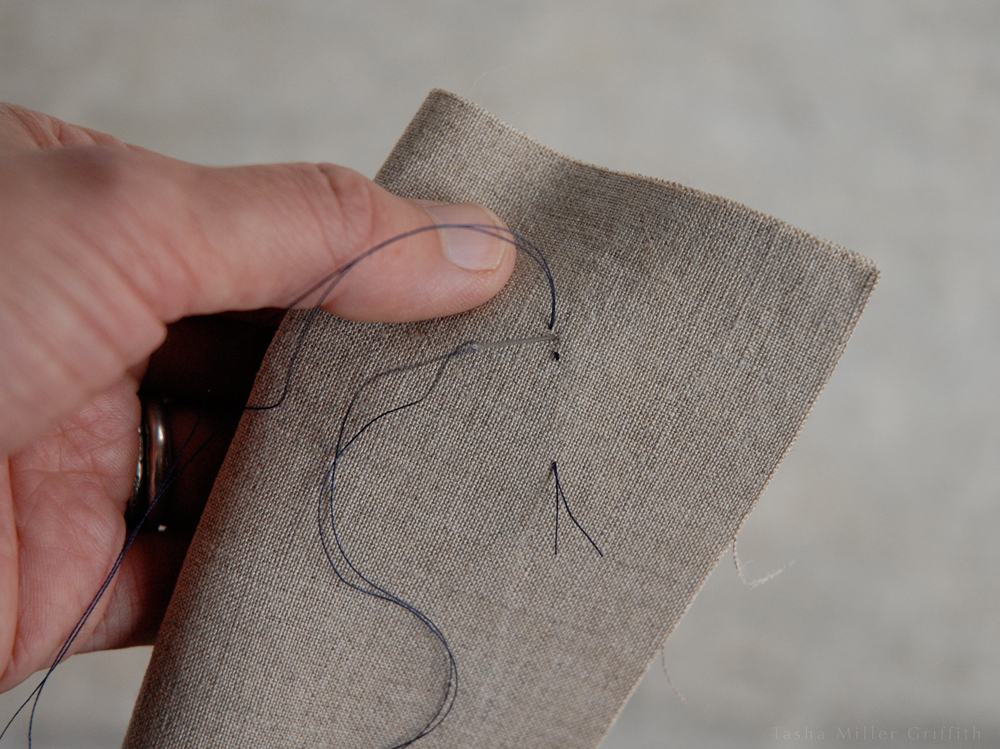
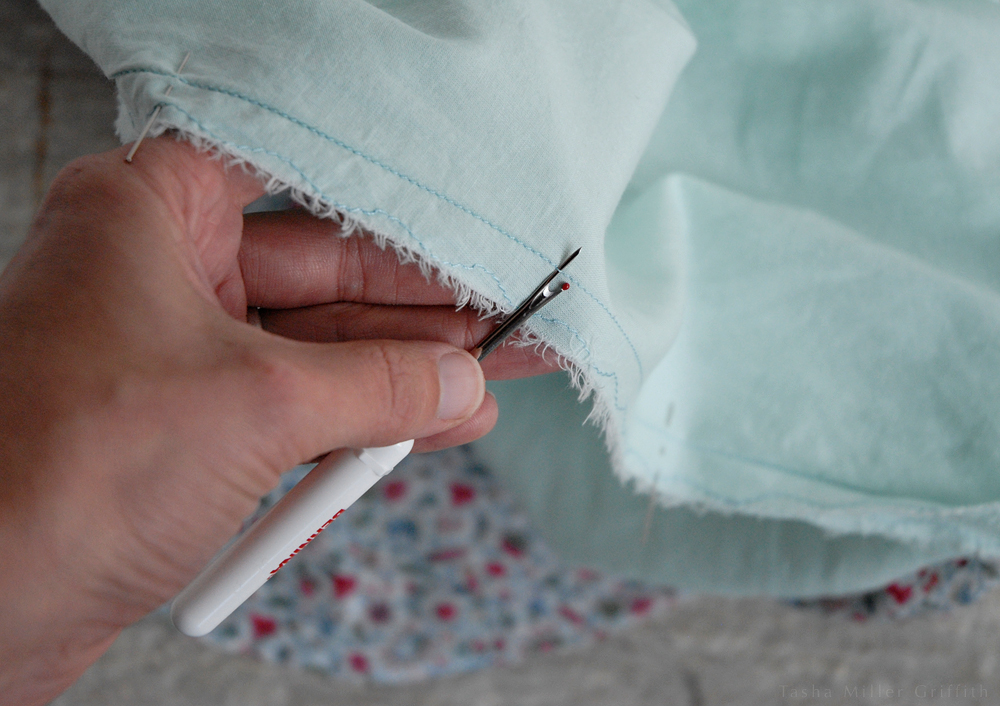
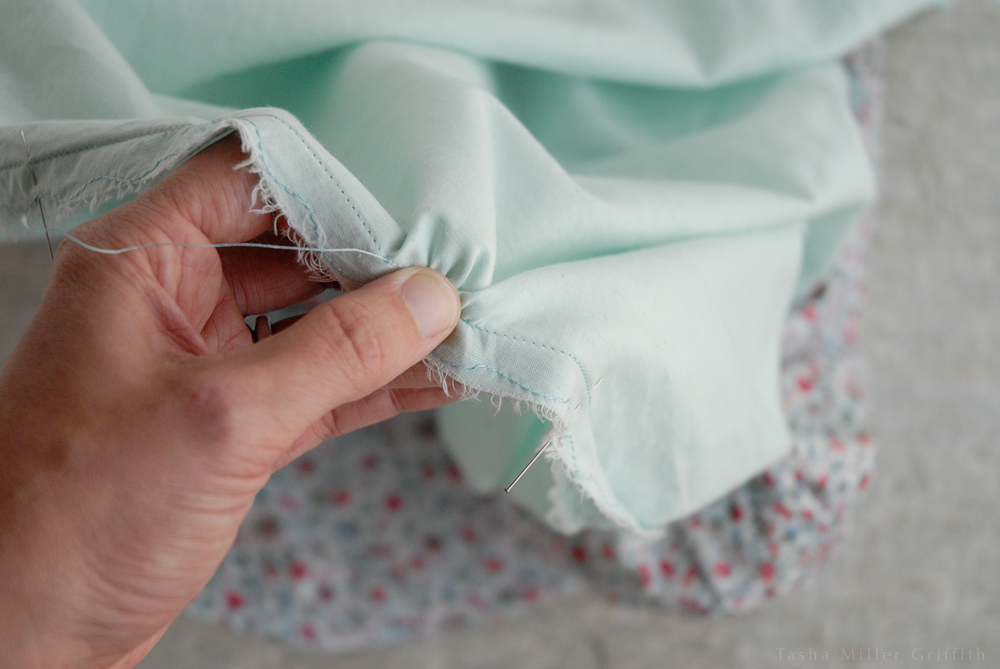
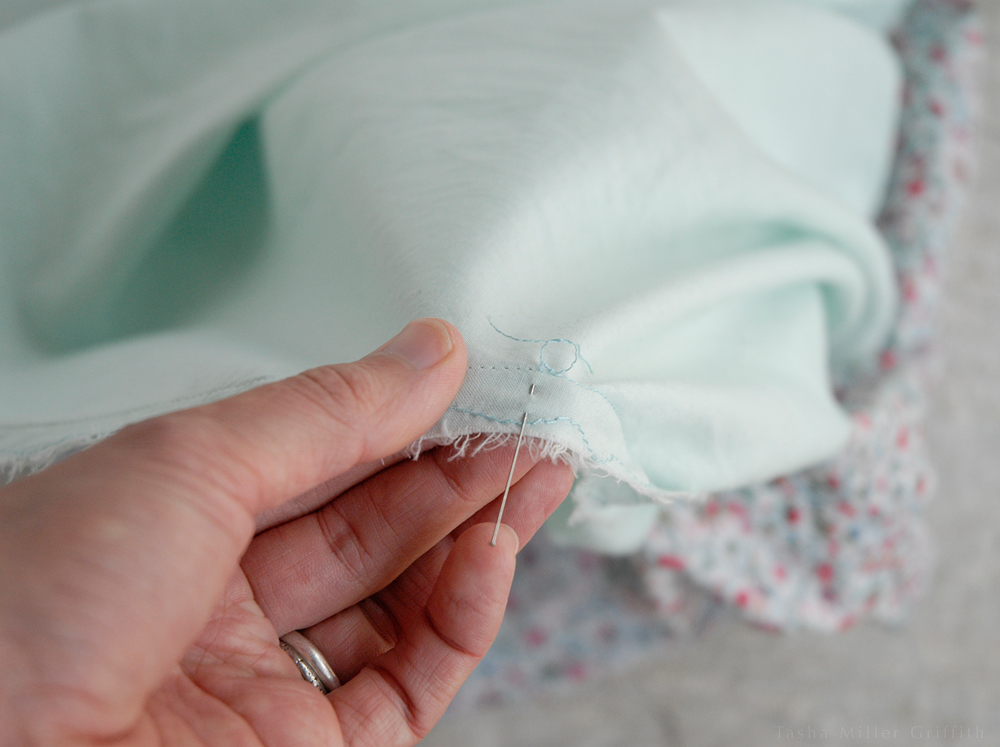
If you are ripping out a specific part of a seam, such as between the pins here, you may want to have a longer thread to work with when you get to your stopping point, so you can tie a knot to hold it in place.  In this case, pull up the last inch or two of stitches without cutting either side.  It may help to turn the seam ripper so the stitches don’t slide into the cutting part.  Once a stitch is loosened, you can also use your fingers, the whole handle of the seam ripper, or another tool to pull the stitches up without cutting them.


pocket seam ripping 5


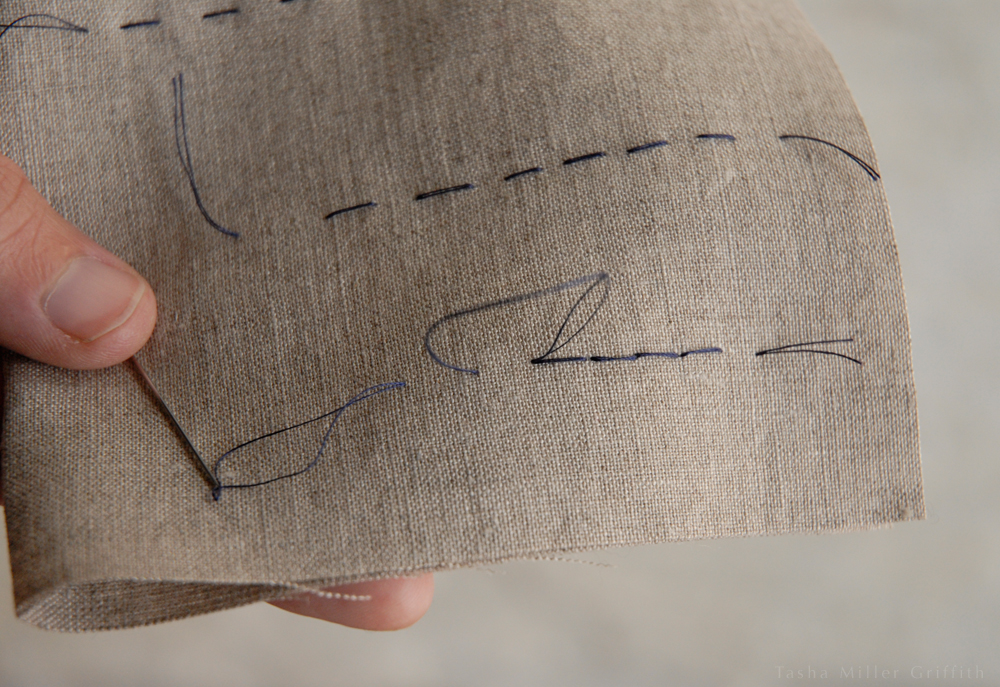
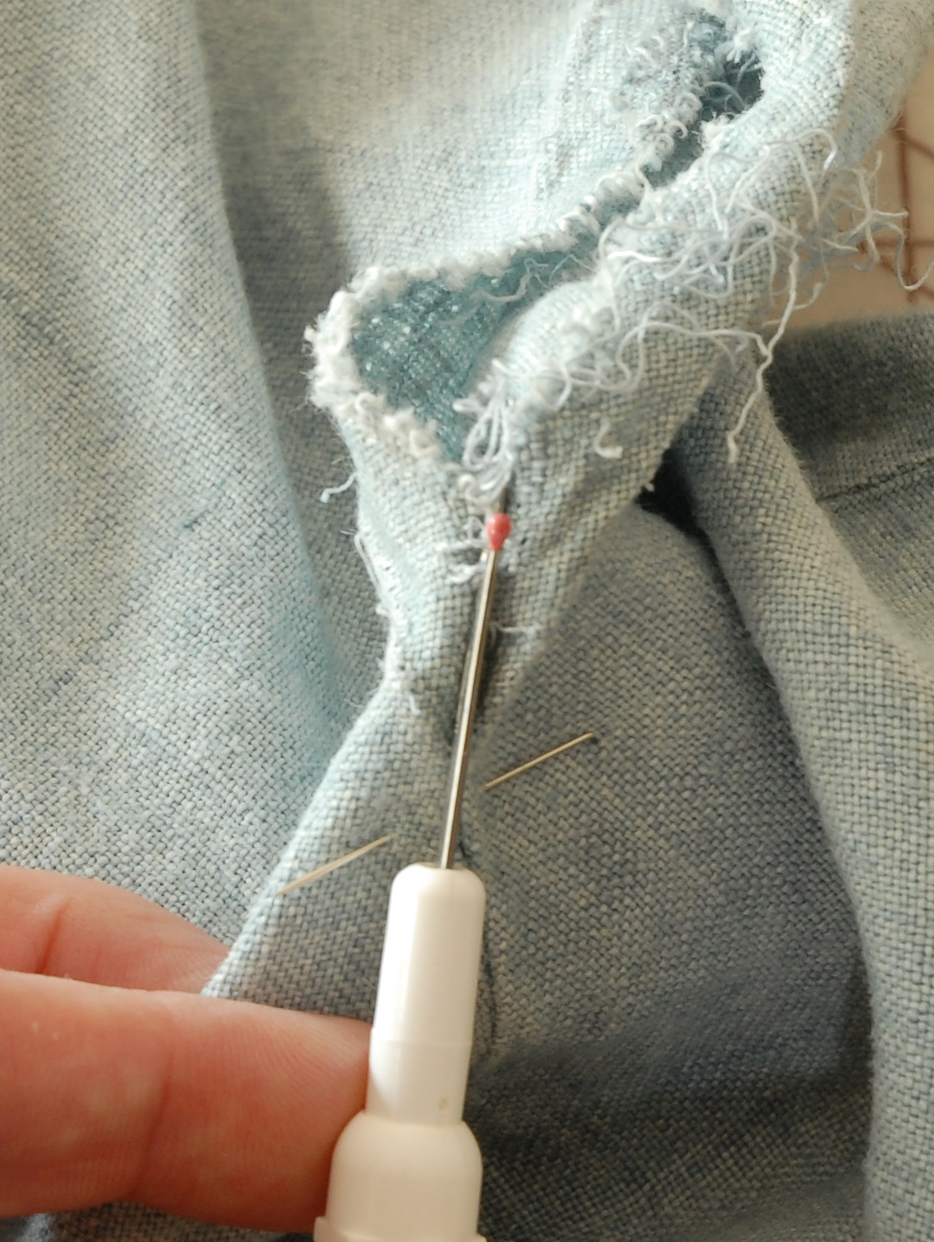
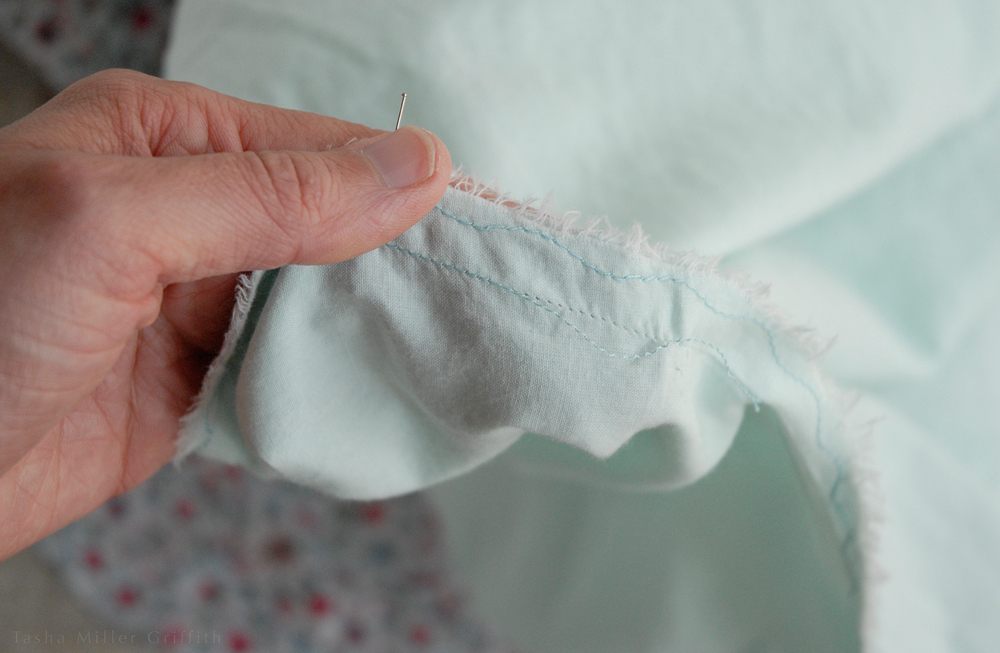
When you get to the new end of the seam, pull on the thread to get the last stitch from the back side to pop through onto your side.  Slide the point of the seam ripper into this new stitch and pull it up so that both ends are on the same side.

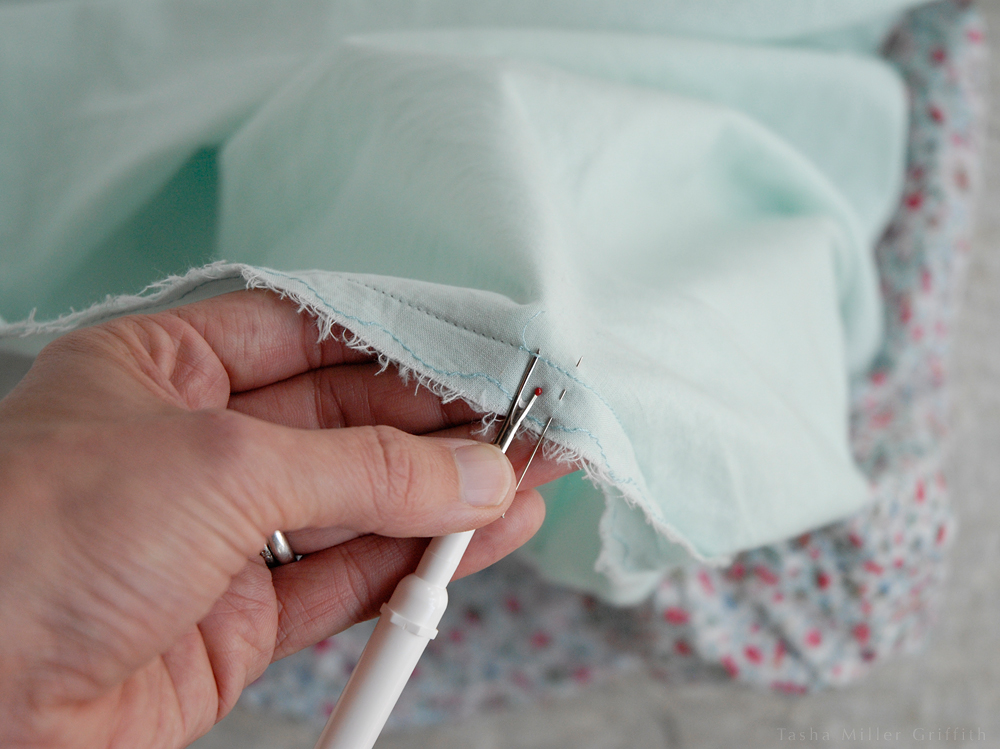
Tie a knot or use backstitch, and bury the ends if they’ll show.


pocket seam ripping 6


Again, this last part is only necessary if the end of the old seam won’t be crossed by or stitched over with a new seam, and so you need to secure the end.

This way of seam ripping works great on zig-zag seams, too, although it won’t work with seams where the thread crosses back over itself.  Sometimes I’ll get lucky and pull the right thread on serged seams, but I don’t have a sure-fire formula for those yet.  Maybe you do?

I’m sure that others use this technique, I just discovered it recently and I’ve been using it all the time …


Wire Turns Fabric Tubes!

The other day I was making fabric straps, and the time came to turn them right side out.  I never bought one of those proprietary tube-turning things, and I don’t do this very often, so usually I just tie the seam ends to a blunt needle and slide it through the tube bit by bit.  It’s kind of a pain but it usually works.  However, on this day my studio was somehow completely devoid of blunt needles.  I don’t know where they went, but I suspect karma is involved, since I always tell even my knitting students to buy sharp ones for burying ends.  I tried it with a sharp one, but that was clearly the wrong idea, of course the needle point kept piercing the inside of the tube.

After stewing it around in my brain for a while, I remembered that I had some millinery wire left over from another project.  I twisted one end into a loop, tied the thread ends to it, and pulled it through – viola!  Then I tried it with beading wire, which is much thinner and more flexible, but also worked just fine.

This is why we invented pliers, so you can make a loop smaller than your finger.  You may need to squash the loop flatter with the pliers to get it to be narrow enough to go through your tube.

Twist the wire around itself – it’s more secure if you twist both the end and the main wire around each other, not just one around the other.

Cover the pokey wire end with some tape to keep it from catching on the fabric  – I used artist’s tape, electrical tape or painter’s tape should also work, duct tape is too gooey.

Ok!  Slide your new wire tube turner inside your tube.  Take the ends left from sewing the seam and tie them securely around the wire loop.  If your knot is not secure it may pull out part way through the turning process – terrible!  I pushed two thread ends through the loop one way, and two through the other way, and tied them in several square knots on top of the loop.

Pull the wire into the fabric tube, and the tube should start to turn inside itself.  Sometimes it’s a bit hard to get it started, you can try using your finger nails to pull the scrunched up fabric over the end.

General tube turning tips:  Don’t get so much fabric bunched up right where the tube is turning that it gets packed in and won’t turn.  If you get stuck, back the bunched up fabric away from the end and try moving a smaller amount through the turn.  Pull on the wire threader and the turning point, stretching a bit can help.  Once you get going, pull on the fabric end inside the tube instead of the wire, so there’s no danger of the thread breaking.

It’s much easier if you have a slippery fabric!  Mine at the moment is two layers of cotton, not slippery at ALL, but it still worked without too much fuss.  I wanted my straps to be as thin as possible, the limit with this fabric was a 1/4″ seam.  With a slipperier fabric smaller could work, keep in mind though that you have to have enough seam allowance so that your finished tube won’t unravel, and that seam allowance has to fit inside the finished tube!  I zigzaged over my SA since I absolutely do not want to take my dress apart later due to straps coming apart.

What am I making with these tubes anyway? A sundress!  I took this picture on Sunday during our giant spring snowstorm, which is now melting like crazy.  Whatever the weather says, it’s time for spring/summer sewing!  I used the fabric tubes for the straps, and also button loops at the top.  I’m glad to have my new wire turner, I can make some more straps for tops and dresses for the upcoming season.

Here is my sketch of the finished sundress.  I haven’t decided whether to do the big patch pockets or not.

What do you think?  What are you making now?

All About Backstitch


Backstitch Drawing 1


Revised and updated with new photos and text (and drawings I found in my sewing class materials), this tutorial is now better than ever! Feel free to grab a fabric scrap and some thread and follow along.

If I had to name the single most useful hand sewing stitch I know, it would probably be the backstitch. I love it for repairs, for sewing in zippers, and for anywhere I need the control and flexibility of hand stitching with a hard-wearing stitch.

When you think of hand sewing, you probably think of running stitches, like the ones below. The needle dips into the fabric and comes up going in the same direction. You can make several running stitches on the needle before pulling the thread through, and the thread slides easily through several running stitches at once.


new backstitch 1


In a backstitch, the thread loops around itself, which makes the stitch much harder to pull out. To make one, take the needle backwards from the direction you’re stitching in, stab into the fabric, and bring the needle out at the further end of the next stitch. Then go backwards again and take the next stitch.


new backstitch 2


You can see the overlapping loops on the wrong side (backside) of the stitching. By contrast, the running stitches look the same on both sides.


new backstitch 3


If you make backstitches touching each other, from the right side (public side) it looks almost exactly like machine stitching, which makes this a great stitch for repairs and touch-ups.


new backstitch 4


You can also leave more space between small backstitches. This is sometimes called a prickstitch. It’s the stitch I use to sew zippers into just about everything, including my trousers! I love sewing zippers by hand, it gives me great control and precision, and more flexibility about when I attach them. Susan Khalje wrote an article for Threads magazine about hand-picked zippers that’s worth looking up if you’re interested, that’s what got me started doing them this way.


new backstitch 5


Because each one is almost a knot in itself, backstitches are really sturdy. The zippers I’ve sewn with them have lasted at least as long as the pants!


Pickstitch Drawing 1


Backstitches are also useful for securing your thread anywhere you don’t want to have a knot. I often use one or two to secure the beginning or end of a seam, and when I’m burying yarn ends in knitting. In the days when most garments were sewn by hand, it was common to use running stitches with a backstitch thrown in every few stitches for extra strength. (I know that from reading The Mary Frances Sewing Book, which is amazing).

Happy stitching!


new backstitch 6


Quick and Easy Ski Straps

We are hanging out and skiing with some wonderful friends this week in Oregon, so it seemed like a good time to add this project!

We got these ski straps for Christmas, but for some reason the foam part only extended partway between the skis, so they could still rub on the other side (imagine the cardboard here is the skis).  The top strap is how they started.


This is how I get into trouble, of course this could be better, and so I have to make it better.  The bottom strap is after I altered them.


It would be super easy to make your own for cross country or downhill skis, all you would need is something thick and squishy for between the skis, like felt, fleece, foam or batting covered with fabric.  Plus wide velcro.  Make the squishy part a little wider than the skis, plus enough to overlap and sew to the velcro, and enough velcro to reach around skis and stick to itself (fuzzy side out, hook side in).  Sew it together with a sturdy X pattern, and you’re done!

These would make a great little present for skiers you know.  Here’s hoping for some more snow in Flagstaff this winter, we love to xc ski right near our house when there’s enough.

Note: to sew an “X” for extra strength: sew in a rectangle first.  When you get back to where you started, sew diagonally across to the other corner, then along one side a second time.  Sew diagonally to the other corner, and back along the opposite side.  Overlap a few stitches where you started.

How to Sew on a Button

And make a thread shank, for a better-working button.


sewing on a button 10


As promised, complete directions!  Anyone can do this.  All you need is some thread and a sharp needle.  Start with a piece of thread about as long your arm, and put it through the needle so you have a double length.

Start by anchoring your thread.  The conventional way to do this is by tying a knot in the end.  But sometimes a big knot on one side is too conspicuous or would catch on things.  Instead try backstitching.  A backstitch is a stitch that makes the thread loop back on itself, it’s very secure.  On the wrong side, slide the thread between the fabric layers and come up near where you want the button to be.  Pull the needle though, leaving a thread tail at the start.  Take a small backstitch.  Put the needle out nearby, then take another backstitch in the opposite direction.  The thread is ready to go!  Pop the needle up to the right side where you want the button.


sewing on a button 1Click on any of the photos to enlarge if you’d like.


The next part is pretty much self-explanatory, except for one thing.  Use a spacer to make room for a thread shank underneath the button (ignore this part if your button already has a metal shank on the back—just stitch through that).  This makes room for the fabric (where the buttonhole is) to fit underneath the button.  I often use a toothpick which I keep in my sewing stuff.  You may want a bigger or smaller spacer depending on the thickness of the fabric and how curved the button is.  Just sew over the spacer as you go in and out through the holes of the button.


sewing on a button 2


sewing on a button 4


Go through each part of the button a couple of times.  Pull out the spacer and pull up on the button, see how there’s now extra thread underneath?  Bring the needle up from the bottom under the button.


sewing on a button 5


sewing on a button 6


Wind the thread a few times around the thread bars under the needle—but not too tightly.  If you make this whole thing too tight, the sides of the holes in the button can rub and wear through the thread.  Stab the needle straight through the thread shank a couple of times from different directions.


sewing on a button 7


Secure the thread either just under the button, or on the back side with a couple more backstitches, then trim the thread tails.


sewing on a button 8


So the next time a button pops off your shirt, you don’t need to send it off to Mom or stuff it in the back of your drawer, you can fix it yourself!  Feel free to post other button questions, too …


Fix a Ripped Out Button (or Other Small Hole)


This is a sweater/jacket I picked up at the thrift store the other day, I thought it would be good for our upcoming ski trip to Bend (and also because I’m cold basically all winter long).  Only one or two small problems, the original buttons are some crazy unique things, more like a snap with one large flared button side and a flat back, and two of them are missing, leaving holes where they ripped out.

But small holes like that are pretty easy to fix, especially since the result will be covered by a new button.

The fabric here is a sturdy (not very stretchy) knit.  I happen to have some sturdy black knit fabric to cut little circles from, but if I didn’t I would use a woven rather than something too thin or stretchy.  The fixed place is going to have lots of stitches in it and not be very stretchy anyway.

The easiest way to get the patches to stay where you want them is to baste them in.  (Basting just means stitching that’s not permanent, but meant to hold something in place while you sew.)


Because I want this spot to be super sturdy, I put one small patch directly behind the hole and another one on top to back a larger area (both on the wrong side of the jacket).  I used contrasting thread for basting, but you may want to try matching, it will make pulling out the smaller stitches later not as necessary.

Next, smooth the sides of the hole down and as much back where they came from as possible, and sew using your machine.  If the fabric has a distinct color on each side, you can use different color top and bobbin thread – I used cream on top and black in the bobbin.  (A picture of me sewing this would show nothing, since it’s all under the foot!)  I used a short stitch length and went back and forth over the hole, mainly in the same direction as the knit ribs of the fabric, and then a bit side to side.  Make sure to catch all the raveling edges.  When you’re done it should look something like this:


Pull out the basting threads, bury the sewing thread ends, and you’re done!  Next week: how to sew on the button.

One final note, only one of these cuffs had the button come off.  But as you can see, the other one is about to go.  And besides, it will look more natural if they’re symmetrical.  Sometimes it just feels good to pull something off with pliers – rawr!


Got something you would like to fix?  Not sure how?  Leave a comment!