News Jan 2016


Arizona Fiber Arts Retreat, Things I Forgot to Mention, and More

 
Lately I haven’t been doing as good a job as I’d like keeping you all, lovely readers, updated when I have something going on outside of this blog.  I haven’t wanted to stick random announcements into tutorials or thoughts that will (hopefully) be read long after the news is relevant, but I also don’t want to pepper you with little posts for each bit of “look at this!” type news.  So I’ve decided to do a periodic news round-up when warranted.  Because this is the first one, there’s some overdue stuff as well as some newer items.


Old News

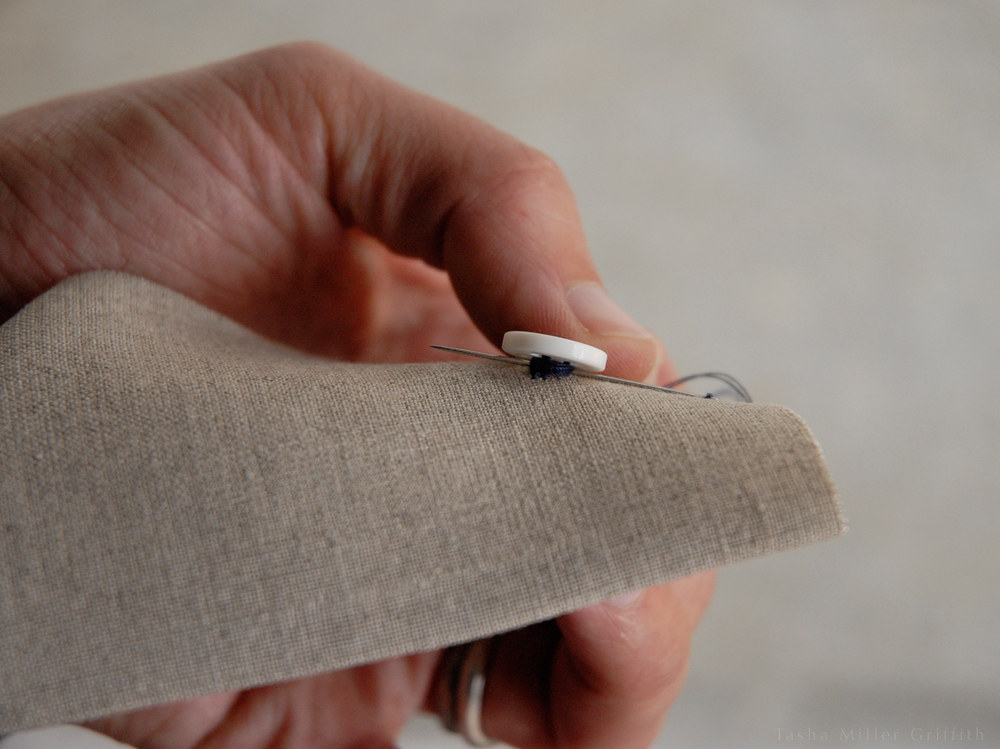
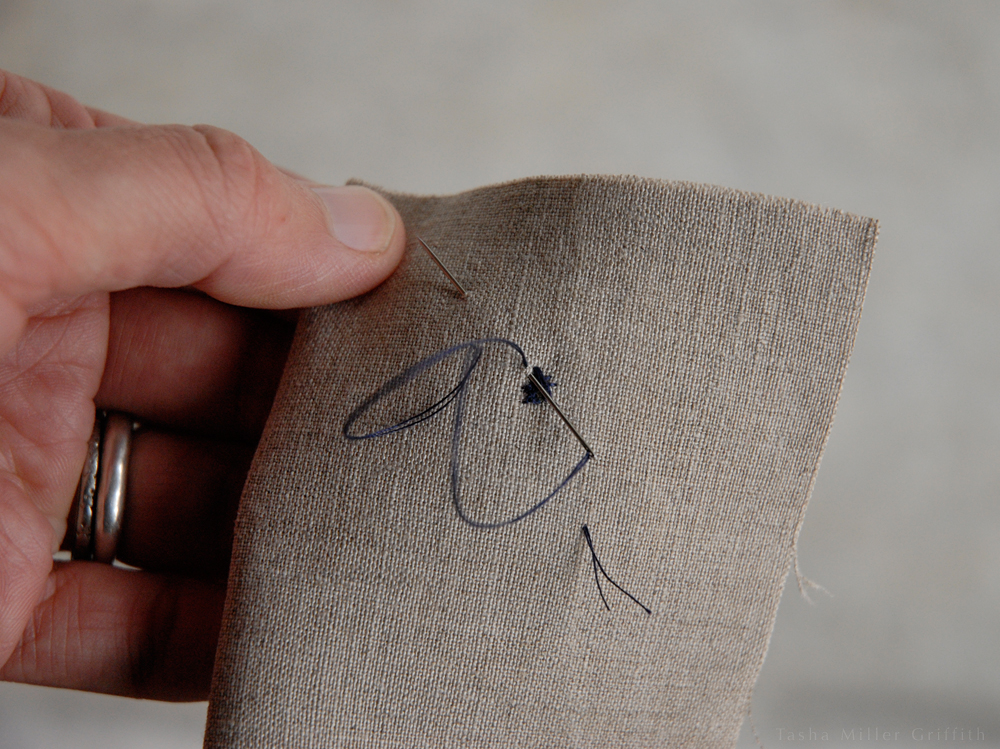
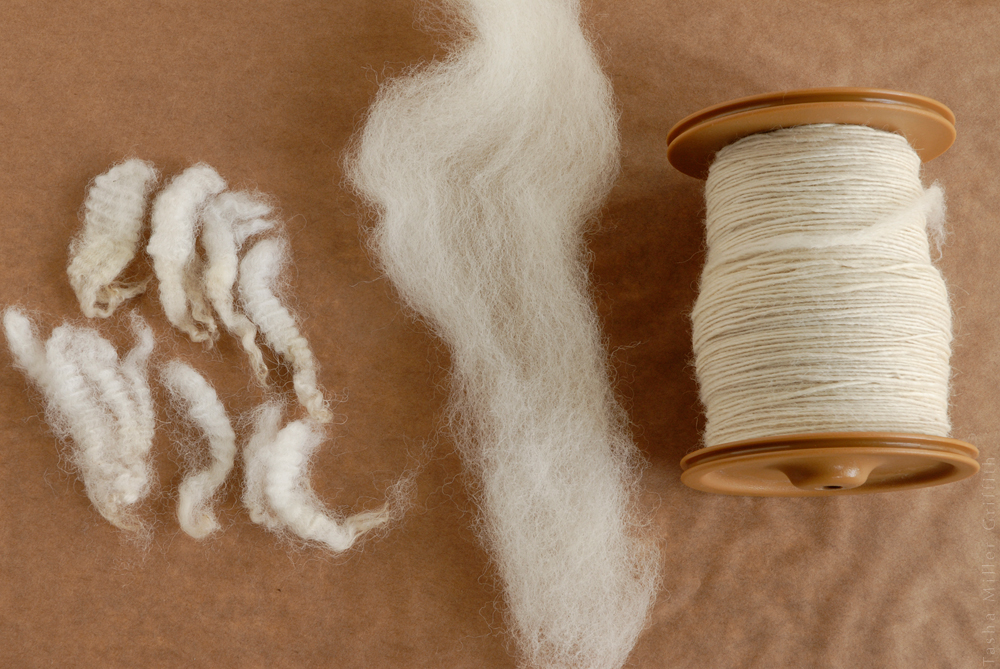
I wrote a few more articles that came out in Seamwork magazine this fall, and the latest one in the December issue.  Although I mentioned some of them in passing, I didn’t really point them out.  There’s one on how fabric is woven, and how to use your knowledge about that to improve your sewing.  It draws on what I learned when my grandma taught me how to weave, and uses a toy loom that belonged to my mom as an example.  The latest article is about five essential hand stitches, and it’s just what it sounds like, a tutorial on my most-used stitches.  I’ve been inspired by all the hand sewing and visible mending going on lately, and I’m happy to add to it!  Maybe my favorite article so far is the one on wool.  It was a total blast to research it, and I’m really happy with how it came out.  It covers some of the history and science of wool, and how to use that knowledge when you’re sewing with it. It also features my favorite (super easy) hand-wash method for all your lovely woolens.

As always, you can read any of the articles in Seamwork for free online.  I’ve also added links to the ones I’ve written in my category page (you can also get there by clicking “Sew” under “Tutorials + Inspiration” at the top of my site) so they’re included with the rest of the sewing info I’ve shared.


wool prep thumbnail


To wrap up the older news, I joined Instagram this fall, and also never mentioned it here outright.  My inclination at this point is to avoid anything that involves more “screen time”, but there was so much going on there, especially in the fiber arts world, that I decided to try it out.  And I think I like it.  It’s nice to have a place to share quicker projects, things in progress, and thoughts that won’t become their own blog posts.  And there was some surprisingly deep conversation going on there during #slowfashionoctober!  Still I’m determined to use it sparingly.  If you too are on this exciting/elitist/beautiful/frustrating/inspiring platform, do come say hi, I’m @frenchtoasttasha.


New News

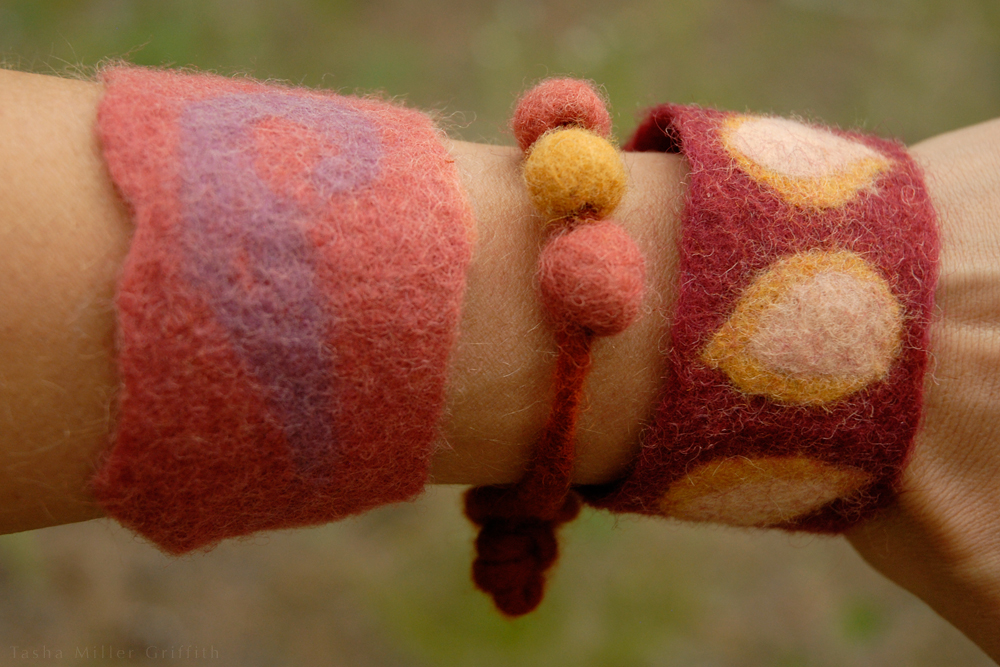
The winter gathering at Arcosanti has a new name: Arizona Fiber Arts Retreat, and I’m teaching there again this year.  It’s coming up January 22 and 23, and as of this writing there are still spaces in both my classes.  One is on 3D wet felting, and one is making felt cuffs and beads (pictured below) while learning to use attachments, prefelts, and shaping in your felt making.  Click over to their new website for details and to sign up.  Observant readers of this blog may notice my digital fingerprints on the AFAR site, and indeed I’ve been spending a fair amount of time working on that lately.  It’s a bit surreal to be the one in our group with the most web skills, but there you have it!

Knitting classes are also starting up again at Purl in the Pines in Flagstaff.  The first session of my beginning knitting series is this Saturday (complete beginners welcome), along with a “knitting skills lab” where you can get all your questions answered and learn some new techniques.  If you’re interested, head on over to their class page for details.  It’s still snowing like crazy as I type this, but if the forecast holds, the roads should be clear by the time classes start.


Felt Cuffs with Tasha


I have a more contemplative post for the new year in the works too, but (appropriately enough) it’s taking a while to distill my “Slow” thoughts for that one.  In the meantime, if there’s anything you’d like to see in this space, or for classes etc. in 2016 feel free to let me know!


How to Mend a Small Hole: Sewing a Patch by Hand


small hand sewn patch 5


Here’s another way to fix a small hole in a shirt or a sweater—especially a hole that’s a little too big to simply sew back together without causing puckers.  No sewing machine required though, it’s more invisible to sew a little patch like this by hand.  These examples are in woven fabric, but this technique also works on knits.  I sewed a patch like this on the front of this sweater, which because of the fuzzy knit fabric is too invisible for pictures!

I’m going to demonstrate on two skirts, which happen to both be made of linen, cut on the bias, and have small holes.  The difference is, the blue one at the top I fixed for keeps—it had a little tear, but the rest of the fabric is still in good shape.  I bought the pink stripey one for a dollar on the sale rack at St. Vinnie’s, and it followed me around the country on our summer travels for years.  I even tried out two different ideas for adding pockets to bias skirts on it.  By now it’s on its way out, the fabric across the back has a few tears, and is super thin and ready to tear in a lot more places.  It’s ready to retire, but I can get one more use out if it by fixing one of the holes with bright green thread so you can see what’s going on.

To start, cut a circular patch, about three times as big across as your hole.  Making it a little bigger will make the sewing easier, and you can trim it later.  If you have a piece of the garment fabric, cut the patch from a section that matches up with where the hole is, in terms of color, pattern, or wear.  If not, just try to find something that matches as well as possible.  Hold the scrap behind the hole to see how it looks.  If your fabric is very loosely woven, you may want to sew around the edges of the patch to keep it from unraveling.  Otherwise, a circular patch should be ok as it is through normal wear and washing.

Click on any of the pictures to enlarge, you can see more detail here than I could while sewing the patches!


small hand sewn patch 1


Carefully center the patch behind the hole.  Match the grain (the direction of the grid of threads) of the garment and the patch.  This is especially important if the garment is cut on the bias (with the grain at 45°) like this one, because I want to avoid changing the drape of the bias cut.

Pin the patch in place through the front of the garment, sticking each pin in and out of the fabric twice.  Check to see that the patch is centered over the hole, and re-pin if necessary.  If the fabric is slippery, it may be easier to sew a few temporary basting stitches, and pull them out when you’re done, than to get the pins to hold it.


small hand sewn patch 2


Knot your thread, and bring it up from the back.  Sew around the hole a couple of times, sewing through both layers using small backstitches.  Don’t pull the stitches too tight, or the fabric will pucker up.  Try to catch each thread that is cut by the hole on one pass or the other.  If there are intact threads in the center of the hole, tack them down to the patch too.

The goal is to keep the hole from unraveling any further, without adding so many stitches that it makes the patch stand out.

When it’s done, secure the thread with another knot or a couple of backstitches just through the patch on the back.

Here’s the finished patch on the front:


small hand sewn patch 4


And from the back.  You can trim the patch, but leave some around the edges so that if it unravels slightly, there will still be enough fabric to hold it in place.


small hand sewn patch 3


Here’s the back of the blue one:


small hand sewn patch 6


Hopefully this adds another option to your mending toolkit!

Making a Lining for a Simple Top

In which I concede that yes, some wool is itchy.


lined MD top front


My grandmother wove the fabric for this top, and she sewed it!  She gave it to me many years ago, but I’ve never worn it much, because when it touches your skin, the fabric is super scratchy.  You all know how much I love wool, and I try to advocate for it, so I usually say that it doesn’t have to be itchy!  But the truth is, of course, it varies enormously with everything from the kind of sheep the wool came from to the way it’s processed, leading to everything from super snuggly high-end next-to-skin layers all the way to heavy duty outerwear.  (And here’s something I can’t get out of my head since I read it, that we might not even want all wool to be soft, we want some to be hard-wearing too.)

Ok, so say that you do have a scratchy wool garment that touches your skin, what to do?  Line it!  I’ve had vague plan for lining this top for a few years, a plan which gradually clarified itself and worked out details in my head, as I realized that I could satisfy my clear need for more sweater layers using almost exclusively things I already had.


lined MD top side


This top is a very simple construction which seems to have a been a favorite of handweavers in the 1970’s.  It’s just two large rectangles for the front and back, and two more folded over for the sleeves.  It has slits at the side seams for a little more movement, and the edge of the fabric is just turned under to make a bit of a curve at the front and back neckline.


lined MD top reinforcementI’ve been storing this in my brain and knew I would use it!  A couple of the older sweaters I’ve re-used for Fiddleheads have a sturdy ribbon reinforcement at the underarms.  I know this is a point of stress for this top, as the stitches had already popped there, and I’m not going to want to undo the lining to fix it again!


I thought it would be pretty simple to line this, and I was right.  There is a lot of minor fudging going on here, and it doesn’t really show, since it’s um, the lining.  I measured all the dimensions of the top and cut the lining the same size, plus seam allowances.  I knew that that would make the lining a little bit baggy, since it’s the same size and inside the top, but I didn’t want to make it too tight, or make this project super fiddly.  For such a simple garment this worked well.

Since the issue with the itchy-ness of this top is where is touches my skin, I knew that I needed an edging that would stick out past the wool at the neck and sleeves.  I had two candidates for lining fabric in the stash, both blue rayon.  I really liked how the color and slight twill texture of one looked with the wool fabric, but it was a little heavy for lining and has more potential as a garment on its own.  So I decided to use the first fabric for just the edging strips, and the lighter weight, darker colored rayon for the main lining pieces.


lined MD top sewing detailsI’m trying something new here, a lot of the sewing details are in this photo.  I hope that it will both be visually more clear what I’m talking about, and make the main text a little less dense.  Click to enlarge and read!


No doubt, this project has a LOT of hand stitching, mainly backstitch.  Fortunately, I love handstitching.  It has all the advantages of knitting in that it’s soothing and portable, I could work on it anywhere, and while talking to people on the phone, etc., so it actually went pretty fast.  Plus, I didn’t want the stitches to show on the outside, and since I could place and pin the fabric as I went, handstitching gave me the most flexibility to see how things were coming out, and pin under more or less to adjust.


lined MD top inside done

handwoven by Dottie MillerSo, many little stitches later, there you have it!  Lined garments just feel so finished, and kind of luxurious when you put them on, don’t you think?  And, the itchy issue is 100% gone, to the point where I forget all about it. (Remind me not to cuddle small children while wearing this . . . )


lined MD top front cowl


Now I just have to figure out how to wear it.  I’m not used to having wide 3/4 length sleeves, and sometimes catch them on things . . .  The first time I wore this into town, I thought it looked better with a cowl or scarf on top.  But looking at these pictures, I kind of like it on its own.  I live in layers, and this one is a bit tricky to layer on top or under, so I think a cowl or scarf will be a good option when it’s cooler.  The weather has been so mild lately that I was really comfortable taking pictures outside in just the top.  It may be a sign of impending doom, but I might as well enjoy it, right?


lined MD top side cowl


Totally, that’s what I thought.  What are you working on for winter, assuming we get winter?


Hemming Jeans Part II, with Catch Stitch Tutorial


In my last post, we went over how to shorten your jeans, or other pants, keeping the original hem intact.  We left off with the jeans the length you want them, and a little fold of fabric on the inside.  That fold may have cut and overcast edges, or not, depending on how much you needed to shorten the legs.

First, let’s neaten up the thread ends left from sewing the hem by hiding them, and then trimming.  Get out your hand-sewing needle and thimble.  (Any time that the fabric I’m sewing is thick or tough, I use a thimble to protect the finger I’m pushing the needle with.)  Thread your leftover tails onto the needle, and take a stitch between the layers of the fold.  If the ends are short, you may need to put the needle into the fabric, and then thread the tails onto it.  Pull the needle through, and clip the tails where they emerge.  This keeps your stitches from pulling out later, and also keeps the thread tails from showing.


Jeans hem ends


This next thing I’m going to tell you to do is not exactly industry standard.  It’s better!  If you’ve ever had your jeans hemmed at the store where you bought them, they probably sewed them in a similar way to what I showed you in the last post.  At the store, for some reason, they usually turn the fold of extra fabric up and stitch it in place.  I think that looks weird, and like the jeans have obviously been hemmed after the fact, since the bulky fold of fabric is not where you would expect it to be for the hem.  It looks much more natural if you fold the extra fabric down, where the original hem is.  Try folding it both ways and see what I mean.

So, if we turn the fabric fold down, how to keep it there?  You could stitch beside the original hem stitches by machine, either with thread that blends into the jeans fabric, or a contrasting thread you like.  However, that’s a lot of layers of denim to sew through, and it’s likely to be difficult for your machine, and cause some skipped stitches and broken thread.  There are some times when using a hand stitch really is quicker and easier, and I think this is one of them.

Then hand-sewing stitch I like for this is called a catch stitch.  It’s designed to do just what we want here, to keep two layers of fabric in place against each other.


Jeans hem catchstitch 1


I used a doubled thread, to make the stitches a little more resistant to abrasion.  Get a piece of thread no longer than twice the length of your arm.  Thread it onto a sturdy hand sewing needle (choose one with a little more metal around the eye if you can, it will be less likely to break in the thick fabric) and knot the two thread ends together.

You want the knot to be on the inside of the fold, so stick the needle in there, and bring it out a little way away, on the outside edge of the fold.

Catch stitch crosses back on itself as you sew it.  To do that, you’ll make each new stitch further along in the direction you are sewing (away from you or to your right in the pictures) but bring the needle in and out going the opposite way (towards you or to your left in the pictures).  Hopefully this will make sense as you read through the next few steps.

Make the first small stitch in the original hem.  Go through only the first layer of denim, to make it easier, and so that the stitches won’t show on the outside.


Jeans hem catchstitch 2


Make the second stitch in the fold, again taking a small stitch through just one layer.


Jeans hem catchstitch 3


Continue alternating taking a stitch in the fabric fold and one in the original hem.  Make each stitch towards you/to the left, then move a little bit away from you/to the right, and to the opposite side to take the next stitch.

When you get to the seams, you may want to make the stitches smaller and/or closer together, since those areas are thicker and more likely to flip up.

What if you run out of thread?  No problem.


Jeans hem backstitch


When you get near the end of the thread, secure it by taking two small backstitches a little way apart.  It’s fine to only go through one layer of fabric, and the stitches can be tiny, as long as they loop back on themselves.

Bring the needle out a little way from the second backstitch, and snip off the thread where it emerges.  Get a new length of thread, and tie a knot in it.  Stick the needle inside the fold (to hide the knot again), and bring it out where you left off stitching.  Keep stitching around the hem until you reach the place where you started.


Jeans hem new thread


That’s about it!  Backstitch again when you get to the end, to secure the thread.  Bury the ends and clip them off.

Enjoy your new hemmed pants!

Summer Spark Batik Dress


I finished this dress on time!  Just barely.  I know that sewing on a deadline is not my friend, but in this case I had backed myself into corner, since I really wanted to finish in time for my annual family and friends women’s craft retreat.  You see, last year at the same event we batiked fabric (which was ridiculously fun) and I dyed this panel with this sundress in mind.  I should at least be able to sew one dress in one year, right?  Well, sure, but a whole lot of other projects of various types jumped ahead of it in line throughout the year, until I found myself headed to retreat 2012 with the mostly-finished dress and my hand sewing kit.  I finished the hem in the car on the way over.


When I got there I tried it on again.  Although I had carefully tested out this pattern in a previous version, I decided that the darts from that version were a little out of hand.  Although I liked the fit, the darts just took up a lot of the bodice, and I thought that they might not look so good with the sparser print of my batik fabric.  So I decided to convert the darts to gathers.  Lesson 1 from this project: darts and gathers are not the same thing!  Although they both take up excess fabric and fit it into a smaller area, darts control the release of the excess up to a certain point, while gathers release it all right away.  Although I liked the gathers at center front, the ones under the bust were clearly not working, they created a big poof of fabric right under (definitely not at) the fullest point of my bust.  There’s no picture of this, it looked ridiculous.


Since I had already sewn the gathers, and my sewing machine was hundreds of miles away by this time, my idea was to hand sew a few of the gathers closed, essentially creating a few small darts to release the extra fabric where I wanted it, which hopefully would not look too jarring.  I tried it out by basting the darts in place.  Have I mentioned I love basting?  It’s just a collection of fairly loose, impermanent stitches, but it’s one of the sewing world’s most perfect tools.  I truly don’t understand why anyone complains about it, it’s so wonderfully precise and useful, and you can see exactly how something is going to come out before you commit to sew it, without the distortion of pins or clips.


Anyway, I basted my new tiny darts in place, using the places where the gathers naturally wanted to make a deeper fold.  I tried on again, then hand sewed them in place.  I used all tiny backstitches, which was probably overkill, but for such a small seam it didn’t slow me down very much, and I wanted a similar look to the rest of the machine-sewn seams on the dress.  If I was at home with my machine, I could also have taken out the gathers, planned and measured for the darts, sewed them in place and stitched the bodice down again.  To be honest I’m not sure it would look much better, although it would look more precise and even on each side.  However, I have been comfortable with this dress having a handmade, not-so-perfect look ever since the very first flower I drew in wax (note the splotches/wax drips).


Checking out the final result, I am overall thrilled.  Probably what makes me the happiest is that I was able to plan the print on the fabric in a way that worked how I envisioned when I went to sew the dress!  It also makes me happy to look at the little bits of hand stitching on the inside, for some reason I can’t explain I love that look, when I worked at a museum I used to spend much longer than necessary checking out hand stitching on antique garments.  I will tweak the bodice a little more in further versions of this dress, it still has a funny wrinkle or two, but as I said this project was not meant to be a showpiece and I think it looks cute.  I wore it all day, on a retreat field trip to the fiber festival at El Rancho de las Golodrinas and then out to dinner with the whole group.  One of my favorite things about custom-fit clothing is how comfortable it is – I could easily have also worn this dress to sleep in, but restrained myself, after all it was pretty dusty out, and the dress doesn’t need that wear and tear.


I realize as I’m working on this post that some of these pictures have quite a different color cast, some are from my iPhone on the trip which may explain it.  If you are curious, the laundry line picture is probably the closest to the real colors.

Although I don’t have a specific project like this to be ready for next summer, I am so hoping I have learned my lesson about timing and leaving things until the last minute.  We shall see.

All About Backstitch


Backstitch Drawing 1


Revised and updated with new photos and text (and drawings I found in my sewing class materials), this tutorial is now better than ever! Feel free to grab a fabric scrap and some thread and follow along.

If I had to name the single most useful hand sewing stitch I know, it would probably be the backstitch. I love it for repairs, for sewing in zippers, and for anywhere I need the control and flexibility of hand stitching with a hard-wearing stitch.

When you think of hand sewing, you probably think of running stitches, like the ones below. The needle dips into the fabric and comes up going in the same direction. You can make several running stitches on the needle before pulling the thread through, and the thread slides easily through several running stitches at once.


new backstitch 1


In a backstitch, the thread loops around itself, which makes the stitch much harder to pull out. To make one, take the needle backwards from the direction you’re stitching in, stab into the fabric, and bring the needle out at the further end of the next stitch. Then go backwards again and take the next stitch.


new backstitch 2


You can see the overlapping loops on the wrong side (backside) of the stitching. By contrast, the running stitches look the same on both sides.


new backstitch 3


If you make backstitches touching each other, from the right side (public side) it looks almost exactly like machine stitching, which makes this a great stitch for repairs and touch-ups.


new backstitch 4


You can also leave more space between small backstitches. This is sometimes called a prickstitch. It’s the stitch I use to sew zippers into just about everything, including my trousers! I love sewing zippers by hand, it gives me great control and precision, and more flexibility about when I attach them. Susan Khalje wrote an article for Threads magazine about hand-picked zippers that’s worth looking up if you’re interested, that’s what got me started doing them this way.


new backstitch 5


Because each one is almost a knot in itself, backstitches are really sturdy. The zippers I’ve sewn with them have lasted at least as long as the pants!


Pickstitch Drawing 1


Backstitches are also useful for securing your thread anywhere you don’t want to have a knot. I often use one or two to secure the beginning or end of a seam, and when I’m burying yarn ends in knitting. In the days when most garments were sewn by hand, it was common to use running stitches with a backstitch thrown in every few stitches for extra strength. (I know that from reading The Mary Frances Sewing Book, which is amazing).

Happy stitching!


new backstitch 6


How to Sew on a Button

And make a thread shank, for a better-working button.


sewing on a button 10


As promised, complete directions!  Anyone can do this.  All you need is some thread and a sharp needle.  Start with a piece of thread about as long your arm, and put it through the needle so you have a double length.

Start by anchoring your thread.  The conventional way to do this is by tying a knot in the end.  But sometimes a big knot on one side is too conspicuous or would catch on things.  Instead try backstitching.  A backstitch is a stitch that makes the thread loop back on itself, it’s very secure.  On the wrong side, slide the thread between the fabric layers and come up near where you want the button to be.  Pull the needle though, leaving a thread tail at the start.  Take a small backstitch.  Put the needle out nearby, then take another backstitch in the opposite direction.  The thread is ready to go!  Pop the needle up to the right side where you want the button.


sewing on a button 1Click on any of the photos to enlarge if you’d like.


The next part is pretty much self-explanatory, except for one thing.  Use a spacer to make room for a thread shank underneath the button (ignore this part if your button already has a metal shank on the back—just stitch through that).  This makes room for the fabric (where the buttonhole is) to fit underneath the button.  I often use a toothpick which I keep in my sewing stuff.  You may want a bigger or smaller spacer depending on the thickness of the fabric and how curved the button is.  Just sew over the spacer as you go in and out through the holes of the button.


sewing on a button 2


sewing on a button 4


Go through each part of the button a couple of times.  Pull out the spacer and pull up on the button, see how there’s now extra thread underneath?  Bring the needle up from the bottom under the button.


sewing on a button 5


sewing on a button 6


Wind the thread a few times around the thread bars under the needle—but not too tightly.  If you make this whole thing too tight, the sides of the holes in the button can rub and wear through the thread.  Stab the needle straight through the thread shank a couple of times from different directions.


sewing on a button 7


Secure the thread either just under the button, or on the back side with a couple more backstitches, then trim the thread tails.


sewing on a button 8


So the next time a button pops off your shirt, you don’t need to send it off to Mom or stuff it in the back of your drawer, you can fix it yourself!  Feel free to post other button questions, too …