Stamping on Fabric – With Hand Carved Stamps and Household Objects


Ok, so now you have a hand carved stamp.  Or, maybe you don’t yet.  How about stamping with something you already have around your house?  And, what gets me excited about either of these options: being able to use them on fabric and clothing.


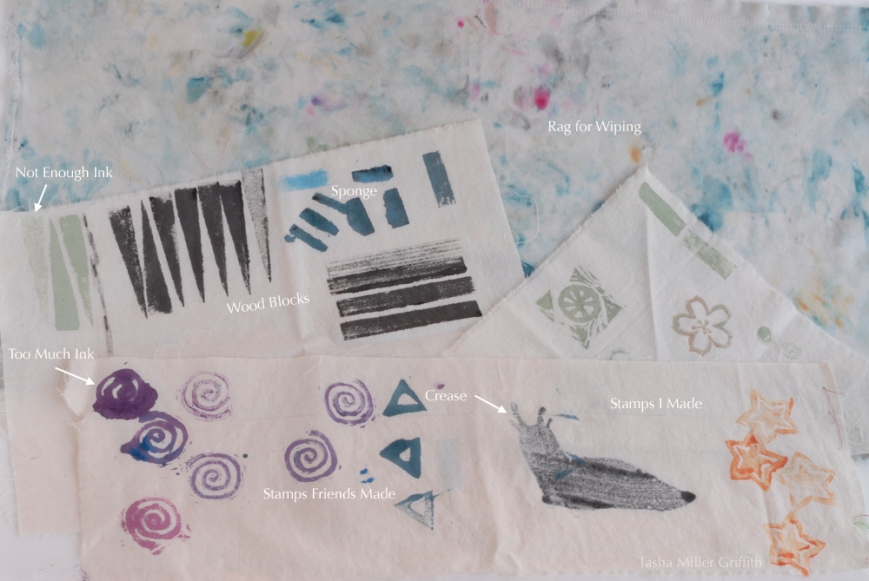
Before we discuss fabric ink and stamping, let me talk briefly about how I set up these buttons as stamps.  I got this idea from a really creative slideshow (on Martha Stewart of all places) which illustrates using all kinds of things you might find around your house to make some interesting designs.  My favorite was the buttons.  Some things already have an easy point to grab them by without getting your fingers covered in ink (like long pieces of wood, which you can see printed in the top photo), but buttons, not so much.  I cut some pieces from a leftover dowel and a small wood block, just using a clamp and a handsaw, they don’t have to be perfect in any way.  I did some quick online research and a couple of sources suggested using some kind of foam to back your stamps, to give them a little more give for even printing.  This seemed like a good idea since buttons are pretty much hard to begin with.  I used tiny pieces of dish packing type foam (we get it as packing material with some supplies) glued to the back of each button and its piece of wood with ATG, which once again I borrowed from the photo studio.  You can use any type of glue as long as it will hold the object and be water-resistant enough to be rinsed after you stamp.  And, you could use just about anything squishy for the foam, just cut the pieces smaller than your object, otherwise the edges of the foam may print.


Ok, time to stamp!  For ink, I used Speedball Water-Based Textile Screen Printing Ink.  I have gotten it from Blick, local art stores, and chain stores.  On the jar, it just says FABRIC Screen Printing Ink, but if you look on the side it also says water based and non-toxic.  I really like that you can thin this ink as much as you want with water, and you don’t have to worry about it if you get it on your hands, which is pretty much inevitable.  Plus it is permanent on fabric with heat setting.  It comes in lots of colors.  I like to mix my own using the three primary colors; the “process” cyan, magenta, and yellow will give truer mixing results than the regular red blue and yellow.  You’ll also need white and black.  A tip I learned from Lena Corwin’s book Printing by Hand (I highly recommend this book if you are interested in more about printing!) is that mixing in a little of both white and black will give you a more subtle color (less screaming bright) and I love subtle colors.

To set up for printing, you’ll need ink, a little water for mixing, and more for washing things off (a big cup full with an old toothbrush for scrubbing is perfect) and a wet rag to wipe your hands and tools on after you rinse.  It’s easier to print on thin fabrics if you put down an old towel underneath to give the surface a little more give, which can allow more details of the stamp to print.  Putting all this on a big table you can wipe off is ideal, and it’s nice to have something under the messy ink part to catch drips.  I used a box since I figured it would still be good for shipping with ink on it.  I used one spoon to get out each color, one to mix my color with, and a small foam brush to hold the ink for stamping.  I let the spoons dry when I’m done, and wash the foam brushes to save for the next time.


When mixing ink colors, start with as little ink as you can, you’ll add more as you decide what to add to get the color you’re looking for (a color wheel can help here), plus you’ll be adding water, and stamping doesn’t take very much ink in any case.  Keep in mind that the ink will dry slightly darker in color than it looks wet.

Having scrap fabric to test on is essential!  The closer the fabric is in type, weight and color to your intended project, the better you’ll be able to see how the stamps are coming out.  For this project, I just used a small section on the edge of my fabric for testing, changing the color or the dilution of the ink a little bit at a time and waiting a couple of minutes to see how the results looked as they dried.

I like the ink to be absorbed into the fabric so that it doesn’t leave a hard or crunchy surface, but looks more like a dye.  To get this effect, I add water until the ink slowly drips from the foam brush when I lift it up.  The consistency you want may vary with your fabric, again, testing is key!


Here is my best fabric stamping tip: squeeze the ink out of the foam brush until it’s not dripping, and only releases ink when you press on it, like a stamp pad.  Then, gently press your stamp or object against the sponge to get a coat of paint.  You can see which parts are going to print by where the ink is on the stamp or object.


Keep the foam brush in one hand, and bring your stamp back to it for a fresh coat each time you print it.  The sponge will hold enough ink for a bunch of stamps before it needs more from the cup.

I found that a light coating of ink, and a soft rolling motion against the fabric with each stamping helped the full possible detail of the buttons to print.


That’s about it!  I place my stamps pretty much randomly, alternating whichever ones I am working with until I get a design density that I like.  It helps to step back and take a look, especially if you are printing something big that you can’t work on all at once.

For troubleshooting, take a look at the very top photo (click to enlarge it).  If you have too much ink on the stamp or the ink is too watery, it will spread out all around your stamp and the detail of the design will be lost.  Clean the stamp off, squeeze more ink out of your sponge, press it gently on just the surface of the stamp and try again.  If it’s still too flowy, add more ink to your color to reduce the water content.  If you don’t have enough ink on the stamp, you’ll get a pale ghost of an image.  If the ink is thick, like it comes out of the jar, it will dry harder and raised on the surface of your fabric, which you may want, depending on your design. If your fabric is wrinkled, iron it before you start.  Soft wrinkles won’t get in the way too much, but if you stamp over a crease, you can see it when the crease opens up.

One last troubleshooting thing: some objects print better than others.  Some of the buttons I tried had details too fine to print, but this will depend a lot on what fabric and how much ink you use, so test it out!


Here’s my finished button printed fabric.  I think it may become a skirt.


Stamping is also awesome for reviving finished clothes or linens that are a little too plain.  I used some of my aunt Barb’s hand made stamps to decorate this previously just beige thrift store skirt.


While your stamped fabric is drying, it’s worthwhile to clean off your tools, since this ink can eventually clog your stamps if left to dry.  Using the old toothbrush and a little water from your clean-up cup works great.

Next time, I’ll post about heat setting the ink, lots of options for this important step that makes the finished product washable!  Plus, a little bit about “green” crafting and less waste from what we make.

In the meantime, have you tried something similar?  I’d love to know what you did and how it came out!


Half My Wardrobe in Detroit, and What I Did About It

Not as much as I would have liked.  But, contrary to the impression you may have gotten from this space, I did squeeze in a little sewing for myself the last time we were home.  When we leave the truck somewhere in art show land (otherwise known as the Midwest) and fly back home to get some r&r (or maybe embark on some crazy giant new project) I leave a bunch of my summer wardrobe out there.  This last time, I kind of did it to myself on purpose, packing even fewer of my summer tops than I reasonably could have fit in my luggage, hoping that it would motivate me to sew some new ones.

First, I finished a top I had been working on during the visit home before this one.  I wear a lot of tank tops in the summer, and I have been thinking about how to make some woven ones as well as the usual knits.  This one is a copy of a silk top, the cups of which I found flattering and comfortable.  During Me Made May, I fell in love with linen all over again, specifically this one mm green linen skirt, which is getting to the super soft and drapey stage of life.  I had this natural linen leftover from a long-ago project and thought I would try it out.


I lined only the cups, with thin soft cotton, catching them in the midriff seam and folding under and hand sewing the other sides, I like how it came out.  The original top has a scalloped satin stitch on the edges, and I decided to try something similar.  I also had some thick linen thread which I loved with the fabric, but no amount of coaxing and bigger needles would convince my machine this was a reasonable thing to work with, so I ended up using a narrow zigzag to hold in on the surface.  Both of the edge treatments are softer and more subtle after a few washings.  I made the straps using a thin piece of fabric from the selvage edge, wrapping it around a thin ribbon.


I wanted to make sure it came out long enough, and I may have overdone it, but the tunic length is working alright so far.  Funny how I don’t notice things in the original (like the back riding up) until I copy it.  Sigh.  I’ll also check out the front wrinkles before I make another one.

Next, I pulled out some pink knit leftover from another top to make a tank for yoga, of which I desperately needed more.  I had some narrow fold over elastic in my stash which should have been perfect, but for some reason every step of this project fought me tooth and nail and used up WAY more of my precious sewing time than was reasonable for something so simple and small!  I ripped a lot of seams.  I tried adding a self-fabric section for the hem which absolutely refused to look decent with any type of stitching.  Plus, when I tried the top on it seemed too tight and clingy, and I already have one round of tops made from this pattern (a heavily modified Kwik Sew 3524) which are NOT too tight and clingy!  Finally I realized that if I ripped the stitching from the little bit of elastic I had used as a test, I would have just enough to put around the bottom as well.  Which I did, and without even trying it on again, put it in my closet and wore it to yoga the next day (keep reading for a picture).  The top stitching on the elastic is beyond wonky.  But I needed it, I made it, and I was wearing it, and some days that just has to be enough.

After that, I made a pair of dainties, partly because I didn’t have much time left and they were cut out already, and partly to prove that my beloved Bernina and I do actually have a good relationship with knits.  Which in fact we do.


On our “real” return home for the fall a couple of weeks ago, I decided to make one more tank top before moving on to fall/winter sewing. I had a tee shirt with a hole in it that I had been meaning to convert into a wearable top for ages.  Unfortunately, it was cut so far off the grain of the knit that I couldn’t just use the the original hem, as Zoe suggests, and I had to cut the back and front shelf liner in two pieces each to get them to fit.  But I did use white top stitching, which I liked on the original shirt.


I liked this picot edge elastic, but it was not exactly soft, so I sandwiched it between the layers, sewing it to the liner first with a zigzag, and then the top layer with a twin needle.  For the straps I used a similar idea to the ribbon wrapping, but using plain elastic, zigzag, and the twin needle again.  This time everything went smoother, and start to finish, including experiments, took less than three hours.  That’s more like it!


See me being all zen about the pink top.  See how much clingier AND drapier it is than the blue one?  Crazy fabric difference.  I checked and the previous versions have stretched out with wear as well.  I might make the next one just slightly wider to start with.

Next up for my sewing, pants!  What are you making for the coming season? How do you figure out what fabric will do before you sew it?  I’m, um, still figuring that part out apparently. . .


Summer Spark Batik Dress


I finished this dress on time!  Just barely.  I know that sewing on a deadline is not my friend, but in this case I had backed myself into corner, since I really wanted to finish in time for my annual family and friends women’s craft retreat.  You see, last year at the same event we batiked fabric (which was ridiculously fun) and I dyed this panel with this sundress in mind.  I should at least be able to sew one dress in one year, right?  Well, sure, but a whole lot of other projects of various types jumped ahead of it in line throughout the year, until I found myself headed to retreat 2012 with the mostly-finished dress and my hand sewing kit.  I finished the hem in the car on the way over.


When I got there I tried it on again.  Although I had carefully tested out this pattern in a previous version, I decided that the darts from that version were a little out of hand.  Although I liked the fit, the darts just took up a lot of the bodice, and I thought that they might not look so good with the sparser print of my batik fabric.  So I decided to convert the darts to gathers.  Lesson 1 from this project: darts and gathers are not the same thing!  Although they both take up excess fabric and fit it into a smaller area, darts control the release of the excess up to a certain point, while gathers release it all right away.  Although I liked the gathers at center front, the ones under the bust were clearly not working, they created a big poof of fabric right under (definitely not at) the fullest point of my bust.  There’s no picture of this, it looked ridiculous.


Since I had already sewn the gathers, and my sewing machine was hundreds of miles away by this time, my idea was to hand sew a few of the gathers closed, essentially creating a few small darts to release the extra fabric where I wanted it, which hopefully would not look too jarring.  I tried it out by basting the darts in place.  Have I mentioned I love basting?  It’s just a collection of fairly loose, impermanent stitches, but it’s one of the sewing world’s most perfect tools.  I truly don’t understand why anyone complains about it, it’s so wonderfully precise and useful, and you can see exactly how something is going to come out before you commit to sew it, without the distortion of pins or clips.


Anyway, I basted my new tiny darts in place, using the places where the gathers naturally wanted to make a deeper fold.  I tried on again, then hand sewed them in place.  I used all tiny backstitches, which was probably overkill, but for such a small seam it didn’t slow me down very much, and I wanted a similar look to the rest of the machine-sewn seams on the dress.  If I was at home with my machine, I could also have taken out the gathers, planned and measured for the darts, sewed them in place and stitched the bodice down again.  To be honest I’m not sure it would look much better, although it would look more precise and even on each side.  However, I have been comfortable with this dress having a handmade, not-so-perfect look ever since the very first flower I drew in wax (note the splotches/wax drips).


Checking out the final result, I am overall thrilled.  Probably what makes me the happiest is that I was able to plan the print on the fabric in a way that worked how I envisioned when I went to sew the dress!  It also makes me happy to look at the little bits of hand stitching on the inside, for some reason I can’t explain I love that look, when I worked at a museum I used to spend much longer than necessary checking out hand stitching on antique garments.  I will tweak the bodice a little more in further versions of this dress, it still has a funny wrinkle or two, but as I said this project was not meant to be a showpiece and I think it looks cute.  I wore it all day, on a retreat field trip to the fiber festival at El Rancho de las Golodrinas and then out to dinner with the whole group.  One of my favorite things about custom-fit clothing is how comfortable it is – I could easily have also worn this dress to sleep in, but restrained myself, after all it was pretty dusty out, and the dress doesn’t need that wear and tear.


I realize as I’m working on this post that some of these pictures have quite a different color cast, some are from my iPhone on the trip which may explain it.  If you are curious, the laundry line picture is probably the closest to the real colors.

Although I don’t have a specific project like this to be ready for next summer, I am so hoping I have learned my lesson about timing and leaving things until the last minute.  We shall see.

A New Month, A New Challenge – Spark Your Summer

The thing I love about setting a particular goal or participating in a challenge is that it can push me to take something I am vaguely thinking about doing and make it something I am actually doing and concretely thinking about.

I loved participating in Me Made May’12 this last month.  I was surprised by how much pride and self-sufficiency I felt wearing at least one me-made garment every day, even though I didn’t make anything new for the challenge!  It also got me thinking about what I really wear and how I want my style to evolve.  Although I’m not sure I would want to spend as much time thinking about my wardrobe all the time as I did in May, it really pushed me to better define my style (see this post), to figure out what I really need to make (pants!), and to meet some other sewers/thinkers/bloggers, all of which has been wonderful.  In another unexpected spillover, after MMM ended I found myself coming up with new combinations of my not-self-made clothes to better fit my style – bonus!


So when my new friend Alessa, along with Ali and Sarah, announced a new challenge for June, I was pretty much in at the word go.  Plus, this one is a little less involved, you just sew one special garment in June, something you’d like to wear all summer.  It’s good timing for me, since I have fabric I batik dyed last summer that’s supposed to become a dress in time for a special event which starts June 20!  I’ll be making my self-drafted sundress, with a few modifications from the first one.  And, I’ll be home late tonight!!  One thing I have really missed during MMM is my studio – sewing starts tomorrow!


Again, it seems to me that there’s no reason you have to sew to set yourself a helpful challenge for this month.  What about a cooking one?  An art one?  What are your broader goals and how can you set a specific goal to help you get there?  What would you like to do more of?  Why not set aside a specific amount of time for that every week?  Whatever you decide to do, I’d be willing to bet you’ll get some unexpected lovely side effects.

Personal Style, Me-Made-May, and How the World Sees Us

Oh, never mind the fashion. When one has a style of one’s own, it is always twenty times better.

~Margaret Oliphant

I’m so excited about this post, because I’ve recruited some awesome fellow participants in Me-Made-May’12 to share their photos and their thoughts about personal style with us!  I was so inspired by clicking through the Flickr group and checking out everyone’s photos, and by the thought-provoking comments they sent me!

I’ll start with my own style, which is definitely still a work in progress.

When I first started making my own clothes, quite a few years ago now, I chose what appealed to me most, (if you don’t want to know how much of a nerd I really am, please skip to the next paragraph) which was mainly historical styles.  If no one cared what I wore, I could happily wear long skirts, petticoats, 1940’s style dresses, etc. every day for the rest of my life.

But what I wear does affect how people see me, and how seriously they take me.  Sometimes what I’d like to wear doesn’t broadcast the message that I’d like people to get when they see me.

I still love historical clothes, and wear lots of long skirts in the winter, but now I look for ways to incorporate silhouettes I love with more timeless, modern designs and details.  I’d like what I wear to say, “I am unique, interesting, capable, beautiful, feminine, grounded, elegant.”  As I said, it’s a work in progress.


My first new friend for this project is Alessa.  I love the playful element her outfits have.  Check out her lovely blog of her handmade adventures by clicking any of her photos, or here!


She says:

I wouldn’t know to put a name to it, but there’s definitely a trend there. I think pretty and comfy sum it up best. I like dresses, because they are less constricting than jeans and I guess I also don’t like to be part of the “uniform” (jeans and t-shirt) wearing masses. Also, they make my stumpy legs look longer. 😉 A lot of people put labels like “nice” and “cute” on me, which I guess I generally am, and which is also reflected in a large part of my wardrobe. I like that I can also dress up to other facets of my personality, though, like “girlishly nerdy” (skirts and sciency graphic tees) and “playfully sexy” (that would be a black polka-dot dress with a red belt, red lipstick and a bowler hat).


Next is Oona.  I love how much body language is in her photos.  If you need a laugh in your day, you MUST read her blog!


She says:

i’d say my style is schizophrenic, vivacious, and a bit colorblind.  i like to think i make other peeps smile when they see me, especially strangers.  as a whole i don’t feel we dress up anymore, and peeps seem to take happy note of bright colors and thoughtful (if clashing) ensembles.


Finally here’s Sallie.  I love how sleek and put together her outfits are!  There’s lots more pictures and witty comments about the outfits on her blog.


She says:

I think personal style is really complicated because it involves a certain amount of self-awareness. Sometimes the things we love, sadly, don’t love us back. For me this translates into my love for vintage, an unrequited love that I think I’ve finally given up on. But the great thing about fashion and making your own garments is that the possibilities are endless. So instead I’ve focused on more modern looks that make me feel lady-like and put together. I like my clothes to fit well and to maybe have a touch of drama – like playing with texture, color or volume/structure. I think other people see me as someone who always looks laid back, but still elegant, and maybe a touch prissy – I’m taking this from compliments and comments I’ve received over the years (and I just asked my husband and thats what he said! haha!).


I can’t help feeling like I don’t have much to add here!  These ladies have summed it up and given me a lot to think about.

One last thing I will say, I know many of us who sew (or make anything else for that matter) do it at least partly so we can have just what we want, what’s not available anywhere else.  It’s a great feeling when you can be creative, and make something that you’re proud of, something that broadcasts the message you want to send.

So, how does the world see you?  What would you like your style to say?

Me-Made-May Thoughts So Far, and my Cartoon Summer Wardrobe

Ok, I realize that it’s the middle of Me Made May, and I haven’t said anything about it!  I have been thinking about it a lot though, and keeping a daily log of what I wear and my thoughts.  So far I have met my goal of wearing one me-made article every day, and on only one day has underwear counted.  (I have one sundress, not a me-made, that I wear when it’s just too hot to wear anything else.)


I wanted to make some kind of visual record so you could see what I’m thinking about for this project.  I loved Tilly’s photo collage of her me-made wardrobe, although photographing mine during several days of camping didn’t seem very practical.  But one of my goals for this summer is to draw more, a perfect activity for unplugged time.  Then I saw the book Information Graphics on Brain Pickings, and was inspired to make my own graphic for Me Made May.

The space we have in the truck for clothes is quite limited.  Every year I try to pack less, leaving out the things I don’t end up wearing much, but a little more of the most versatile, the things I can wear a lot of different ways and the things I know I wear all the time.  This also leaves me with a small enough wardrobe that my drawing project seemed practical.


I circled the clothes I made in yellow.  Somehow, this didn’t seem to represent the amount of effort that it feels like goes into what I wear.  So I circled things I had dyed or otherwise substantially altered in green.  Due to the careful selection of these clothes discussed above, there are only a few things here that I haven’t worn a lot.  I circled them in blue.  All four of these I included this season as a change from wearing mostly the same clothes I did at art shows last year – too much of that and it starts to feel like a uniform, which makes me start to hate even clothes I really like.  Still it looks like I have a little tweaking to do to make these pieces fit, and a couple of them may not fit in my summer wardrobe.

I was surprised to see how many tops I had in relation to pants and skirts, especially since I have been thinking I need to make some more.  I even have one about half done at home, based on the shiny top but in a linen fabric more suitable for every day.  Then I remembered that all three of my me-made tank tops are not exactly spring chickens, in fact, they are getting to the only-suitable-for-camping stage.  I circled everything that is wearing out in red.  After that, I does look like I could use a couple more basic tops, and sundresses, I live in those when it’s warm and it would be great to have a couple more.

One of my favorite things about a challenge like Me Made May is that it asks us to take a look at what we are really using and what we need.  For example, you can tell that pants that fit are the hardest thing for me to find ready-to-wear.  And making my own is still a journey, every time I wear those grey ones I think about what’s wrong with them, but I also get inspired to make better ones this fall!  In fact, with the cool weather we’ve been having so the past week or so, I’ve renewed my vow to make pants I like.

I’ve thought a lot the past few weeks about how what we wear is a compromise between what we’d ideally like to wear, what’s available (due to funds and time), and circumstances like the weather, what we have to wear to work, etc.

What do you think?

What’s in your closet?  What do you need, and what do you have but don’t wear?


Recycled Elisabethan Shirt


Note the “s”, we’re not talking the era of Queen Elizabeth I today, but rather fabulous upcycled clothing made by my friend Beth!  She has been my confidant and mentor in the world of recycled fashion for a while, and when we saw her last week at the Fiesta Arts Fair in San Antonio, I decided it was high time to add a piece from her Elisabethan line to my own wardrobe.

I totally love this shirt!   The design is what makes it for me, those flattering and interesting curvy seams, and the fabric choices.  Me Made May is coming up fast, and while I didn’t make this shirt, it exemplifies what MMM is all about; making choices that reflect who we are and who we want to be.  It’s sustainable, made in USA, and did I mention fabulous, and comfortable?  Head on over to the Elisabethan site for lists of stores and shows where you can get your own!

Another Way to Rip Seams


pocket seam ripping 1


If you’re going to make anything, it’s fairly certain that you’ll have to un-make and re-make part of it at some point.  It’s not bad, it’s just part of the process.  In sewing, this involves seam ripping.  It’s an essential skill for makers, and especially those who are interested in refashioning, repairing, upcycling, etc.

Although some folks rip stitches fast and furious with razor blades, I have always stuck to my trusty seam ripper.  Recently I’ve been using it in a slightly different way on straight and zig-zag seams, with really good results.

seam ripping 2014 0


The photo at left shows classic seam-ripper technique.  Slide the seam ripper into the seam, use the pointed part to pick up a stitch or two, and slide them into the blade in the middle of the ripper to cut.  Once you have a couple of stitches cut, pull the seam open and you will be able to see and cut more without harming the fabric.


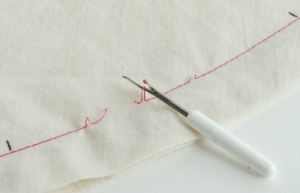
seam ripping 2014 1For this technique though, everything stays flat, which is especially nice if you have a delicate fabric or it’s hard to see the stitches in the seam.  Use the ripper to cut a stitch, and then another one 1 -2 inches away, creating a small thread section with cut ends.  Then use the long prong of the ripper to pull a few stitches up and out of the back thread without cutting them.  You may need to do this one by one if the stitches are small.  The object is to get a little tail that’s long enough to hang onto with your fingers.


Once you get a tail, grab it with one hand, hold the fabric with the other, and pull the the thread section out in one go!  Pulling close to the plane of the fabric, instead of straight up, will make it easier.


pocket seam ripping 3


If you flip the fabric to the back you’ll see that the stitches on the other side, which were held in place by the ones you just pulled out, are now free.  All you have to do is cut a stitch a little way down the seam and you can use the free thread to pull out another section.  Every time you pull out a section, flip the fabric over and you’ll find a tail ready to pull out the next section.  I find this quite fast, and it also creates fewer tiny thread ends that you’ll have to clean up.


pocket seam ripping 4


If you are ripping out a specific part of a seam, such as between the pins here, you may want to have a longer thread to work with when you get to your stopping point, so you can tie a knot to hold it in place.  In this case, pull up the last inch or two of stitches without cutting either side.  It may help to turn the seam ripper so the stitches don’t slide into the cutting part.  Once a stitch is loosened, you can also use your fingers, the whole handle of the seam ripper, or another tool to pull the stitches up without cutting them.


pocket seam ripping 5


When you get to the new end of the seam, pull on the thread to get the last stitch from the back side to pop through onto your side.  Slide the point of the seam ripper into this new stitch and pull it up so that both ends are on the same side.

Tie a knot or use backstitch, and bury the ends if they’ll show.


pocket seam ripping 6


Again, this last part is only necessary if the end of the old seam won’t be crossed by or stitched over with a new seam, and so you need to secure the end.

This way of seam ripping works great on zig-zag seams, too, although it won’t work with seams where the thread crosses back over itself.  Sometimes I’ll get lucky and pull the right thread on serged seams, but I don’t have a sure-fire formula for those yet.  Maybe you do?

I’m sure that others use this technique, I just discovered it recently and I’ve been using it all the time …


Me-Made-May 2012!

What is that, you ask?  It’s a fabulous idea from Zoe of the blog ‘So, Zo…’ wherein participants make a pledge to wear one or more self-made garments every day for the month of May, and/or to interpret the challenge in their own way.


What I really love about it is the idea of spending a month thinking about what we make and wear and why.  Does what you wear suit your personality and what you want to say about yourself to the world?  Why do you choose to make things?  Do you wear/use the things you make?

My pledge for May is to wear at least one thing I made everyday, and document my experience here in a way that’s also relevant to those of you who don’t sew, and addresses some of the interesting questions above.

If you do sew, I encourage you to head on over to Zoe’s blog and check it out!

If not, what about coming up with your own Me-Made-May challenge?  Maybe pledge to cook one new recipe or make one up yourself each week, or finish your woodworking project, or even the mending!  I think anything we make has the tendency to push us towards, as Zoe puts it “a more self-sufficient, sustainable and authentic life.”  I love that phrase – I couldn’t have described my own goals better!

The last part of my personal pledge for MMM’12 is to make more friends in the blog world and reach out to the other creative types out here, so I’d love it if you let me know your ideas, and pass on the spirit of Me-Made-May!

Wire Turns Fabric Tubes!

The other day I was making fabric straps, and the time came to turn them right side out.  I never bought one of those proprietary tube-turning things, and I don’t do this very often, so usually I just tie the seam ends to a blunt needle and slide it through the tube bit by bit.  It’s kind of a pain but it usually works.  However, on this day my studio was somehow completely devoid of blunt needles.  I don’t know where they went, but I suspect karma is involved, since I always tell even my knitting students to buy sharp ones for burying ends.  I tried it with a sharp one, but that was clearly the wrong idea, of course the needle point kept piercing the inside of the tube.

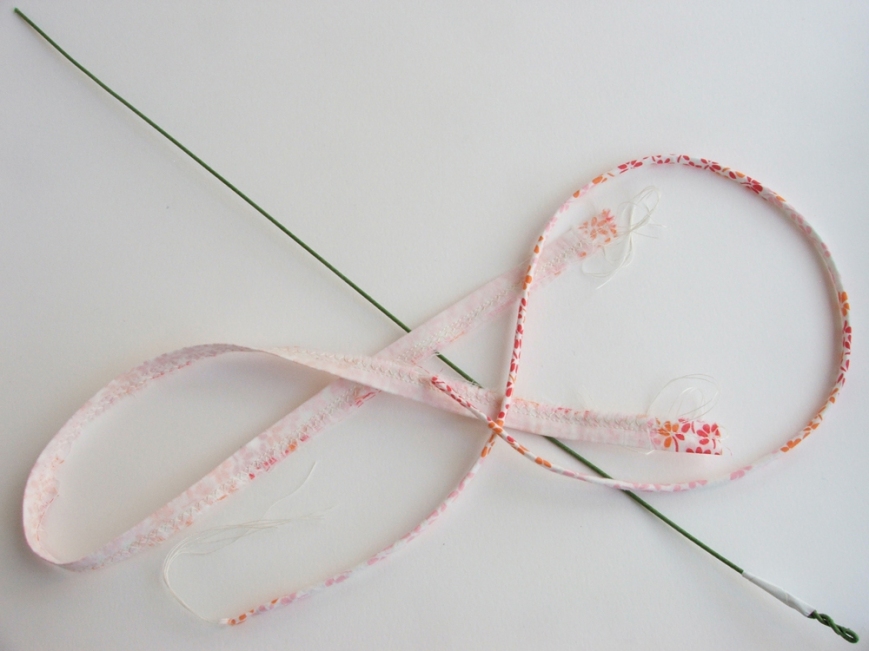
After stewing it around in my brain for a while, I remembered that I had some millinery wire left over from another project.  I twisted one end into a loop, tied the thread ends to it, and pulled it through – viola!  Then I tried it with beading wire, which is much thinner and more flexible, but also worked just fine.

This is why we invented pliers, so you can make a loop smaller than your finger.  You may need to squash the loop flatter with the pliers to get it to be narrow enough to go through your tube.

Twist the wire around itself – it’s more secure if you twist both the end and the main wire around each other, not just one around the other.

Cover the pokey wire end with some tape to keep it from catching on the fabric  – I used artist’s tape, electrical tape or painter’s tape should also work, duct tape is too gooey.

Ok!  Slide your new wire tube turner inside your tube.  Take the ends left from sewing the seam and tie them securely around the wire loop.  If your knot is not secure it may pull out part way through the turning process – terrible!  I pushed two thread ends through the loop one way, and two through the other way, and tied them in several square knots on top of the loop.

Pull the wire into the fabric tube, and the tube should start to turn inside itself.  Sometimes it’s a bit hard to get it started, you can try using your finger nails to pull the scrunched up fabric over the end.

General tube turning tips:  Don’t get so much fabric bunched up right where the tube is turning that it gets packed in and won’t turn.  If you get stuck, back the bunched up fabric away from the end and try moving a smaller amount through the turn.  Pull on the wire threader and the turning point, stretching a bit can help.  Once you get going, pull on the fabric end inside the tube instead of the wire, so there’s no danger of the thread breaking.

It’s much easier if you have a slippery fabric!  Mine at the moment is two layers of cotton, not slippery at ALL, but it still worked without too much fuss.  I wanted my straps to be as thin as possible, the limit with this fabric was a 1/4″ seam.  With a slipperier fabric smaller could work, keep in mind though that you have to have enough seam allowance so that your finished tube won’t unravel, and that seam allowance has to fit inside the finished tube!  I zigzaged over my SA since I absolutely do not want to take my dress apart later due to straps coming apart.

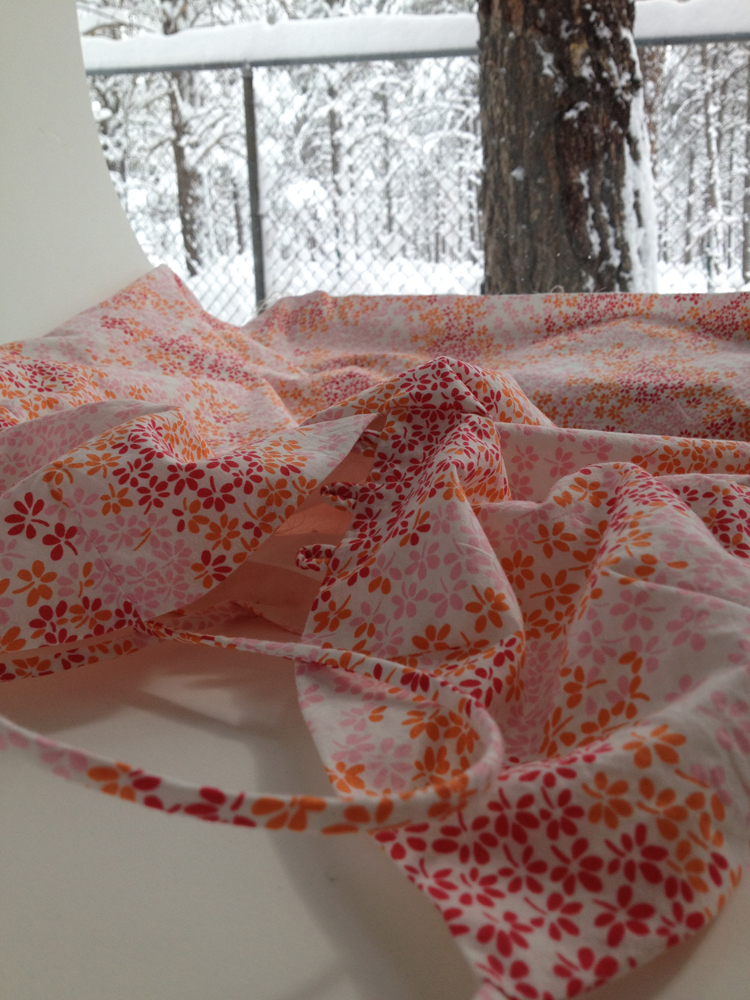
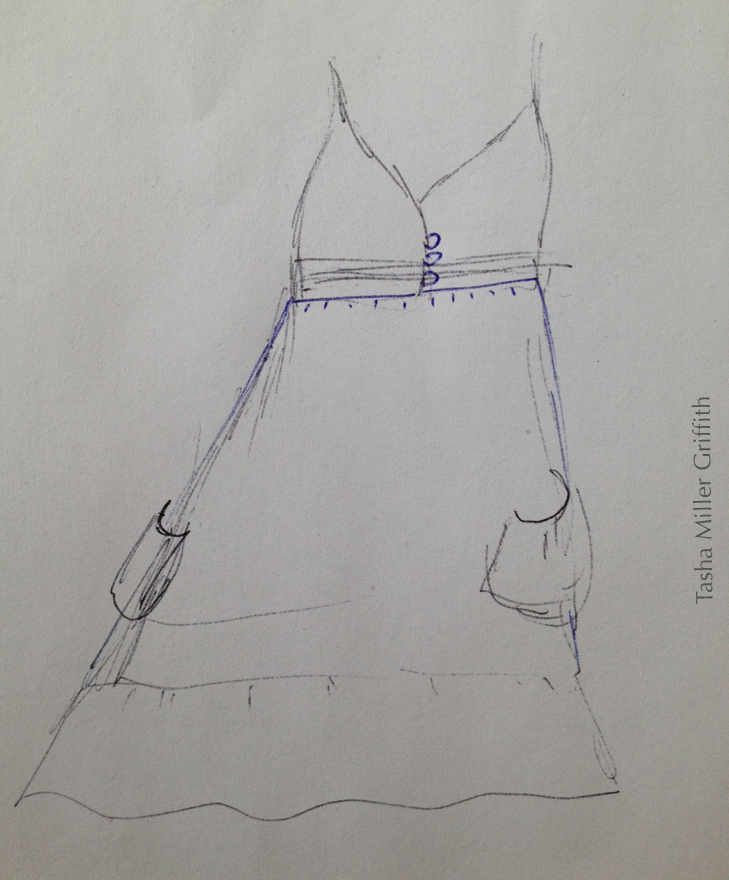
What am I making with these tubes anyway? A sundress!  I took this picture on Sunday during our giant spring snowstorm, which is now melting like crazy.  Whatever the weather says, it’s time for spring/summer sewing!  I used the fabric tubes for the straps, and also button loops at the top.  I’m glad to have my new wire turner, I can make some more straps for tops and dresses for the upcoming season.

Here is my sketch of the finished sundress.  I haven’t decided whether to do the big patch pockets or not.

What do you think?  What are you making now?