How to Add Pockets in Seams

finished pockets on

I used to joke about this, but I’ve decided it’s actually true: the lack of pockets is holding women back.  I mean, if our choices are either carry a purse everywhere and don’t let it out of sight, ask someone of the opposite gender to hold things for us, or attempt to stick our phones in our bras, of course we’re going to struggle to be taken seriously.

I do carry some kind of bag most places I go (with essential stuff like my notebook, and sometimes knitting in it), but there are lots of times when just pockets will do.  Everyone needs pockets, good pockets that are actually big enough to put your phone in, and sit down afterwards.


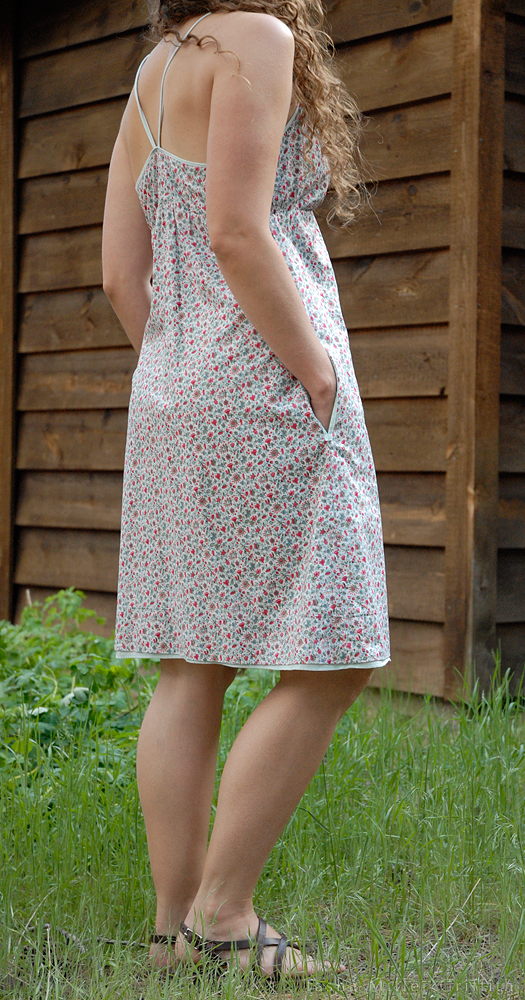
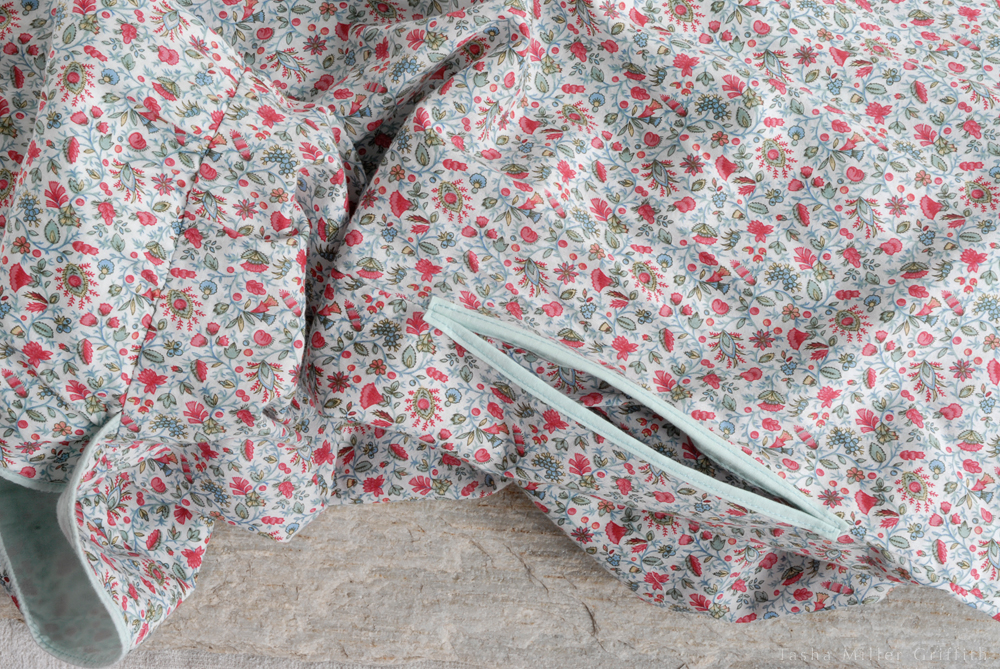
I was so exited about finishing this dress that I forgot to add the pockets, and had to go back and put them in! I’ll include a bit about the decorative edging I used at the end of the post.


This is why maker & fixer skills are important: instead of complaining about the lack of pockets, we can change it, and add some ourselves.  Guys who don’t have enough pockets in their lives are welcome too!

In this post I’ll go over adding pockets to a seam in your garment, commonly called “side-seam” or “in-seam” pockets.  You can do this as you’re sewing, or retrofit pockets into a garment that’s already finished.  In short, the steps are: 1. Plan your pocket, and prepare the pieces.  2. Sew the pocket pieces to the garment seams.  3. Sew the garment seams, including around the pocket.  If you have some beginner sewing skills, you can handle this.  (Ahem, get some skills here.)  Let’s get started!  As usual, click on any of the photos to enlarge for a closer look.


Plan & Prepare Your Pocket

measuring pocket pattern
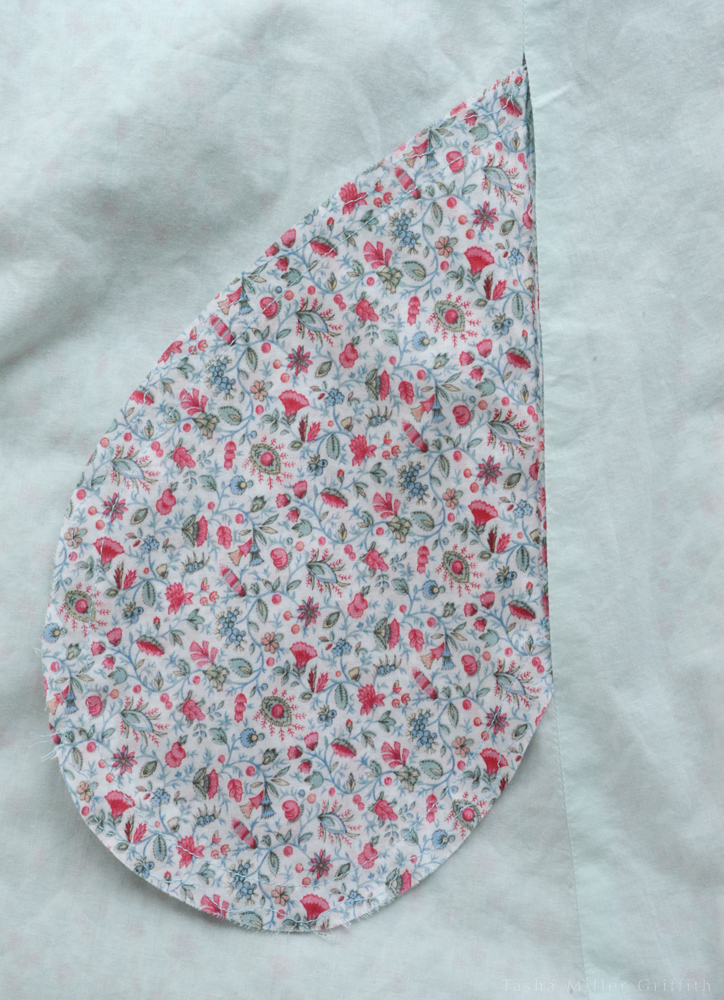
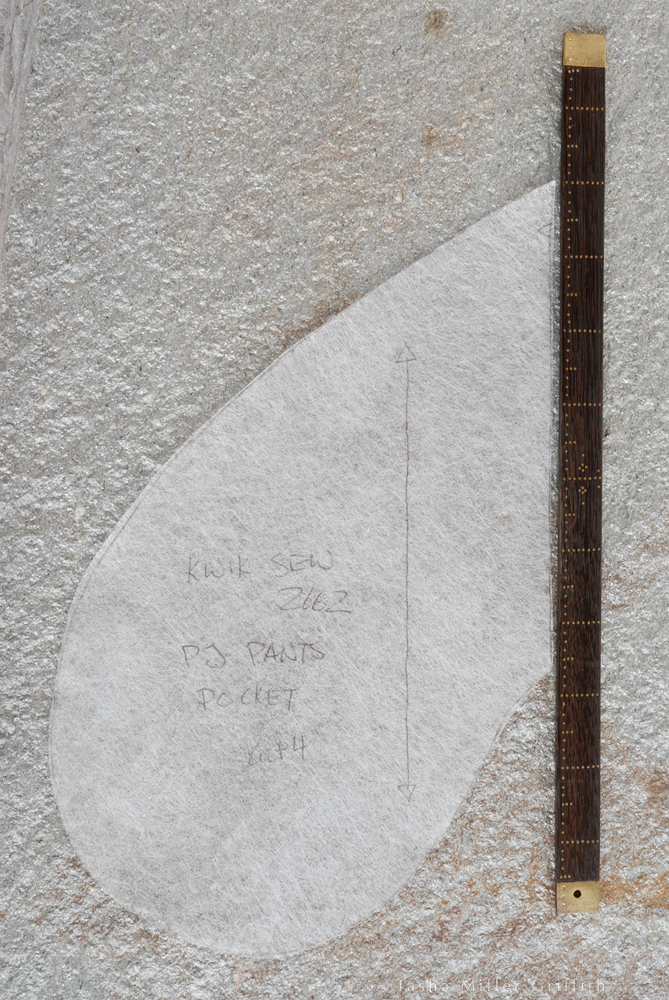
First figure out how big and what shape you’d like your pocket to be.  You can use a pocket piece from a pattern you have, or trace the shape of an existing pocket that you like onto paper for a pattern.  (If you trace an existing pocket, remember to add extra space—seam allowance—all around it to account for the fabric that will be used up in the seams.)  I used the pattern piece at right, which is a common shape for side-seam pockets.

Figure out where along your seam you want your pocket to go, and mark it with pins.  Measure the length of the flat side of your pocket, the part that you’ll sew into the seam.  This is how much space you’ll need on your seam for the pocket.  If you’re sewing from scratch, you can just center the pocket on your pin marks, and sew it as explained below, before you sew the seam.  If you’re adding pockets to a garment that’s already finished, you’ll need to rip the seam where you want the pocket to go, taking out a space a bit bigger than the pocket piece, to give yourself room to work.  I really like using this method to rip seams.  Don’t worry about tying off the ends of the old seam here, because you’ll sew over them later.


adding ss pockets drawing 1


Fabric and Piecing

You’ll need two pocket pieces for each pocket you want to add.  Cut them so that they’re mirror images, i.e. so that you can sew the shape together and have the right (public/outside) sides of the fabric touching.

This kind of pocket doesn’t show much, but you’ll probably be able to see a bit of it peeking out.  If you have matching fabric, obviously cutting your pockets from that will make it blend in the most.  If not, choose something you like that you won’t mind seeing a bit of.  The pocket fabric should be fairly tightly woven/sturdy, especially if you plan to carry heavy objects in it.

If you have only a bit of matching fabric, you can cut each side of the pocket in two pieces, so that the matching part is at the top.  When planning this, don’t forget to add extra seam allowance where the pieces meet.  Sew the pieces together into the pocket shape before you attach them.


pieced pocket
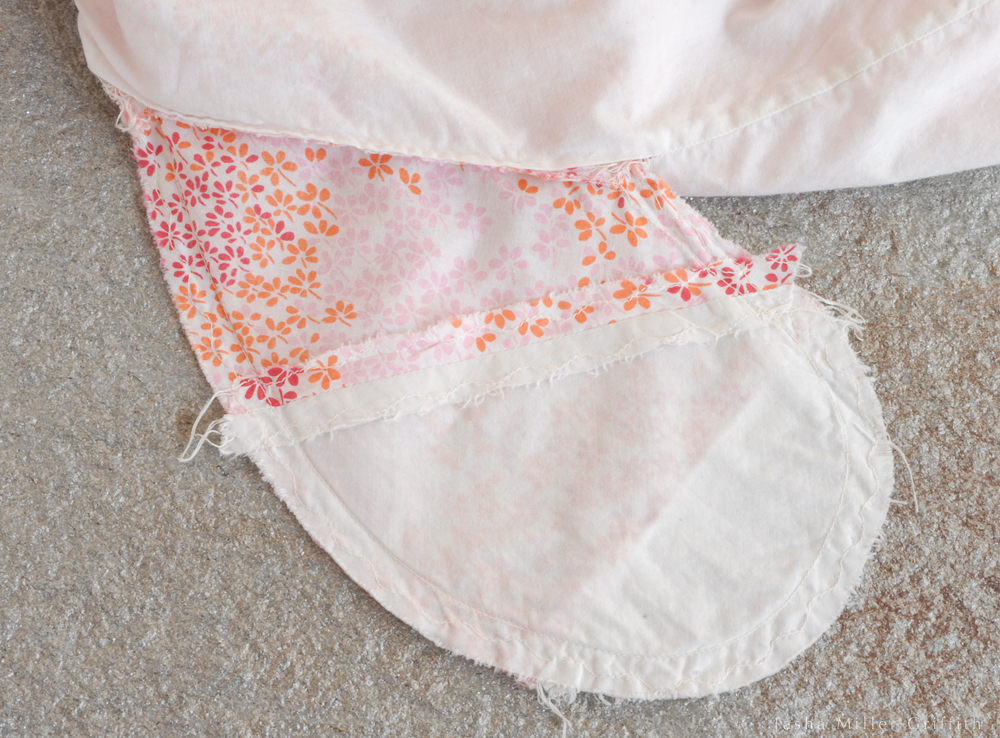
On close inspection you can see that the two halves of this pocket are pieced in different places, and that’s fine.  The printed fabric matches the outside of this dress, and the white is scraps from the lining.


Note: You can also add to a skimpy existing pocket (I hate those!), by cutting off the bottom and adding more.  Rip a bit of the old pocket seams along the sides to give yourself room to work.  Sew each side of the new pocket bottoms to the old pocket tops, then sew around the pocket, overlapping the old seam.  The finished pocket may look something like the one above.


Sew the Pocket to the Seam

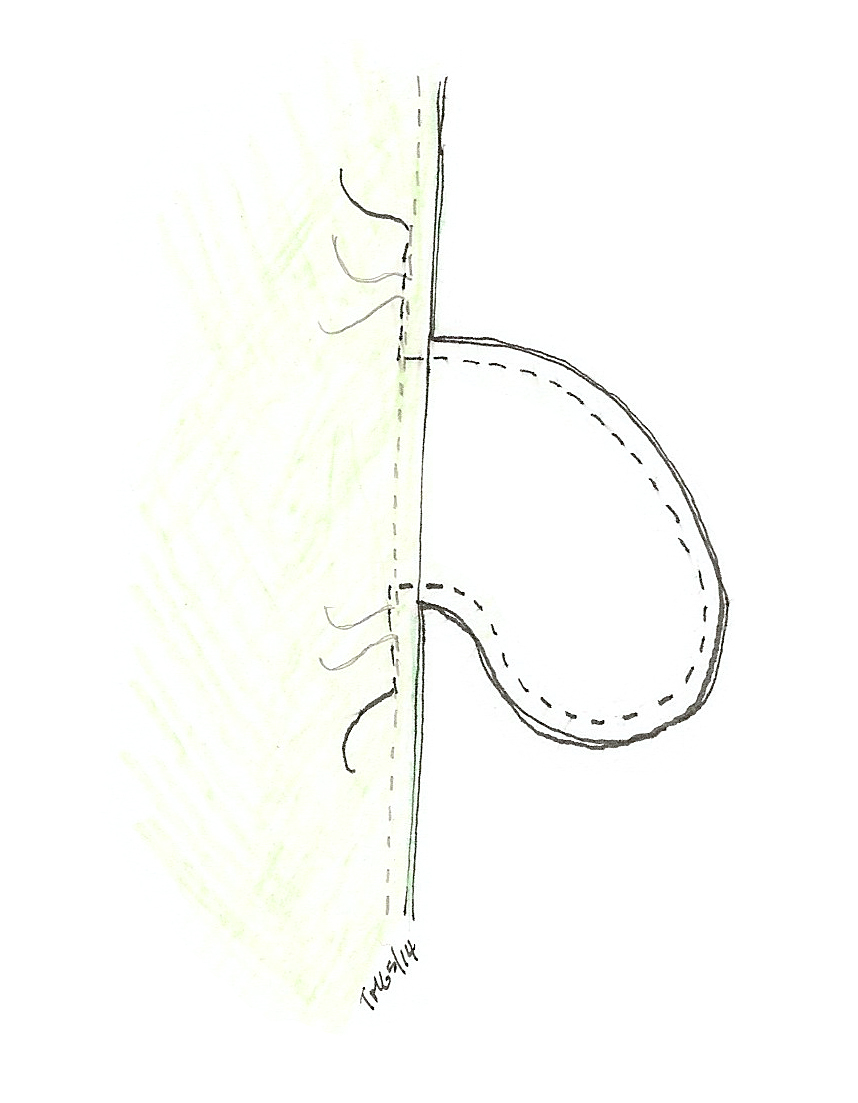
Once you have your pocket ready and know where it will go, pin one pocket piece onto one side of the garment seam.  Line up the seam allowances, and make sure you place the right side of the pocket touching the right side of the garment piece.  Sew the pocket on, using the same seam allowance as the garment seam, or just slightly narrower.  Start and stop a little bit outside the pocket.  You don’t need to back-tack your seams, they’ll be held in place by other stitches later.

adding ss pockets drawing 2
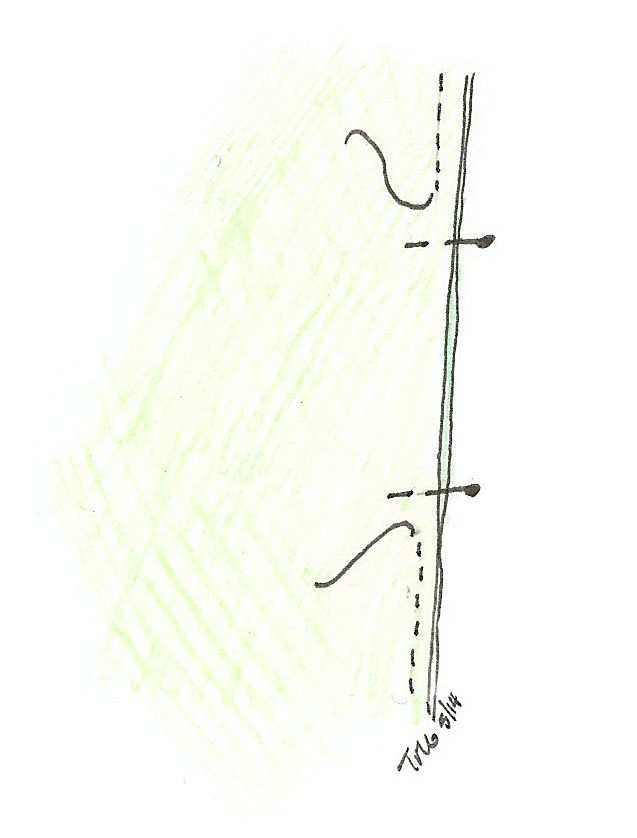
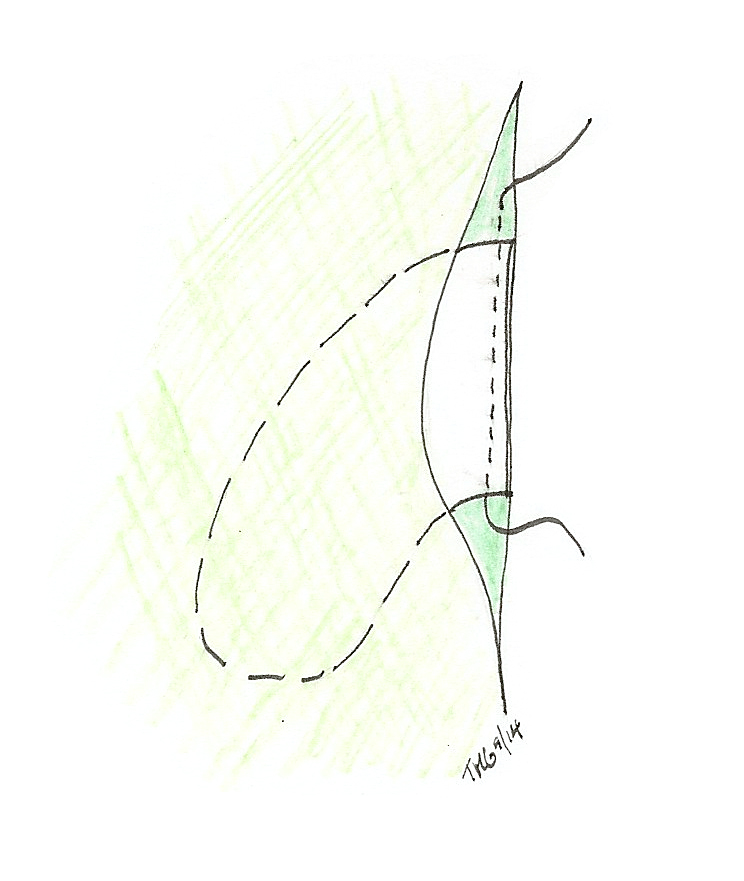
This illustration shows attaching the pocket to a seam you’ve ripped, which is still in place above and below the pocket.  It’s the same if you’re starting from scratch, except that the other piece of the garment won’t be attached yet.


Repeat this procedure with the other pocket pieces, making sure that any two sides which will be one pocket are aligned at the same place on the garment seam.

Using your iron, press the pockets open, away from the garment.  Don’t skip this step!  It will make all the difference in a clean finish.


adding ss pockets drawing 3
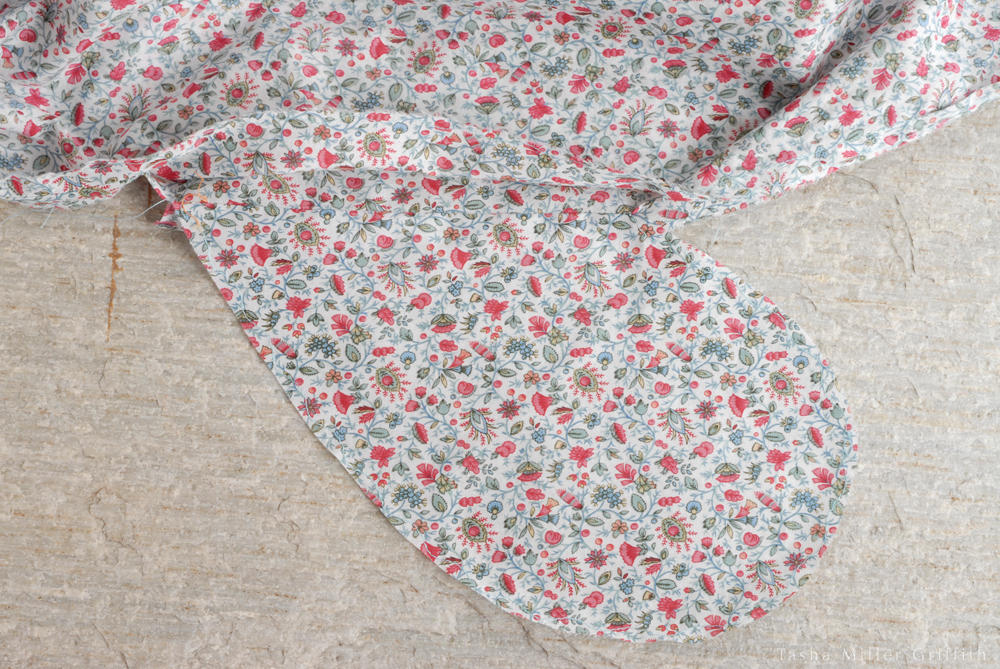
Here’s what it looks like in real life, with one side of the pocket sewn on and pressed open, although it’s a little hard to see in the tiny print:

pocket seams one side done


 Sew the Seam with a New Pocket

To finish, sew the garment seam, including around the pocket.  When you get to the top of the pocket, sew just inside of the pocket stitching and fabric, to avoid catching anything in the seam that will show.  Stop with the needle down, and pivot at the point where the seam allowance matches on the garment and the pocket.  Keep sewing, around the pocket, and pivot again when you reach a point just inside (towards the garment, not the pocket) the first seam at the bottom of the pocket.  If you’re sewing from scratch, you’ll sew the whole seam above and below the pocket in this step as well.  If you’re refashioning a pocket, you’ll start and stop just enough away from the pocket to overlap the old seam stitching.


adding ss pockets drawing 4
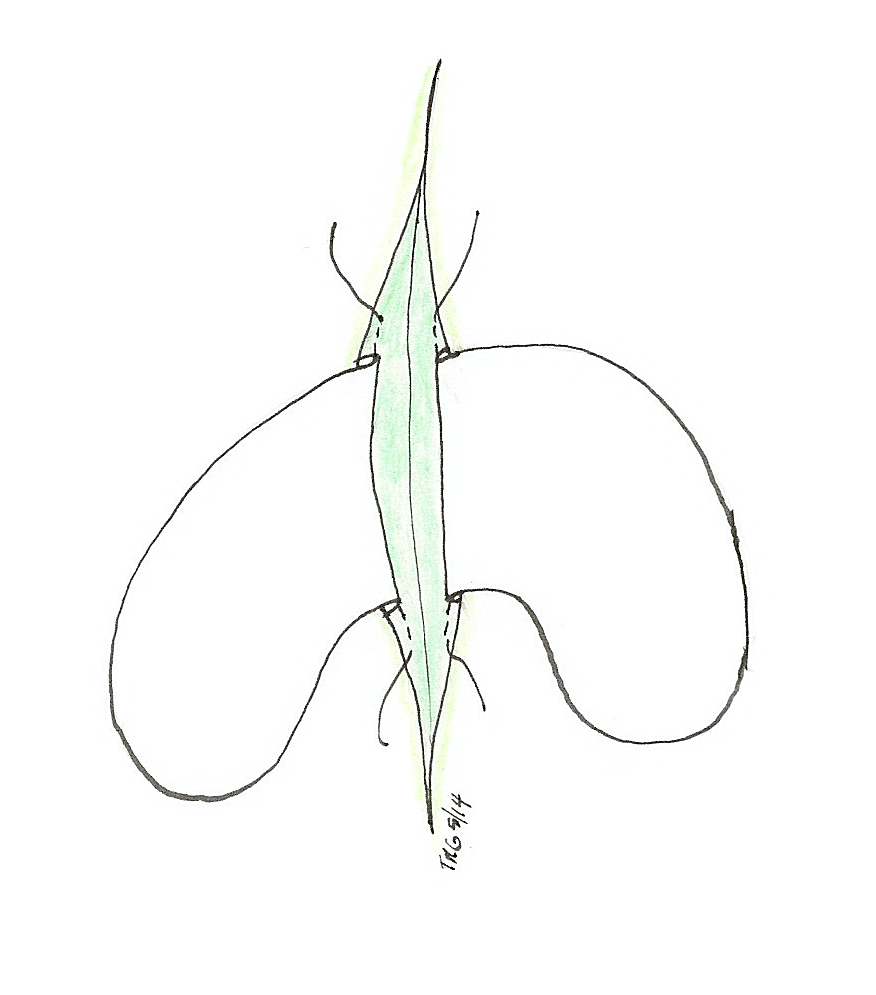
The stitching for this step is shown in the darkest color, overlapping the old seam, and just outside of the seam that attaches the pocket pieces.


Look, brand new wonderful pockets!

If your garment has a lining, you now have two choices.  You can leave it alone, meaning the pocket will sit between the garment and the lining, which is usually good.  On my lightweight dresses, I decided to make an opening in the lining seam, so that the pocket would be inside the lining too, and show less from the outside.  All you need to do for this option is to rip the lining seam at the pocket opening, or leave a gap when you are sewing the seam.  Knot the thread ends, or back-tack your stitching, to hold the edges of the gap in place.

finished pocket inside


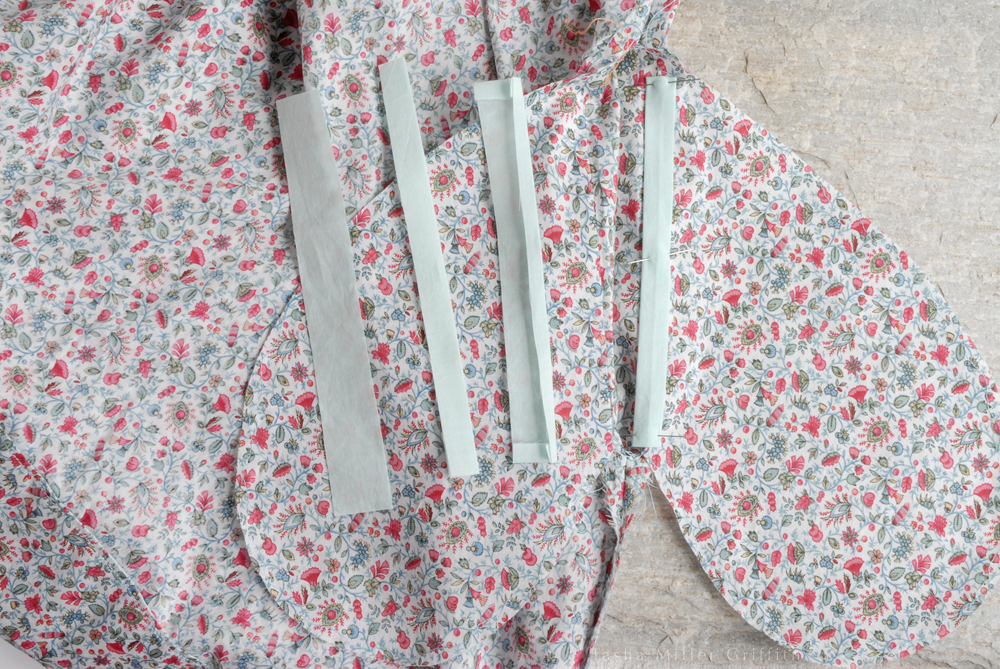
And Finally, Optional Decorative Pocket Strips

Since I was thinking about celebrating pockets, I decided to make the ones on my latest sundress a little more visible by adding fabric strips that matched the binding and straps on the dress.  Just in case you like this look, here’s how I did it:

1. Cut strips 1/2″ wider and longer (for 1/4″ SA) than you want them to appear when finished.  I made them 1/2″ wide finished, (cut 1″ wide) and slightly longer than the pocket opening.

2. Press the strips in half to mark the center, then press the SA under all around.

pocket decorative strip 1


3. Topstitch each strip in place, close to the edge of the strips.

pocket decorative strip 2


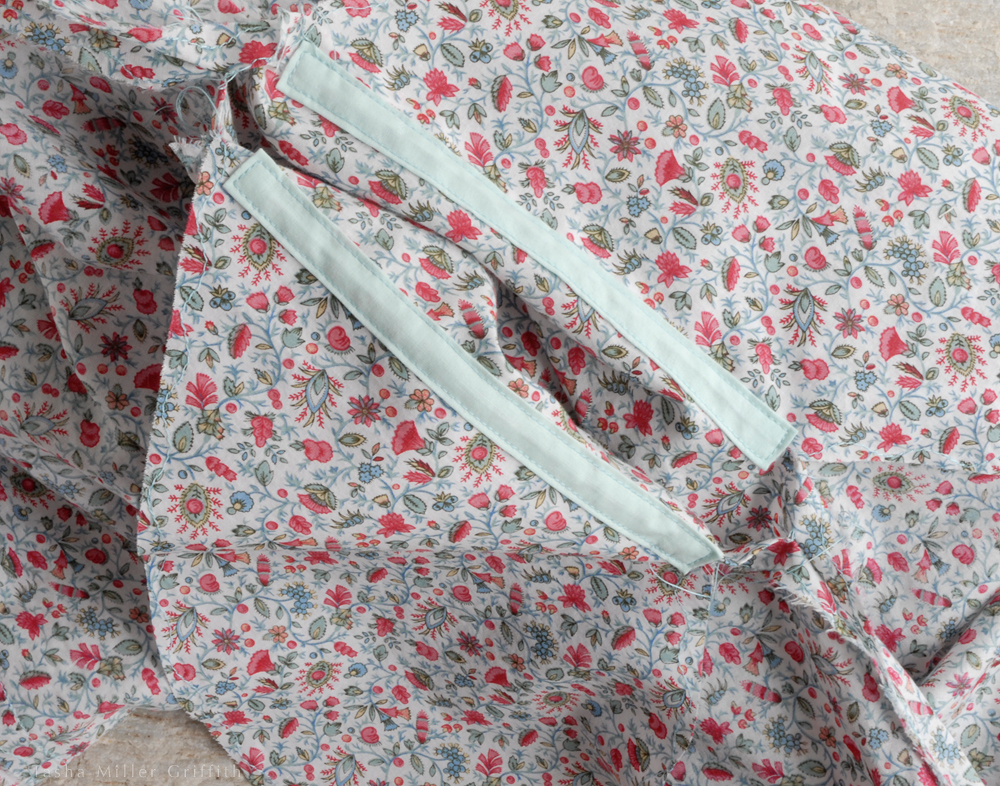
4. Sew the seam, and around the pocket, as you normally would.

finished pocket outside


Have you ever added or improved pockets?  What do you think about how the pockets in ready-to-wear relate to our society’s image of women?  Any other relevant thoughts?


New DIY Kits on Etsy, Plus the Hats are Back …


Hello all!  I’ve been using my computer time for the last week or so working on brand new stuff … if you can call ideas that have been rattling around in my head for a year or more “brand new” … but they now exist, in real life!  Or at least on the internet.


SRCR title page blog


Brand new: instructions and materials so that you can make the some of the scarves and blankets I’ve been making the last couple of seasons from cashmere ribbing!  I’ve laid it out for you, with lots of tips on sewing the ribbings, plus directions for three projects.  Make one of these, or make a totally new design of your own!

The color combos I found in the ribbing box are pretty great.  Get these now if you love them—there’s more good stuff in there, but the next batch will be different.


4 ribbing colors 1014


Plus, Fiddleheads hats are back for fall.  There are some new, incredibly cute pictures of children who shall remain nameless modeling them.  It’s worth a click just to see them all.  And—sigh—I think I said I wasn’t going to do this, but then I suddenly needed to, so I did—I modeled the adult size myself.  The kids are SO much cuter!


two friends


I’ll be back soon, with more cool stuff!


Pistachio Pesto


Apparently, it took me all the time since pine nuts were suddenly out of my price range (years!) until this year to figure out that pistachios are the pesto substitution nut to beat all others.  I’m amazed.  It’s so obvious once you taste it.


pistachio pesto 3


It also took me a little while (but not nearly as long) to nail down some quantities for this recipe.  I get in this funny mood sometimes when I’m cooking by taste, where I just want to, um, cook by taste.  Any attempt to quantify what’s going on feels like an unwelcome intrusion of thoughts that might be interfering with my creative process. It’s funny because I’m also a fairly obsessive note-taker.  I guess it’s just hard to take the notes at the same time I’m making the thing … in any case, I tried a few times, and finally got it close, I think.

The worst that could happen is that you’ll also need to make and eat a few batches to nail down the proportions you prefer … that’ll be terrible I’m sure.


pistachio pesto 1


Pistachio Pesto

Makes about 4 servings, enough for each person to have on top of ratatouille (which is fabulous!) or pasta.  Any leftovers are delicious just spread on bread.

I’m convinced that the food processor was invented by someone who needed to make big batches of pesto in a hurry.  It pretty much the perfect tool for this.  Combine in the bowl:

pistachio pesto 41 level cup shelled unsalted pistachios

1 1/2 cups very well packed basil leaves

1/2 cup grated Parmesan Reggiano 

2 large or 3 small garlic cloves

A generous drizzle of good quality extra virgin olive oil

A sprinkle of black pepper

Process until you get close to the texture you want.  Taste and adjust.  I usually end up adding a little more olive oil partway through, even though I prefer it slightly chunky and not too oily.  I find it salty enough from the cheese, but of course you can also add a little salt if you like.  I predict that if you try it, you’ll be converted, the taste is worth the shelling!


pistachio pesto 2


A Simple Piece of Mending, and Some Thoughts on Posting


potholder front


So, here I am.  We’ve been home for the fall for a few weeks now, and it’s lovely to be back.  But ever since we got here, I’ve just felt swamped.  With good things mostly, and some of the best kind of quality time with family, but still swamped.  I have great ideas for posts.  I even have pictures for a lot of them, but I just haven’t been able to put together the time to edit and put in the words.

As I’m sure you know if you’ve been reading for a while, I’ve been shifting more towards posting when I have something I really want to share, and away from a set schedule.  I hope this gives me more time to work on each post, so that each post is better.  Goodness knows we all have enough arriving in our email every day, and I don’t want to be contributing to that just to make something appear in this space, unless it’s something I’m proud of.

And yet, sometimes (like right now) I really do want to connect with my online community, I want to put something out there, and it doesn’t have to be complicated to be worth reading, right?  Sometimes the simplest things are the best.

Like this potholder.  I know, I mended a potholder, it’s not exactly Earth-shattering news.  In fact, I didn’t even like this potholder.  Bryan had it when we met (goodness knows where he got it) and I always thought it looked so cheesy—definitely not my favorite kitchen object.  But, the back fabric wore out.  (It was yellow plaid.  I had so little intention of posting about this that it never occurred to me to take a “before” picture.)  The front was still fine, even the binding was in good shape, and I have this stubborn genetic defect which makes me refuse to throw out anything useful, so I just sewed a patch of sturdy black knit over the back.  After I sewed around the edge, I thought it needed a bit more, and I decided to outline the tacky shapes on the front.


potholder back


Then, the stupidest thing happened: I suddenly loved this potholder.  It’s now cheeky, it’s a little edgy, it’s visibly mended, it’s mine.  Every time I see it I smile.  Sigh …

What about you, ever fixed something and then fallen in love with it?  (The more I think about it, the more I think this happens to me all the time.)  If you blog, how do you balance the number and quality of your posts?


A Cashmere Scrap Rainbow Baby Blanket—Selfless Sewing


rainbow ribbing baby blanket 3


After reading this post in the spring on Ginger Makes, I started thinking about how I do actually sew things for other people sometimes, and maybe I should post about some of them.  Especially when I actually go outside and take pictures before mailing the thing off.


Sometimes, I sew a blanket for the new arrivals in the families of my nearest and dearest.  The last several have been made from the scraps from these hats (quick shameless promotion: they’ll be back in my Etsy shop soon!  Ask for them at your favorite kids’ store.  Get me in touch with that store!  Ok, I’m done).


I can’t get rid of these ribbings, they’re so irresistibly textural, and so vibrantly colored, and so buttery soft, basically perfect for a new baby’s blanket as far I’m concerned.  Mamas, did I mention already felted = machine washable?  (Just like the hats.)


rainbow ribbing baby blanket 5


rainbow ribbing baby blanket 2


I used the mock-serger stitch on my machine, for strength plus some stretch.  With these materials, the seams will never be 100% ripple-free, so I’m going with “ripples are part of the charm.”  In lieu of extra decoration, I switched thread colors at intervals as I went, and it made a big difference in the look, I love that the thread isn’t distracting from the ribbing colors.


rainbow ribbing baby blanket 1


We’re actually going to meet the recipient of this blanket today! I’m really excited.


rainbow ribbing baby blanket 6


One thing I love about making things for other people, besides the warm fuzzy feeling, is that it’s often an opportunity for me to try out a new idea and be more creative, thinking about things from another perspective.


rainbow ribbing baby blanket 4


What about you? How do you feel about making things for others?


Washing Fruit and Veggies on the Road


washed fruit in cooler


So, you’re driving along on a late-summer road trip, the farmers’ markets and road-side fruit stands are overflowing with beautiful produce, but you hesitate to buy a bunch of berries or tomatoes if you can’t figure out a way to wash them, right?  Here’s our solution.  All you need is a container (a tub that yogurt came in is perfect) and some water.  A cooler is optional. I’m not really sure why it took us so long to figure this out.  It works a lot better, and uses a lot less of our drinking water, than trying to pour water with one hand while somehow holding and scrubbing fruit with the other hand by the side of the road.  Even if you are on your way to a house or hotel where you could wash fruit, this has the advantage of letting you eat it right NOW, while you cruise along with the windows rolled down, or at your favorite picnic spot.

Put your produce in your little tub, and pour in enough water to cover it.  Swirl everything around with your fingers for a minute or so, and then hold the fruit back and pour the water off. If a lot of dirt comes off in the first round, or you just want to make sure it’s really clean, repeat.


tomatoes in tub of water


Then you can put the clean tub of fruit in your cooler, or on top of the parking brake between the seats for easy access.  If you’ve washed something like tomatoes that does better dry and room-temp than cold and wet, you can dump them out onto a towel, or use one of those little green plastic baskets to store them. If you knew how many picnic style meals we’ve eaten, consisting mainly or entirely of various versions of caprese sandwiches, you’d laugh out loud.


tomatoes in green basket 1


A couple more notes: basil does well in the cooler with the stems in the water, or in a sealed plastic bag with a little moisture inside (kind of like the cooler version of this method), but not if the leaves touch the ice (they’ll frost and turn black).  Thanks to Bryan for hand modeling, and for being as enthusiastic about fresh local edibles as I am.


tomatoes in green basket 2


A Cabarita Top Variation, with Tips for Matching Stripes


The first picture I saw of the Cabarita Top from Cake patterns must have been one where Steph is wearing the “back” as the front. I’m hardly ever struck by the sudden need to make a pattern exactly as shown, but in this case I knew I needed this top … even though it turns out that’s not exactly what the pattern intended. I also hardly ever make anything trendy … but I love how many chevrons and clever stripe matching I’ve seen in the last couple of years, so I guess it’s a trend I don’t mind being part of. (Fair warning: I’m going to wear this top until it falls apart, whether or not it starts to look dated.)


cabarita front


Anyway, how about some tips for stripe matching first, and then a couple notes on changes I made to the pattern?

The first step of stripe matching is careful cutting & planning. I cut striped fabric in a single layer, so I can see exactly where the stripes on each piece go.

Lay your first pattern piece, the one you most want to match, on the fabric, and trace the stripes onto that pattern piece with a pencil, so you can see exactly where they line up, and then cut them the same, or in a mirror image, on the next piece. I could swear that I took a picture of this step during this project, but apparently I was mistaken.  I’ll have to get one next time I’m in the studio. The point is to carefully draw the stripe placement along the seam lines of the pattern piece.  Draw both edges of key stripes, so you can see how wide they are and where each edge goes.  It may help to use colored pencils that match your stripe colors.  For a fairly simple stripe, you can go ahead and cut, and then move the pattern piece as necessary (don’t forget to flip if needed), align the stripes with the ones you drew, and cut again.  If you want to match along a seam where two pattern pieces meet (like a side seam between a front and back) you’ll need to transfer your drawn stripes from the first piece you cut to the second one, making sure they are aligned at the bottom.  This project was a straightforward one for this part, since there are just four copies of the same piece.


cabarita side


Sometimes, especially with plaid fabrics, or more complex garments with lots of seams, you may have to pick your battles, choosing the most visible/important seams to match stripes on as you’re planning and cutting the fabric. Also keep in mind that if a seam runs in the same direction as a stripe, it’s much much easier to make it look good if the seam runs through a wide area of the same color, than if it’s along the border between two colors or a narrow stripe, where it’s likely to look wobbly.

When you get ready to sew the stripes, my all-time best step for perfect matching is: baste! Don’t worry about exactly matching the seam allowance edges, worry about exactly lining up the stripes. Peel back the fabric and look. As you stitch, check to make sure that the needle goes in and out in the exact same place on the stripe in both layers, and adjust if necessary. You can check, and even try on your project, after basting to see how it’s coming out. You can bet that if your stripes are matched as you baste, they’ll be matched after you sew the seam.

I also use my walking foot for stripes, as a little extra insurance against the layers shifting.


basting stripes

It works:


finished matched stripes


Just in case you want to make Cabarita hack like this, here’s how I did it:

I compared the v-neck on the pattern to another me-made shirt I like, which suggested I should use the marked neckline for the group of sizes bigger than mine. I forgot that having a V in the back as well (instead of a plain round neck) would give the top more leeway to slip off my shoulders. I ended up adding thin clear elastic, barely stretched as I sewed, all around the neckline in the seam allowance of the binding seam, to keep it hugging in a bit. I like it, but if I cut this again I would use the V suggested for my size for both front and back.


cabarita left


To make the bands at the shoulders, I took an inch off the shoulder from the top down, minus seam allowance, and cut a separate piece 2” wide plus SA, across the stripes. I sewed the extra shoulder piece between the front and back on each side, and then the binding around the neck and sleeves.

I sewed the binding once on the seam, and again near the edge to keep everything flat as it’s washed and worn. Then I flipped the binding around and sewed one last time just along the edge, from the right side. Have I mentioned I’m really liking zigzag as topstitching lately?


cabarita stripe bands


This fabric is an organic cotton & hemp blend from The Fabric Fairy. It’s yummy, and I’m looking forward to it getting even softer and drapier as the hemp ages. I decided to use the “wrong” side as the public side, because I love how you can tell that the stripes are knitted in, and how the little rows of purls (for you knitters out there) soften the transitions between the stripes just a bit.


cabarita back


I’m really liking wearing this over tank tops, maybe even more than on its own. I think I like how another layer showing below it breaks up the pattern a bit, but it also could be just because this summer has been generally cool enough that light layers have been a good option.


What about you, what have you been sewing? Any more tips for stripes?


Time, Productivity, and All the Things I’d Love to Do

Or, how I discovered the mindfulness of the infinite list.

This post is illustrated throughout with projects we made at our annual family and friends craft retreat a few weeks ago.  I’ll tie that in later in the post.


I'm kind of obsessed with the hand as a symbol of the ideas I hold dear.  This was my design in a reductive printing process we tried.

I’m kind of obsessed with the hand as a symbol of the ideals I hold dear. This was my design in a reductive printing process we tried.


I’ve struggled on and off my whole adult life with a problem that boils down to this: there will never be enough time in my lifetime to make everything I want to.  Much less will there be enough time to learn nearly enough new skills, or to read everything that’s so good, it might change my life.


Speaking of new skills, we got to try wood carving this year thanks to my dad.  I made this new and improved wood version of the giant plastic hair pins I use all the time.

Speaking of new skills, we got to try wood carving this year thanks to my dad. I made this new and improved wood version of the giant plastic hair pins I use all the time.


I used to have a fantasy that if I could cut out all time-wasting activities, I’d have time for everything I on my love-to-want-to-do list.  I really, really hate to break it to any of you who may be still thinking about this, but it won’t work.  I got rid of the low-lying fruit a long time ago: I haven’t had TV since college, and one of the few benefits of being one of the millions of Americans paying too much for bad internet is that our connection is way too slow to spend hours watching video, or even reading content-heavy pages online.  I fully support giving up time-sucks, but it’s sad and true that no matter how much you cut out, all the good stuff still won’t fit in.

So sad, right?  Although, I do agree, as elegantly put in this article from the NPR blog, that it would be so much sadder if humans hadn’t produced more beautiful ideas than I can take in in one lifetime throughout all of our history so far.

After I figured out that no matter what, there would still be more lovely projects to make and music to listen to and books to read on my list than I could ever get to, the idea simmered on the back burner of my brain, sometimes seeming as if I had things under control & was making good progress, and other times like my available time was a thing with wings, or fangs, chasing me, or flying away at warp speed.


I led a refashioning session for everyone to remake & mend as they saw fit.  I'm awful at taking any pictures while I'm teaching, but even the pile of scraps from this session was lovely.

I led a refashioning session for everyone to remake & mend as they saw fit. I’m awful at taking any pictures while I’m teaching, but even the pile of scraps from this session was lovely.


Then, just a few weeks ago, we had our annual craft retreat of family and friends, hosted at my house for the first time.  I had a classic moment of semi-panic as I suddenly saw through the eyes of these people who I wanted to think well of me, some people who had never seen my house before, and my yard looked like a redneck junkyard in-the-making … I consider myself a decent housekeeper, and I did make an effort to get some stuff out of the yard on our last trip home … but there was this moment, about two days before the first arrivals, when I looked around and realized I could clean the house non-stop, without sleeping, until everyone got there, and still be seeing deeper levels of dirt, areas I had missed.

That’s when I got it.  It’s not that the list is longer than I can ever hope to finish, it’s that the list is infinite.  There’s a freeing, meditative aspect of mindfulness to the infinite list.  Since it’s not just unlikely, but actually impossible, to do everything on an infinite list, any infinite list, a certain amount of letting go is perhaps an inevitable next step.


My aunt Barb Miller made this truly lovely pillow from a unwanted garment, using my grandmother Dottie Miller's handwoven fabric.

My aunt Barbara Miller made this lovely pillow from a unwanted garment, which used my grandmother Dottie Miller’s beautiful handwoven fabric.


I’m still looking around in this infinite-list paradigm, getting my bearings. A few consequences that seem important have occurred to me so far.  Priorities, for one.  Since I can spend an infinite amount of time cleaning the house, I have to choose to stop at some point, even though of course I want things to look nice.  As a guest, if I could arrive at either a house with sparkling windows, or one containing delicious homemade ice cream, I’m wouldn’t hesitate to pick the latter option.  Your choices might be different from mine, but we all get to choose which of the current available options is the most important to us.


She was so right about putting the label on the outside.

She was so right about putting the label on the outside.


Since my to-do list is infinite, it makes more sense than ever to block out time for the things I love, which would otherwise get immediately buried under the small mountain of tasks I “should” do every day.  Back around the time I gave up TV, I decided to pencil in an hour a day for myself to sew, and I was fairly astonished at how quickly I finished projects.  I have more to-dos now than I could have imagined in college, but I’ve also realized that if I work on only one thing all day, even something I like, my brain slowly turns to mush over the days and weeks.  Plus, the feeling of getting further behind on my personal goals really starts to drag me down.

I need a little “fun” creative time, and a chance to explore new ideas, to keep me happy.  I reinstated the practice of giving myself an hour a day to work on whatever I want, regardless of whether it’s likely to ever make me any money, a few years ago.  It’s a huge and immediate boost to my life satisfaction.  If you can’t spare a whole hour, even 15 minutes a day can give you enough time to make progress on anything you’d like to fit in (Mark Frauenfelder of Make magazine says so, and I’ve seen a lot of sewing bloggers trying it out in the last couple of years, particularly after this post appeared on The Coletterie).

Mark Frauenfelder

The infinite list only beefs up my justifications for scheduling my “free time”, since it makes clear that the time when I “don’t have anything else pressing to do” won’t ever come.  I must choose to make time for the things I love, rather than waiting for the time to appear.


My dear aunt Barb also made this wonderful spoon.

My dear aunt Barb also made this wonderful spoon.


Perhaps the most freeing thing about meditating on the infinite list so far, is that since there’s no pressure to finish the list, it’s easier to give myself permission to to pay attention to what’s happening in the here and now, and to take care of some things right away.  Or just to appreciate a lovely moment, rather than always focusing on the tasks already stacked up from yesterday.

Overall, I’m feeling pretty stoked about this mental shift from the incredibly long list to the infinite list.  I’m hoping that it will help me focus on the things that are most important, leave some room for spontaneity, and let go of some of the unreasonable expectations I tend to hold over my own head.  Sounds pretty good, right?  What about you, any thoughts to add from your own experience?


Basting: Thread Magic


new backstitch 1


I kind of feel sorry for anyone who doesn’t like basting, or thinks they don’t.  It’s a like a magic wand for your sewing.  It keeps things exactly in place for exactly as long as you need it, doesn’t distort your final sewing, doesn’t need to be removed as you go, and can be pulled out when you’re done, leaving no mark behind.

I fell in love with basting many moons ago, while sewing a collar onto a button-down shirt.  I had all the layers of shirt and collar scrunched together ready to sew, and no matter how many pins I put in, the fabric kept shifting under the sewing machine as I went and getting terribly uneven, and/or folding over and catching pieces of the shirt I didn’t want in the seam.  After ripping it all out and starting over two or three times, I decided to baste it in by hand and see if that was any better.  Held by the basting, the shirt and collar seam went through the machine without a hitch, as nice as I could ask for, on the first try.


basting stripes


Basting just means any kind of temporary stitching, meant to hold fabric in place until you can get the final stitching done.  The advantage is that the basting doesn’t have to be neat and even, or strong enough to hold up with wear, so you can concentrate just on the fabric while you’re basting, and then just on stitching when you’re sewing the final seam.

If I’m in a situation where I want basting, usually it’s because I need more precise control over the fabric, so I baste by hand.  To baste, simply sew running stitches (illustrated at the top).  The stitches can be pretty big and uneven—concentrate on the placement of the fabric layers with each stitch, rather than the stitches themselves.  I like to begin and end with a backstitch, just to keep the basting from pulling apart until I’m done.

Some good places to use basting are: when you want things to align exactly (like matching stripes), when there are a lot of shifty layers (like the collar seam), or any other time when you want to make sure some part of your project will stay in place while you sew it.  For the soft bra below, I knew there was no way the lace would stay in the folds I wanted against the fabric if it was held only by pins.  Plus, basting allowed me to put everything together on my dress form, seeing exactly how the lace would work on a body, and then take the whole thing off the form and sew it.


basting lace on form


finished soft bra lace


It worked great!  When you’re done with the final seam, you can remove the basting easily.  Pick out the backstitches at the ends and grab one thread tail, then you can often pull out a long basting thread with one pull.  Unless of course you sewed over it in the final stitching, but no worries, that happens.  Just pull out what you can at once, you may have to cut and pick out a few small thread bits.

Although it may sound like a technique for more advanced sewing, I definitely recommend basting for beginners too.  When you’re just starting out, learning how your machine handles fabric, especially in tricky situations, isn’t easy.  You can baste practically anything that you just can not get to stay in place while sewing on the machine, get much better results, and save yourself a lot of frustration.  According to The Mary Frances Sewing Book, back when most garments were sewn by hand, it was more efficient to baste a seam first, and then sew it, than to sew the final stitches while trying to keep the fabric layers in place.

Best of luck with your sewing!


Asparagus Tarts for Spring and Early Summer


asparagus tart


Posting this recipe feels kind of, sort of, almost like cheating. It’s a variation on the savory tart/quiche recipe I’ve been using all the time since this past fall. With the late spring in the Midwest this year, there’s still a lot of asparagus around, and I’d have a hard time thinking of anything easier and more satisfying to do with it than this. I made the tart shown here with about a pound of asparagus, and some fresh thyme. A week or so later, I made another one for a new friend who’s eating gluten free, without the crust, with slightly less asparagus, and adding some leftover potatoes and onions. This really is one of those recipes (my favorite kind) that encourage experimentation and new flavor combinations.


Asparagus Tart Variations


Refer to the original recipe for the cornmeal crust, if making a crust, and more filling ideas.

For the asparagus, either broil it lightly first for more smoky flavor, or simply wash, and chop it into approximately equal diagonal segments, discarding any tough or dried out ends.

Optional: prepare potatoes as for the potato and green chile tart, or use any other leftover cooked potatoes you happen to have around.


For the Filling:

4 eggs

A generous splash heavy cream or milk

A few Tablespoons grated cheese (I like a hard cheese such as Parmesan)

Fresh ground pepper

(Salt is optional, depending on your taste, and saltiness of cheese)

Fresh thyme or other fresh herbs to taste (Tip: if the stems are sturdy enough, you can get most of the thyme leaves off by grabbing the stem near the top and running the fingers of the other hand down the stem from top to bottom.)

Feel free to add an extra egg, and a little more of the other ingredients, if it seems like there’s not enough filling for the veggies you have.

If not using a crust, make sure to grease your pan thoroughly.

Mix the cut asparagus (and potatoes) in with the filling, and pour into the pan/crust. For the second variation, I sprinkled the top with minced garlic and more Parmesan, which puffed and browned as the tart cooked for a tasty crispy top.

Bake at 375° F for about 40 minutes, turning once, until the tart is golden on top, puffed up, and just moist inside when tested with a knife.