Using Fusible Web to Alter Patterns


From reading this blog, you might think that I haven’t been doing much sewing lately, but actually I have, and altering patterns too.  I intend to catch you up soon.  In fact, I intended to catch you up Monday Tuesday today, but I’ve been busy, and I’m realizing that by the time I finish the photo editing it will be next week.  Never fear though, I have something good (but short) the meantime, one of those why-didn’t-I-think-of-that-ages-ago things.  This one involves adding paper to patterns.

If you have ever changed a pattern in a way that required drawing part of it outside the current cut edge, or cutting it apart and adding more in the middle, you know what I’m talking about.  It’s hard to tape more paper to the pattern smoothly, it tends to make folding and cutting weird, and smoothing the pattern pieces when you get them out to use again involves carefully dodging the tape with the iron, or cleaning tape gunk off the iron (ask me how I know that).  Sure, I could trace the whole pattern again, but that seems wasteful of my lovely pattern paper.


fusing pattern paper


Then one day it just occurred to me – I have fusible webbing tape.  If I fuse the two pieces of pattern paper together, folding and ironing them is suddenly super easy, and the edges are seamlessly held together all the way along, with no gummy stuff on the outside!

I peel the fusible web off of the backing, and tack it along the edge of the pattern paper with my fingers.  Then I lay the pattern on top of the new paper, making sure that both are flat and smooth.  I press with a dry iron and voila!  I can trim the new paper edge right next to the fused part for a smooth join.

I use Sewable Swedish Tracing Paper”, which I get from Birch Street Clothing, to draft and copy my patterns.  I usually don’t sew it, but I love everything about it, it’s sturdy, yet soft, I can see through it to trace, and also write all over it with ballpoint pen.  It worked great for this technique.  If you try it on another pattern paper (must be iron-able) do let me know how it works!  I used Lite Steam- A-Seam 2 fusible web tape, which I got from my local quilting store.

Sometimes it seems like I should have a talk with my brain about timing (as in, could we have this idea before ironing Scotch tape by accident?), but on the whole, I guess I’m willing to wait for new ideas, if they’re as elegant and helpful as this one is to me.


DIY Crème Fraîche – and Kohlrabi Salad


Or, why I like The Joy Of Cooking so much.


creme fraiche and kohlrabi

I know, it looks like strange bedfellows, but keep reading . . .


If you’ve never had crème fraîche, I recommend trying it.  It’s kind of like sour cream, but a little less sour and much more subtly flavored.  And expensive, at least here.  It’s a cultured food, so we figured that if some of the cultures are still active, we might be able to get more crème fraîche by adding some of what we had to some plain cream.  Good quality organic heavy cream is about 1/4 the price per ounce of crème fraîche, at least in Flagstaff, AZ.

And in fact, if you look up crème fraîche in the KNOW YOUR INGREDIENTS section at the back of The Joy of Cooking (I love that part of the book), they suggest as a substitute: adding one tablespoon of buttermilk to one cup of heavy cream, warming it to 110° F on the stove, and then pouring in into a jar, letting it set loosely covered “until the cream has thickened and has a pleasant mildly sour flavor,” anywhere from 6 hours to 3 days.

We tried the same thing, using one tablespoon of store-bought crème fraîche to one cup of cream.  And, almost three days later, tada!  It’s funny because it looks like nothing is happening for quite a while, the cream still very liquid, and then finally a few more solid clumps appear, and the then bam! it’s done.  Once it gets as thick and mildly sour as you would like, store it in the fridge to keep it from becoming overly acidic.

These directions say to leave it in a warm place while the cultures are working.  Our house is short on warm places in the winter, so the first time I tried it, I left the little jar near the stove, figuring that whenever I heated something up it would get a little warmth.  That was the time it took almost the whole three days, but definitely worked.  The next time, I actually forgot to heat it at the beginning, I just added 1 tablespoon of the first batch to one cup of fresh cream and stirred it around.  I thought it might benefit from a warmer place, so I put it in the middle of the burners on the stove as I was cooking dinner, checking from time to time to make sure the jar was getting warm, but not hot, and to rotate it around a bit.  That time the whole jar had become thick crème fraîche by the next morning!


kohlrabi salad


Ok, so once you have some crème fraîche, kohlrabi is probably not the first thing you are inspired to put it on.  Dolloped in soup or on waffles might sound more luscious, and both are wonderful.  But, if you’ve never had kohlrabi, I definitely recommend it.  It’s one of those winter vegetables that looks knobbly and scary on the outside, but on the inside has a lovely subtle flavor, in this case a little cabbage, a little nutty, and quite good.

I tried one recipe for kohlrabi salad earlier this winter, but I thought the amount of lemon juice in the dressing overwhelmed the soft flavors.  If you look up almost any specific vegetable in Joy, it will tell you not only whether it is good raw or cooked, and how to cook it, and whether to peel it first, but it also gives a list of flavors that compliment that veggie particularly well.  That features was a huge help when we joined our local CSA – even though I had never heard of most of the greens we got, they were almost all listed, and I could figure out at least whether they were for cooking or salad, and what they were likely to taste like.

Under kohlrabi it says, among other things, that it goes well with cream, parsley, and dill.  As do carrots, and so . . .


Recipe Sketch: Kohlrabi and Carrot Salad with Crème Fraîche

This makes enough for 2 or 3 servings, feel free to make more!


Peel, taking off the woody outside layer (chew on a bit if you are not sure), 2 small kohlrabi

Scrub one medium carrot (I pretty much never peel carrots)

Grate the kohlrabi and carrot on the largest teeth of your grater (a trick I only recently figured out is to leave the carrot top as a handle, start grating from the skinny end, and stop when you get almost to the top).

Put these in a bowl, add 2 – 3 tablespoons of crème fraîche, and mix with your fingers, it should be slightly creamy all over.

Sprinkle on about a tablespoon each of chopped fresh dill and fresh parsley.  (Remember how I keep herbs in a jar in the fridge?  Dill keeps practically indefinitely that way.)

Mix together, taste, and add a pinch of salt if desired.  If you are not serving it right away, you may find that the veggies have absorbed some the liquid and the salad is a little dry, if so you can add a little more crème fraîche or regular cream before serving.


I love all harmonious delicate flavors in this salad.  And, as you might guess, some crème fraîche mixed with the cream for carrot and raisin salad is pretty great as well.

If you can’t find any crème fraîche to start from where you live, you may be able to get the cultures from a source like New England Cheesemaking Supply.

I did a little research on using the same process to make perpetual yogurt, which I’m embarrassed to say I’ve never tried, but it’s now next on my list of kitchen projects.  From what I’ve read so far it seems only slightly more complicated, heating the milk, I presume to kill of any unwanted bacteria, then adding the yogurt or culture once it’s cooled back to warm.

What about you – have you made your own crème fraîche or yogurt, or other cultured food?  Any tips or thoughts?


All’s Well That Ends Well, but Please, Don’t Put Your Wool in the Washine Machine


viola outfit 2


At one point, I considered not writing this post at all, because I’m pretty embarrassed about how this skirt got to the point where it needed remodeling in the first place.  But in the end, there was no way to not write about it, especially since I ended up wearing this once-shameful skirt to dressy Flagstaff event (maybe the only dressy Flagstaff event? We always joke that people here wear jeans to everything) . . .

I made this skirt, as near as I can figure, about 10 years ago!  This was a time before I knew much at all about wool, other than the basics; it comes from sheep, it’s been used since ancient times, people say it’s lovely, etc.  It may be worth pointing out that this was also years before I had felted anything, on purpose or otherwise.  You probably see where this is going.  I put a sample of the fabric though a normal cycle in the washing machine.  Nothing happened, the fabric looked just about the same as when it went in.  “Great!”  I thought.  I made up the skirt using the Folkwear Walking Skirt pattern, one I love and have used a lot.  And, I continued to wash it in the machine.  It never went in the dryer, thankfully, or what happened next probably would have been a much shorter process.  As it was, the fabric continued to look like nothing happened, for many years, for dozens and dozens of washes.  But eventually, all that agitation inevitably started the fibers felting together.  By last winter it was impossible to ignore.


pinstripe skirt remodel 1


Since I now know quite a bit about felting, once I could look past my obvious horror since I had ruined some lovely fabric, I found it fascinating that the places on the skirt where small parts of the fabric were stitched to each other (the waistband, hem, and back placket) were still unfelted, while the big skirt pieces were noticeably felted, thicker and fuzzier.  Actually, it was the contrast between the two parts that made the skirt look weird, especially the unfelted hem, which looked almost gathered against the felted skirt.  My current theory is that since the hem and placket fibers couldn’t move as much, they couldn’t interlock to felt like the others did.

The skirt sat in my to-fix pile until I figured out a plan, actually a pretty simple one, which I think is essential to not spending inordinate amounts of time remodeling something.  I would cut off the not-as-felted hem, waistband, and placket, fit the remaining felted skirt to a wider and lower waistband facing, make a new placket, and re-hem it.  Above you can see my chalk lines for what to cut in the back, I continued the line of the wider side of the placket down to the hem, and cut a symmetrical amount from the other side of center back, to keep the back pieces the same size.  I got little pieces of felted fabric to use for my new placket from the extra cut off below the old placket.


viola outfit 3


While I working on this project, I was also trying to figure out what I would wear to the Viola awards.  They’re Flagstaff’s yearly art and science awards for teaching, exhibits, and community outreach, and they throw a big Oscar-like party to give them out.  Bryan was nominated for one this year, for the exhibit of his In a Big World Wandering work, for which we also made the giant silk cyanotype.  I’d never been before, and I wondered what would everyone wear, what should I wear, should I borrow something, is it more like a costume party, should I wear something shiny?

I am not a shiny person.  In the end, I decided not even to go to my friend’s and try on formals to borrow, but instead to wear something that reflects who I really am.  Not only that, but I realized I could actually wear the lovely tailored skirt I was working on – if I went ahead and finished it!  I took the photos of my outfit right before we left, and I think you can tell I was pretty thrilled with my decision.  If what we wear tells everyone we meet a lot about who we are and where we stand, shouldn’t it be even more important, at an event where people are actually paying attention to my clothes, for me to wear something that shows my values and my heart?


pinstripe skirt and top


So I wore the rescued skirt, in it’s newly tailored glory!  Note the buttery folds.  And a nubbly cream silk tank top I made to wear to a wedding last year (same copied pattern as this linen one) which has proved more useful than I thought it might.  The shawl is something I started knitting for our wedding, realized would never be done in time, and eventually finished later.  (It’s a longer and wider version of the Fiber Trends Cocoon Lace Wrap, in a wool/alpaca blend lace weight yarn.)  It’s drapey and surprisingly warm, enough to keep me comfortable outside while I took the photos.  The pin holding it closed was my grandmother’s.  I didn’t make the tights or shoes, but I still love them . . . topped off with my winter coat, and I felt like I had stepped back to the ’40’s.


bryan and tasha viola photo booth


Proof that we went and I wore this outfit!  If you are curious what others wore, or what the event looked like, there are lots and lots more photos on the Facebook page for the organization.   We didn’t win (Bryan’s photo exhibit was up against the opening of the Discovery Channel Telescope!  And the winner, a recycled art exhibition that’s been going strong for 10 years here) but it was a really fun party, and I got lots of compliments, especially on the shawl.


pinstripe skirt remodel 2


But back to the skirt, and I might as well confess one more thing, I feel slightly guilty but I can’t help it; I like this fabric more now than I did in it’s new/intended state.  It’s so soft but with so much body, and it tailors like a dream.  In fact, making the new placket and waistband gave me the itch to sew with wool again, it’s just a pleasure to work with.  This has got to be the flattest-laying, easiest-pressed-in-place placket I’ve ever made.  And the buttonholes – I made them by hand with a single strand of waxed black cotton sewing thread, and it was as if I sealed the cut edges with a magic wand.  Not only can you not see the stitches here, I couldn’t see them in my studio while sewing in broad daylight.  Note the pockets!  Another benefit of me-made formal wear.


pinstripe skirt remodel 3


I also thought about how much I’ve learned in the last ten years.  I was able to add several refinements to this second round of the skirt, including using rayon ribbon on a lot of the edges to reduce bulk, adding a contoured waistband that fits my figure, and using catch stitches to secure the hem and placket so they wouldn’t show from the outside.  Now that it’s on a strictly hand-wash-only plan, the new and improved version should last me another ten years at least!


viola outfit 1


Morals of the story: please wear your heart on your sleeve, especially to formal events.  Sometimes a silk purse is lurking inside the sow’s ear of your mistakes.  And people please, no wool in the washing machine!


Why Not Fix an Item, as a Gift?

jacket repairs


So, it was my dad’s birthday recently, and he asked me if I would fix this jacket as my present to him.   Great idea, right?  Since half my DNA comes from this man, I guess I shouldn’t be surprised if he comes up with ideas I love, but I was a little surprised by this one.

Think about it, instead of getting someone we care about a thing which they might or might not use, we could offer to fix something they already have and love.  Who couldn’t use a chair glued back together, something painted, or a ripped seam sewn.  Especially if you, the giver, have some expertise in what you’re fixing.  Book repair, sock darning, judicious application of super glue . . .

This jacket has been in Dad’s wardrobe for years.  It needed a new zipper, and as I inspected it I noticed that the fabric around the cuffs was also shredded, and the pocket corners starting to wear.  I cut new cuffs and reinforcing patches for the pockets out of some leftover outdoor fabric from my mom’s stash, which luckily matched pretty well.  Now it’s ready to go, hopefully for a few more years of wear!

When we choose to repair an item, not only are we keeping things out of the landfill and extending the life of a much-loved/used object, the time we spend fixing something is a thoughtful gesture to a loved one and, to me anyway, far more satisfying than trolling the stores.

So, thanks Dad for the wonderful idea!  Let’s spread it, it has potential . . .


Felt Flower Tutorial is Now on Craftsy


Hello!  So, you may have noticed that blogging here has been at a more, um, measured pace than usual, even for me.  That’s mostly due to a new project I’m working on, which I’m so exited about, sweat breaks out on my upper lip every time I start thinking about it – no kidding!  More about that before long.

In the meantime, I wanted to let you know that I found a great new platform for my felt flower tutorial.  It’s called Craftsy – the folks who run it have done a great job recruiting well respected authors in all kinds of crafts to teach their online classes, plus they are making a significant effort to support indie designers such as myself in their pattern shop!  The best part for customers is that you don’t have to wait for me to email you the pattern, you can download it instantly.  Just click on the picture at the top of the post.

Um, if you like it, tell all your friends!  As they say on American Routes, “If you don’t like it, don’t tell nobody!”


Finished flowers

Me-Made Purple Corduroys—How Life is Like Fitting Pants

purple cords 1


Where to begin?  I think I could talk about these pants and all their glories and implications well past what you would read.  Well – I think I’ll begin with why they are purple, which will lead right into why they are fitted, which will lead right into why they are the best pants I’ve ever had.

So, a few years ago now, my aunt got this pair of purple corduroy pants, and for some strange reason I fell in love with them at first sight.  I’m not usually into purple, or brightly colored trousers, nevertheless I’ve wanted my own pair ever since.  I found 1 1/2 yards of, get this, lavender hemp and organic cotton corduroy on the NearSea Naturals clearance page!  (It had a “stain” on it, which washed right out.)  Update: although I love love love the idea of this fabric, the color of this fabric, and the resulting pants, the fabric is just not sturdy enough.  I got about a year of good-looking wear out of these before the corduroy pile started coming out, even with washing them inside out and not once putting them through the dryer, and that is just not enough for something I made.  If anyone knows of a source for sustainable, long-lasting fabric, please let me know!  The good news: all the work I did on fitting (keep reading) is already transferred to the pattern and waiting for me to find the next fabric! 

I thought this was the perfect amount of fabric.  I planned to make another pair just like my grey pants, even though I wasn’t sure that wide leg would be the best look for purple corduroys, I would figure out that fit first, and save more close-fitting pants for another day/next fall maybe.  Well – it turned out that all the wide leg pattern pieces would not fit on this much fabric.  To fit them in I had to narrow the legs quite a bit.  Well.  I just tapered the tops of the pattern pieces from the grey pants into the narrower legs, cut them out, and this is what I got.


purple cords fitting


Clearly those fabric saddle bag areas on the sides had to go straight away, that was the easy part.  Getting a better fit through the seat/inner thigh area took a lot more work.  Every day for weeks, my sewing time consisted of: ripping out and re-basting in a slightly different position some part of the crotch seam and/or inseam and/or side seam, trying the pants on, deciding what to rip out next (often the same part).  Although I worked on these only a little bit each day (partly to keep myself from getting frustrated and doing something hasty/stupid), I thought a lot about how life is like fitting pants.  The baking equivalent might be yeast bread, or even macarons.  There are a lot of variables, and each one seems to affect all the others, so that a small tweak in one area can change all kinds of things I would not expect.  But, if I just keep plugging away, trying things, seeing what happens, I will eventually reach a place where I am very happy with the results.


purple cords side


Well – I really could not be happier with this result!  Although I have tweaks to make in the next version (pants are clearly a journey, not a destination) they are the first pair I’ve ever had that really fit and flattered my figure, they’re incredibly comfortable, and I’m ridiculously satisfied with myself when I wear them.

If it wasn’t for the fact that things need washing, (Ok, and I do love skirts, and some days are for grubby clothes, etc.) I might conceivably wear these straight through until they wore out.


purple cords sewing table


Some sewing and fitting things I figured out while making them:

I took out all that extra I added to the back inseam of the grey ones, and then some.  Clearly a different fit requires a different shape.

See that diagonal wrinkle across the back hip in the first fitting?  I tried all kinds of things to get rid of that; letting out the side seam, unpicking the waistband and pulling the pants up, but nothing worked, until I saw something in Patternmaking for Fashion Design by Helen Joseph-Armstrong (which is one of my all-time favorite sewing books, expensive but worth it, I asked for it for Christmas one year).  It was one of my cousin’s textbooks at FIT in San Fransisco, and it shows you how to draft a pattern for just about anything you could ever want to make, plus all kinds of construction techniques.  It’s designed more for the fashion industry that for home sewers, and there’s not a lot about fitting, so I guess it says something that there is a section on pants fitting, where I found an illustration of a similar wrinkle with this note, “insufficient dart intake for dominant buttocks.”  That’s not how I’d like to think about my derriere, but the part about the dart totally worked!  I had been leaving that dart alone since I fit it in the last pants, but clearly it’s not a good idea to start think of any part of the fit as “finished” when I am changing the rest.


purple cords back


purple cords edgestitching


I used my edge stitching foot for the first line of top stitching (with a size 100 topstitching needle, moving the needle slightly to the left), and it worked great!  It was much easier to get an even stitching line with that little guide riding right on the edge.  I am now trying to figure out how I can use a similar guide for for the second line of topstitching, further to the inside..  Anyone know of a foot like that?  I used two colors topstitching and I really like it, one pair of Bryan’s jeans has that look and I decided to try it out.


purple cords inside


I trimmed a bit of the waistband lining before applying the rayon ribbon to the bottom edge, next time I’ll trim a bit more, but I like this finish.

If the legs look a bit long, I left them that way on purpose.  I keep noticing that the hems of cotton pants tend to creep up just a bit over time with washing, usually after I fix them just how I want them.  I’m not sure what the shrinkage of hemp is, but if these don’t get any shorter after a while I can always hem them up a bit more.

By the way, the above shot of the inside waist is probably the closest I got to the actual color, for some reason this purple seems to be hard to capture.

That’s about it, I guess, unless of course you want to talk some more about sewing, body image, and the power of DIY, etc. . . . if you see me around, I’ll be wearing these pants, and feeling happy!


tasha in purple cord pants


How to Fix a Small Hole in a Knit – Glorious Mending

fix sleep pants 1


Before I lose anyone who doesn’t currently have a sweater to fix, I’d like to mention a couple of really interesting things about mending and repair I’ve come across while working on this post.  The first one is Tom of Holland’s Visible Mending Programme, which is based on darning knits and on the idea that mending is something to be proud of.  Pretty much needless to say, I love this idea and it’s implications.  The second one is about fixing all kinds of other things, I saw it just yesterday (via Boing Boing via Root Simple) it’s a project by Paulo Goldstein called Repair is Beautiful in which he repairs all kinds of things (like a lamp, a chair, headphones) in unusual and beautiful ways.  I love the aesthetic of his project, it says all kinds of provocative things about repair, not just that it can be lovely and unusual to look at, but also he’s calling attention to the repairs, asking you to think about what it means to fix something.  Check it out, the pictures are way better than my description.

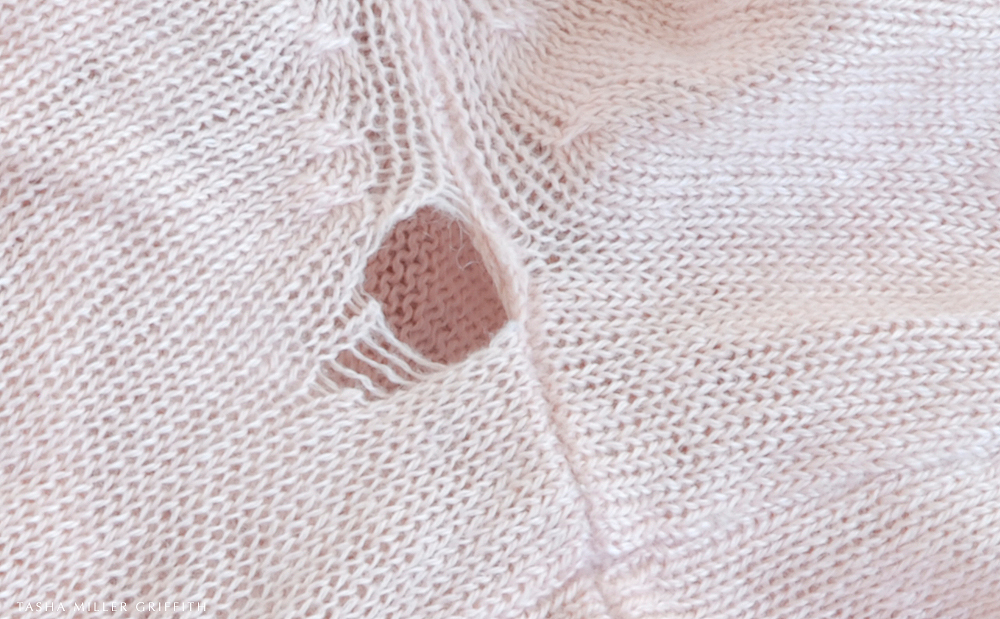
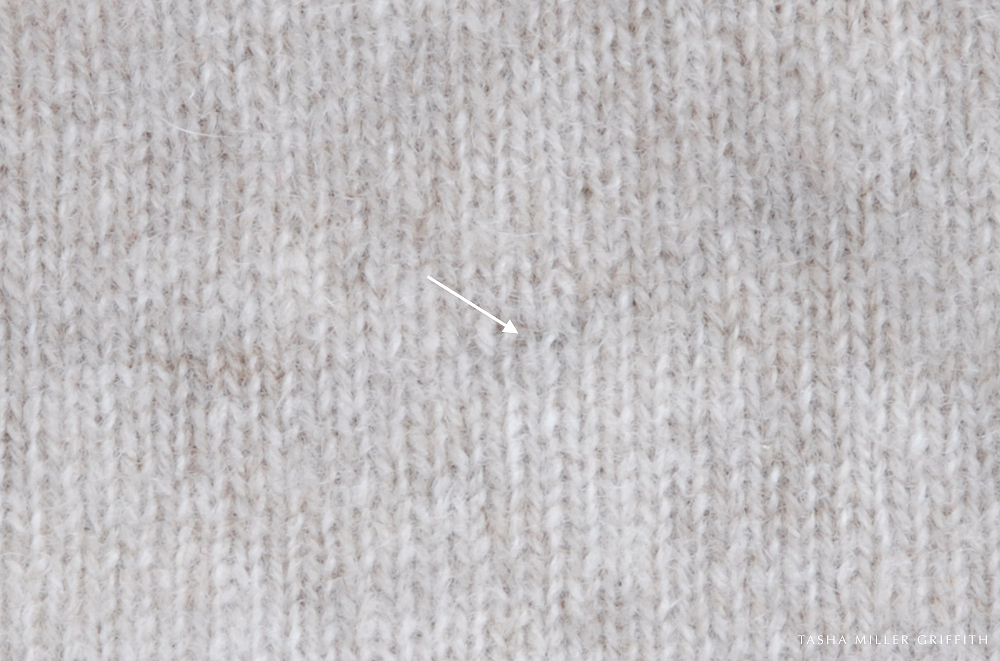
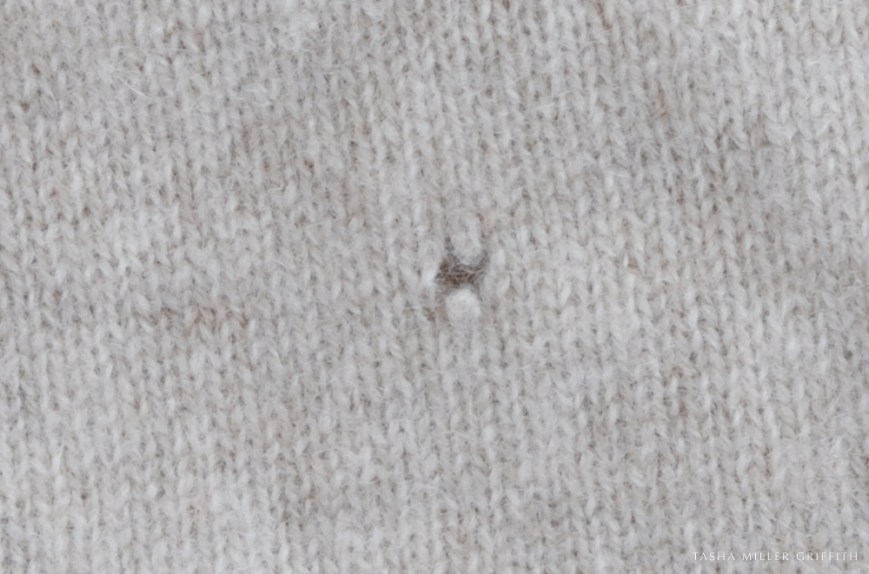
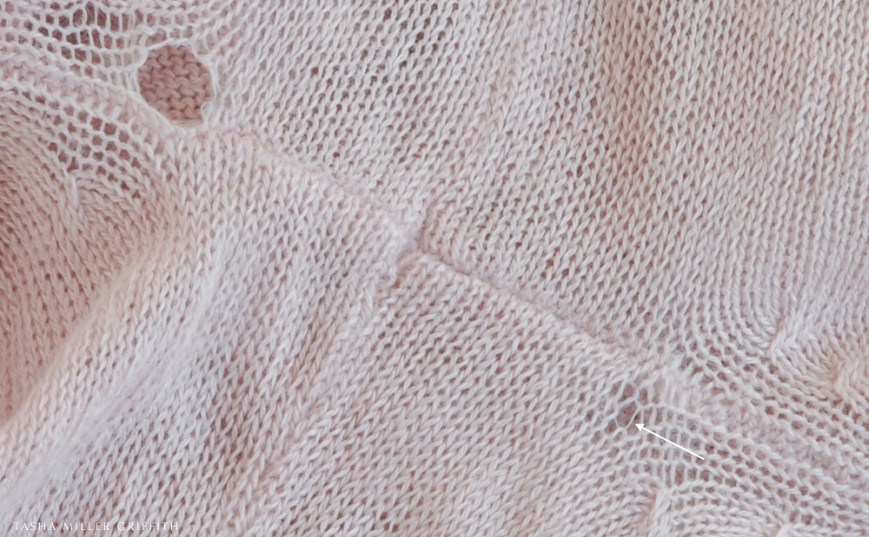
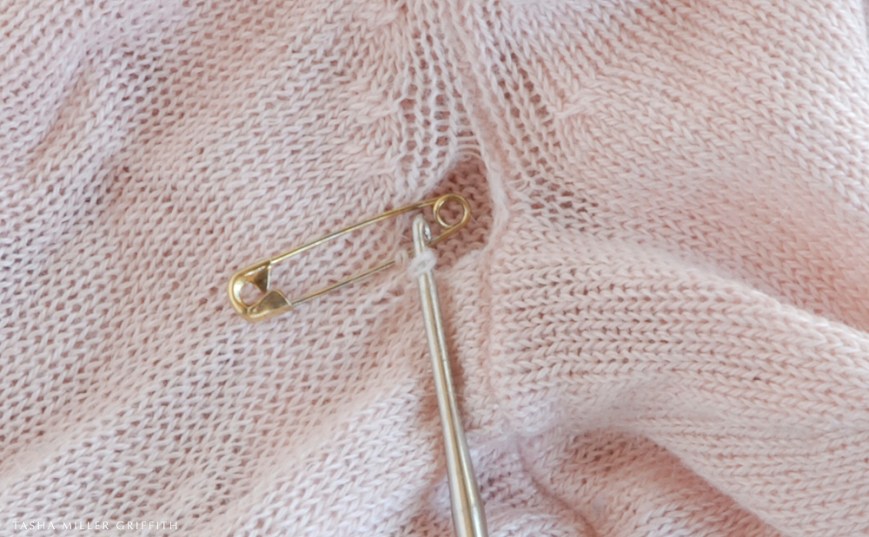
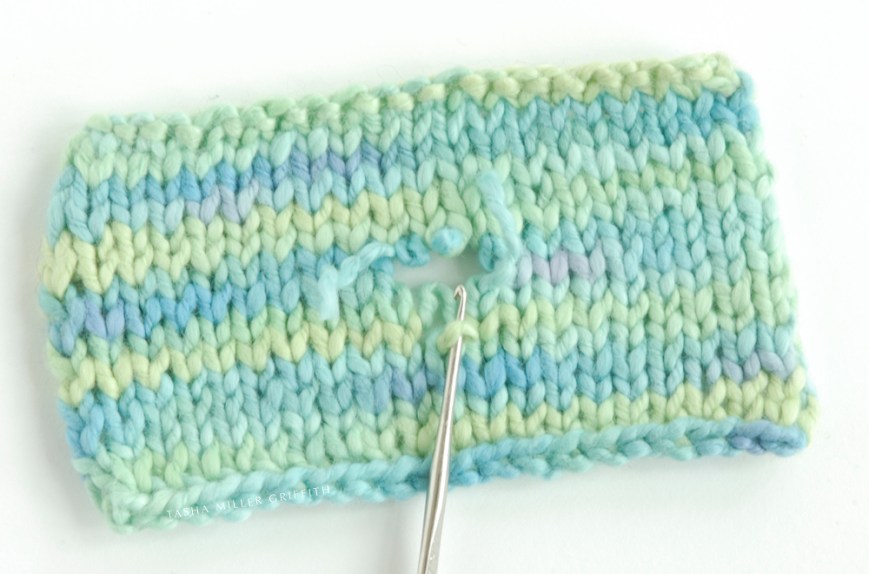
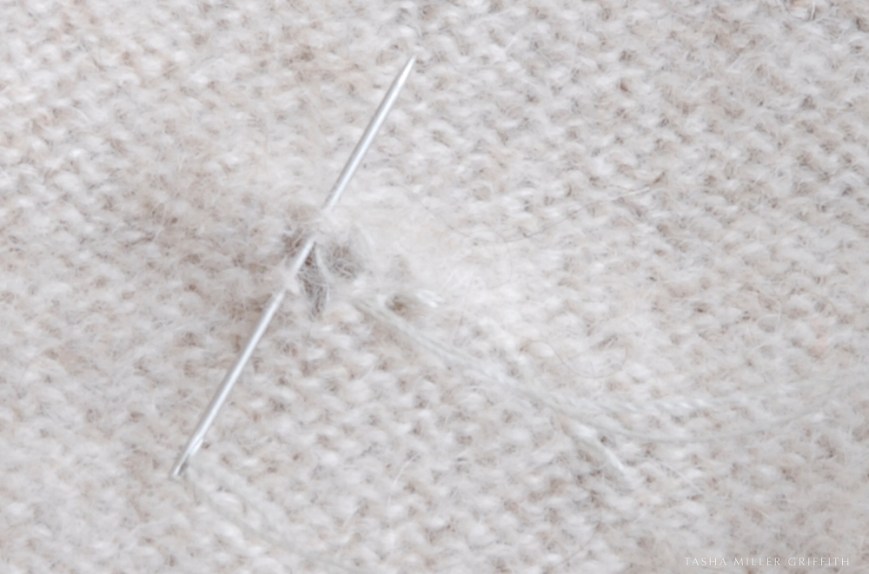
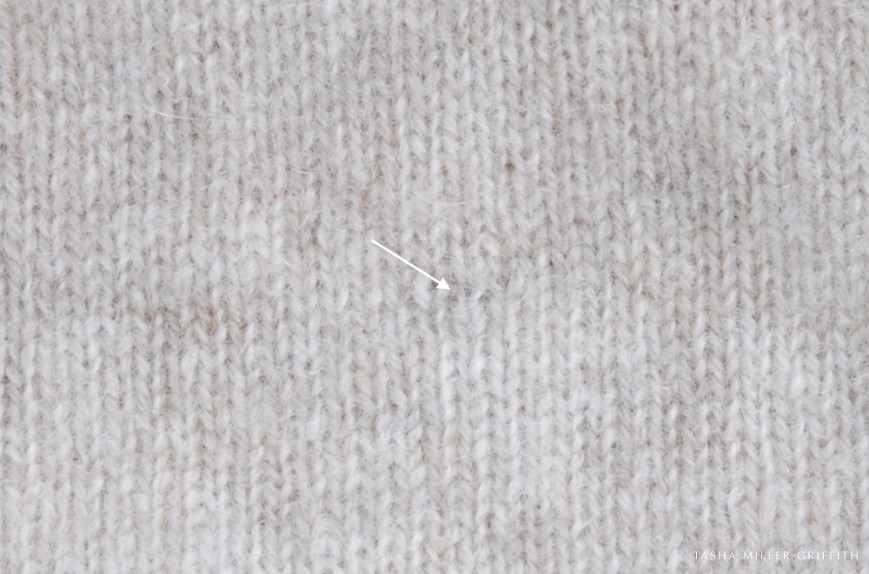
So, after all that, just an invisible mend for today – kind of disappointing I know, sorry!  I do have some ideas for visible mending of a couple of things now in my to-fix pile, and I’ll share them as they are done, but sometimes, you just need to repair a little hole.  The idea for his post started a month or so ago, when I realized that two of my favorite light sweaters/tops were sprouting holes under the arms.  Not big enough holes to need filling in/darning, but still enough to need fixing before they got out of hand.  Sometimes I even happen to catch a problem when it’s still a thread that’s about to break, like the one near the arrow below.  Most of the time, I don’t notice until it’s more like the hole on the left.


knit fabric fix 1


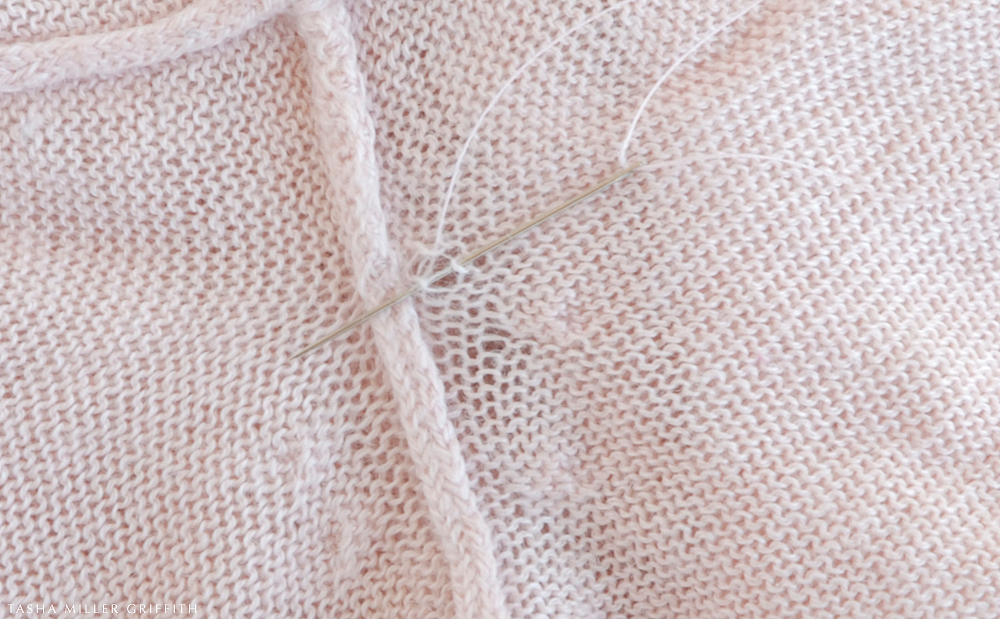
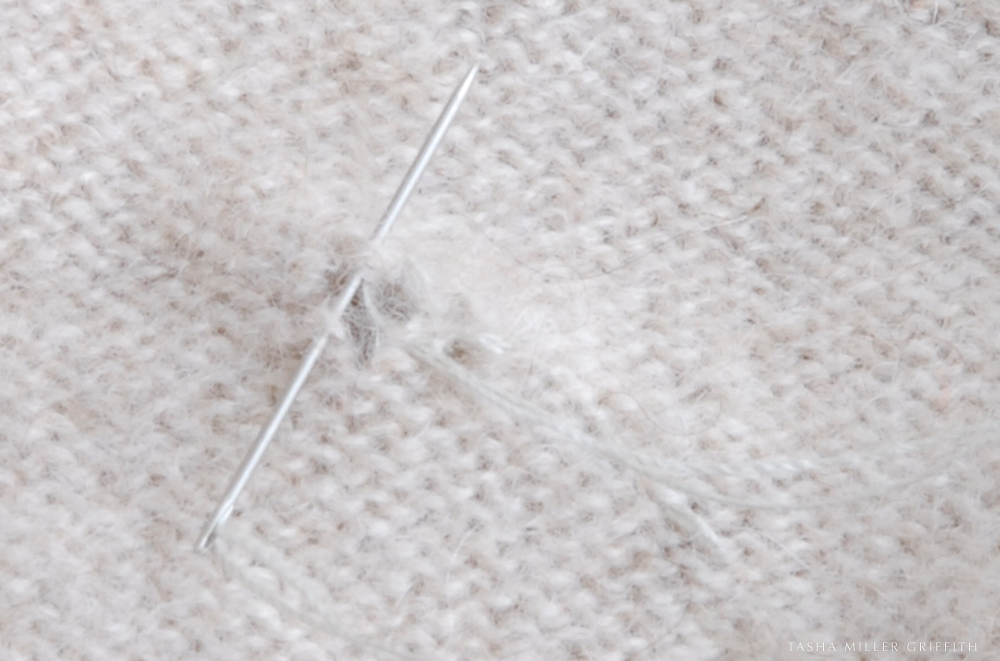
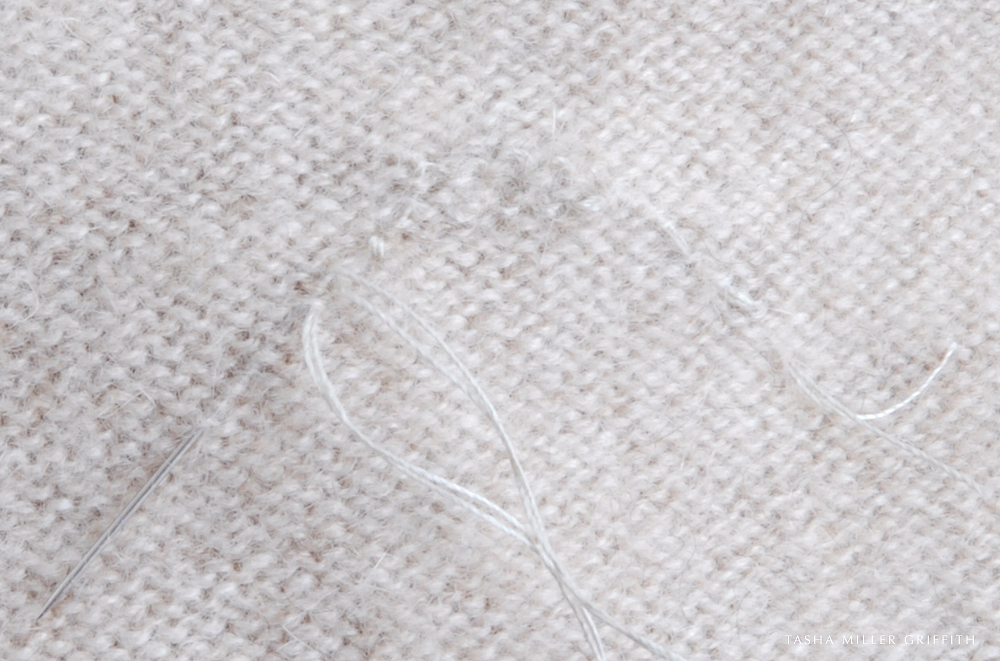
If you do find a weak thread that’s still intact, you can “trace” along it, following its path with a new stronger thread.  This is a fine gauge sweater, and I had sewing thread almost exactly the same color, so I used that.  You can also try embroidery floss or yarn of various types and thicknesses to get something close to your garment yarn, or something you like as a contrast.  There will probably be at least one stitch that is only made up of the mending thread, so if you want it to be invisible, choose something as close as possible to the original yarn of the garment.


knit fabric fix 2


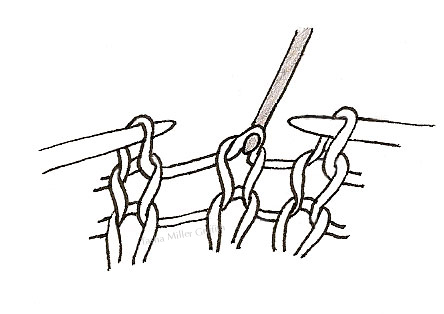
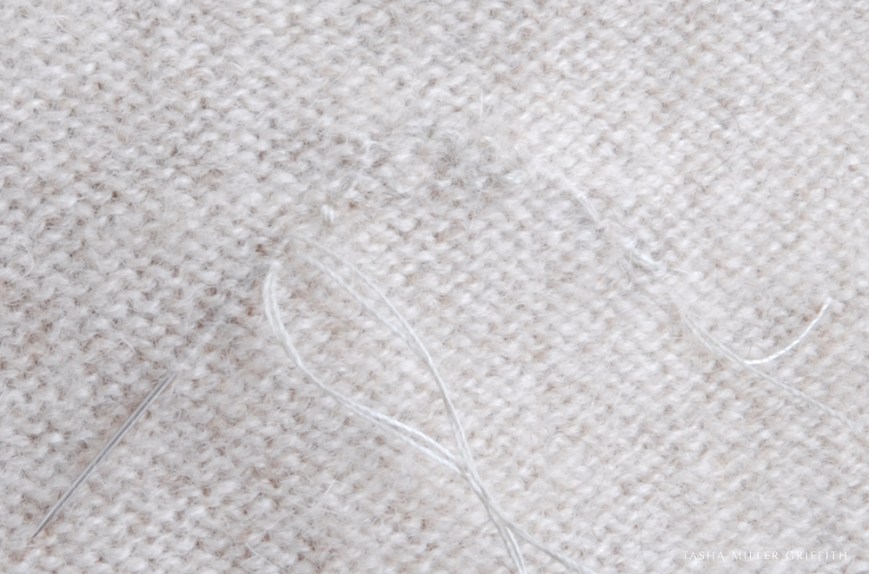
We’re now looking at the sweater from the inside.  I like to start a repair like this by anchoring the thread somewhere where you won’t see it, like in the seam or in the back of a nearby intact knit stitch, with a couple of back stitches.  Then I start picking up the parts of the sweater that are coming apart.  Can you see how the thread and needle are following the path of the weak stitch?  In this case, that’s all I need, so I’ll go back to the seam, take two more back stitches, bury and clip the thread, and I’m done.

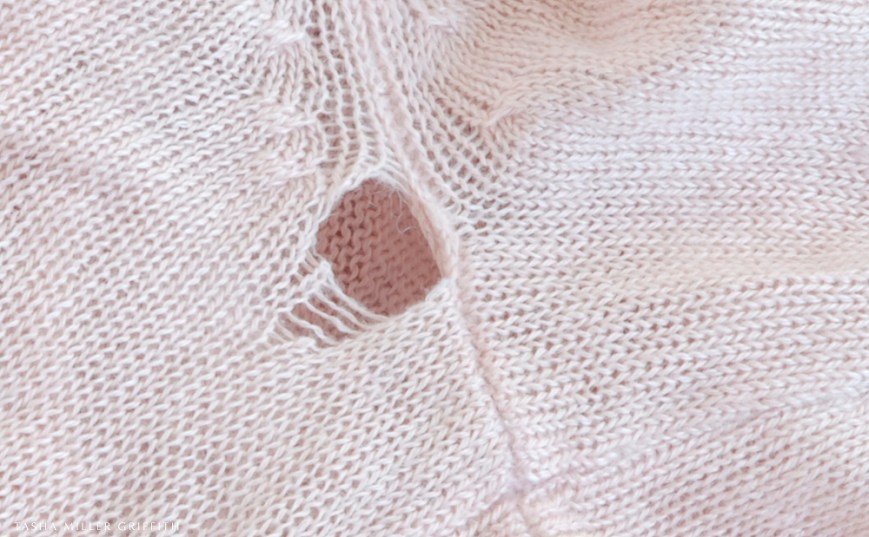
Ok, how about a hole that’s progressed a little further?  Also illustrated further down is a small hole with one broken thread, keep scrolling down for that one.


knit fabric fix 3


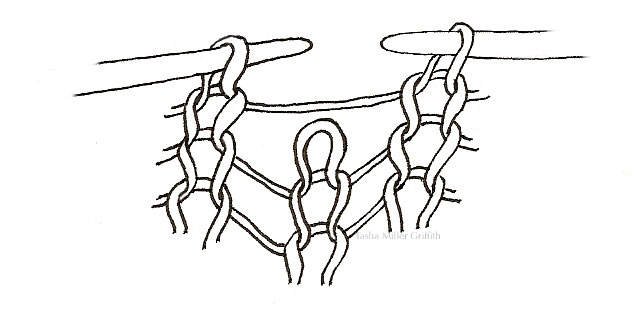
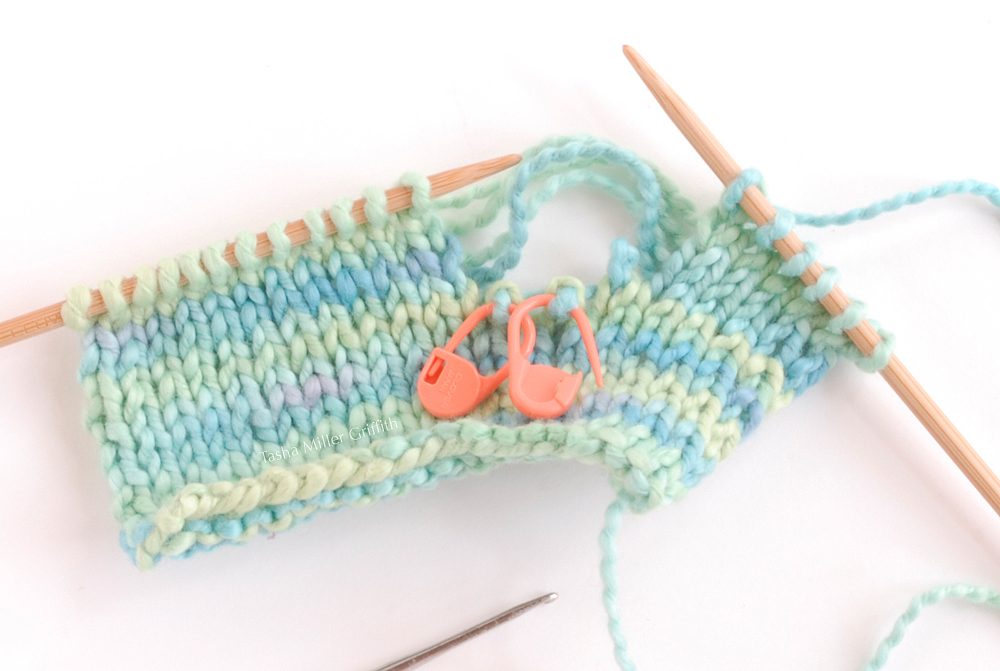
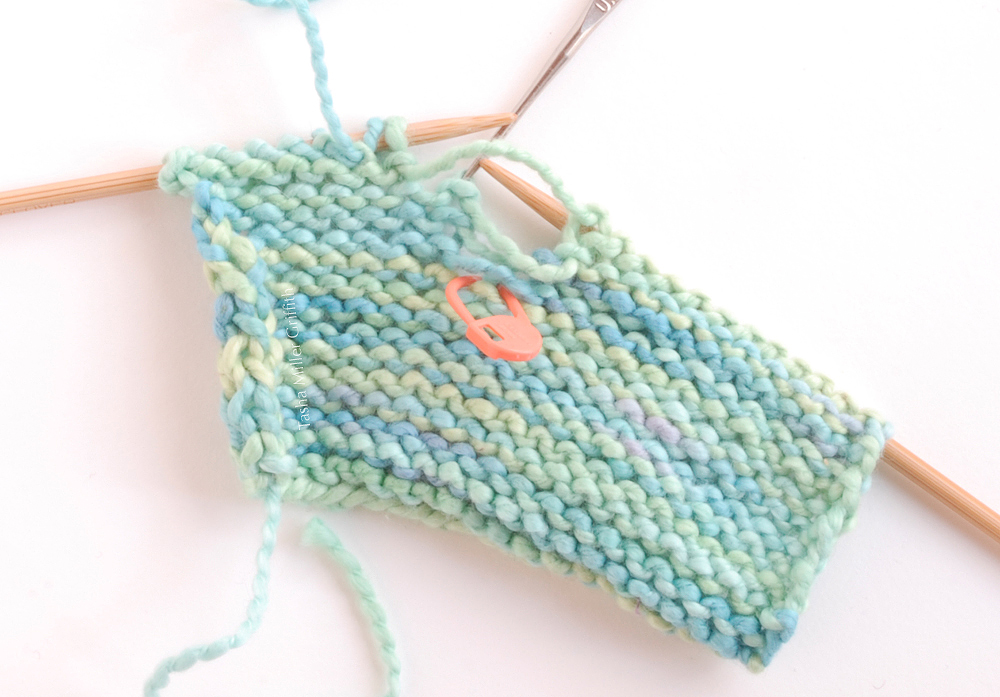
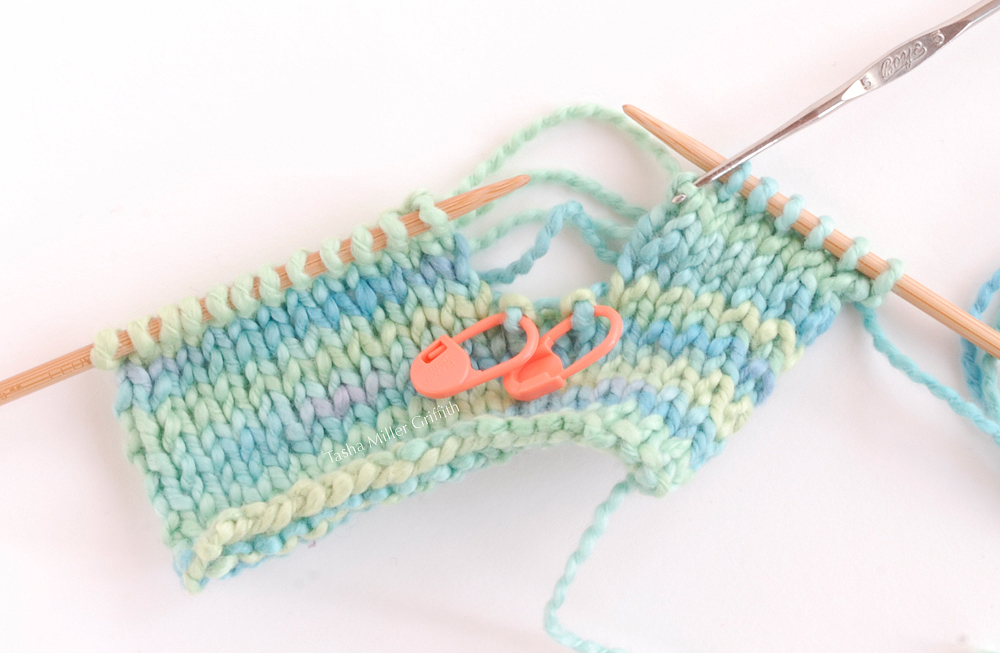
The first step here is to pick up the fallen stitches as much as possible.  Remember when I said that knowing how to pick up a dropped stitch in knitting would help you figure out how to fix things?  (Incidentally, I learned I new tip from my resident photography expert to make the photos from that post clearer, so I went back and edited them, it should be easier than ever to see what’s going on.  You can click on those photos, and the ones in this post to enlarge them as well.)


knit fabric fix 4


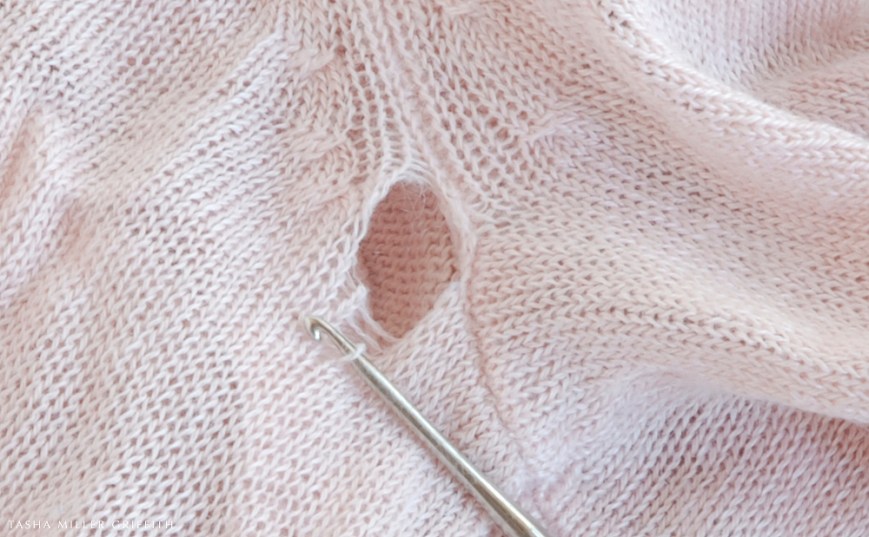
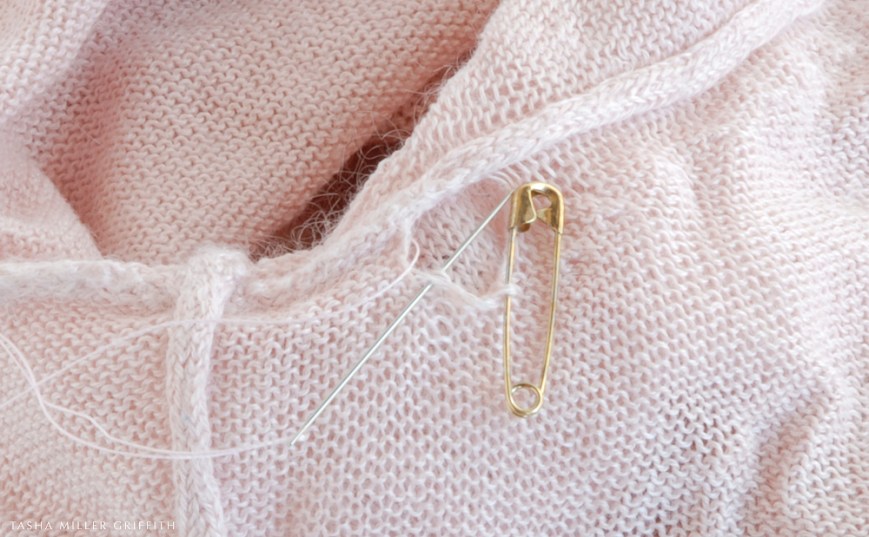
I’m not going to lie, it helps to have a really small crochet hook, or another tool with a tiny hook on the end.


knit fabric fix 5


It may also help to use a safety pin to hold any stitches that may pop loose while you work on the rest.


knit fabric fix 6


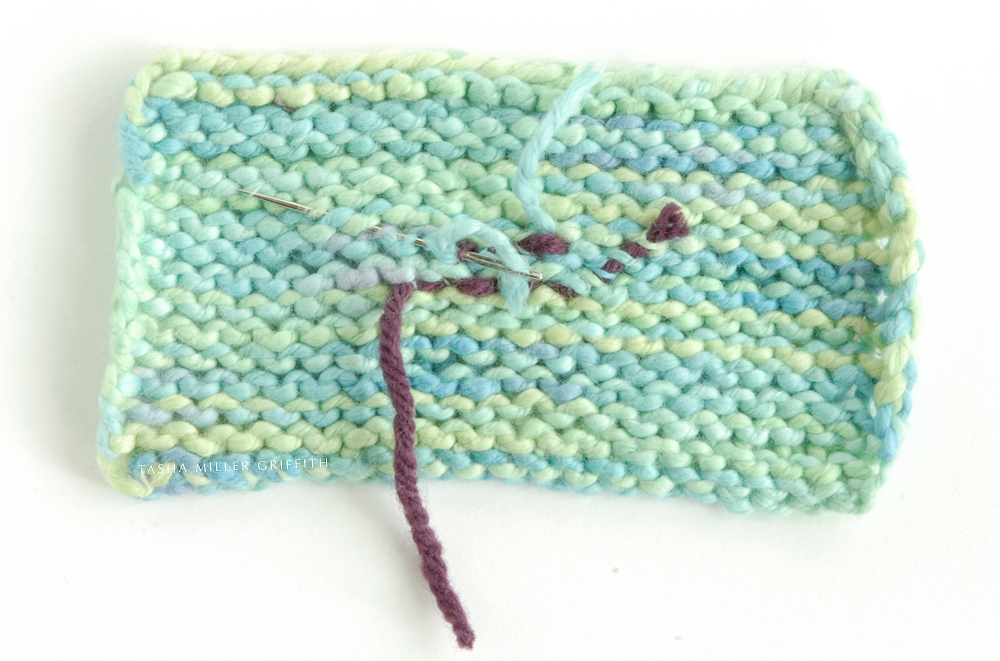
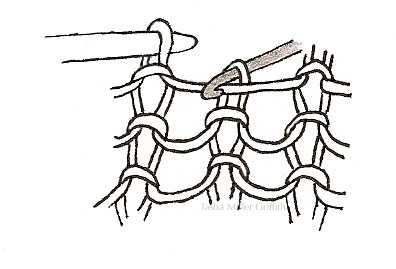
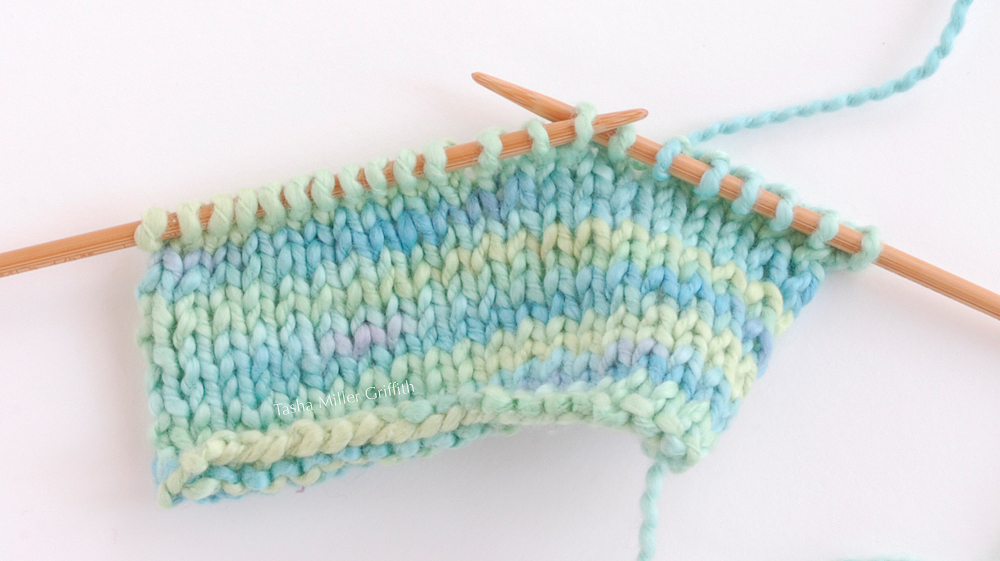
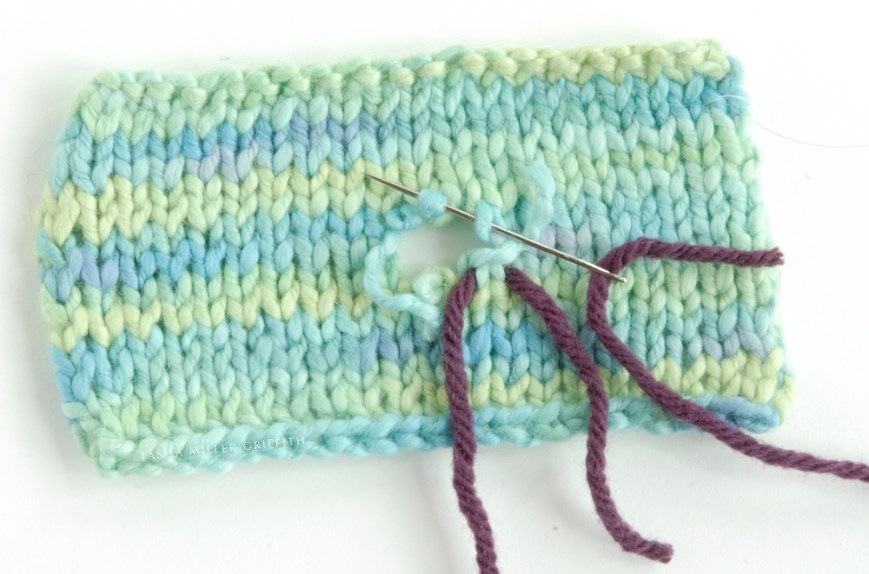
When you have picked up as many of the stitches as you can, it’s time to stitch the hole closed.  Start by anchoring the thread with backstitches again, in this case in the nearby seam.


knit fabric fix 7


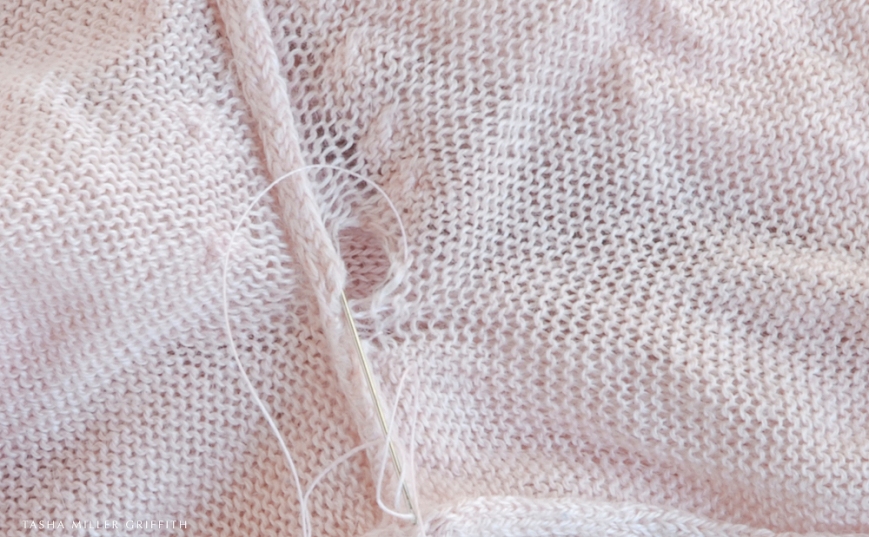
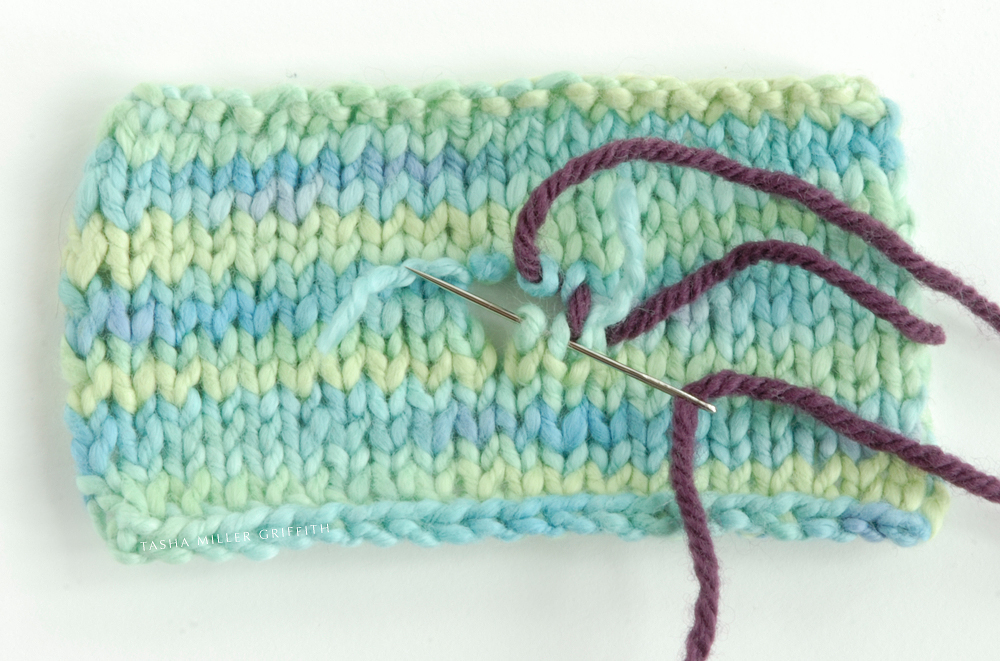
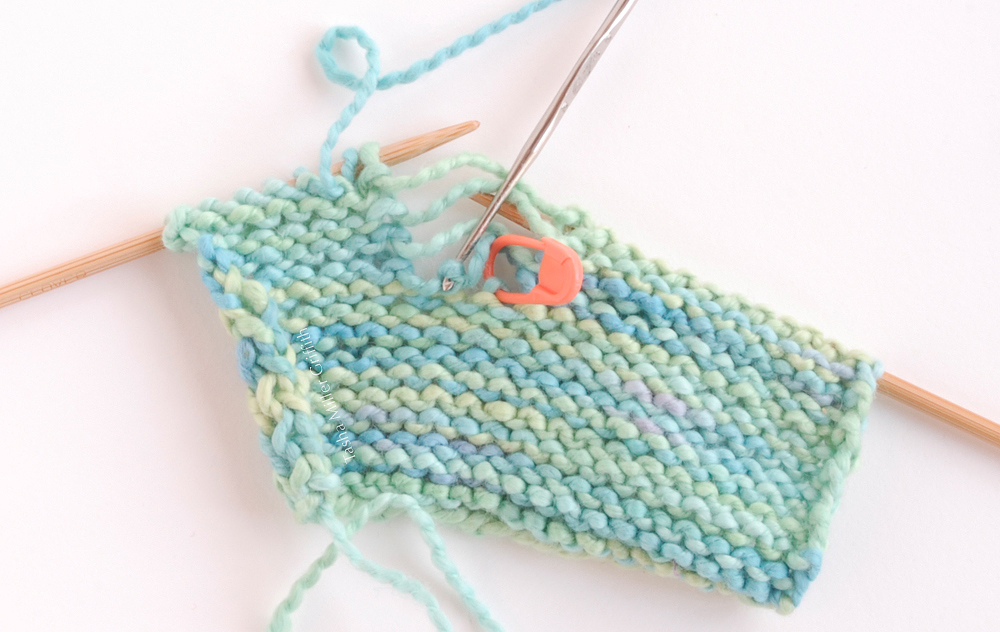
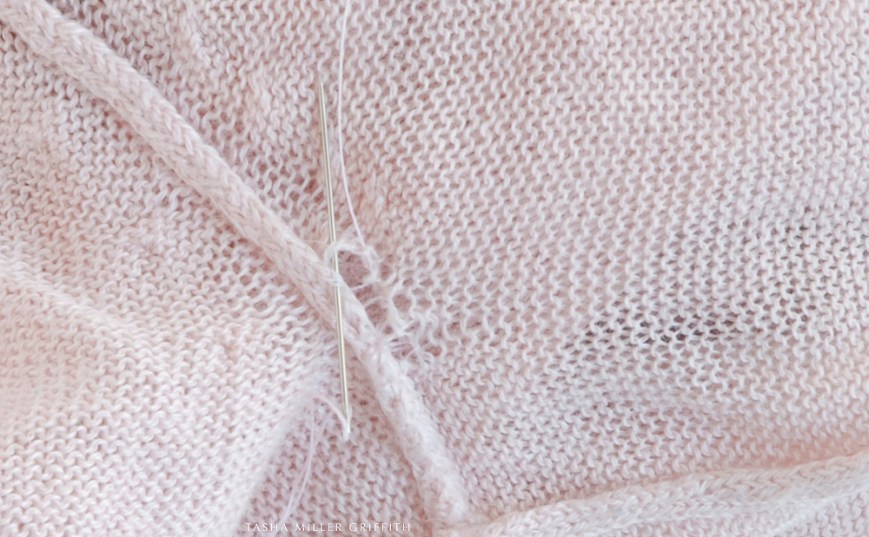
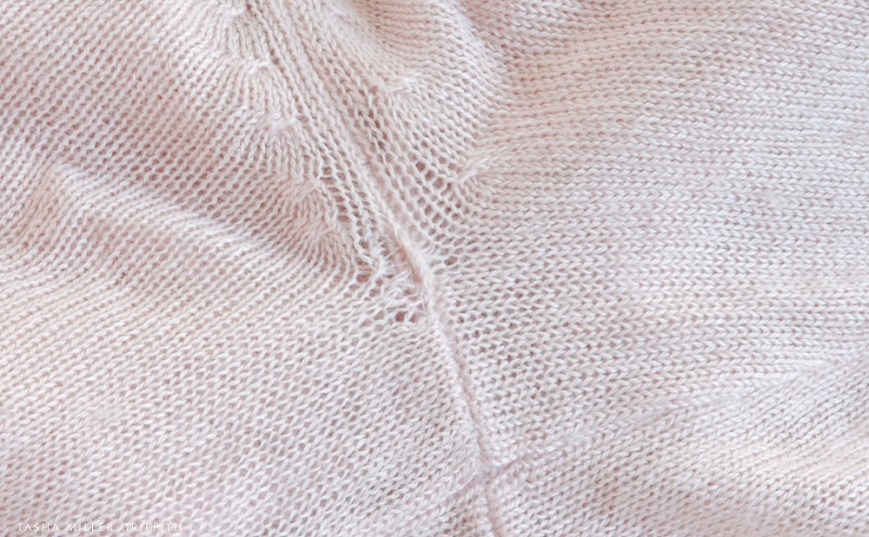
For a small hole right near the seam like the one in this pink sweater, I basically stitch the sides of the hole to the seam, making a couple of passes and trying to keep my sewing stitches looking as much like the knitting as possible, which often involves going back and forth and going though each knitting stitch more than once.  Again resist the temptation to pull the thread very tight, or you’ll pucker the fabric.


knit fabric fix 8


If the hole is in the middle of an area with no seams, still start by picking up any dropped stitches that you can.  Take the anchoring backstitches through only the wrong side part of a nearby stitch, so that they don’t show from the outside.  Bury the thread between backstitches by moving diagonally, again piercing the stitches and not going all the way through to the front side.  In a garment with thicker yarns, you can fix the hole first and bury the yarn ends later, the body and friction of the thicker yarn will usually keep them from unraveling, although of course you can also do backstitches if you wish.  In any case, avoid pulling the mending yarn too tight or the fabric will pucker.

If the hole is too big to look good when pulled almost closed, it’s time to darn it, which will make a more visible patch.  (Look up “darn a sock” if you aren’t sure how.  You could start with Zoe’s post about it, which is where I first found out about Tom of Holland as well).


kitchener stitch 1


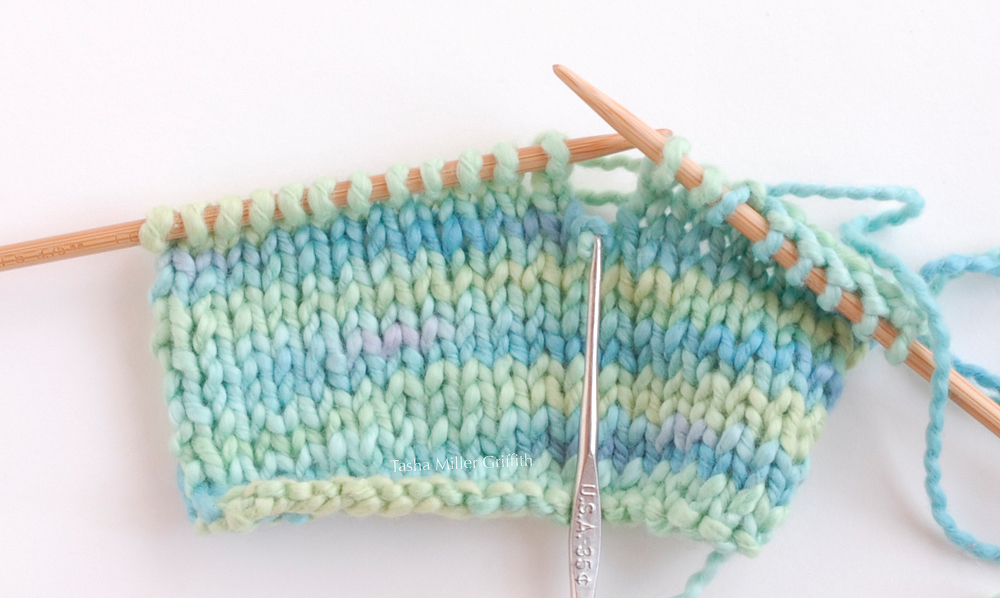
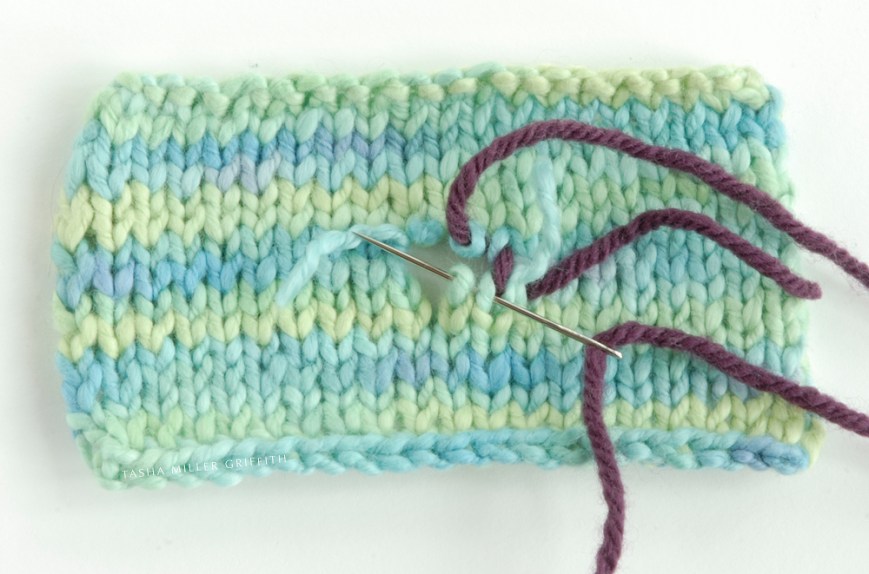
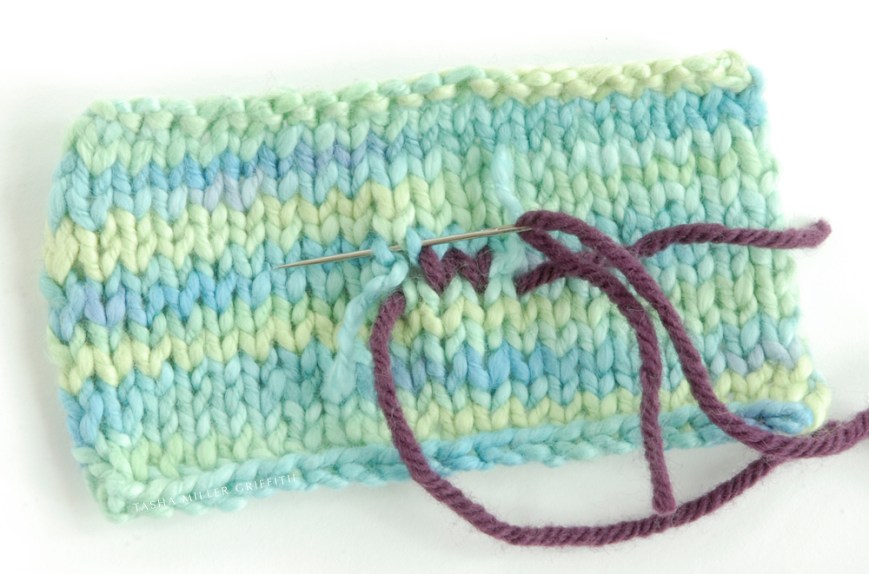
The mend will be most invisible if you can mimic the structure of the knitting.  The knitting term for this is Kitchener Stitch.  If you search for it, you’ll find all kinds of diagrams and instructions, but the only way it ever makes sense to me is just to look at the knitting and follow the path of the yarn.  Start a couple stitches away from the hole to make sure that you catch all the threads around it, and to practice moving the needle the way that the yarn goes.  When you get to the missing area, try to keep the pattern going.  This will involve going through a stitch above and a stitch below the hole, then the next stitch below with the same stitch above, or a similar pattern.  I’ll say it one more time, the mending yarn needs to replace some of the yarn that broke, so let it be there and don’t pull too tight.


kitchener stitch 2


kitchener stitch 3


fix sleep pants 2


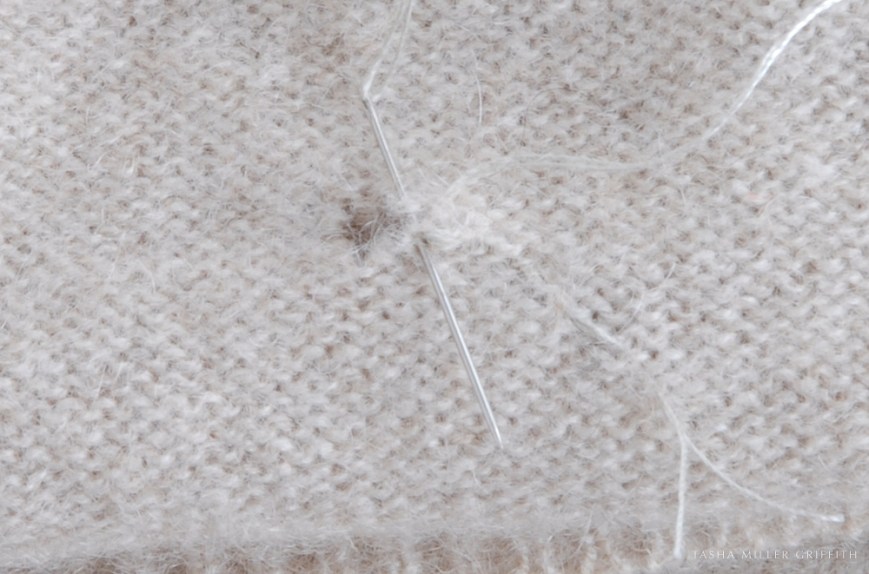
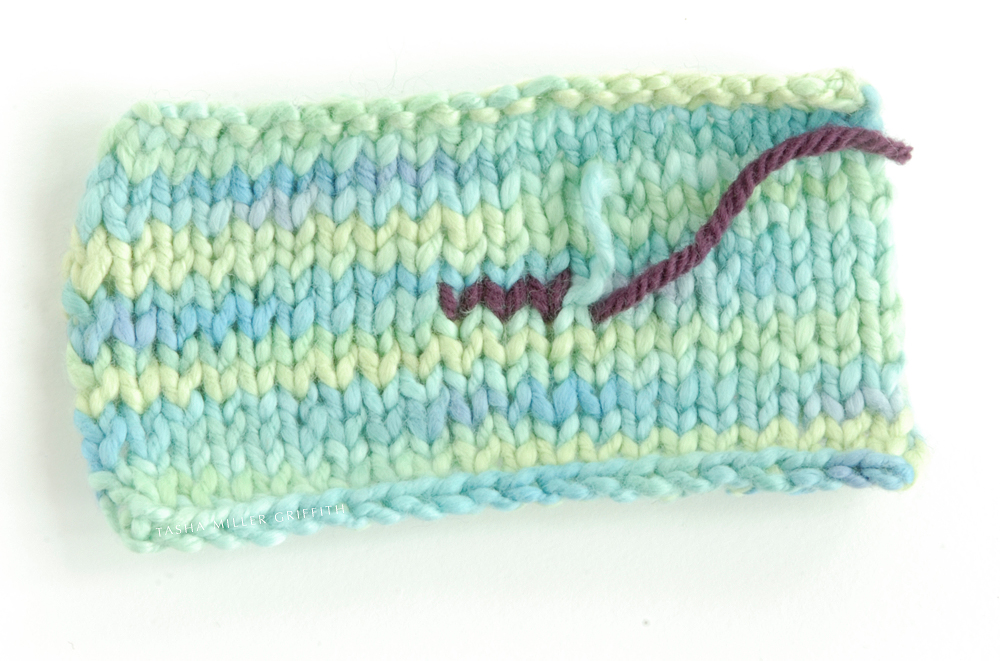
I fixed the sample from the right side, and the cream knit pants from the wrong side.  You can do either one, whatever works best for you.  Just check the public side if you are working from the inside, and make sure no stitches that you don’t want to show are showing.


kitchener stitch 5


fix sleep pants 3


For a little hole like these, we’re just about done!  If you are tracing the knitting stitches with mending thread, keep going past the hole to make sure that you catch all the stitches which the broken one was connected to.  End with a couple of backstitches to make sure that everything will stay in place, and leave a short tail of the mending thread or yarn on the wrong side so that they don’t pull out.  With thicker yarns, you can use a sharp needle to bury the mending yarn, and any leftover ends of the original yarn, by piercing the back side of the nearby stitches.


fix sleep pants 4


kitchener stitch 7


The finished repairs.  Believe it or not, the arrow points to the replaced stitch in the cream knit.  The green sample still has two ends to bury in the back.


knit fabric fix 9


fix sleep pants 5


kitchener stitch 6


If you have questions about mending something, or an unusual repair you made to share, I’d love to hear about it, do share!


Simple Homemade Cheese – Goat Cheese and Paneer too!


My friend Tom comes up with some good ideas sometimes (shh – don’t tell him!) especially when it comes to food.  The other day he appeared at my house with some goat cheese he made.  I have been making fresh paneer cheese for Indian food for a while, mainly because we live a fairly small town and (to my knowledge) you can’t buy it here.  So, I already had a method for fresh cheese that’s pretty foolproof and I know works with a variety of different ingredients, and thanks to Tom’s idea, I tried it with goat milk too, and it worked great!  I got a soft fresh goat cheese.

I first learned this method from reading the paneer cheese directions in Laxmi’s Vegetarian Kitchen by Laxmi Hiremath, my favorite Indian cookbook.  Since then I have figured out a few tricks and variations.  One thing I love about this way of making cheese is that you don’t need anything you don’t already have in your kitchen or can’t easily get.  And there’s only one thing you need to know that may not be obvious if you’ve never made cheese before – read on.


fresh cheese 1


Recipe Sketch: Simple Homemade Cheese

Start with milk.  You can use whole or low-fat, cow or goat etc.  If you can get small-batch pasteurized, or non-homogenized milk, it will make a big difference in the texture of the curds and the cheese, for the better.  We used to get local dairy milk in glass bottles in Madison, which worked great.  Organic Valley has a non-homogenized “grass milk” I can get here, which also works great.  Don’t worry if you can’t find anything other than ultra-pasteurized milk though, you can still make cheese!  The only goat milk I could get was homogenized and ultra-pasteurized, and it still worked, as you can see.

Put the milk in pot with room to spare.  You can use whatever portion of milk you happen to have left in the fridge.  Most of what’s in milk is water, so be prepared for to more to become whey than cheese.  I used 1 quart of goat milk and got just over 5 oz of soft cheese, a ball about the size of my fist.

Heat the milk until it starts to boil, stirring occasionally.  Stay around the kitchen for this part, even though it will take a little while for the cold milk to heat, because as soon as it starts to boil it will want to boil over!  I like to put away the dishes or something while I’m waiting.

Also while you’re waiting, get out something acidic to curdle the cheese.  You can use fresh lemon or lime juice, or yogurt, cultured buttermilk, or even vinegar.  Each one will give a little different flavor to the cheese.  One of my favorites is a little lime with a little buttermilk.  Use whatever you have and experiment to see what you like best.

When the milk starts to boil, turn it down to a simmer and add a little bit of your acidic substance of choice.  Stir and wait for about 30 seconds, then if nothing is happening, add a little more acid, stir and wait again.  At some point a separation will occur, instead of milk you’ll have solid curds and translucent whey (yup – little miss muffet).  This is the key to knowing if the separation is complete, the whey will be yellowish and almost clear, you will be able to see distinct white curds floating in it.  The curds may be tiny flakes or huge globs, depending on the milk, but all the white milk solids will be in them, and they’ll be floating in the translucent whey.  I could have sworn I had a picture (from my not-well-lit kitchen) of what it looks like when the curds are huge, but I can’t find it anywhere.  I’ll take one next time it happens.  For this goat milk the curds are tiny.


fresh cheese 2


Once you have curds and whey, turn off the heat and let them rest for a few minutes while you get ready to drain the cheese.  Put two layers of cheesecloth (yup – that’s why it’s called that) in a colander.  If you want to save the whey, put a bowl under the colander.  You can use the whey instead of milk to make pancakes, etc., as a soup stock, or to make other kinds of cheese.

Pour the curds and whey into the colander.  If you want to make a firmer, sliceable cheese, add any flavorings you want at this point, while you can still stir them into the cheese.  For soft cheese you can do it later.  In any case, then gather up the edges of the cheesecloth and tie it together, so that the cheese continues to drain.  I have a long, plastic coated twist tie that I use, one end is twisted into a loop that goes over my faucet, and I twist the other end around the cheesecloth and let it hang it the sink, still inside the colander.  You can also tie the cheesecloth to a wooden spoon or other tool laid across the top of your colander.  You just want the cheese in its cloth to be suspended so it continues to drain.

fresh cheese 3


That’s about it!  Leave your cheese to drain for an hour or more, depending on how firm you like it to be.  If I’m making paneer I want it to be sliceable, so I’ll leave it longer than for soft goat cheese.  You can always open the cheesecloth and check to see if it has reached the consistency you want.  If you’d like it to be firmer, just tie it back up and leave it to drain a little longer.  You can also press the cheese after draining, between two plates with something heavy on top, and leave it in the fridge like that for a few more hours to make it even firmer.  So like I said, lots of options.

Ta-da! Cheese!  You can now scoop it out of the cheesecloth and into a bowl or container to save it.   For soft cheese, you can stir in a little salt or any herbs you would like to add to the flavor.


fresh cheese 4


So there you go, I hope that’s enough to get you started on your own cheese-making adventures!


How to Pick Up a Dropped Stitch in Knitting


dropped stitch drawing 1


I wanted to show you how to fix hole in a sweater (or other knitted article) and as I started putting words and pictures with how I do it, it became more and more obvious that knowing this first would be extremely helpful.  So, even if you don’t knit, keep reading . . .

A “dropped” stitch is one that falls off a knitting needle, or the thread above it breaks (like a run in stockings) so that it becomes disentangled from the stitch above it.

Knitting is just pulling loops through loops.  When one loop pops out of the loop below it, it releases into a long loose bar, and can easily cause a chain reaction.  But please do not panic, it’s almost as easy to pick those loops up again as it was for them to pop out in first place.


dropped stitches 1


If more than one column of stitches is coming undone, first find the last/uppermost intact loop of each column and stick something (like a safety pin or a piece of yarn) though it, to keep that column from unraveling any further while you work on the others.


dropped stitch drawing 2


To pick up a stitch, get a crochet hook (mine is tiny – I found it in a heat vent in an apartment we rented in Madison, and it’s been in my knitting bag ever since – a little bigger one will probably be easier to work with).  Stick the hook through the last intact loop, grab the bar above that loop with the hook, and pull the bar through the loop.  It will form a new loop.  Ta da!  I think it’s easiest (and doesn’t cause twisted stitches) to have the hook facing down, grab each bar from above and pull it straight through.  This does mean you’ll need to take the hook out and stick it straight through the new loop to pick up another bar, if your stitch has dropped more than one row.


dropped stitch drawing 3


One refinement; knit stitches are loops pulled toward you, and purl stitches are loops pulled away from you.  So, to pick up a knit stitch, have the bar behind the old loop, and pull it toward you.  To pick up a purl, put the bar in front of the old loop, insert the hook from the back, and pull the bar away from you to make a new loop, as shown above.  That’s it!  Not only can you now pick up stitches, if you’re paying attention you’ll understand the fundamental structure of knitting, and the difference between knit and purl stitches.  Pretty cool, eh?


dropped stitches 3

dropped stitches 4


If you’re working with a bigger area of dropped stitches, pick up one column at a time by making a new loop from each bar, making sure to pick up the bars in their natural order.  Move them around with your finger and check which ones connect to the adjacent stitches where to make sure.  The two pictures above show picking up one column of purl stitches.  When you get to the top of a column, put the last loop back on whichever needle is convenient to continue working, you can rearrange them when you’re done.  Make sure that the loop is sitting on the needle the same way as the other ones which did not fall off – flip it the other way and check if you aren’t sure.


dropped stitches 2


Move to the next column if there is one, and pick up the bars in order again, until all the top loops are sitting on the needles again.  Look to see where the yarn you are working with is coming from, this is always the last stitch you knit.  You may need to pass stitches which haven’t been knit on this row yet back to the left needle to get them ready to work.  Remember to pass them with the needles tip to tip, which won’t twist the stitches.  And we’re done!


dropped stitches 6


Now that dropping stitches and picking them up is not so scary, we come to the second great thing about knowing this: you can do it on purpose to fix other mistakes.  Say you look back and realize that three or four rows previous to where you are now, you knit a stitch when you should have purled it in your pattern.  Instead of ripping out all the stitches you’ve done since then, you can just drop the stitch directly above the mistake, and let it ladder down as far as you need.  Then, you can pick up each stitch as a knit or a purl, whatever you need to make your pattern right – and your mistake is fixed!


dropped stitches 5


I was mostly done with the photos for this post, and wondering if they were clear enough, when I remembered that I already had drawings, scanned in and ready to go, from the handouts I make for in-person classes – a good thing!

If you have questions about this, or another topic you’d like to see featured here, just let me know.  Happy making!


Just a Wreath


SW wreath 1


I spent this morning making wreaths with my crafting buddies at my friend Elena’s house.  She’s been making them for 20 years, so she gave us expert advice, and it was super fun.  Her whole living room floor was covered with a big blue tarp, and on top of it, buckets and boxes stuffed full of all kinds of wonderful greenery, dried pods, and beautiful berries, chiles . . . with that much natural beauty it would be tough to make anything that didn’t look good.  I made this one with lots of stuff from right around here.  I wish you could smell it!  Piñon cones and juniper are two of my favorite smells in the whole wild world.  I guess we all like smells that remind us of home.


SW wreath 2


I hope you’re enjoying the season!