How to Felt Basics, and Felting FAQ Part 2:

Fulling, Felting Your Knitting, Felted Fabric, and More Questions Answered


If you read Part 1, you already know what felt is and how to get started making it by hand.  For Part 2, we’ll start with how to finish your handmade felt, or felt something you’ve knitted first.

wet felt bag example
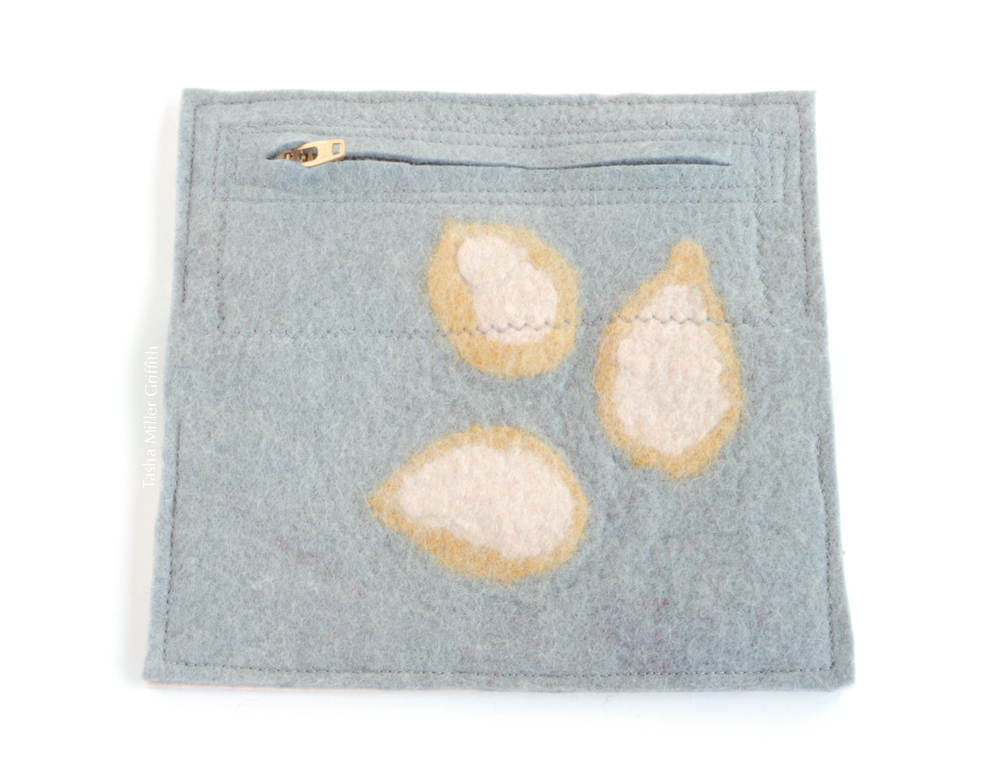
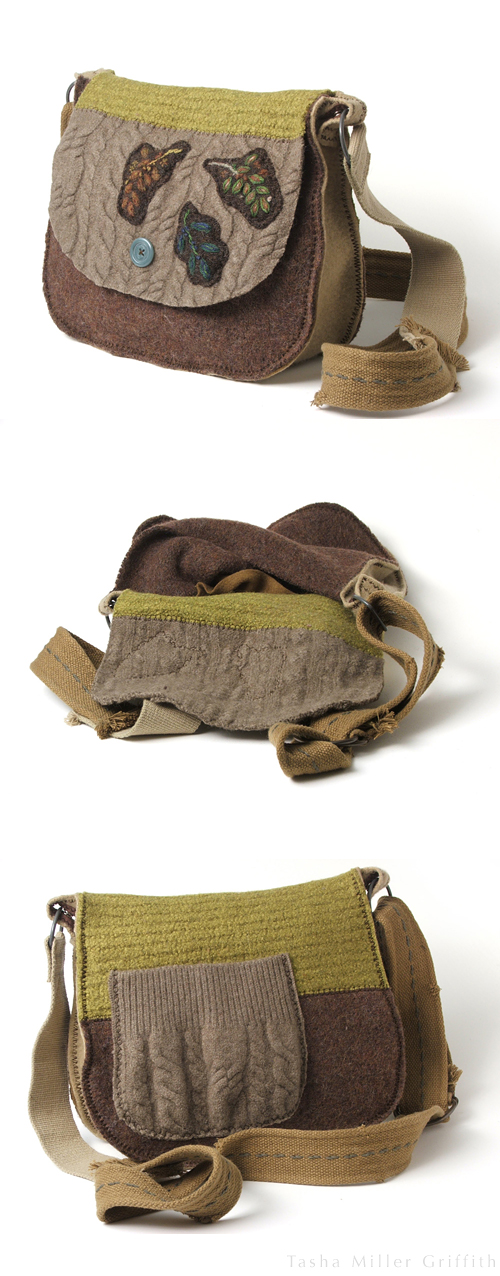
An example of the bags I made.  These are made entirely by wet felting; they start out as fluffy wool like the example in Part 1.  As you can see, it’s possible to make complex sculptural shapes without any stitching or even yarn!  I formed the pockets by using resists to keep the two layers from felting together where I didn’t want them to.


What is fulling?  Or, how do I felt knitting or fabric or old sweaters?

Fulling is a term used for the second stage of felting, and for felting fabrics which are already knit or woven.  This makes sense because in either case, the fibers are stable enough to take some more vigorous agitation.  Although, when you’re felting something like your knitting by hand, it’s still a good idea to gently encourage the fibers to cling together at first, rather than rubbing them around as hard as possible.  Keep in mind that at any stage, gentle agitation can actually work better.  Try it and see.

There are lots of ways to full, or harden, your felt.  This is where the majority of the agitation takes place.  In Mongolia (where there’s an amazing heritage of felting, think yurts), the tradition is to roll a new rug up inside an old one, and drag the bundle behind a horse!

By Hand

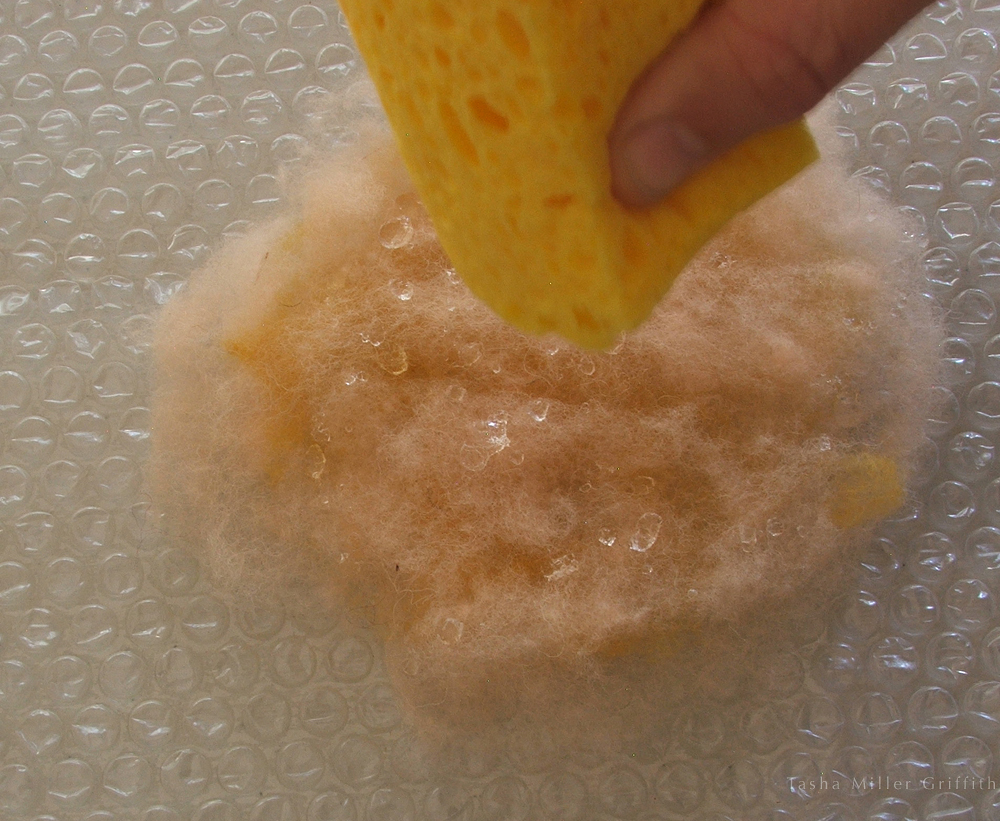
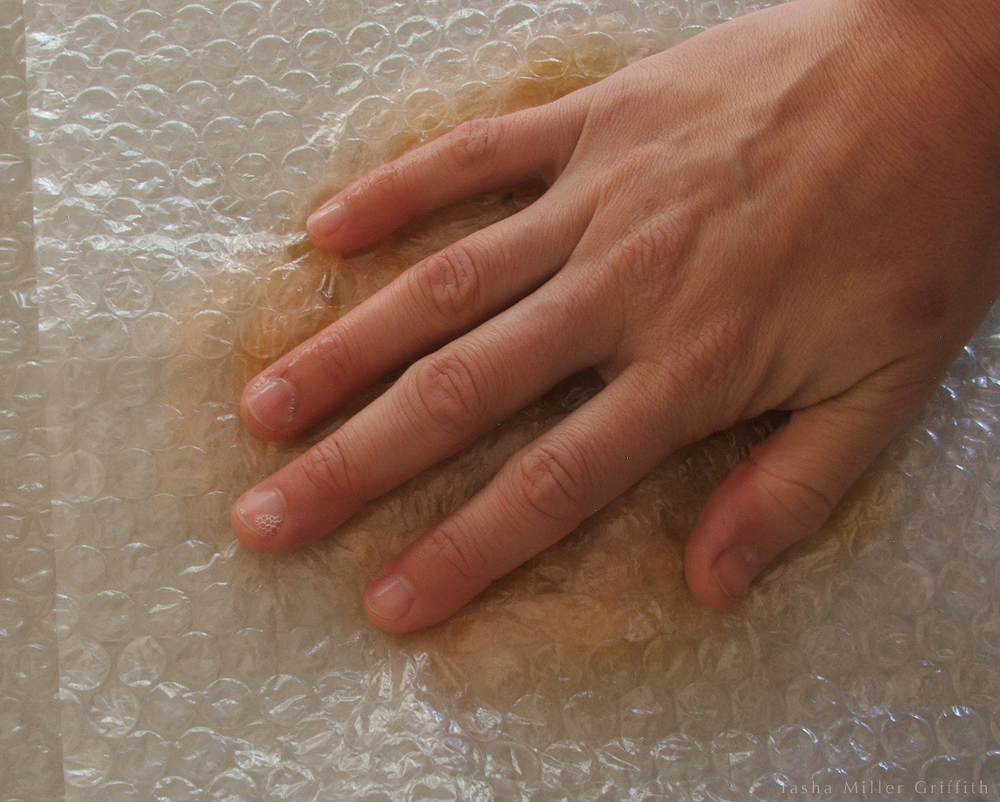
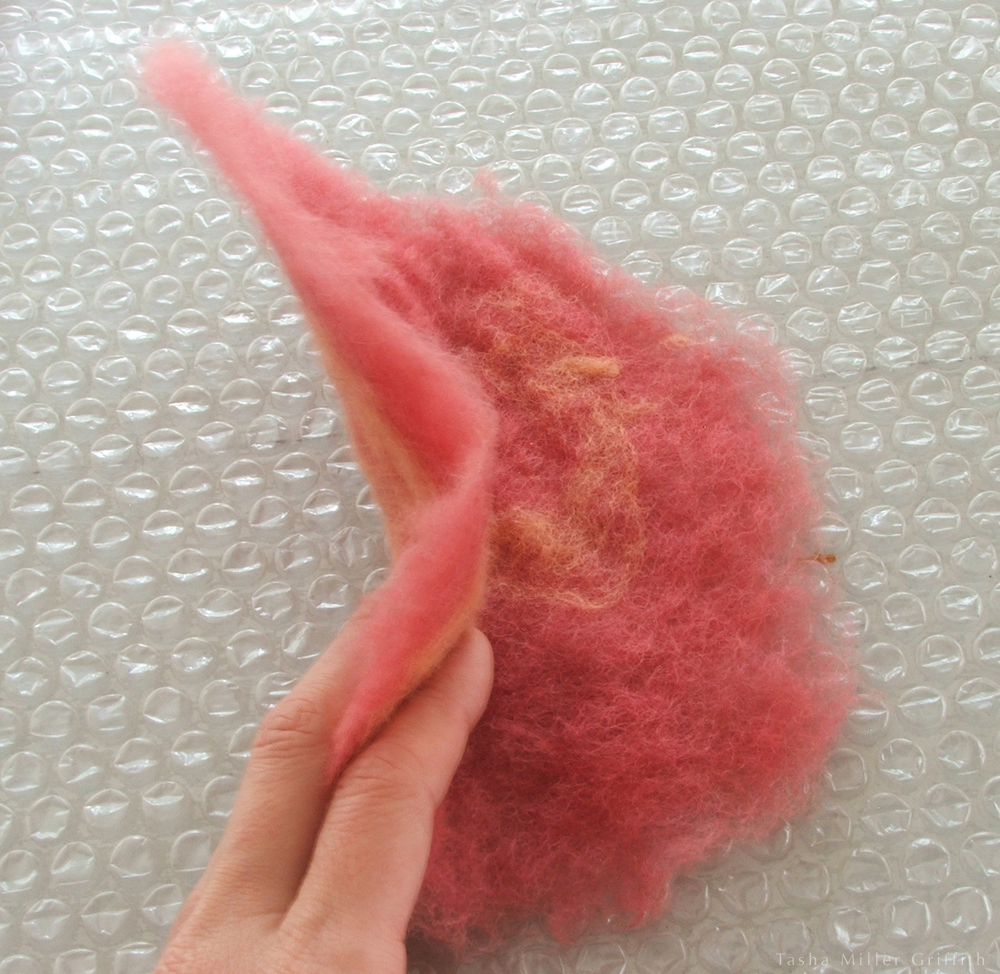
When I’m felting knitting by hand, or fulling a felt piece like the one illustrated in Part 1, I have a bowl of water about as hot as my hands can stand.  I dip the piece into the water, squeeze some of the water out, and rub it.  Two effective motions are rolling, and scrunching the felt between your two hands.  You can also scrub it around on the bubble wrap, or even throw it against a hard surface to get the shrinking going.  Whatever you try, remember to keep your hands in alignment with your arms and wrists in good alignment.


felting motions drawing

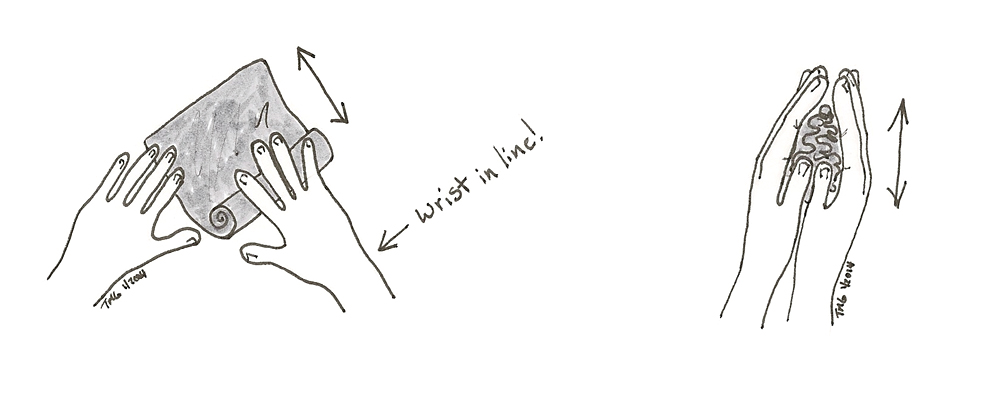
The advantage of felting and fulling by hand is how much control you have.  The exact parts of your felt you rub are the ones that shrink, and they shrink dramatically more in the specific direction you are agitating them!  Try it by rubbing a corner in towards the middle of the felt, and you’ll see what I mean.  For even fulling, make sure to rotate the direction in which you’re rolling and rubbing.

Stop and stretch your felt (and your hands & arms!) from time to time, stretching out your work will actually help it shrink down further.

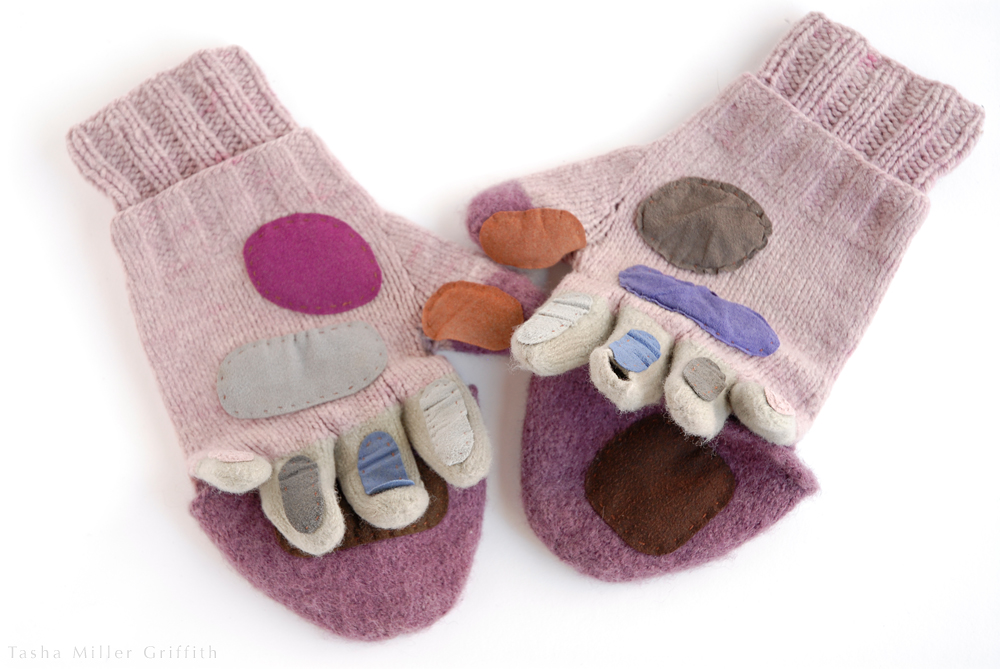
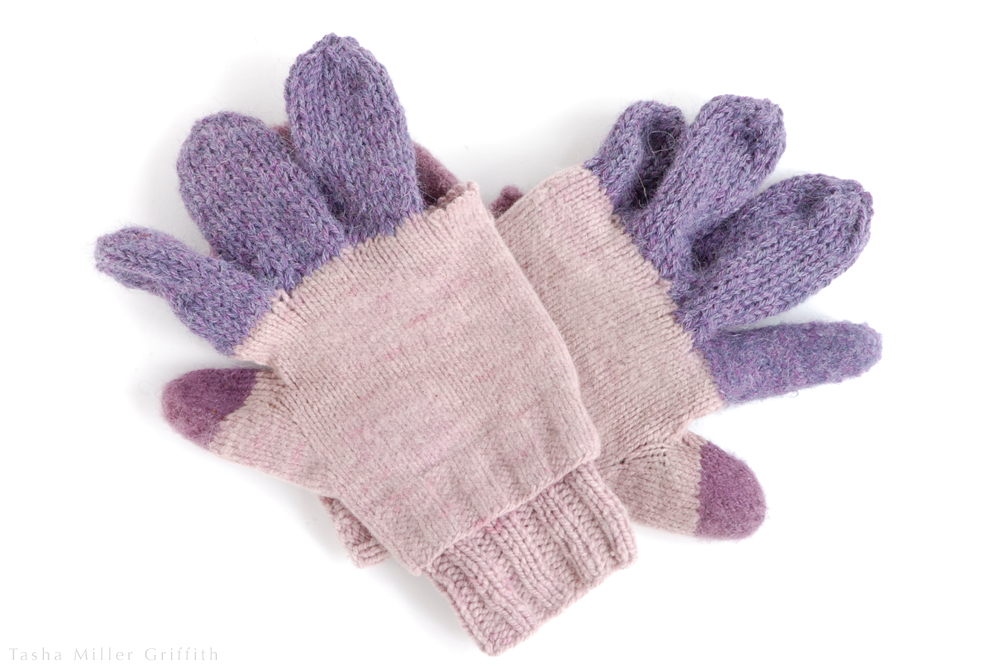
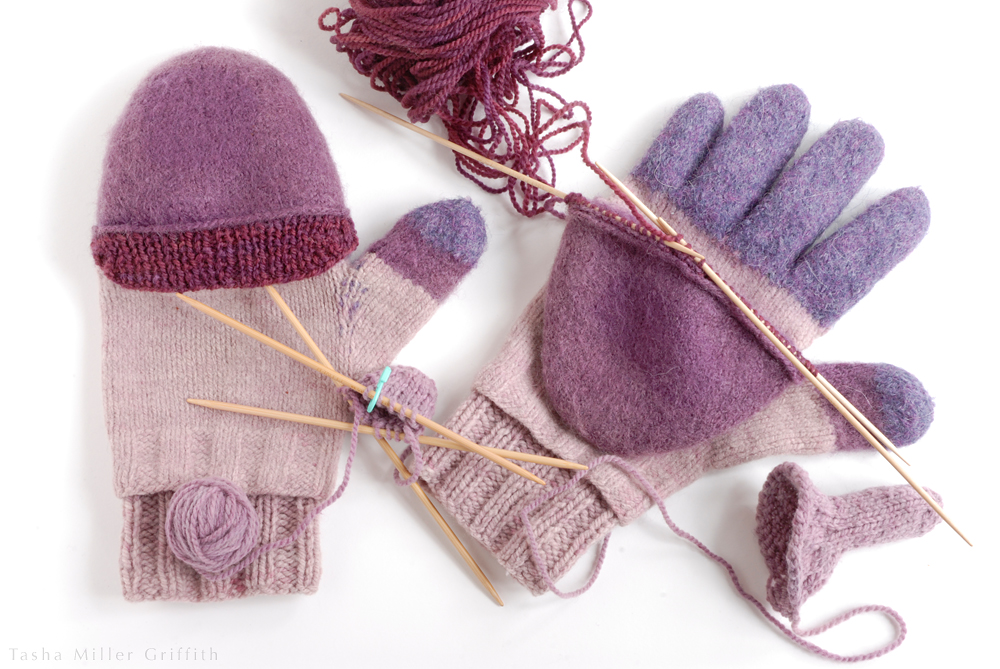
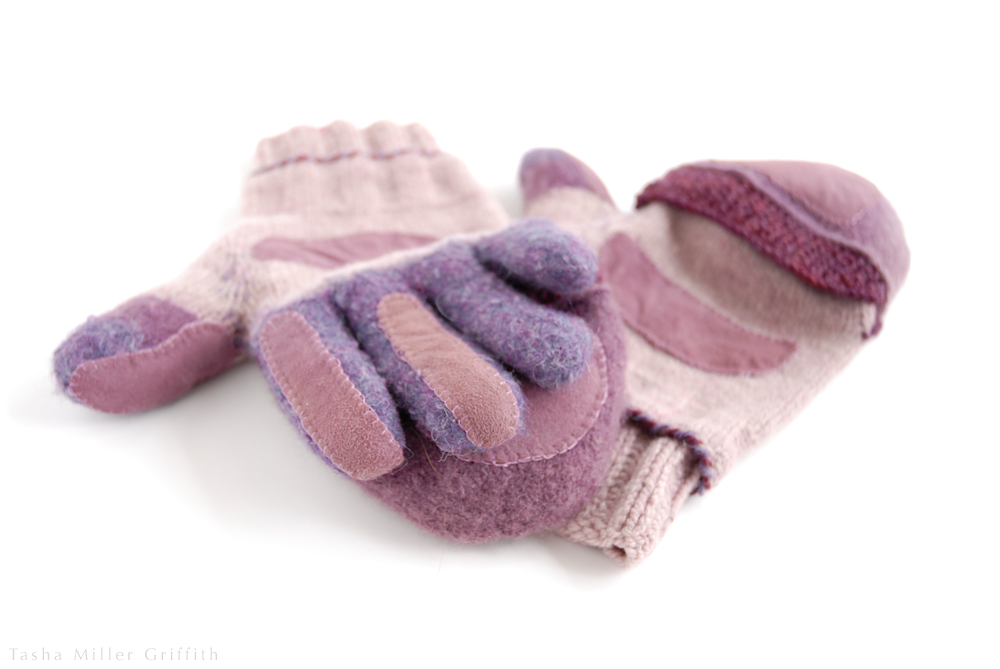
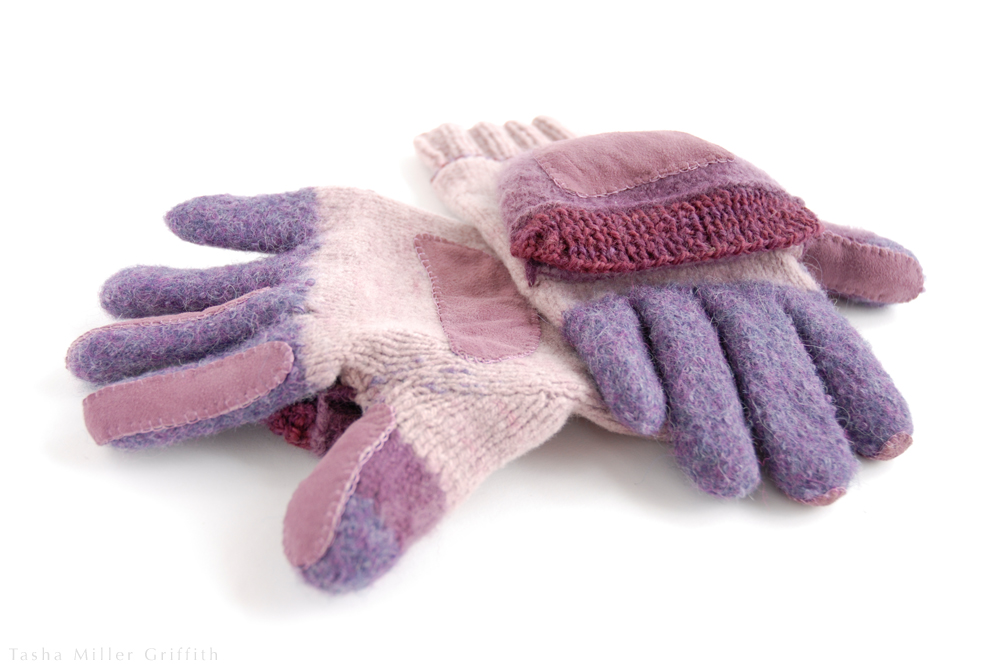
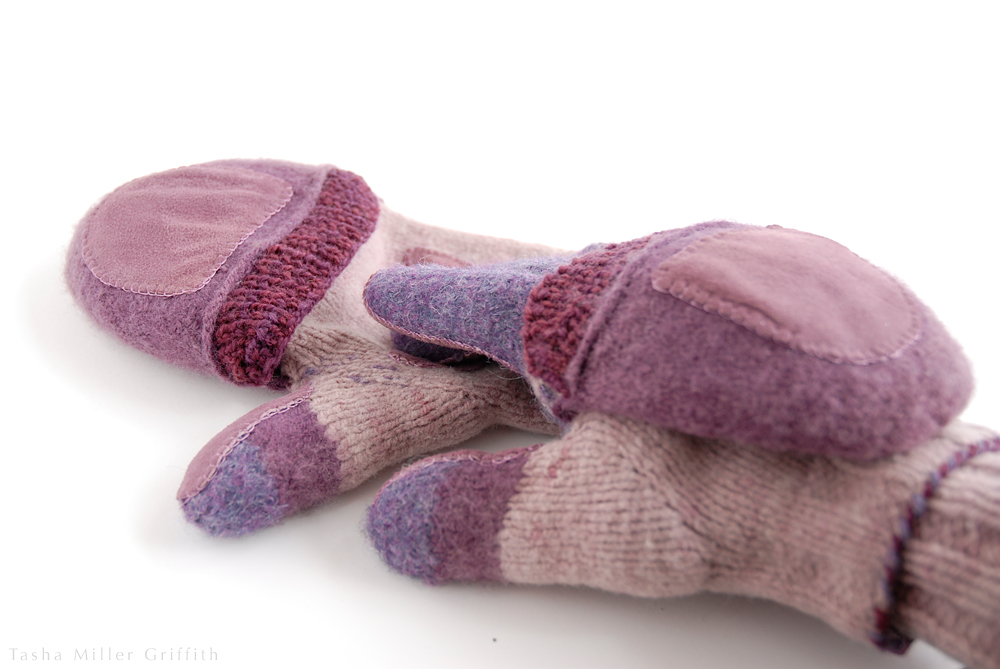
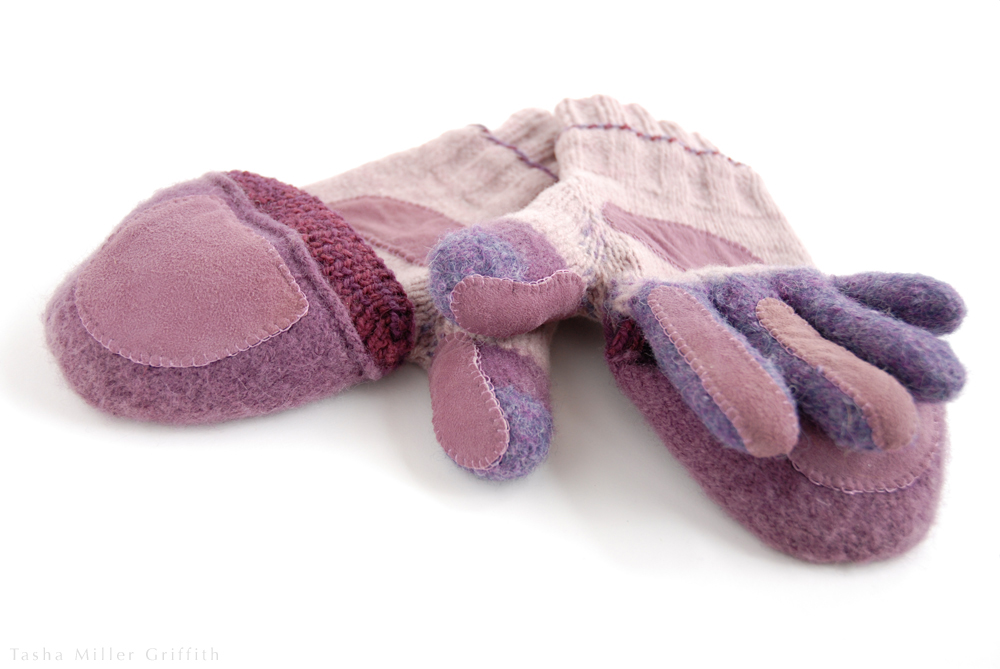
For felting my gloves/mittens, I put them on, dunked them in the water, and rubbed them all over and around each other, concentrating on areas that I wanted to shrink more, and alternating taking them off for stretching and rolling with more rubbing while on my hands.

natural dye felt color sample
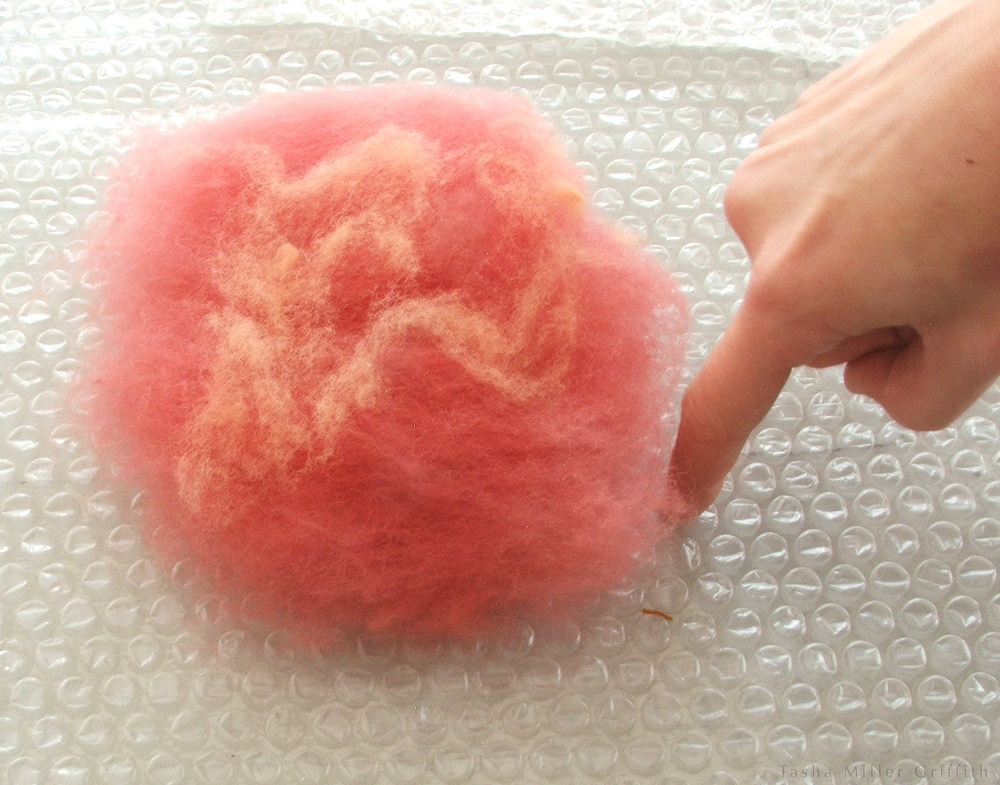
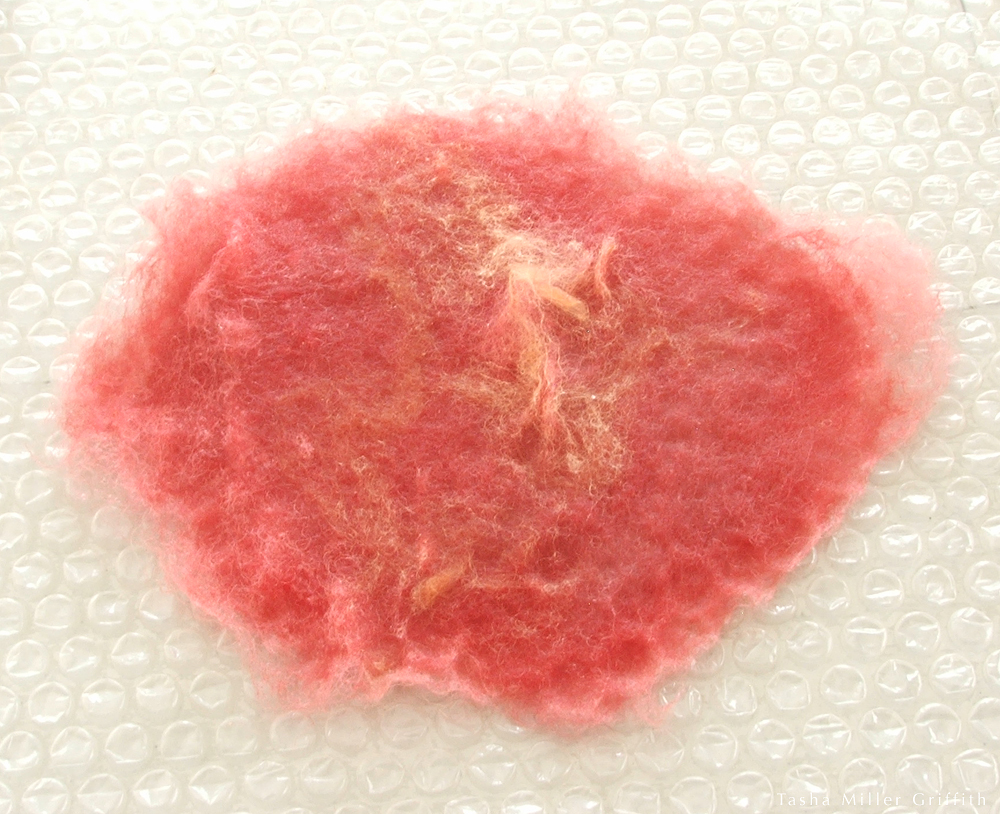
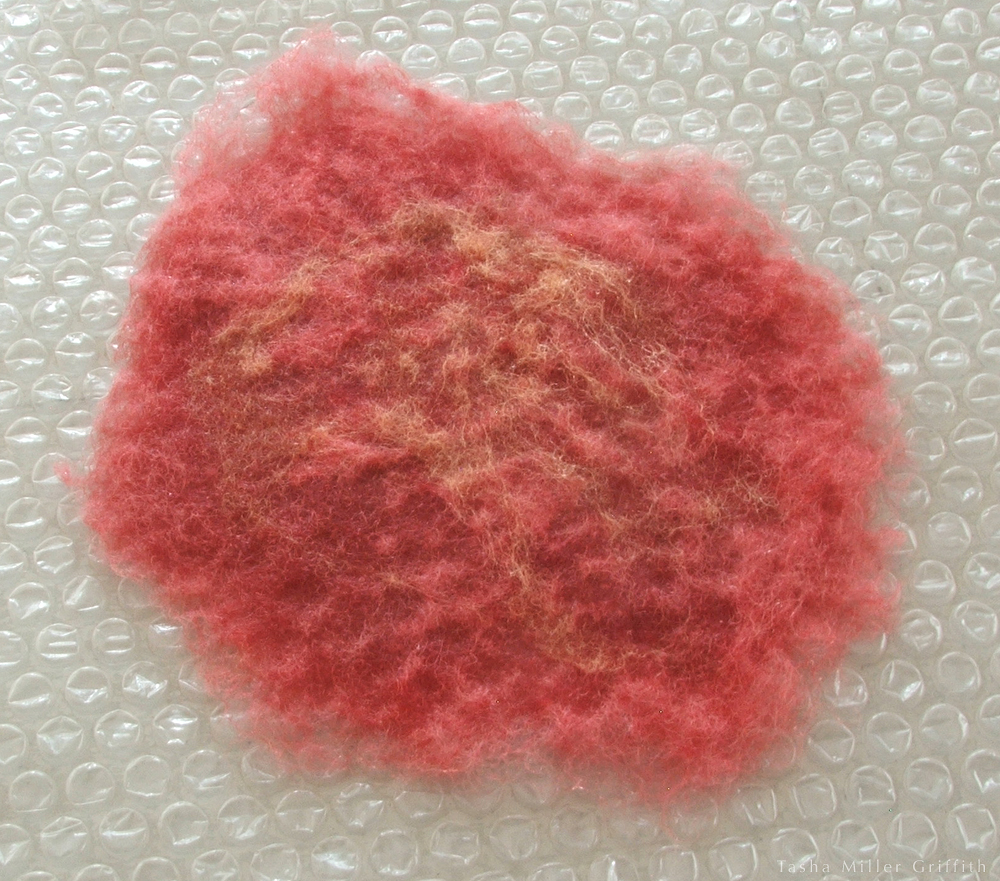
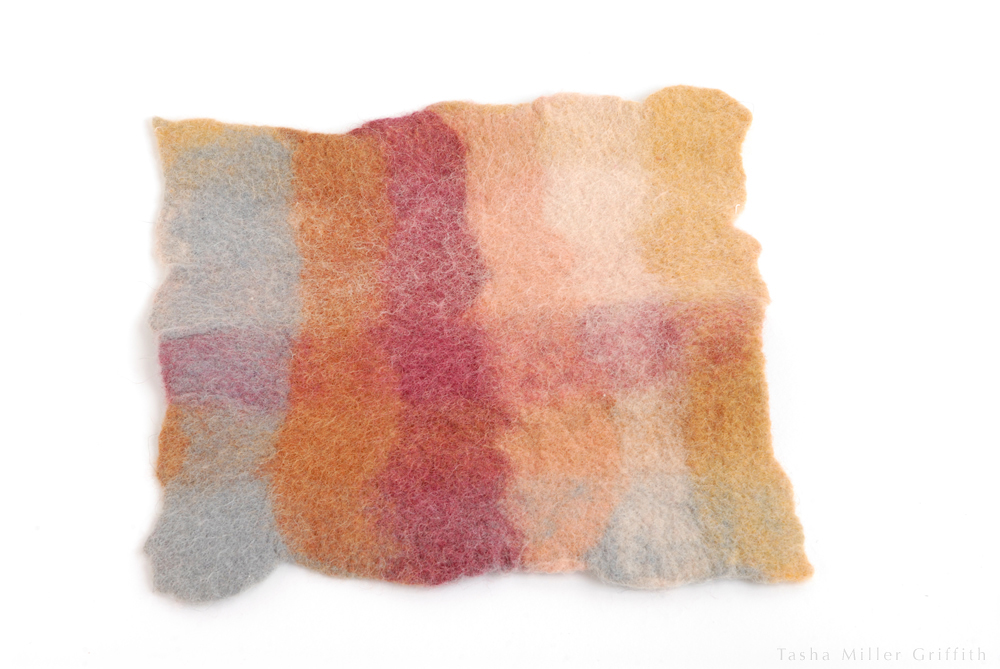
In this wet-felted color sample, you can see how fibers from each side of the piece worked their way to the other side with thorough felting.


In the washing machine

You can also shrink knitting, fabric, and even hand made felt that’s getting good and sturdy, in the washing machine.  Proving that agitation trumps any and all other factors, even though the fibers are swimming in water and the water may not be that hot, you can quickly get dramatic results.  The downside is that you don’t have much control over what happens.  I usually use the washer to help with fulling when I’m felting something big, but I check on it every few minutes, getting the felt out of the water and stretching or rubbing certain parts to help it take on the shape I want.  Top-loading washers produce the most agitation, and are the easiest to use for checking the felt frequently. Front-loading washers also work, especially if you are trying to felt something as much as possible, so you’re planning to leave it in for the whole cycle.

Set the water level for lowest amount that will cover whatever you’re trying to felt, and the most soil/most agitation setting, with hot water.  Put your piece in a zippered pillowcase, to prevent the wooly lint which some pieces shed a lot of from clogging the washer pump (ask me how I know about that!).  If your washer has a removable lint filter, you don’t need the pillowcase, just be sure to clean the filter when you’re done.

I don’t recommend felting large pieces of fabric in the washing machine, the agitation is just too uneven over such a large piece, and it will probably come out with some areas much more felted than others.  If you want to felt fabric for a sewing project, try cutting it into smaller pieces first (be sure to account for shrinkage when planning the size of the pieces, see below).  Even then, you’ll get the most even results if you can alternate being in the washer with stretching and rolling the pieces.

Some people use the dryer to felt as well.  If you’re trying to shrink your felt as much as possible, throwing it the dryer certainly won’t hurt.  Also feel free to experiment with putting damp felt in the dryer, and checking on it frequently the same way you would for felting in the washer.


orange felt with unfelted label
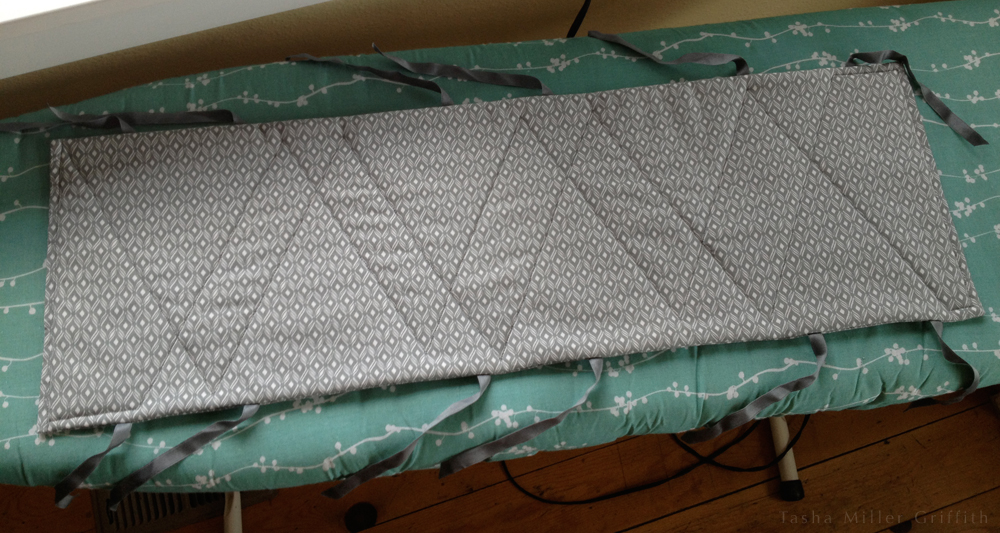
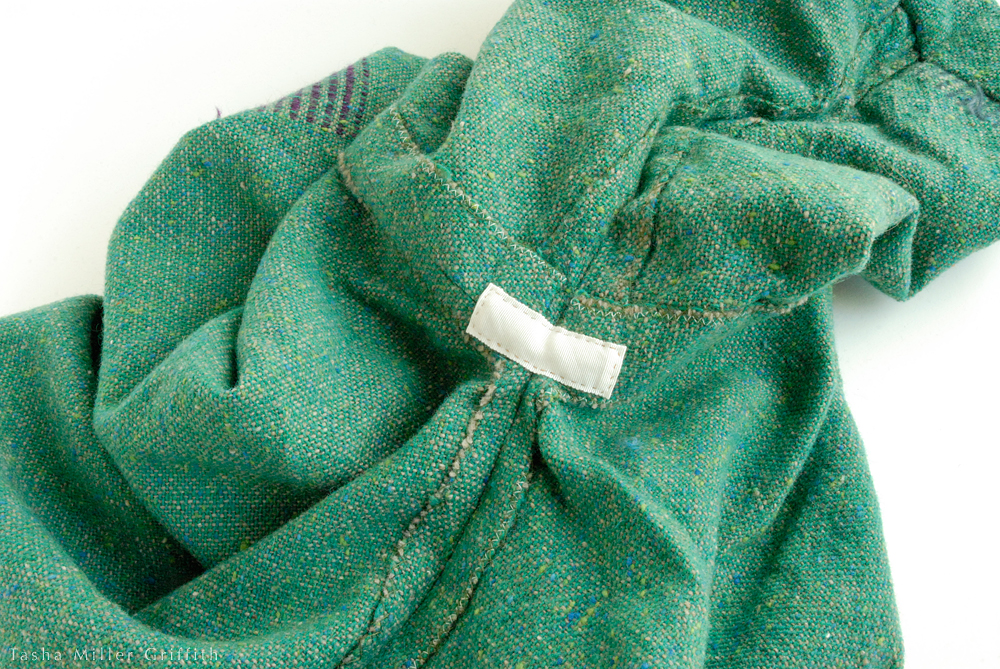
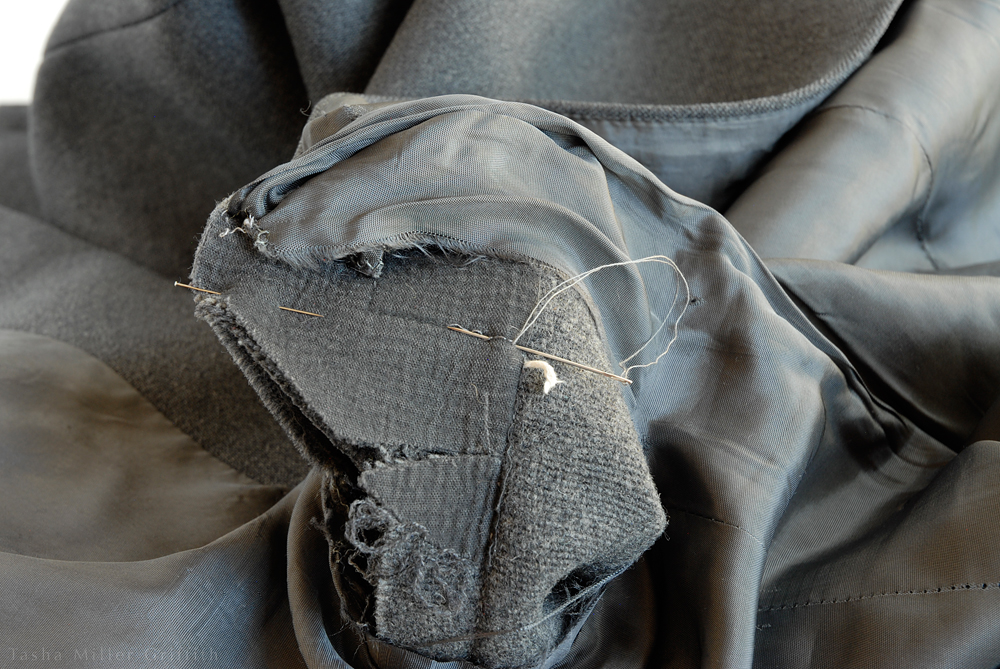
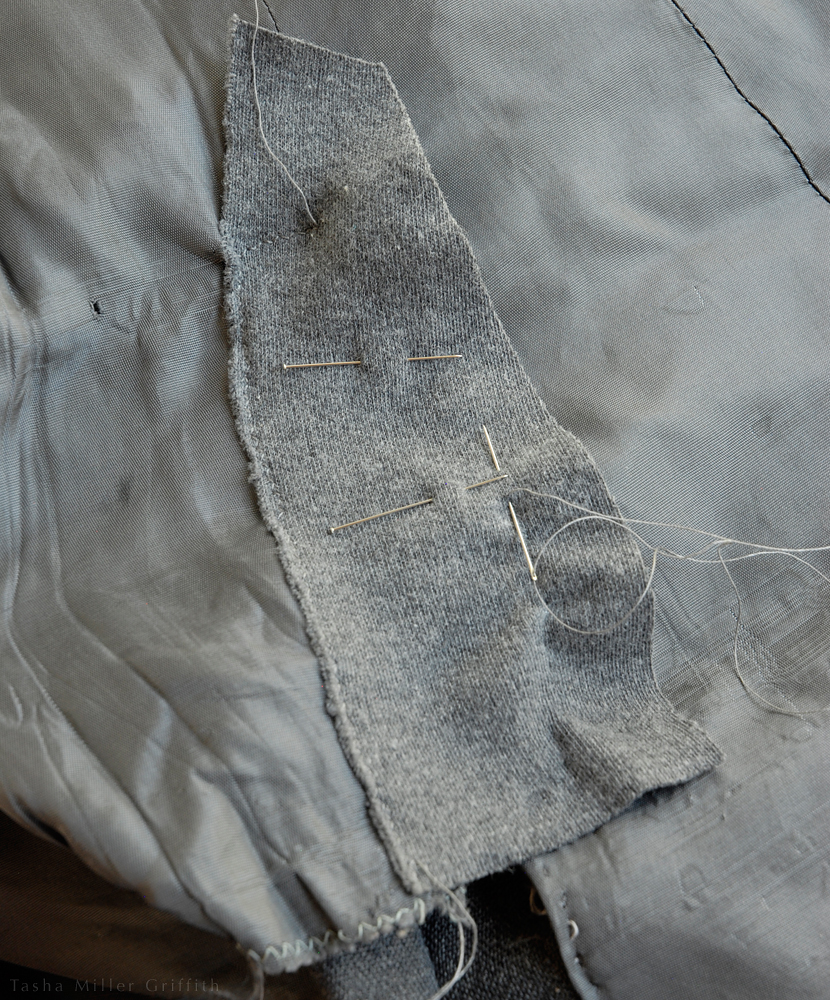
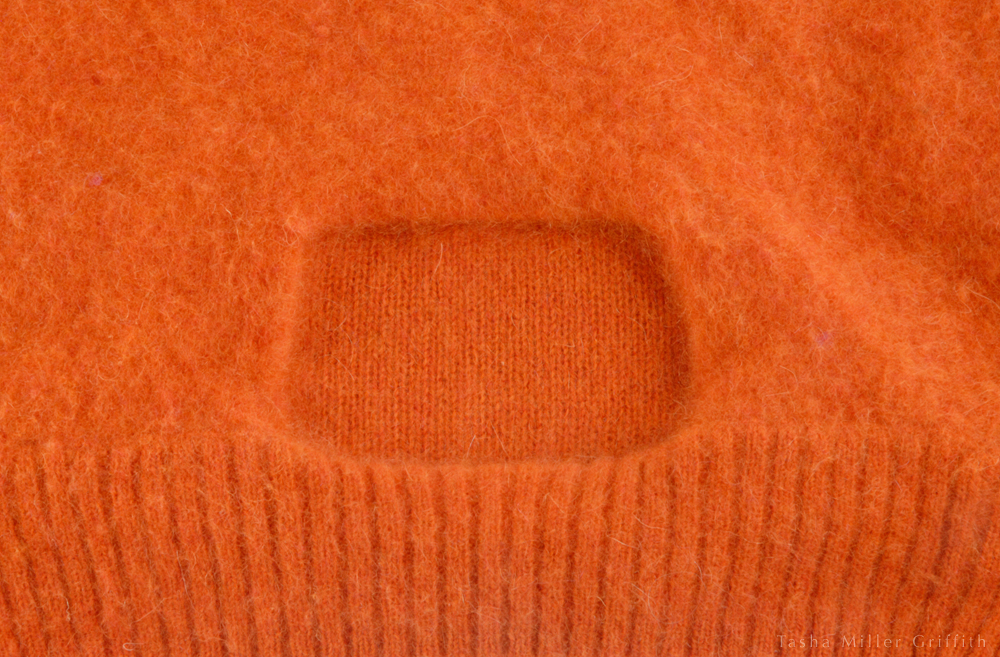
The body of this sweater felted well, except where the stitches were held in place by the sewn-in tag.  Since those fibers weren’t free to rub against each other and felt, they still look the same as they did before going through a few hot washes!


Will felt keep shrinking forever?

No.  At some point, the fibers have locked down as much as they are ever going to, and you really can’t get your piece any smaller, even if you want to.


Can I decide that my felt is done even if it hasn’t shrunk/hardened as much as it could?

Absolutely.  As long as it’s sturdy enough for its intended use, you can stop whenever it’s the size and thickness you want.  Sometimes the maximum that your felt could shrink would be much too thick and stiff for what you intend, or just too small, especially for felting knitting and fabric.  On the other hand, if you are making hand-felted boots or handbags, you’ll probably want to plan on the maximum amount of felting you can get, so that as many fibers as possible will be locked in, and the finished item will be as long-wearing as possible.


How much will my felt shrink?

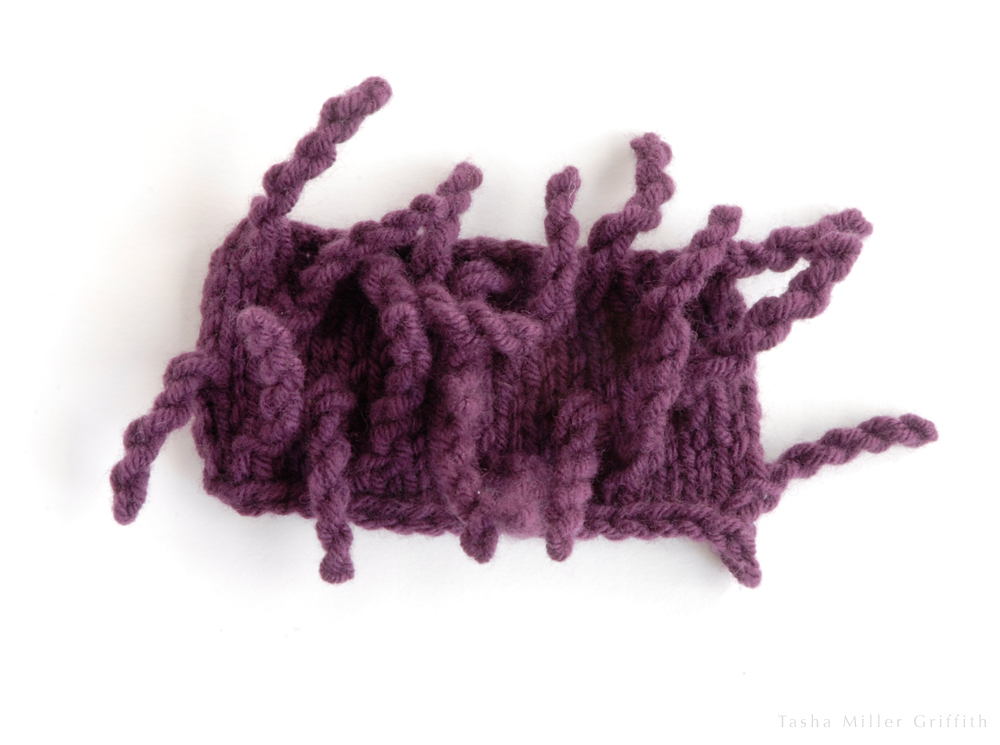
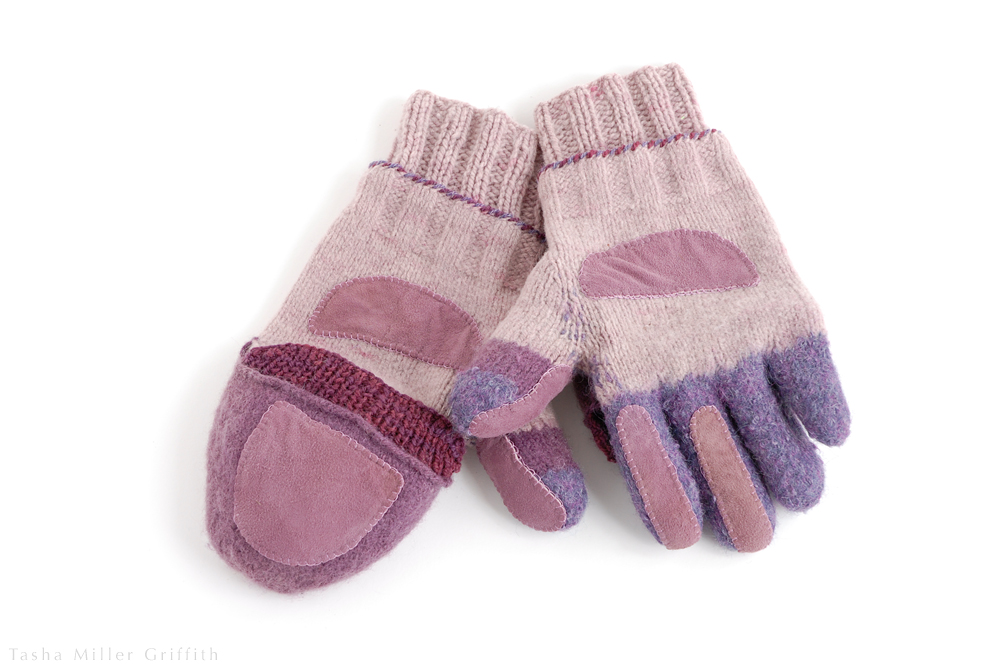
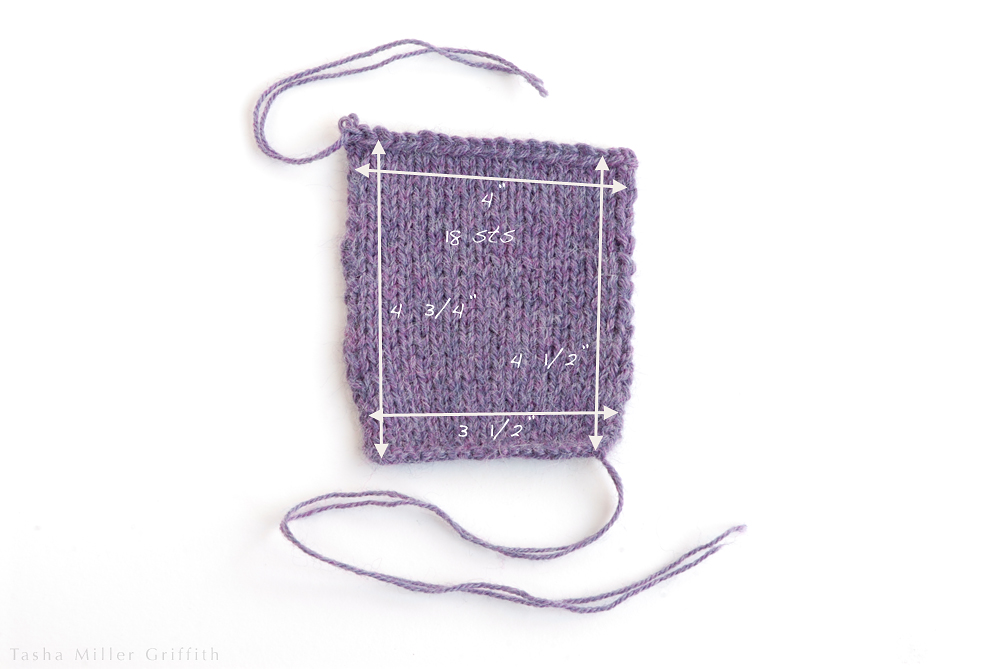
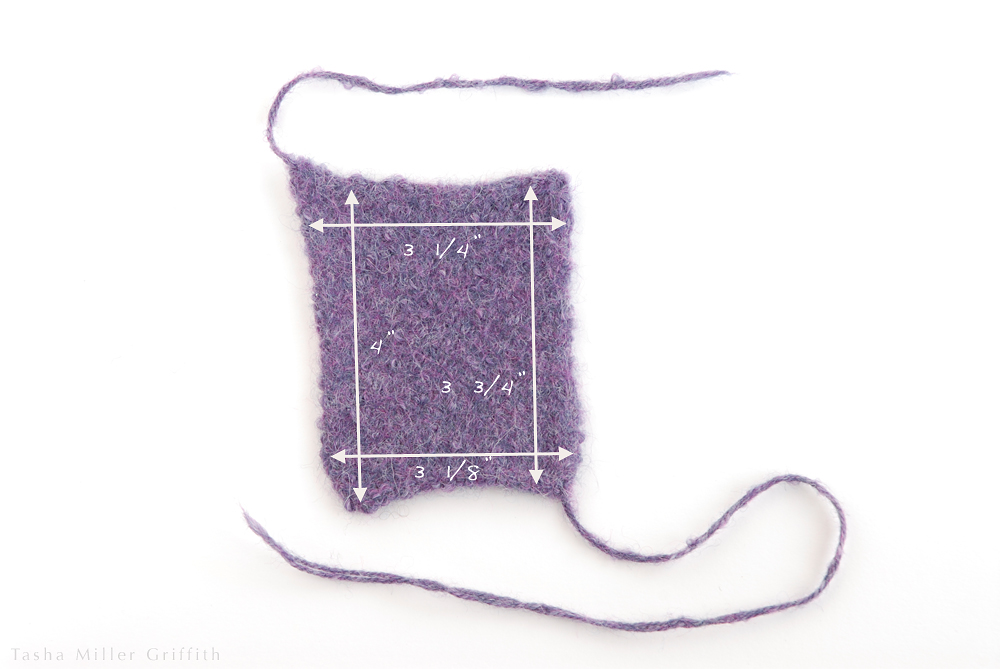
It depends on a dizzying number of factors, but there is one sure way to find out: test it, by making a sample and measuring it before and after, as I illustrated in my post about the magic purple mittens.  This method works for wet felting too, just measure the dimensions of the wool you lay out before you felt it. If you’re trying to get a sense of how much fiber you used, any dry felt weighs the same as the fiber used to make it.

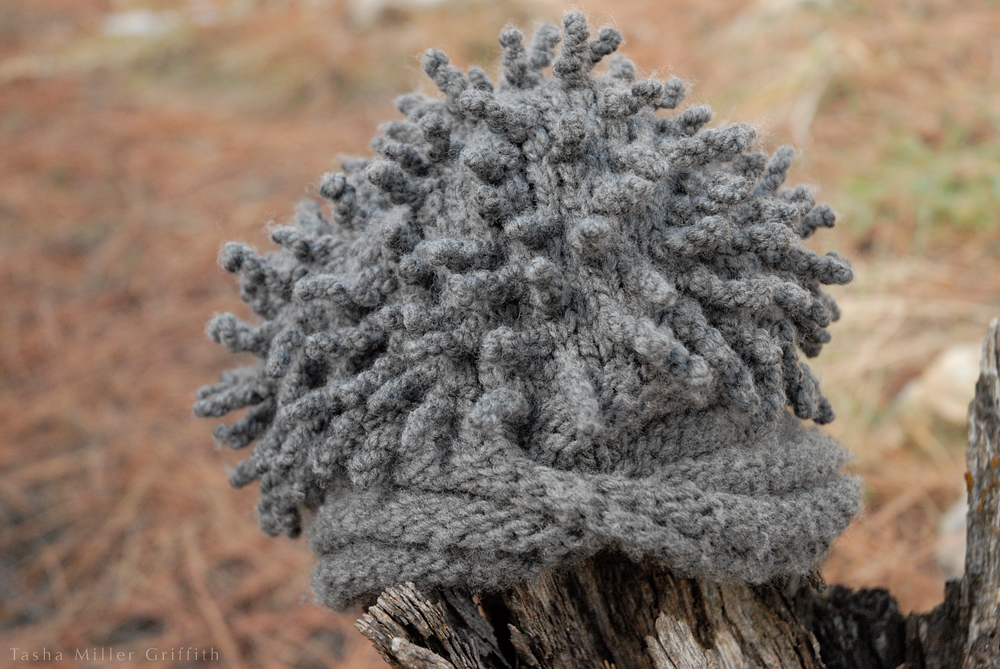
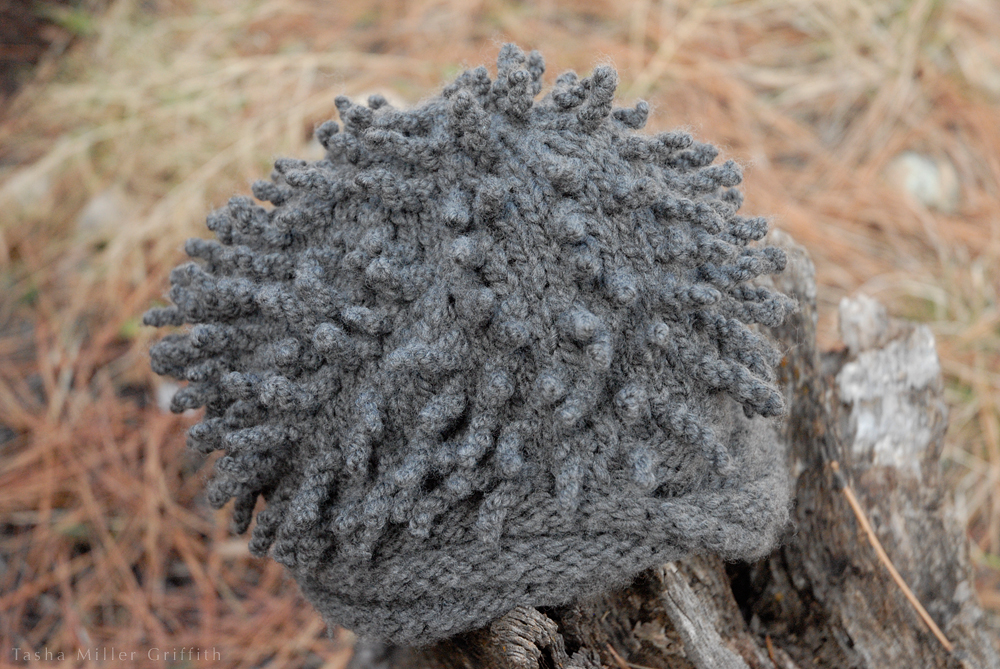
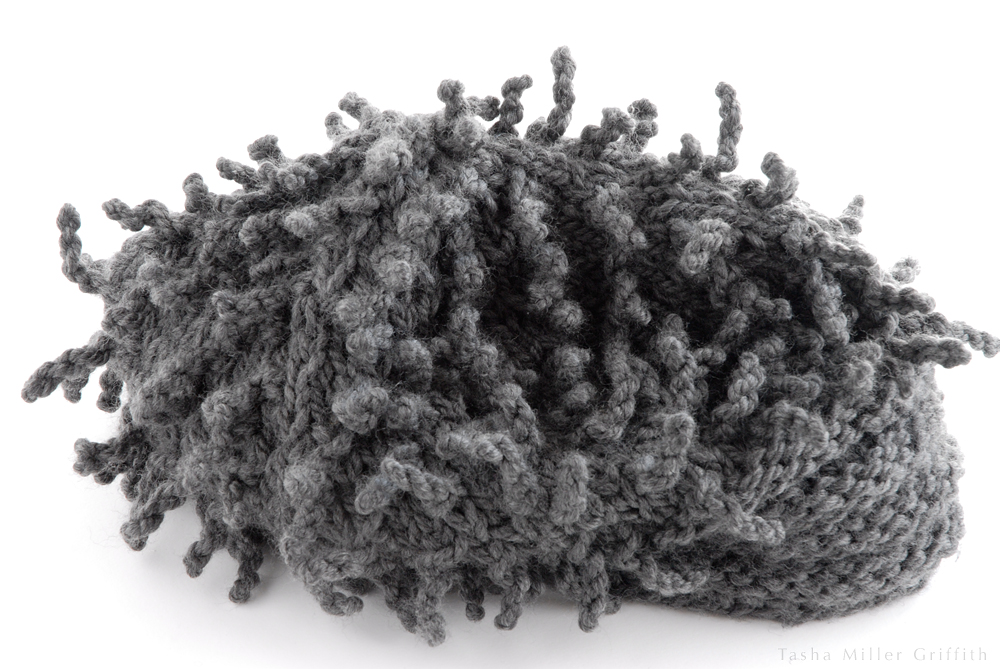
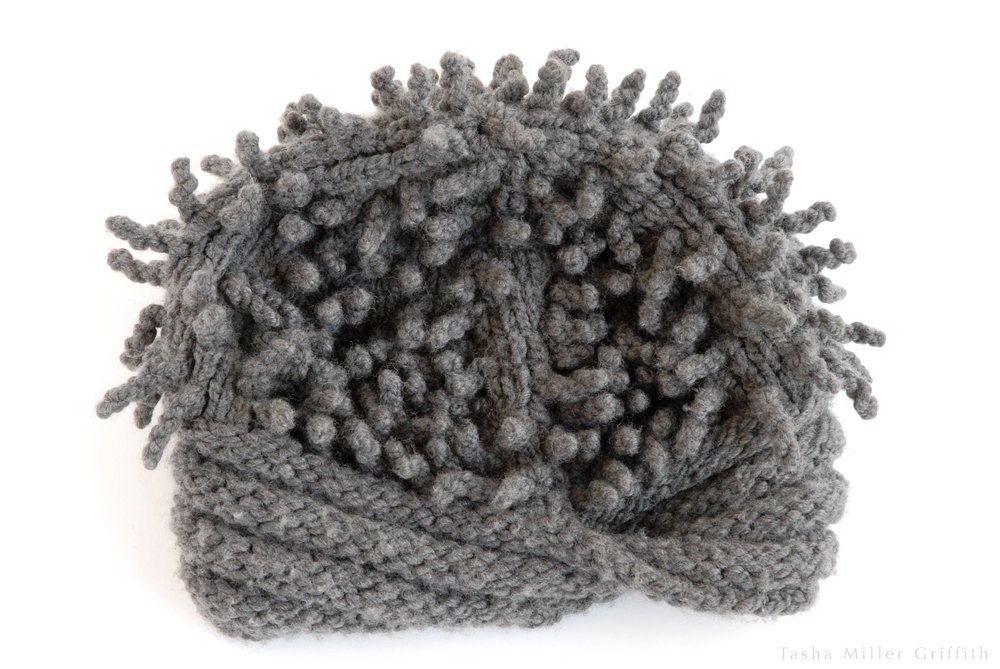
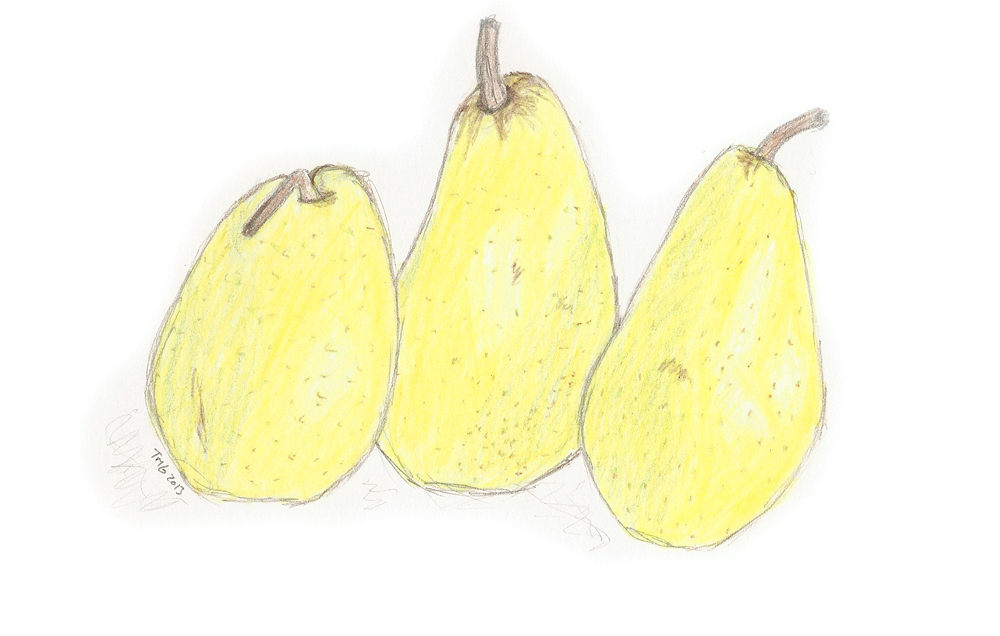
Wool from different breeds of sheep felts dramatically differently, some from sheep raised for meat may not felt at all!  Even different individual sheep can produce wool which felts differently from the next sheep over.  The hat at the beginning of Part 1 is Churro wool, which shrinks a lot, as you can see from the pattern!

If you’re buying yarn or fabric to felt, unless it’s from a local herd, you may not know what type of sheep it comes from, but most quality wool will felt to some degree.  The yarn or fabric should be at least 50% wool, alpaca, cashmere, or other feltable critter, and not be treated (“superwash” etc.) to prevent felting.  Bleaching can be hard on the fiber scales that make felt work, so lighter colors often take longer to felt.  Like I said, there are a lot of factors, so if it matters what size the final felt is, test first!


felt breed samples
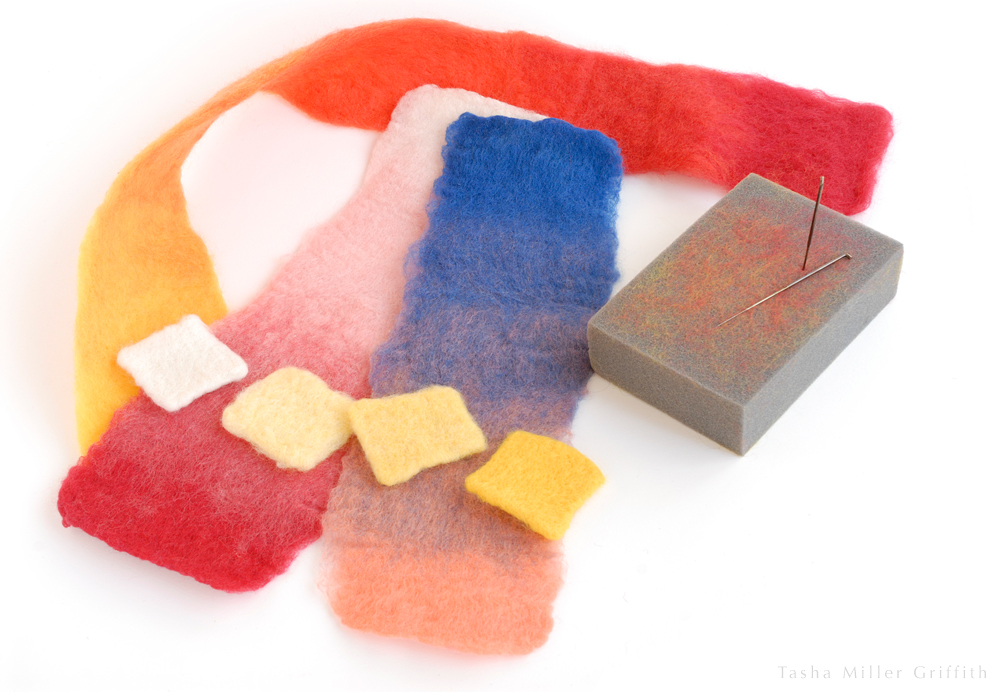
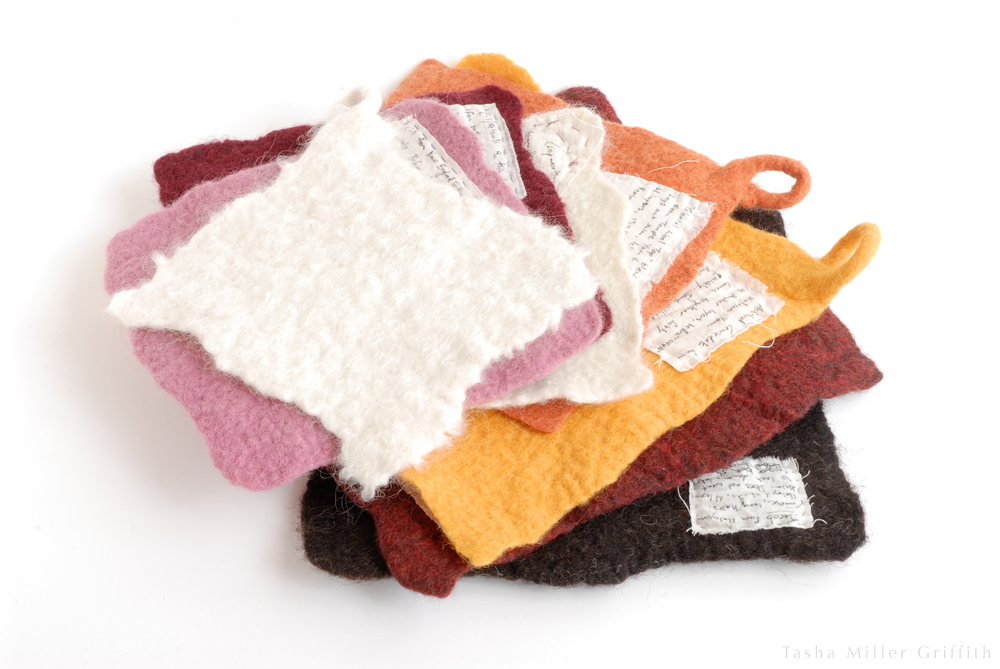
When I was looking for a wool to make my wet felted bags from, I made a lot of samples!


Can felt happen by accident, or with wear?

Definitely.  As you’ve seen by now, the conditions for felt are readily available in your washing machine, which can be disastrous if your nice sweater accidentally gets in there.  And, as I found out the hard way, even if it seems like a garment made from wool fabric is not felting, over many many washes, it eventually will (illustrations and happy ending here).

I also know from experience that a garment can felt as you wear it.  I have a pair of alpaca and wool blend fingerless mitts that, as they are exposed to warmth and moisture from my skin, and agitation as I wear them while I grab my keys, the steering wheel, etc., are slowly becoming more solid.  We shall see what the end result is.  This is something I’m really interested in at the moment, so stay tuned for more findings.  For now, my best advice is: don’t make an article that will be exposed to felting conditions out of a material that felts easily, or plan for shrinkage and felt it first.


What should I do with my felt when it’s done?

Let it go through the spin cycle, or roll it up in an old towel and squash it, to get out as much extra water as you can.  In this damp state, the felt is super malleable, so plan on doing some final shaping.  You can rub, tug, scrunch, stretch, and otherwise push the felt around into exactly the shape you’d like.  If you’re felting something like a hat, it helps to have an object to “block” (shape) it on, try a bowl a little bigger around than your head.  When you get you new felt shaped just as you would like, leave it alone to dry.  If the felt is thick, this can take  a couple of days.

Once the felt is dry, you still have another chance to shape and smooth it, with steam from your iron.  All wool responds especially well to steam (think about tailoring), but on felted wool steam is a minor miracle.  It can straighten out lumpy areas and smooth the whole texture of your felt.  Placing the iron right on the felt will also smooth and flatten the surface fibers, so if you don’t want that, hold the iron above the surface to fill the felt with steam, then put the iron down, and shape with your hands.


Don’t I need soap to felt?

My current experience says not necessarily, except under special circumstances.  Historically, all kinds of harsh chemicals were used in felting, to roughen up the fibers’ scales and speed up the process.  These were also highly toxic.  Most felters now just use a mild soap.  Olive oil soap and liquid soap are popular choices.  This soap doesn’t do much beyond decreasing the surface tension of the water.  Lately I have been felting mostly without soap, and I haven’t noticed a difference between using it and not using it in my studio.  You may find soap more helpful than I do, depending on your wool and your water.  Don’t add too much though, if the fibers are too slippery they won’t want to grab on to each other.

When you are hand felting, if your hands are sticking to the fibers rather than sliding over them, a little soap on your hands should help.  A mixture of solid soap and water can be a very effective “glue” if you are hand felting two things that don’t want to stick together.

If you are felting in the washing machine, you definitely do not need to add soap.  There will be enough left from the last load to make plenty of foam.

If you do use a soap that’s alkaline (most are), make sure to rinse it out thoroughly when you are done felting.  Animal fibers, like your own hair and skin, are slightly acidic, and being left in an alkaline environment for long periods can damage them.  Include a splash of vinegar or lemon juice in the last rinse, and let the felt soak in it for a few minutes to neutralize any remaining alkalinity.


sewn felt bag example
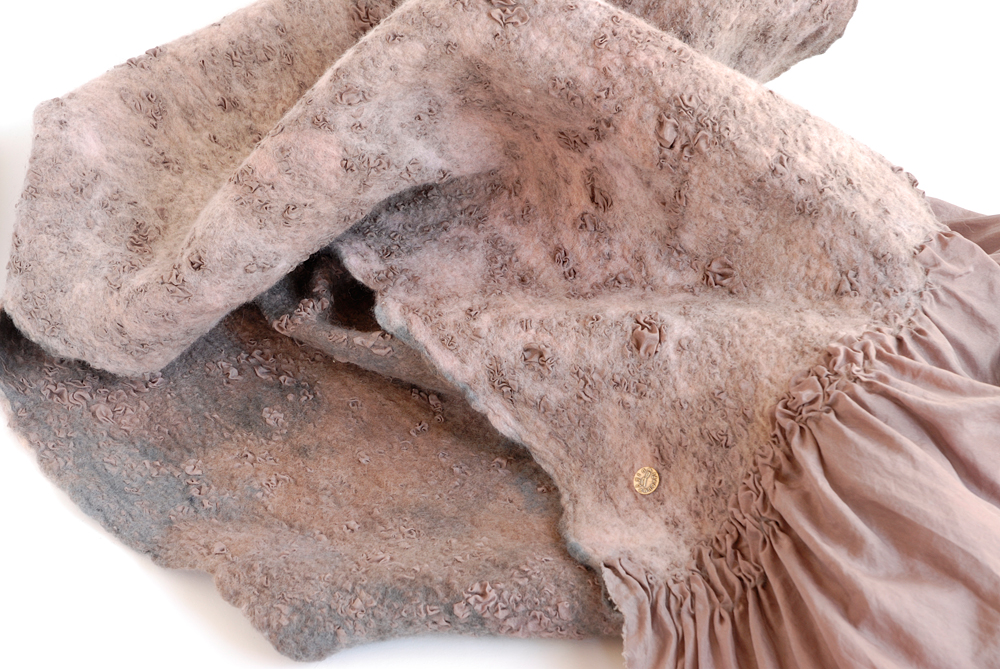
I made this bag from felted wool sweaters.


Why would I want some felt anyway?

Felt is fabulous!  It’s a dream to work with.  As you sew it, you can ease in what seems like an impossibly large piece onto a small one, just using your fingers.   It doesn’t ravel when you cut it.  It wears like iron (assuming it’s tightly fulled).  It’s so insulating that I can iron the outside of one of the wet-felted bags, with lots of steam, with my hand inside, and feel nothing for minutes.  It’s breathable and odor-resistant and has all the other lovely properties of natural fibers.  Plus it’s beautiful, natural, and fascinating.  It can be sculpture with fiber.  It’s the perfect next stage for a sweater that’s been attacked by moths or pets, or just has cuffs too worn out to repair—felt it and make it into something else.


Finally, how not to felt

To care for precious article you’d rather not felt, basically do the opposite of what you would to felt it.  Hand wash it very gently: place it in water with a little bit of pH neutral soap.  Let it soak clean, press down gently to move the water through it, and drain the water off without agitating.  Keep the rinse water the same temperature as the wash (lukewarm is fine) and avoid letting the water run directly on the article.  Spin it out (spin only) in the washer, or roll in a towel and mash on the roll.  Reshape, and leave to dry flat.


Further reading

My favorite felting book is Uniquely Felt by Christine White.  It covers, in detail, methods for just about every type of wet felting you could think of.  Pat Spark, who I mentioned in Part 1, has been at the forefront of bring felting to the internet since the very beginning, and she has a ton of useful info on her site.


I packed as much as I could in here without going into exhaustive detail, so I hope it’s helpful and not too overwhelming.  If you have more felt questions, send them my way!


How To Felt Basics, and Felting FAQ Part 1:

What is Felt, and How Do I Get Started Making it?


felted hats with patternA hat I made early in my felting experiments (top) and a commercially felted hat.  The hats are sitting on the pattern I used to lay out the wool . . .


As I mentioned in the post about my magic purple mittens, felting is probably the fiber technique I have the most claim to be an “expert” on, and, until now, I haven’t posted much about it here at all.  Most of my deep explorations into felt happened before I started this blog, and as I’ve been digging into my research and photo archives, compiling what I want to say as an intro to felting, it’s clear there’s enough material here for a least two posts.

I’ve organized this roughly as a list of felt FAQ.  I could go on at length from any one of these starting points, but I’ll try to keep it concise.  The photos and illustrations here are necessarily going to be a little mishmashy, as they represent work over a big swath of time.  Click on the photos to enlarge for an better view of the felt texture.  Ok, let’s get started, shall we?


What is felt anyway?

The short answer: Fibers (for real felt these must grow on an animal: a sheep, an alpaca, a cashmere goat etc.) which have matted together into a permanent fabric.  It’s the scales on the fibers (like the ones on your hair, visualize the close-up from a shampoo commercial) that open up and cling together.  It doesn’t sound permanent, but if you’ve ever tried to pull apart a piece of felt, or un-shrink a sweater that accidentally went through the wash, you know it is.

There are lots of types of felt.  It can be made from combed fibers alone, or from fibers that have already been spun into yarn and woven or knitted into fabric.  In either case, as long as there are at least 50% feltable fibers in the mix, the fabric should be able to felt.  It’s easy to make felt at home (even by accident) and there are factories that make felt on a commercial scale.  I’d love to visit one sometime.

Wet Felt

When someone says their work is “wet-felted”, they’re probably talking about the seamless, stitch-less felt made from only fluffy brushed wool fibers (read on for how to make your own).  Below is a piece of my hand made wet felt, which I cut and sewed after it was done, to make the wallet.  The decoration was made at the same time as the fabric.

Most commercially made felt, whether starting from fibers or fabric, uses some kind of wet or steam process.  When you felt your knitting, recycled sweaters, or fabric, you’ll also use water and heat.


blue petal wallet 2


A couple of special types of felt that I won’t cover in depth, but wanted to mention, in case you’re curious:

Nuno felt

Nuno felt is made with thin layers of wool on either either side of a piece of fine fabric, usually silk.  We traded Bryan’s work for the totally gorgeous example below by Gina Pannorfi at one of our art shows this past summer.  (Lucky me, it’s just the loveliest thing.)  Because the silk provides some of the structure, nuno felt can be quite thin and drapey while holding together.


Gina nuno scarf


Needle felt

Needle felt is what it sounds like, made by pushing fibers together with a special barbed needle, or a collection of them.  Although it doesn’t make a sturdy, hard-wearing fabric the way that wet felting does, amazing detail is possible with needle felt.  Do a search for “needle felt” with your favorite animal name on Etsy, and you’ll see what I mean.  I made the examples below in a class on color theory for felters—with Pat Spark!  She has a whole bunch of good felting information and tutorials on her site if you’re looking for more felt info.


needle felt color studies


Fake felt

That slightly sticky, slightly glittery “craft felt” at the hobby store is usually made from polyester.  The fibers are punched together with needles and/or held together with glue.  It really has none of the lovely properties of real felt.  Commercial wool and wool-blend felt is more readily available than it used to be (at least in the US), so you may be able to find it at your craft store as well.


How do I make felt?

The short answer: Most importantly agitation, combined with at least a little moisture, and optionally heat, on wool, alpaca etc. makes felt.  There are about a million ways to apply these, depending on what you’re working on and what equipment you have.

I’ll start with a quick intro to making felt from just combed wool.  I think that way, the rest of the felting process will make more sense, and it’s interesting to know, even if you only plan to felt from knitting or fabric.

If you’re looking for to buy wool for felting, it’s usually sold as roving (a loose roll that spinners use) or batts (which are more convenient for felting, since you can pull off big thin layers).

These photos are from my felt flower tutorial, which will walk you through the whole process if you’re interested.

Step 1

Lay out thin layers of wool, with the fibers alternating directions.  Keep in mind that your finished project will shrink in as the fibers pull in toward each other, so make it bigger than you want (I’ll go into how much bigger in the next post).  The wool is very fluffy and will seem thick, but it will compress to almost nothing once it’s wet.  Use several layers for a cohesive piece of felt.  Squish it down with your hand to get an idea of how much fiber is really there.


dry wool layers


Step 2

Add a little water.  Dripping it from a sponge is a good way.  You want the wool to be all wet but not swimming in water.  You can squash on the wool gently with the sponge to get it all wet.


water from sponge


Step 3

Agitation.  Arguably this is the last step, but there are a few stages to it.  At first, you’ll need to rub the felt very gently.  You want the fibers to cling together, which they won’t do if they’re being shifted all over the place.  For wet felting small pieces like this, I like to use two layers of bubble wrap (the ordinary, small-bubble kind), one underneath the fiber and one on top.  The bubble helps spread and soften the motions of your hands.  Think about getting the bubbles to massage the wool, not about moving your hands on the bubble.

Important!: Felting by hand involves a lot of repetitive motion.  As you work, make sure your wrists are in line with your arms and not bent at a strange angle, to avoid injury.


bubble wrap rub


Rub for a couple of minutes, then lift the bubble and check on how things are coming.  You’ll probably need to rub some more.  As you practice felting, you’ll start to notice subtle changes in the texture of the piece that show how it’s coming along:


wet wool layersWet wool layers.


slightly rubbed wool layersThe wool is starting to cling together, but there are still a lot of loose fibers.


more rubbed wool layersAlthough still soft, this prefelt is now a cohesive unit.


Once your wool is holding together enough that you can pick the whole thing up and it stays together, it’s what felters call a prefelt.  A prefelt isn’t strong enough to be a finished object, and it has lots of fibers that are still ready to cling to each other or to other parts of your project.  You can check by pinching up a few of the top fibers to see if they’re attached to the ones below.  At this point, the felt is ready for whatever you have in mind for its next stage.  It can be easier to work with if you dry it off, by squashing it between two layers of an old towel.


prefelt


So, my wool is holding together, now what?  Read on to Part 2 for how to finish felt like the piece above, how to felt your knitting, more questions answered, and even how not to felt . . .


A Hedgehog Anemone Hat

Plus, another way to fluff up knitted tendrils.


hedgehog hat outside 2


I know—what??  If you have no idea what I’m talking about, please bear with me for a minute.

First, the hat.  This is one of Cat Bordhi’s designs, the Arctic Anemone Hat.  It just looked SO fun to knit, I really wanted to make one.  But I couldn’t see myself wearing it . . . I could see my mom wearing it, though.  She loves all kinds of sea creatures, hedgehogs, and plants with unusual spiny pods—so it definitely fits her aesthetic.  I had planned it as a surprise, but it ended up being so much better that I told her (when she was thinking about knitting one); I got to ask her what color she wanted, and get her to try it on as I went, and consult her about design details.  We decided to make the tendrils a little shorter, more like hedgehog quills, which I think went well with the grey color.


hedgehog hat outside 1


This was such a win-win.  The hat was every bit as fun to make as I thought it would be, from the moebius band (yes you can knit a moebius strip—from the inside out) to making the tendrils, it was a blast.  And, my mom loves it!  It looks so cute on her, too.  Actually, it looked really cute on every single one of my relatives who tried it on.  I knit this hat mainly on our Thanksgiving trip, so all my relations saw it in progress, and wanted to try it on when I finished.  However, Mom hates having her picture taken almost as much as she likes unusual creatures, so I decided to photograph the hat in the natural environment.

The only reason I got it back for long enough to photograph it at all, is that Cat’s directions suggest you use a superwash wool (one that’s been treated so that it won’t felt) and fluff up the tendrils by running it through the dryer.  I have a dryer, and mom doesn’t.  This definitely worked.

Before:

hedgehog hat before fluffing

After:

hedgehog hat after fluffing


But after fluffing, I began to wonder if there was another way to do it.  I’m a fan of untreated wool, and I wondered if I could get some tendrils to fluff up by steaming them.  After all, what’s happening in the dryer is: dampness, heat, and agitation.  I tried it out on a sample, knit with organic, not-superwash wool yarn.  This worked too!

Before:

tendril sample before fluffing

After:

tendril sample after fluffing

It might not produce quite the fluffiness of the dryer method (keep in mind that the yarn I used was also not as thick), but it wonder if the tendrils would continue to fluff up a bit with washing and wear?  I got the best results by using my iron—not touching the tendrils, but holding it above them and putting on lots of steam for a few seconds.  Then I picked up the sample, and, holding it upside down, gently scrunched and shuffled the tendrils around.  I decided on upside-down because the tendrils tended to wilt downwards with all the steam.  It also seemed to help some that were reluctant to fluff up if I sprayed them with a little water from my plant/laundry mister, then steamed and scrunched.

At least with my sample, it would have required a nearly impossible amount of effort to felt anything using the steam, and gentle fluffing.  However, wool + water (usually much more than this) + heat + agitation does = felt, so be advised.  I would agitate the base of the hat as little as possible while it’s steamy, just concentrate on moving the tendrils around and scrunching them up.

sweet tomato knee socks frontOne more note: in honor of knitting more lately, and knitting something that was so fun without even changing the pattern very much at all, I have finally decided to stop lurking Ravelry and using it only as the world’s absolute best pattern search (you can be shocked, I don’t blame you).  I’ve gone back and posted some of my favorite knitted projects from the past few years, whatever I could think of that I still had and/or had pictures of, and there are a few more of those still to add.  I even posted a few yarns from my stash that might find a better home.  If you’re on Ravelry too, come and say hi, I’m FrenchToastTasha.

Even if not, happy making!  I suggest making something that’s just plain fun to create, at least every once in a while.

How to Make French Toast—and Happy New Year

With variations, tips and tricks to customize your own perfect French toast recipe.


french toast in skillet


It took me long enough, right?  (Can you believe it’s been almost two years?  Yeah, me neither.)  For a blog with this name, which features recipes, the lack of actual directions for making French toast was getting a little ridiculous.  Here’s the thing, I didn’t want to post just a recipe for French toast, that seemed silly, everyone already knows how to make French toast, right?  Instead I would put together some marvelous, unheard-of combination of toppings and put that in a post, with the actual French toast just included almost as a by-the-way, here’s how I make it.

I started off yesterday morning with just such a plan, to make a seasonal orange-based sauce.  I wasn’t going to tell you this next part, but it now seems important: it did not go well.  In fact, it reminded me specifically of the part of the year just passed that I would very much NOT like to repeat in the year to come: me trying very hard for a goal which I (perhaps) have somehow misjudged in one or more ways, expending a lot of time and energy but not quite getting where I’d like to go.

I like to think I’m not superstitious, but at first, this seemed like the most inauspicious possible sign for January 1.  Then, as it rolled around in my brain a little more, I started to think that maybe the failed orange sauce (it came out ok after all) was a cautionary tale, and if I took it the right way, I could use it to steer away from the process I don’t want, and towards the one I do.


french toast on plate


I started thinking; maybe just French toast is enough.  Of course not everyone already knows how to make it.  Especially since I have some tips and ideas to get you started with your own never-before-seen, awesome variations.  After all, this space is supposed to be about empowering you to make things, and not about me showing off, even though I love sharing the things I make here.

In 2014, I’d like to be more grounded, less hectic.  I still have a million dreams of every kind, so many things that I’d love to do.  But my journey towards them might not be about reaching as far as I possibly can in one grasp, or frantically trying to fit as much as I possibly can into every single day.  Maybe it will be more about doing one little bit at a time, and even about recognizing and sharing the good bits I already have right in front of me.

Happy New Year, friends!  May it be a good one for all.


How to Make French Toast


First, and most importantly, you need bread.  You can use any kind, and it’s not just a metaphor, or part of the 6 words I chose to describe my life, it really is the best possible use for bread that’s staler than you’d like to eat it.  Brioche, or banana bread, or any other thing that’s called a “bread” and maybe borders on dessert, will make amazing, Ann-Sather-worthy French toast.  I’ve used my homemade bread for our most recent versions.  As always, a quality bread (or any ingredient) will lend even more layers of subtle delicious flavor to the toast (or any finished dish), but it also may be a tastier use for a less-than-stellar bread than eating it alone.  How much batter the bread will soak up varies wildly depending on the type of bread and how dry it is, etc.

Next, you need some egg and stuff to soak the toast in.  I like it to be mainly egg, because I do not like the inside of the bread to be soggy when it’s done.  I like to whisk up the egg etc. in a glass dish with a flat bottom rather than in a bowl, so I can put a few pieces of bread in to soak at a time, and not be left with a little well of liquid at the bottom that the bread can’t reach.  For about 6 pieces of bread (again, this varies a LOT depending on your bread, but you can always add a little more to the pan) I use:

3 eggs, whisked up well with:

1/4 cup milk (it’s Ok to substitute non-dairy milk here)

A pinch of salt

A larger pinch of sugar

Next, add some flavorings to the egg mixture—whatever your heart desires.  A generous sprinkle of cinnamon, a pinch of ginger and a pinch of cloves is a good way to start, especially in winter.  A splash of liqueur is good—for an especially luxurious version, substitute a generous splash of cream for the milk, and add the lost liquid back in by way of brandy or rum etc.  Vanilla extract is good (but probably choose it or liqueur), or try another extract, maybe paired with a spice or two, for a unique flavor.  I especially like to compliment whatever I’m planning to put on top with a bit of something in the batter, but keep it fairly subtle.

french toast soakingSoak the toast in the batter for a few minutes, then flip the slices over, and let them soak for another couple minutes.

To cook the toast, heat up a heavy skillet over medium heat and melt some butter in it, maybe 1/2 Tablespoon butter for four slices (in my little skillet I used less).  The toast should sizzle when it hits the pan, and the egg batter should start to set up right away.  It only takes a few minutes to get lovely brown spots on the bottom side, at which point flip the toast over.  You may need to add a little more butter between batches.

If not all of the toast is done at once, you can keep it warm on plates in the oven at 200° F, until you’re ready to serve it.

For toppings, really, the sky is the limit.  It’s—ahem—delicious with just real maple syrup and homemade crème fraîche.  A little orange zest (or even iffy orange sauce) is really good with this basic setup.  Practically any fresh seasonal fruit is amazing on French toast, strawberries in spring are particularly wonderful.  Any jam you have is good.  Coarsely chopped toasted nuts are great (bread with nuts in it would also be great as base).  Melted butter, fruit syrup, whipped cream . . .

Some of my favorite flavor combinations may yet appear as time goes on.  Please share yours as well!


Convertible Knitted and Felted Mittens

In which I remodel my mittens to make them better than ever, and show you how to calculate shrinkage when felting your knitting.


purple mittens finished 2


My friend Tom once commented that many of my clothes have stories behind them, and these mittens are no exception!  In fact, I’m going to tone it down here, story-wise, and stick to only the most interesting and relevant of the many angles I could go for.


A Very Short History of the Original Mittens

I started knitting these as my take-along project on our trip to Italy in February of 2010.  I knitted the main parts from yarns that we dyed the first time I ever did natural dyeing, with my grandmother and a bunch of dear family members in 2008.  (I’m telling you, I’m skipping  a lot of stories here).  My goal was glove fingers for finer dexterity, that could also be covered by a mitten flip-top for extra warmth.  Typically for me, I consulted a few patterns, but didn’t end up really using any of them.  I didn’t have enough purple for the fingers and the flap, and because I love purple and green together (one of my favorite color combos for the hats) I decided to get green yarn.  No one else was impressed with this decision, and I can now admit that one of my students at the time probably put it best when she said they looked like “dead fingers.”  So, moving on, when I discovered that they were too slippery to drive in, I sewed on a bunch of patches from faux suede samples in different colors.  Ignoring whether or not this made the green fingers look any better, and also the fact that all the fingers had come out too short after felting, I wore them all the time, all over the place, skiing, shoveling snow, etc., through last winter.  By the end of that season, one of the fingers had developed a rather large (and cold) hole in the end.


purple mittens before


A Plan for New and Improved Mittens

When I got them out this fall for the season, the more I thought about it, the more I wanted to do more than just fix the hole.  You see, if I was going to fix the hole, it made way more sense to knit on a little more finger, so that it would be actually the right length.  And, it would be ridiculous to do that for only one finger.  And, if I did it for the rest of the fingers, I would either have more green fingers or an even more ridiculous color mash-up than before.  I decided to start over on the fingers, and this time, do the math.

As fate would have it, last winter I sent my blog friend Alessa some American patterns, and she sent me some yarn and other lovely stuff from Germany (these mittens really are more full of stories than average, even for me).  Thanks Alessa!  One skein of the yarn (on the left below) was a lovely variegated purple in 100% alpaca.  Alpaca felts like a dream, and is just as soft felted as not.  I saw it in my yarn bin and knew it would be perfect for new fingers.


package from AlessaIs that not the most-awesome-looking tin of chocolate?


How to Calculate Shrinkage for Felting Knitting

Lots of times I tell my students that knitting can either be all math; full of charts, calculations, and exact numbers of stitches, or no math at all; flowing along and decreasing when it looks right to you.  In my mind, the happiest mix is somewhere in the middle.  When you’re felting, it really helps to have a least a little math, which comes from making a sample in your intended yarn and measuring how much it shrinks, especially if you need it to come out a certain size.  (I neglected to do this for the first fingers, and you saw how that went.)

I started out with a tighter gauge, then decided to increase my needle size, because looser knitting will felt faster (you can see from the before and after that it also affects the percentage of shrinkage).  I’m using two strands of the yarn since it was fairly fine, and I wanted the fingers to be nice and thick and warm when finished.  You don’t have to take a photo, but do measure and draw around your sample.  Also make a note of how many stitches are in your sample, they will disappear into the felted texture and you won’t be able to tell later.  (This is about the smallest sample that will give you an accurate idea.)

Before felting:

purple mittens sample before

After felting:  (As usual, click on the pictures to enlarge if you wish.)

purple mittens sample after


Here’s the math part, it’s not too scary: divide the felted measurement by the unfelted measurement, to get the percent of the original measurement after shrinking.  F/U = %  I did this across my various measurements and got an average of 79% for the width, 84% for the height.  I wanted both, because I had noticed when felting the fingers the first time that they wanted to shrink more in height than in width, no matter how I stretched them out, which meant that I had not added enough extra knitting in that dimension.

Now that you have your percentage, apply it like this (there was algebra involved but I did it for you): the unfelted measurement (the one you want so that you know how much to knit before it shrinks) equals the felted measurement (how big you want it to end up) divided by your percentage of shrinkage (.79 or .84 in my example).  U = F/%  Clear as mud?  Try it, you’ll see what I mean.  You end up with a number a bit bigger than the felted/finished number you put in.  You can check it by putting it back in the first formula and see if you get the right percentage.

For my finished/felted measurements, I used the width of the previous fingers (by now chopped off), which I liked, and measured the height of my fingers sticking out of the mittens, adding a little extra for the thick knitted fabric to go over the top.  I calculated the unfelted measurements, then used the gauge from my sample to figure out how many stitches to use for each finger.  You can’t have a fraction of a stitch, so round up or down, whichever is closer or you want to err on the side of.  I knit until each finger was about the calculated unfelted height, erring on the side of a bit extra at the top, which turned out to be a good idea!

Just in case, I made one finger as test (the index finger on the right below) and felted it before knitting the others.  It came out great.

purple mittens unfelted fingersEven though the old fingers were felted on, I was able to snip the green stitches and pull them out, leaving the purple ones which I could pick up and knit from.  It helped that the palms never got totally felted.

Other Improvements

The thumbs were too short as well, plus worn mostly through in one spot from gripping.  And having only one layer of knitting (the part between the thumb and palm where the stitches tend to stretch open no less) meant that my thumbs were sometimes cold.  I fixed all that.  At this point, there was no stopping.  Since the thumbs were somewhat loose, I decided to knit inner layers for them.  I thought that I might need to slash the top of the mitten flap and extend it too, but after felting the fingers, it fit snugly over them, which would be warm, and I could add a bit of ribbing on the palm side for a little more length and to help hold the flap down.  Neither of these new additions would be felted, and both were small, so this was the no-math part.  I made adjustments visually, pulling something out if it didn’t seem right, and tried on the thumbs a lot to fit the shape to my hand.


purple mittens knitting extras  This may be hard to believe, but according to my notes, the wool I used for the new ribbing is the same as the original flap and thumb!  So it has definitely faded with sun and wear and washing.  Fortunately I like both colors.


A Minor Miracle of Purple Suede

Finally, I needed something for grip on the fingers and palms.  (I’m telling this story whole, it’s a good one.)  I want to be able to drive and grab ski poles and my keys, etc., and I didn’t want to go back to the multicolored bits of Ultrasuede.  I briefly considered using some light green suede elbow patches I got along with a sweater for recycling . . . and was fortunately dissuaded by friends.  What I ideally wanted was something that would match the mittens.

Almost on a whim, I dropped into a rather old-school shop downtown, which sells saddles and leather and a few seemingly random bolts of blanket wool and skeins of rug yarn.  I remembered that the last time I was there, over a decade ago, they had a bin of leather and suede scraps, and I thought if they still did, I might be able to find something close.  I was the only one in the little shop, not too long before closing, and the woman working said that no, they didn’t have any scraps.  I had the mittens with me, I showed her what I wanted to do.  Suede and leather started at half a hide for $24, there were black and green and red . . . and at the end of the rack, four smaller, scrappier pieces, all in dusky, slightly mottled shades of purple.  Not just purple, four distinct purples that each were so exactly what I needed that they looked like they were dyed to coordinate with the mittens, and left on the end of the rack by magic.  “Oh,” she said, “You could use those!  They’re $9 each.  We sold all the red, all the black . . .”  Hardly believing my good fortune, I picked the color I liked best out of the thicker two (two were quite thin), paid for it, and practically skipped down the street towards my car.  A few times, when I’ve been intensely searching for a supply I cannot find, probably which doesn’t exist, I’ve dreamt that I went into a shop and found exactly that thing, only to wake up disappointed.  This is the only time, so far, it’s ever happened in my waking life.  I have a rather large piece of somewhat smelly purple suede left in my studio to prove it!


purple mittens finished 5

purple mittens finished 3


I love love love these mittens.  I finished sewing on the suede over our family Thanksgiving trip, and just in time too, when we got back our town had a major cold snap, not getting above freezing at any time for over a week, unlike our usual mountain cold nights but mild days.  I’ve worn these cross-country skiing, I wore them to art walk downtown at night (during the below-freezing week), shoveling snow, driving, and never one cold finger have I had!  Felted alpaca is like little down blankets for your fingers.  I can easily wriggle my fingers out of the mitten top for fine tasks without using the other hand.   Having placed the suede patches where the wear was on the old fingers, plus the part of my palm that I use when I grip things—surprise!—they are in the perfect spots.  I recommend the inside of the thumb especially.


purple mittens finished 4


If you want to make your own version, I’d start with a glove pattern you like.  Either refer to a flip-top mitten pattern, or make up the flap as you go (Basically:  I picked up sts across the back of the hand, cast on across the front and did a few rounds of short rows for a curved shape, joined everything into a round and knit, decreasing following the shape of the fingers underneath).

I realize that I haven’t talked about the actual felting, in fact that felting is probably the thing I know the most about that appears the least on this blog.  Maybe I’ll do something about that in 2014.

In the meantime, if you have any questions about making mittens or felting in general, feel free to let me know!

Happy Solstice, everyone!


purple mittens finished 1


DIY Crib Rail Covers for Teethers — A Tutorial


So apparently, small teething children will chomp down on wooden crib rails like beavers.  I really had no idea until, visiting our dear friends at the end of the summer, I saw the evidence first hand, little teeth marks right through the wood finish.  My friend the mama was thinking about ordering some covers for the crib rails, but I knew we, ok I, could easily make some, and I would get to sew!  In August, after months away from my sewing machine, this seemed like a gift from the universe, plus it would be so useful and cute for friend mama and her little one!  I’m going to share my notes and method, which should work for any crib, below.  This is a fairly quick project, so if you are still looking for a gift for a young family, it could be a good one.


crib rail protectors onTo make up for only having quick snapshots of this project (did I mention there was a baby involved?) I’m making it my illustrated post for this month.


First things first, I measured the crib.  I wanted the covers to go around the whole rail easily, so I added a little extra ease to my measurements.  The back rail is against the wall, apparently too awkward an angle for little one’s head to chew, so I didn’t worry about that one.

crib rail protector mathI know that the quilt batting (which I want here for padding) will shrink a little bit, probably not enough to affect the width, but for the length I’ll include a bit extra.  I usually use 1/2″ seam allowances, which I did for the width.  I decided to use 1″ seam allowance on each end for the length, since that is where I am likely to want more wiggle room.  To figure out how much fabric I need, I made another diagram, since I’m really a visual thinker.

crib rail protector fabricSo here are the supplies I got, including a little extra fabric for shrinkage, since it’s 100% cotton:

Two yards fabric (Modern Bliss design #13662 by Robert Kaufman)

One yard super wide cotton quilt batting, for two layers of batting in each cover

Eight yards of totally beautiful soft cotton ribbon for ties

All of this came from Stitchin’ Post in Sisters, OR.


When getting ready to sew, don’t forget to preshrink your fabric!  Wash the fabric and dry it the same way you (or the recipient) plan on treating the finished project.  I also put the ribbon through wash and dry, in a lingerie bag, just in case it was going to bleed any dye, etc., since a baby might be chewing on it.  I didn’t pre-shrink the batting.  The package it came with says it will shrink 3%, which will give the covers a bit of that puffy quilted look once they are washed.  After washing, I ironed the fabric and ribbon to get rid of wrinkles and make it easier to measure and work with.

Cut or rip the fabric and batting into strips 10″ wide (or the width you picked for your crib), and then divide them for the length of the covers, as in the diagram above.  Take one fabric section with its corresponding batting to the crib, make sure the size seems close, and decide where you want to put the ties and how long they should be.  We decided on 7″ for each tie, which divided fairly neatly into 8 yards, 20 ties with two sides each.  I just cut the ends of the ties at a diagonal to keep them from fraying, and left the other end, which will be sewn inside the cover, squared off.

I pinned the ties to one side where I wanted them to go, and then with the fabric off the crib, folded it in half to match and pin the matching tie. It’s helpful to leave just a bit of each tie sticking out beyond the fabric, so you’ll be able to see where they are when you’re sewing.

Make a fabric stack for each cover, with two layers of batting on the bottom, then one layer of fabric (right side/public side up) with the ties pinned in place (I pinned them in the middle too, so that they wouldn’t shift around and get caught while sewing).  Then top with the other side of the fabric, right side down towards the ties.

crib rail protector sandwichHold the whole sandwich together with a few pins, and sew down each long side with a straight stitch, 1/2″ from the edge—our planned seam allowance.

Each time you come to one of the ribbon ties (which you’ll know because the ends are sticking out) sew over it, then back up and sew forward again, so that there are three lines of stitching holding each tie in place.  Blend back to your seam allowance line, and keep sewing to the next tie.

crib rail protector sewing ribbonOnce you have sewn down both sides, turn the whole thing inside out and tada!  The batting is on the inside and the ties are on the outside.  I had thought I would trim the batting from the seam allowances, but when I got to this stage it didn’t seem necessary.  I just pressed everything in its new orientation, smoothing things out and using the iron with steam.

Check the size of the cover on the crib, the fold the ends to the inside to get the length you like.  I decided to stitch them closed by hand, using a ladder stitch which picks up a little fabric from each side.  It just looks better, and I can also add a line of stitching near the ends when quilting so that the hand stitches won’t take much strain.  The white UFO near my fingers in the photo is the head of a pin . . .


crib rail protector sewing ends


All that’s left is the quilting!  I don’t usually quilt; I’m too obsessed with the properties of different fabrics, their drape as a 2-D material wraps a 3-D body, and the possibility of walking around all day protected and flattered by garments I made.  I do see how quilting is perfect for something like this though, and I don’t mind the quilted look, but it does bug me when the stitching totally contrasts with the fabric, especially when I like the fabric as it is.  I decided to use the diagonals in the print as guides for my quilting stitching, and not to worry about them being exactly all the same.  It gave the covers more of a modern look, which the mama and I loved.  I did check the batting instructions, which said to quilt no more than 8″ apart, and make sure the maximum distance between my lines was not more than that.  I quilted to one end, checked the measurements and then did a second round.  I didn’t have access to a walking foot, so I spread the fabric and batting sandwich outward from the foot with my hands as I went, and it worked just fine.


crib rail protector finished


I just loved making these, mostly because at the time I was thrilled for the chance to take a project from idea in my head to finished object in my hand!  I’m sure I could have looked up someone else’s directions, but I didn’t want or need to, and I love how my version came out.  I played with the balance between making something as good as I can, because it’s for my best friend’s baby, and going with the flow, letting it be a bit inexact and show its handmade-ness, because it’s the real world, and because I always think handmade things are the most beautiful.

If you try this project, I hope you’ll agree, and have as good a time as I did!  Happy week everybody!


Two Everyday Recipes -or- Revenge of the Quiche


leek potato green chile tart


So this last week I found myself feeling swamped, just completely underwater on things to do.  I’m not sure how it happened, but suddenly not only was there not enough time for all the things I’d like to do (never is), there wasn’t enough for all the things I needed to do.

I’ve been feeling a milder version of this all fall, like I’ve got a lot to do, and while I still want to eat a homemade dinner every night, I don’t necessarily want to make one up from scratch every night.  Much less do I want to make something separate for lunch!  Woe to those who might ask me what’s to eat when I’m feeling overwhelmed . . .

I’ve been making a lot of these (and a lot of soups, too), things that last well beyond the initial meal and are pretty much ready to go subsequently.  I’m calling them tarts, like the savory French tarts.  I kind of wore out my own use and conception of the word quiche in the first year I ever joined a CSA.  That time, Bryan and I split a share with my parents, and my dad and I, who were the main cooks of the project, fell back on quiche again and again as a way to use up all the greens we got.  After that (and discovering more uses for the green stuff), I didn’t make it much.  At all.  For years.

It’s baaaack … and better than before!  I’ve been making a crust with a little cornmeal in it, and a variety of interesting new fillings.  My two current favorites (recipes below) are: leek and potato with green chile, and sweet potato with greens.


Savory Tart Crust with Cornmeal

Note: if you are going gluten free, or just happen to run out of flour, it’s easy to make these recipes crustless.  Just grease your pie pan well, and skip to the fillings.

If you’re making a crust, make it first, so that it has plenty of time to chill.

Mix in a small bowl:

1 cup flour (white, whole wheat, or a mixture, your choice)

1/4 cup corn meal (blue is my favorite)

1/2 teaspoon salt

Using your fingers or a pastry blender, cut in 5 Tablespoons butter until the biggest chunks are pea-sized.  Mix in very cold water just a little bit at a time, until the dough holds together, and then put the dough in the refrigerator.


Potato, Leek and Green Chile

Cut off the tops/dark green parts of 2-3 medium-sized leeks.  (Did you know you can use those tops instead of onions for soup stock?  I’ve been doing it all the time lately.)  Slice the leeks in half, rinse out dirt, and chop into fairly thin slices.  Melt 1 Tablespoon butter over med/low heat, add the leeks and a generous splash of white wine or sherry (or water, but I recommend the wine).  Continue cooking, covered, on low, adding more wine if necessary to keep moist, until the leeks are translucent and slightly gooey.  (I got this idea from a recipe for leek confit on Bon Appétit, and it’s been a go-to for leeks since.)

Set the oven to 425° F.  Slice 2 small/medium potatoes fairly thin, skin on (scrub them first).  Place them on a cookie sheet and drizzle with a little olive oil, and salt if desired.   Toss to coat and roast for about 10 minutes, until browned on one side, turn the slices over and roast another 5 minutes or so, until both sides have golden brown spots.  Set aside.

Chop 1-2 roasted green chiles (depending on heat).  (Aren’t you glad you froze some?)


sweet potato greens tart


Sweet Potato and Greens

I used kale for this, use 1 bunch of whatever greens you need to get rid of.  Slice or pull the leaves from the ribs, and steam them in a steamer basket over simmering water until bright green and wilted.  Chop or pulse in the food processor depending on how fine you want them chopped.

Roast sweet potatoes the same way as the potatoes above.


Egg Filling & Assembly

Lower the oven temp to 375° F

For either version (or your own creation) get out the crust, and roll it into a rough circle.  It doesn’t need to be too thin, the recipe makes plenty.   I use a 9″ pie pan.  Set the crust in your pan and press it into shape.  If necessary adjust the sides by pulling off overhanging pieces and sticking them in gaps.

Beat together (you can use the pie crust bowl):

4 eggs
Update: I’m not sure how or why, but when I first started making these I thought 4 eggs was plenty … now I don’t, and I almost always use 5. If you find that you’ve made more filling than you intended and it doesn’t seem like there’s enough egg in the mixture, you can even use 6. The whole thing will be thicker and may take a little longer to cook, but it’s up to you!

A generous splash heavy cream

A few Tablespoons grated cheese (seriously, any cheese you have on hand and like is good.)

Fresh ground pepper

(Salt is optional, depending on taste and saltiness of cheese)


Pour a bit of the egg mixture into the bottom of the crust (or the pan if you are going no-crust).  Add your vegetables.  If you are using potatoes I highly recommend putting them on top, so they get nice and browned.  Bake for about 40 minutes, turning once, until the tart is golden on top, puffed up, and just moist inside when tested with a knife.


One of these makes a good part of a dinner, plus a few more lunches/brunches for me and Bryan—hooray!  It might be a good option to stave off the hungry hoards while you work on Thanksgiving dinner, or a good make-ahead family breakfast for a special day.  Enjoy, and Happy Thanksgiving all you Americans!


Making a Lining for a Simple Top

In which I concede that yes, some wool is itchy.


lined MD top front


My grandmother wove the fabric for this top, and she sewed it!  She gave it to me many years ago, but I’ve never worn it much, because when it touches your skin, the fabric is super scratchy.  You all know how much I love wool, and I try to advocate for it, so I usually say that it doesn’t have to be itchy!  But the truth is, of course, it varies enormously with everything from the kind of sheep the wool came from to the way it’s processed, leading to everything from super snuggly high-end next-to-skin layers all the way to heavy duty outerwear.  (And here’s something I can’t get out of my head since I read it, that we might not even want all wool to be soft, we want some to be hard-wearing too.)

Ok, so say that you do have a scratchy wool garment that touches your skin, what to do?  Line it!  I’ve had vague plan for lining this top for a few years, a plan which gradually clarified itself and worked out details in my head, as I realized that I could satisfy my clear need for more sweater layers using almost exclusively things I already had.


lined MD top side


This top is a very simple construction which seems to have a been a favorite of handweavers in the 1970’s.  It’s just two large rectangles for the front and back, and two more folded over for the sleeves.  It has slits at the side seams for a little more movement, and the edge of the fabric is just turned under to make a bit of a curve at the front and back neckline.


lined MD top reinforcementI’ve been storing this in my brain and knew I would use it!  A couple of the older sweaters I’ve re-used for Fiddleheads have a sturdy ribbon reinforcement at the underarms.  I know this is a point of stress for this top, as the stitches had already popped there, and I’m not going to want to undo the lining to fix it again!


I thought it would be pretty simple to line this, and I was right.  There is a lot of minor fudging going on here, and it doesn’t really show, since it’s um, the lining.  I measured all the dimensions of the top and cut the lining the same size, plus seam allowances.  I knew that that would make the lining a little bit baggy, since it’s the same size and inside the top, but I didn’t want to make it too tight, or make this project super fiddly.  For such a simple garment this worked well.

Since the issue with the itchy-ness of this top is where is touches my skin, I knew that I needed an edging that would stick out past the wool at the neck and sleeves.  I had two candidates for lining fabric in the stash, both blue rayon.  I really liked how the color and slight twill texture of one looked with the wool fabric, but it was a little heavy for lining and has more potential as a garment on its own.  So I decided to use the first fabric for just the edging strips, and the lighter weight, darker colored rayon for the main lining pieces.


lined MD top sewing detailsI’m trying something new here, a lot of the sewing details are in this photo.  I hope that it will both be visually more clear what I’m talking about, and make the main text a little less dense.  Click to enlarge and read!


No doubt, this project has a LOT of hand stitching, mainly backstitch.  Fortunately, I love handstitching.  It has all the advantages of knitting in that it’s soothing and portable, I could work on it anywhere, and while talking to people on the phone, etc., so it actually went pretty fast.  Plus, I didn’t want the stitches to show on the outside, and since I could place and pin the fabric as I went, handstitching gave me the most flexibility to see how things were coming out, and pin under more or less to adjust.


lined MD top inside done

handwoven by Dottie MillerSo, many little stitches later, there you have it!  Lined garments just feel so finished, and kind of luxurious when you put them on, don’t you think?  And, the itchy issue is 100% gone, to the point where I forget all about it. (Remind me not to cuddle small children while wearing this . . . )


lined MD top front cowl


Now I just have to figure out how to wear it.  I’m not used to having wide 3/4 length sleeves, and sometimes catch them on things . . .  The first time I wore this into town, I thought it looked better with a cowl or scarf on top.  But looking at these pictures, I kind of like it on its own.  I live in layers, and this one is a bit tricky to layer on top or under, so I think a cowl or scarf will be a good option when it’s cooler.  The weather has been so mild lately that I was really comfortable taking pictures outside in just the top.  It may be a sign of impending doom, but I might as well enjoy it, right?


lined MD top side cowl


Totally, that’s what I thought.  What are you working on for winter, assuming we get winter?


Pear Crisp with Cardamom

In which I also resolve to illustrate some posts for this blog.


pears 1


Every fall, it’s the pears that get me over my disappointment at the end of the stone fruit season, and convince me that everything’s going to be Ok.  I like to wait until they’re really ripe to eat them (at least most of the common kinds), ripe enough to slide a knife in one clean curve down the stem and around the seeds, with pear juice forming instantly on the cut surfaces.  That first bite of juicy ambrosial pear, that’s what convinces me that maybe I’ll get along with autumn alright after all.

I was hoping to have a recipe, not a just a short soliloquy, about pears for you, and I do!  It turns out that two of the dear friends we visited in the Northwest at the end of the summer have a copy of The Art of Simple Food by Alice Waters, and so I spent a little time pouring through that book looking for various ideas.  I’m really starting to admire the way she looks at the simplicity of cooking.  In the second household there was also a huge bowl of free pears from a colleague’s tree, and the inspired idea to combine pears and cardamom (thanks Becca!), so here you go.


Pear Crisp with Cardamom

Adapted from The Art of Simple Food by Alice Waters


Slice 7 cups/4 lbs of fairly ripe pears (they don’t have to be as ripe as I like them for eating)

Toss the pears in a bowl with:

1  1/2 Tablespoons flour (can be white or wheat or gluten-free alternative, it’s just for thickening the juice)

Zest of 1 (organic) lemon

About 1 Tablespoon lemon juice


Pour the pears into a baking dish and make the crisp topping in the bowl:

Toast 2/3 cup walnuts in the oven at 375° F for about 10 minutes, until golden brown (set a timer!  I’m so bad at that, I burn things more often than I’d like to admit).  While they are toasting, mix in the bowl:

1  1/4 cups flour (again use what you like, gluten is not required to hold the crisp together.  I used a mixture of white and whole wheat flour)

6 Tablespoons brown sugar

1  1/2 Tablespoons turbinado sugar

1/4 teaspoon salt

About 1/4 teaspoon crushed cardamom seeds (if you have whole green pods, crush the pods lightly with the flat of a knife if necessary, pull the pods open, and extract the seeds.  Grind just the seeds in a mortar and pestle or with a spice grinder.  Fairly coarse ground is fine.)

Chop the walnuts and add them to the above mixture.  Mix well, and then cut in 1 stick (8 Tablespoons) of butter (cut into pieces), using your fingers or a pastry blender, just until the mixture comes together and has a texture like big crumbs.

Sprinkle the topping over the pears, and bake at 375° for about 50 minutes, rotating once for even baking.  When done, the crisp topping should be golden brown, and the fruit should be juicy and bubbling down in the dish.


pears 2


About the illustrations: I know I need to keep up my drawing skills, and I’d even like to practice enough to keep improving.  Since finishing Hello Sewing Machine, I haven’t had too much incentive to draw (other than little sketches like these, which I still make all the time).  I thought if I made it a goal to illustrate at least one post a month, I would be sure to get practice drawing.  I kind of forgot that I would also get practice scanning drawings and working in Photoshop . . . but it’s also practice I need.  I’m more of an illustrator than an artist, and more used to trying to make things clear than to capturing 3-D fruit in all it’s glory.  And I need to find some smoother paper . . . but one little bit at a time, right?

Good luck with your fall goals, whatever they are!  (And eat some pears!)


How to Fix a Coat with a Ripped Back Vent


coat vent mend 1


I’ve had this coat for, um, more than a decade now, around 15 years I think (!) . . . I bought it for $5 at a garage sale at my dad’s church, when I was in High School.  It was, without question, one of my best ever thrift finds.  I wear it all winter, every winter, and I still get compliments on it all the time.  I have fixed it so many times, in so many places, which really is the biggest key to its success over all this time, that and the quality fabric. The only clue I have to the coat’s true origins is a little tag inside which says “wolle.”

The other day, as I was finishing up teaching, I looked over at my coat hanging on the back of my chair, and the back vent was completely ripped out.  It’s cold here now, especially at night, so this project jumped right to the head of my line.

Fixing the outside part is actually not too big a deal.  Thanks to interfacing and the aforementioned quality fabric, the stitches have popped but the outside fabric isn’t torn (the lining is another matter which we’ll get to later).


coat vent mend 2

(As always, click on any of the pictures to enlarge for a better look.)

I lined up the vent in its original position, twisting the coat around to get a good angle for sewing.  I can tell where the stitching was by the little channel the thread has left in the fabric, and by the bits of leftover thread.  I lined up these clues, pinned things in place, and started sewing, overlapping the place where the original seam is still intact.

I used a double thread and backstiches sewn by hand to replicate the old seam.  I could have done at least some of this on the machine, but by the time I got the thread, stitch length etc. all sorted out, I figured this way was faster and easier.

As near as I can tell, those bits of thick white yarn are for matching a point in the original construction, and weren’t used to hold anything together.  When this coat does finally give up the ghost, I think I’ll take it apart and see what else I can glean from how the inside is put together.  I’d love to make my next winter coat from scratch.


coat vent mend 3


Back to mending for now; keep following the path of the old vent stitching.  It makes several right angles which seem random, but they were obviously holding everything in the right place before, so just go with it.  I found that right at the turn it was useful to make another pass and add a few more backstitches.  It can be hard to get them as dense as you would like and still get through the thick layers.  Turn the coat right side out and see if everything is held in place the way you would like.  If not, it’s easy to add more stitches.


coat vent mend 4


So that’s actually about it, just keep backstitching until you get to the end of the old seam.  Since that’s obviously a point of stress, I stitched in a little rectangle all around it to distribute the stress, rather than just following the path of the old thread.

Flip the coat right side out, and if you are satisfied with how the vent looks, it’s time to fix the lining.


coat vent mend 5


Sigh, the lining.  On the night that the coat vent busted, I described its lining to a sewing friend as “a hot mess” which pretty much sums it up.  Whatever this (I’m guessing acetate) lining stuff is, it’s not nearly as nice or durable as the outside, so that at this point, particularly at areas which get lots of wear (like the vent, and where the sleeves join the coat body), it’s a patchwork of repairs reflecting the techniques, scraps of fabric, and even moods I’ve had over the past decade or so . . . at this stage my goal is just for it to hang together and not look too awful if someone happens to catch a glimpse of the inside.

Since the fabric itself is ripped here, I needed to patch it with something.  I settled on a scrap of grey knit fabric, because 1. I won’t need to finish or turn over the edges, since it won’t ravel 2. The color is a pretty close match and 3. a knit is stretchy, which might work well at an area that’s clearly getting strain.

I sewed the first part of this patch on my machine, using a narrow zigzag stitch.  It proved difficult to go around the top without everything bunching up under the machine foot, so I decided just sew the second side using backstitch again (but only one strand of thread this time).


coat vent mend 6


After stitching to the top and burying the thread ends, I trimmed the patch for a neater (ha!) look, and there you have it.  I also tacked the bottom of the lining piece to the outside fabric.

This has got me wondering about lining my fantasy next coat in a silk knit.  What do you think?  Could be pretty sweet . . .


coat vent mend 7


Tada!  Fixed.  I just gave it a good press from the outside (a quick ironing with a lot of steam in the repaired part) and it’s good to go.  Pay no attention to the other small hole, I didn’t even see it until I was editing the photos . . .

I bet after all that you might like to see a picture of me wearing this fabulous, recently fixed, coat, yes?


me wearing coat


I know, it’s lovely, right?  If you look closely, some of the repairs are more obvious.  I’ve re-sewn the buttonholes multiple times, re-covered and attached I don’t know how many buttons, tacked down the tabs on the back belt every way I could think of, I put a bigger pocket in one side . . . but I’ve been more than paid back for time invested in repairs vs. time wearing coat.  I think it has another season or maybe two left.  The fabric right around the cuffs and front is starting to obviously wear.  When it does go I may just copy it and make a few modifications.  It occurred to me while working on this post that since this is my only real coat, I’d better make the new one while the weather is warm . . .

Here’s to extending the life of the things you love!